- September 4, 2019
- Houseplants
- Blackwhisker Rose
Blooming geraniums adorn the windowsills of many city apartments and country houses. Also in summer it is used to decorate flower beds in garden plots. This flower is not at all capricious, which allows it to be grown very quickly in large quantities. Geranium gained enormous popularity several decades ago. Its second name is pelargonium. Recently, ampelous geranium, which climbs, has become popular. Interest in this plant increases every year, and more and more new varieties appear. Many readers are interested in learning about propagating geraniums by cuttings at home in the fall or at other times of the year. We invite you to learn about the most effective methods of breeding pelargonium.
Introduction to geranium
Pelargonium belongs to the Geranium family. She fell in love with the comforts of home. The plant pleases the eye with the abundance of shades of its inflorescences. Probably everyone recognizes geranium by the shape of its heart-shaped leaves. Europeans had the opportunity to admire pelargonium back in the 17th century. The plant was brought from Africa. Local breeders fell in love with geranium and developed many interesting varieties. Over the years, this beautiful and hardy indoor plant has found a place in various parts of the world.
The perennial is distinguished by an erect stem, long petioles, and branched roots. It also has long peduncles, and the flowers are collected in racemes. Each flower has 5 petals. Their shades are very different: from white to pink, lilac, red.
Today, both professionals and amateurs resort to propagating geraniums by cuttings at home. Pelargonium has some advantages:
- It is considered not only an indoor plant, but also a garden plant.
- Even the most experienced florist will satisfy his request among the many varieties.
- It does not require much time or serious effort to maintain, care and propagate this flower.
That’s why it won’t hurt you to learn how to propagate geraniums at home using cuttings or leaves.
How to root geraniums: how to properly root geranium cuttings
Propagation of geraniums sometimes raises questions among beginners in indoor floriculture: how to propagate pelaronia in general, how to cut cuttings and how to root geranium - in water or directly in the ground.
But we will reveal a little secret: pelargonium, or geranium, is one of those indoor flowers whose rooting and propagation is not difficult at all. This is probably why almost every home has geranium - a bright and useful flower that does not require special attention, any special care, tenacious, beautiful, fragrant, in general, just the thing!
Content:
How to propagate geranium
Geraniums are incredibly easy to propagate. Pelargonium is most often propagated by cuttings, cutting off branches from the mother bush.
You can cut quite a lot of cuttings from one plant; many generally rejuvenate an old bush in this way, cutting off almost all the shoots from it, leaving only lignified stumps with a small number of growth points.
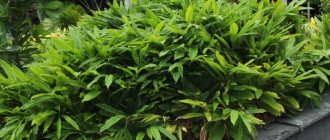
Look at what neglected geranium bushes there are:
It is difficult to form such a plant into a compact, beautiful bush; complete pruning is the only option. Well, then you need to monitor the plant, promptly pinch off branches that are “straying” in the wrong direction, and shape them.
This is how you'll have to cut it:
And, by the way, after such pruning, the geranium will really “come to life”, it will be much more beautiful and lush than if they tried to improve it simply by cleaning it from old leaves. These woody cuttings have many growing points, and with proper care, the geranium will produce new shoots from several at once.
Geranium cuttings: how to root geranium, in water or in the ground?
But we will return to cuttings.
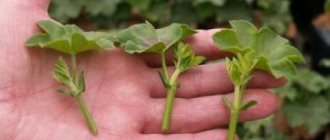
So, if we need to propagate geranium by cuttings, then we use scissors or pruners to cut off part of the shoot from the mother plant. We should have a piece of trunk (preferably 7-8 cm long) with several leaves. We remove the lower leaves; we should have several cm of “bare” stem at the bottom of the cutting.
Before pruning, it is better not to water the geranium for at least 3 days, so the mother plant will tolerate pruning more easily and there is less risk of rotting of the cut stem.
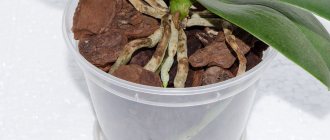
The cuttings should look something like this:
We leave the cuttings in the air for 2-4 hours so that the cut area dries out a little.
Of course, you can try to put the cuttings in water the old fashioned way, or stick them into the ground and wait for rooting.
Today, flower growers have little tricks that will help root a plant faster and with better results. Experience shows that geranium will take root faster if geranium cuttings are planted immediately in the ground, having previously been treated with rootstock.
If you decide to germinate the cuttings in water, then you will have to change the water regularly and add crushed coal to the water every time you change it. This little trick will reduce the risk of the cuttings rotting.
How to plant a geranium cutting
Quite often, beginners in floriculture make the classic mistake: they plant cuttings in a large pot where they plan to keep the geranium in the future. But it is always best to root plants in a small container; take a small seedling pot or plastic cup with a hole made in the bottom for drainage.
Pour soil into the container. What kind of soil is needed for rooting geraniums: take ready-made universal soil. It should be airy and loose so that the cutting has good air exchange.
Under no circumstances take old soil from other plantings or soil from the garden! Such soil is poor in microelements and can also be infected with pests or fungi.
So, the soil was poured and moistened with water. It is important here that the soil is simply moistened, and not so that the water literally “squishes” in the glass.
Next, put a glass of water and a glass of Kornevin powder in front of you. We dip the geranium cuttings into a glass of water - we wet the lower part of the cuttings, and then lower them into Kornevin. The powder should stick, enveloping the cutting.
In a cup with soil, use your finger to make a hole 1.5-2 cm deep and lower the cutting there. Gently press down the soil around the cutting and lightly moisten the surface with water. Just so that the earth compacts around the seedling.
Now let's organize greenhouse conditions. To do this, we put a regular plastic bag on the container with the planted pelargonium and tie it or otherwise fix it.
It is very convenient to use plastic disposable cups and ziplock bags. The glass is simply placed in the bag and the clasp is closed. And that’s it, the greenhouse is ready, and it’s convenient and fast.
How to root geranium
We put our seedlings in a bright, warm place and wait for them to take root. This process takes about three weeks, and, in principle, during this entire time the plant requires nothing except light and heat. There is no need to ventilate, water, or fertilize. If you are really worried about the issue of ventilation, it seems to you that it is too hot and the humidity is too high, then once every 3-4 days you can open the bag slightly for 15 minutes.
After 3 weeks, when you saw that the pelargonium began to vegetate - new leaves appeared, new sprouts appeared from the lateral buds on the shoot, this means you can slowly adapt the new plant to normal conditions.
Pulling it out of the greenhouse right away is risky; it is extremely stressful for the plant, such a sudden change in climate. Be patient, first open the bag slightly, let the seedling stay in semi-greenhouse conditions for 3 days. And then remove the cellophane completely. Remove the wilted leaves and grow the flower further. It is not worth replanting the rooted cuttings in the next couple of months.
Types and preferences of plants
Most often, the following 4 types of geraniums are planted in pots:
- Ampelous or curly. Place in hanging pots near windows or entrance doors of the house.
- Fragrant. It grows as a lush bush with small leaves and flowers and emits a pleasant aroma.
- Royal. Tall bush with large bright flowers. It can be simple or terry.
- Zonal. They reproduce most often. It is distinguished by differently colored circles on the leaves.
All of the listed types of pelargonium have their own preferences. Most of all, this perennial loves timely watering, proper selection of location and soil, and fresh air. Pelargonium growing in a pot in the warm season is best placed on a balcony, terrace or garden. In winter and autumn, you must not forget about ventilating the room. This will help the plant fight fungal diseases.
Next you will learn more about the ways in which you can grow geraniums yourself at home, except for dividing the bush.
Types of geraniums with a brief description
There are a large number of varieties of pelargonium. They vary in color, shape of leaves and flowers. Among the variety, four species are especially popular.
| Species name | Short description |
| The species is easy to care for and blooms profusely with bright inflorescences of various colors. Some varieties are darkened in the center. The leaf blade is rounded, with slight wavy edges. The number of petals depends on the variety: simple has 5 petals, semi-double has 6-8, double has 10 or more. With good care, blooms all year round. But it depends on the volume of the pot: the smaller it is, the more flower stalks the plant will produce |
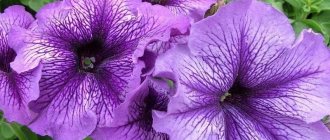
| Large-flowered species. The diameter of the flowers can reach up to 15 cm. They can be of various colors. But there is one peculiarity - each petal is decorated with a dark stripe. The plant grows up to half a meter and blooms for 4 months. Flowering occurs in the second year, the variety is very demanding in care |
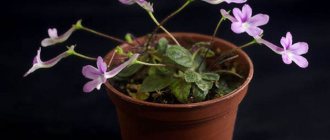
| Very fragrant look. When the leaf is damaged, the room is filled with a lemon, strawberry or ginger smell. The inflorescences are small, pink or purple. This species is used in cooking, cosmetology, medicine and for oil production. |
| The species reaches a meter in height and has thin and fragile shoots. Dark olive star-shaped foliage. Double or simple flowers of a wide variety of colors. Flowering occurs in summer, the flowers are small, 5 cm in diameter, last up to 4 months. The plant looks beautiful in hanging pots |
Geranium is a special and fragrant plant that even a novice gardener can grow. Knowing how to properly root a crop, you can supplement your flower collection with a wide variety of species and varieties. The flower is undemanding in care, but if you surround it with care and love, it will reward you with abundant, friendly and long-lasting flowering.
An interesting beautiful plant is the prominent sedum. Read about it at the link.
Best time
What do you need to know about the time of propagation of geraniums by cuttings at home? It is better to do this from the end of February to the end of March - it is during this period that plant growth is activated. An autumn cutting option is also possible: late August or September. The main thing is to do this before the flower’s winter hibernation. Although, if you really want to, you can cut the petioles from pelargonium at any time.
The fastest rooting will be in spring chibouks, because the release of plant sap is accelerated. In winter, this process is slow, because the culture goes into a state of sleep. Summer rooting will also not be very rapid.
When is the best time to do this?
You can experiment at any time of the year. But experienced gardeners believe that geranium takes root faster in the spring.
Summer heat has a negative effect on seedlings , and with high humidity there is a possibility of developing “black leg”.
It is almost impossible to save the affected plant from the “black leg”. The disease develops quickly, the trunk rots from the very root and pruning does not help. When watering, it is better to pour water into the pan to avoid waterlogging of the soil.
If you propagate geranium in the fall, it will have to create greenhouse conditions:
place seedlings under lamps for at least 17 hours a day;- the air should be heated to 23 degrees Celsius;
- In autumn, rooting takes longer, amounting to 35-40 days.
So, for geranium cuttings to take root well, the best period is considered to be from the end of February to May, but your own experience may refute this statement. Rooting is influenced by many factors and each gardener has his own conditions. And yet, in the spring, geranium is always accepted.
How to propagate geranium at home using cuttings (step-by-step preparation)?
Here is an approximate procedure for selecting pelargonium planting material:
- Carefully inspect the mother plant and select the most suitable stem tips for cutting.
- Take a sharp knife or blade and carefully cut the stem from the donor plant. You can cut stems up to 10 cm long. Make the cut between two adjacent leaves.
- Do not send the cuttings straight into the pot, let them dry. Do this at normal room temperature.
- After the cuts on the plant have dried and a thin film has formed, treat these areas with ash or an absorbent.
- Tear off the lower leaves of the petioles, leaving 2-3 leaves is enough. Do the same with the buds on the tops, if any.
Seed cultivation
Propagating geraniums by seed is important if the idea has matured of planting a large area in the garden with identical plants. To do this, you need to collect planting material in advance, in the fall. Or buy the required quantity from manufacturers.
You need to understand that growing geranium using the seed method is a long-term task that requires attention and knowledge. There are also advantages: plants obtained in this way are more adapted to life than those that were purchased and adapted.
Procedure for growing pelargonium from seeds:
- Sowing begins in early December.
- The soil is prepared from peat, sand and turf soil, one part of each component.
- The seed material is treated with Kornevin or some other germination stimulator according to the instructions.
- The substrate is laid out in a container, moistened, seeds are laid out on top and sprinkled with a layer of sand of 0.2 - 0.3 mm. The container is covered with film to provide a microclimate. The container with seeds should be in a warm place, for example, near a radiator.
- Every day the film is removed for a while to ventilate the soil, otherwise mold will grow on it.
- When the shoots appear, they are carefully transferred (picked) into separate cups, continuing the same care. Now the temperature can be gradually reduced.
- A month after picking, the plants are transplanted to a permanent place. If you plan to transplant into open ground, then before doing this you need to harden off the seedlings on the veranda or in the shade of a tree.
If everything is done according to the rules, pelargonium will bloom this season. True, in the first year it needs to be fed additionally, even in the garden, so that flowering does not cause the flower to weaken or die. It is not recommended to start plants for seeds in the first year.
Proper rooting in water
Most often, chibuki are left to take root in water. If you also want to master the method of propagating geraniums by cuttings at home, then the following instructions will not hurt you:
- Keep the prepared planting material in a growth stimulator for up to half an hour.
- Prepare a plastic jar or glass for water. Pour settled water into it and add one crushed tablet of activated carbon. This will prevent the roots from rotting and the development of microbes.
- Dip the petioles halfway into the prepared water.
- Place the cups in a bright place, out of direct sunlight.
- If necessary, add water at room temperature over time; there is no need to change it.
- As soon as the roots appear, plant the petioles in the substrate.
Methods for propagating geraniums
Geranium, like other flowers, reproduces in two ways: using seeds and vegetatively. The vegetative method includes propagation by cuttings and dividing the bush. Experienced gardeners most often use cuttings, as it is considered the simplest method. But more on that below.
Seeds
As you know, many gardeners are interested in growing geraniums from seeds. In this case, you can use both your own seeds and purchased ones.
But, it is important to remember that hybrid varieties are not suitable for propagation, since they do not have parental properties.
First, you should scarify the seeds. This is when the process of partial destruction of the integrity of the seed shell occurs. The main purpose of scarification is to facilitate seed swelling and germination.
Then the germination percentage increases significantly. The shell of geranium seeds is famous for its hardness and density. If you do not scarify, you will wait a long time for the plant to appear. Gently grind the seeds using two sheets of fine-grit sandpaper. After scarification, you can already plant the seeds in the soil.
Important point! Purchased seeds do not need to be scarified.
Before germinating seeds, you should prepare the soil. You can do it yourself. To do this, take turf soil, peat, sand. The ratio is 2:1:1. Mix the mixture thoroughly. Fill the containers for sowing with the substrate, level them, and spread the seeds. The top of the soil should be sprinkled with sand and moistened with a spray bottle.
Cover the plantings with glass and place the pot in a room, preferably dark, with a temperature of 20 degrees. But at the same time, try to remove the glass every day and ventilate the soil.
After new shoots appear, containers with plantings should be moved to a brighter room. Remove the glass and lower the temperature slightly. After about a month and a half, you will notice the appearance of two or three leaves on the stem. Then you should transplant the geranium into an individual pot.
Cuttings
In principle, you can cut geraniums at home throughout the year. But, it is important to take into account the fact that in the spring the shoots will grow much faster.
The most optimal time for cuttings is March and April.
The first method of cutting geraniums:
- To do this, take a knife, geranium with side shoots, and a container with soil for a new plant.
- The shoot that will separate should be from five to seven centimeters in length. There should be three leaves on its stem.
- Cut the stem with a knife (sharp), let the shoot lie for three hours. This is necessary so that the cut area dries out.
- The cut area can be sprinkled with coal. Next you need to plant. Before doing this, prepare the pot with soil in the usual way.
There is another method of cuttings - the second:
- It is necessary to allow the new shoot to take root in soil with coarse sand.
- The sand should be slightly damp. The cutting should not be covered.
- Water without getting on the stems and leaves. The temperature in the room should be no less than 20 degrees Celsius.
- Already 12 days after the roots appear, transplant the plant into regular soil.
The third method of cuttings is propagation in water
After you protect the cutting, place it in a glass of water. Wait until it takes root and begins to grow. Then you can replant the plant in regular soil.
Dividing the bush
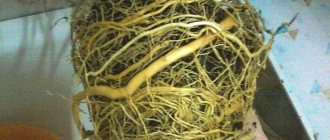
It cannot be said that geranium loves being transplanted to a new place. But, if you notice that the plant has grown too much and the volume of the pot is not enough, you will still have to replant it. An interesting fact: thanks to transplanting geraniums, you can take advantage of the moment and get a new plant by dividing the bush. What do I need to do?
To begin, remove the plant from its pot and shake off the soil. After this, conduct a thorough examination of the kidneys. They should not be rotten or too dry. If there are any, select a section of geranium with healthy buds, separate it from the general plant, and plant it in a permanent place. Watering should be moderate, especially in the first few days.
Note! Overmoistening the soil can lead to rotting of the roots and stems.
Propagation of geraniums by dividing the bush should be done in late spring or early summer. At this time, the plant will take root well and begin to grow quickly.
A completely logical question arises, which method is the best and most effective? Based on the information presented above, you can understand that for propagating geraniums at home, the cutting method and the method of dividing the bush are best suited.
A proven method for rooting varietal pelargoniums - video
Rooting in the ground
Experienced gardeners plant petioles directly into the ground. You can try it too. First, place a layer of pebbles in plastic cups for drainage. Then pour the substrate on top. Deepen the cuttings 4-5 cm into it. Compact the soil and water generously. To help young plants adapt faster, place the glasses in the shade for several days. Before planting, do not forget to sprinkle each cutting tree with a root growth activator.
After 3-4 days, move the glasses to a bright place. The best temperature for rooting will be from +16 to +18 °C. It is better to water through a tray so that moisture does not fall on the leaves and stem - this way you will avoid the appearance of a black leg. After 3-4 weeks, root formation will begin.
If the cutting develops well, do not cover it with a jar or film. Otherwise, be sure to do it. In transparent glasses, the emerging roots will be clearly visible.
Care after rooting
After rooting, the young plant is transplanted to a permanent place. To do this, take a small pot, since in a spacious container it will intensively grow the root system to the detriment of flowering. Drainage is placed at the bottom, covered with nutritious, well-drained soil and a seedling is installed. The soil around is carefully compacted and spilled.
After planting, the crown is pinched to give the crop the shape of a bush. The pot is placed in a well-lit place, protected from direct sunlight and drafts. Watering should be moderate, after the top layer of soil has dried. Pelargonium does not tolerate spraying well, so it is better to moisten it through a tray.
Fertilizing is applied during the formation of buds. For this purpose, phosphorus-potassium fertilizers are used. For lush and long-lasting flowering, remove faded inflorescences in a timely manner.
Read about an interesting type of flower - Ficus Natasha.
Dilution in peat tablet
Fragrant and royal pelargonium require only rooting in the soil. Specialized stores sell special peat tablets in which cuttings develop very quickly. This rooting process is identical to the previous one - in the ground.
For work, prepare the same plastic glasses. Place a layer of drainage on the bottom. On top is a peat tablet. Water it lightly. Deepen the petiole ½ into the peat. There is no need to cover it with film. Place the glasses on a windowsill out of direct sunlight. Water moderately regularly. After 3-4 weeks the first roots will appear. The plant is ready for transplanting.
Possible breeding problems
Why doesn't geranium produce roots when rooted in water? The whole point is that the lower leaves of the cuttings should not fall into water, as they deteriorate and the rotting is transmitted to the entire shoot. Such a plant will simply die.
When rooting in the ground, waterlogging will lead to the death of the cuttings, and they will not be able to grow.
When propagating by seeds, without covering the greenhouse with seedlings with polyethylene or a lid, it is almost impossible to ensure a stable temperature in the region of 22–25 degrees.
Do not place containers with shoots in direct sunlight. In this case, the leaves will receive severe burns.
Important information! The cutting may not produce roots at all if it was chosen incorrectly. To plant, you need to take the tops of the side shoots of a young flower. The lower leaves, peduncles and buds are removed. A disinfected knife is used in this work.
Experience shows that with good care after rooting, zonal geranium species can bloom after 3 months, and ivy and royal geraniums - in approximately 10 months. It must be remembered that excessive application of nitrogen fertilizers leads to an increase in green mass and a decrease in the number of flowers.
Planting rooted cuttings
Prepare pots for replanting. Remember that geraniums do not like large containers. Make drainage, fill the soil. Make a hole in the middle of the pot and insert the rooted planting material into it. Firm the soil around the stem.
What should the soil consist of? Peat and sand are required. The main quality of soil for geraniums is looseness. At any flower shop you can purchase special soil for pelargonium. After planting, water the plant and place it on the windowsill. If the first leaf appears, it means the plant has taken root.
How to carry out the whole process quickly and without losses?
Sometimes a positive result may not be achieved by following seemingly all the rules. The reason is that the rooting process has its own secrets and subtleties :
In the soil, not only its composition is important, but also its acidity, because... geranium does not like elevated temperatures. Peat is characterized by oxidation, and store-bought soil contains 80% peat.- If during the rooting process all the leaves of the pelargonium have fallen off, there is a possibility that there will be no use anymore, but if only a part has turned yellow and withered, it is possible that it will take root.
- Pots with cuttings can be placed in a greenhouse, for example, under tomatoes - and the light will be diffused and the greenhouse will be ventilated; the lower leaves sometimes turn yellow, but the top will be green and strong.
- Feeding is avoided until the roots grow.
- If the cutting has a flower, it must be removed so that rooting does not slow down.
- Once warmer weather sets in, geraniums should be placed on a balcony or loggia, because... insufficient lighting will lead to loss of decorativeness.
How to propagate geranium leaves at home?
The vegetative method of propagation is also acceptable for pelargonium. Geranium can be propagated by leaves. It is much more difficult to germinate them than cuttings, but it is still possible. This method is used if the plant suddenly gets sick and it is not possible to take the offspring. One nuance is important here: you need to pinch off the leaf so that a piece of the stem remains near it! It is processed in exactly the same way as regular cuttings. Such planting material takes root worse than petioles, and there is a risk of its death. You need to care for seedlings from leaves in the same way as planting cuttings.
Rooting leaves
There is another vegetative way of how geranium propagates: under favorable conditions, not only cuttings, but also leaves can germinate. They are broken off from the branch along with the woody “heel”, from which the roots will appear. They grow longer than with cuttings, and the percentage of rooted plants is very small - about 20-30%. Therefore, this method is ineffective and is rarely used.
The soil for propagation by leaves is used the same as for cuttings. Water very sparingly. The planting material is pre-withered. Many of the leaves produce roots and 3-4 leaves and then die. This method can only be considered as a “last chance” if it is not possible to propagate the plant using cuttings.
Activities for caring for seedlings
Remember that geranium does not like the use of fresh organic fertilizers. It cannot be fed with manure and humus. Such actions will lead to the cessation of flowering. Indoor pelargonium requires the use of nutrient mixtures, which include all the essential minerals in equal doses. Active flowering requires potassium substances.
The stable growth of a newly propagated plant depends on trace elements: iron, zinc, copper, calcium, magnesium, manganese, boron. In summer, heat is stressful for a flower, so refrain from excessive fertilization. The optimal frequency of feeding should be 2 times a month. Note that geranium is not very demanding on air humidity. Any atmospheric conditions are suitable for its establishment, development and flowering. But the abundance of light is simply necessary for pelargonium.
Landing
Immediately before planting, the cut of the cutting is dipped in a root growth stimulator (Kornevin, Atlet, Bona Forte, Kristallin, Energen and others). The depression in the ground should be made with your hands or a pencil so as not to damage the layer of healed tissue near the cutting.
The leaf growth point should be approximately 1-2 cm above ground level. The soil around the cutting must be compacted. The duration of rooting can range from 10 days to several months. This depends on the condition of the mother plant, conditions of maintenance and time of year.
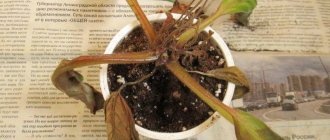
Don't make mistakes, remember the problems of geranium
For most gardeners, cutting pelargonium does not cause any difficulties. If it is done well, it will immediately be reflected in the appearance of the flower. Unfortunately, sometimes pelargonium is susceptible to certain diseases. It won't hurt you to know about the main problems of this perennial:
- Sometimes the lower leaves turn yellow. If there is a lack of moisture, only the edges dry out. Over-watering leads to complete drying of the leaf.
- There are cases of redness of the edges of the leaves. This is a signal that the plant is cold. In winter, move the flower pot further from the window.
- If the stem darkens at the base, then it is affected by black leg. It will not be possible to save such a plant. It will also not reproduce. What is the reason? Possibly in dense and overly moist soil.
- Lack of light leads to bare stems.
- Rarely, mold may appear on the leaves. This phenomenon is associated with a fungal disease caused by excessive moisture. In this case, you need to remove the affected parts and treat the rest of the plant with a fungicide.
From all of the above, we can conclude that there is nothing difficult in propagating and caring for geraniums. You just have to correctly calculate the time for cuttings and harvesting planting material. Be responsible when selecting soil for rooting and replanting. All our recommendations will help you grow your own flowering beauties that will become a real decoration of your home and garden.