Dracaena is becoming an increasingly popular indoor and office plant. She is unpretentious in care, but there are still certain nuances. One of the aspects that you need to pay attention to in order to grow a large, spreading “palm” is regular replanting. How to properly transplant a dracaena into a new pot, and when it is necessary to do this, is discussed in detail in our article.
How to choose soil?
In order for dracaena to feel comfortable in a new place, it needs a well-drained substrate, light, breathable, absorbing a sufficient amount of moisture, with a slight acidity of 6-6.5 pH.
Ready-made earth mixture: pros and cons
The easiest way is to buy a ready-made substrate in a store; choosing soil for dracaena will not be difficult to find. The problem is that most of these soils contain peat. It quickly absorbs water, but hardly releases it, so the soil quickly dries out and the plant does not receive enough moisture.
HELP : As a compromise, you can choose a universal soil for indoor plants. It is suitable for growing dracaena, but still will not be optimal.
How to prepare the soil mixture yourself?
To provide the dracaena with the necessary conditions, it is better to prepare the soil yourself. You can take turf soil as a basis, add leaf soil, humus and coarse sand to it in a ratio of 2:1:1:1.
When is a flower transplant needed?
Any plant, even with the most careful change of a clod of earth near the roots, is injured. Feeding occurs through small shoots from the visible root; they are tender and are damaged by the soil moving around. Therefore, transplanting dracaena is traumatic and is done only if necessary. However, overgrown roots, depleted soil, and changes in its composition lead to insufficient nutrition of the plant:
- Replanting dracaena is required if the plant purchased in the store is in transport soil. Usually such flowers are delivered from Holland. If the container is spacious enough and the flower is grown on local farms, there is no need to rush into replanting.
- The plant has grown and the roots do not fit in the pot; they go out into the drainage holes.
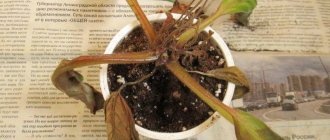
- Dracaena has stopped growing, yellow leaves have appeared, and has been in one pot for longer than the recommended period.
- There are signs of overwatering, root rotting or deterioration in the quality of the substrate.
- Fly larvae and pests appeared in the soil.
If the plant is in satisfactory condition, then transplantation is carried out in the spring, when tissue regeneration is best. In critical cases, transplantation is carried out at any time of the year.
Transplantation process
At home, a young dracaena needs to be replanted every year, a slightly older one - once every 2-3 years as the root system grows. There is nothing complicated about it. Before transplanting, you need to prepare everything you need:
- another pot;
- priming;
- drainage;
- scissors or pruning shears.
ATTENTION! Approximately 3 days before transplanting, watering must be stopped. This will make it easier to remove the flower from the old pot.
Terms and rules of transplantation
Growing a false palm or dracaena indoors is a fascinating activity, but it requires certain knowledge, which must be put into practice at all stages of the growth and development of an ornamental plant. The indoor flower dracaena belongs to the category of heat-loving southern plants , so replanting the ornamental crop requires taking into account botanical characteristics.
It is best to replant indoor dracaena in the spring, but if necessary, this activity can be carried out in autumn or winter. It should be noted that when replanting in autumn-winter, the ornamental plant takes quite a long time to adapt and needs increased attention. As a rule, the decision to replant is made by the gardener taking into account factors such as the appearance of the indoor crop, age characteristics and quality characteristics of the soil in the flower pot.
How to choose a pot?
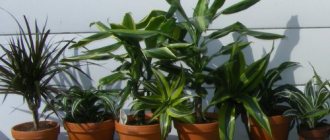
For a dracaena 40–50 cm high, you will need a pot with a diameter of about 20 cm; for each subsequent transplant, you need to choose a container 2–3 cm wider than the previous one. The material and shape of the pot do not play a big role, but clay or ceramic containers, the height of which is slightly greater than the diameter, are considered the most comfortable.
You should not choose a pot that is significantly larger in size than the previous one. The root system of the plant will not be able to immediately absorb too much volume, and this will lead to stagnation of moisture and acidification of the soil.
Transplanting a young plant
It is recommended to replant young dracaena annually, which allows the plant to grow taller and increase leaf mass. The technology for such an event is not complicated, and consists of the following step-by-step actions:
- pour a drainage layer of expanded clay into the flower pot and fill the planting container halfway with nutritious soil mixture;
- carefully remove the root system of the decorative crop from the old flower pot and straighten the roots;
- distribute the dracaena roots over the soil in a new flower pot and carefully sprinkle them with fresh soil substrate.
During the transplantation process, it is very important to pay attention to the area where the stem part transitions to the root system. The root collar should not go very deep into the soil - it only needs to be lightly sprinkled with soil.
In what cases is a transplant required?
Determining when dracaena needs to be transplanted into a new pot is quite simple. This needs to be done if:
- the time has come for a planned transplant;
- the plant has outgrown the previous pot and roots are visible on its surface and in the drainage holes;
- the soil is chosen incorrectly and is not suitable for dracaena;
- there is a suspicion that the soil is infected with pests, fungus or mold;
- the soil became waterlogged and the roots rotted;
- Excessive fertilization led to plant disease.
ATTENTION! It is better to replant dracaena in early spring. This period is the most favorable, since the plant enters the stage of active growth and most easily adapts to changes.
Step-by-step instructions for transplantation
The sequence of actions is quite simple, if you follow it, there should be no problems.
- Prepare everything you need. Wash the pot and tools with soap and scald with boiling water.
- Carefully remove the dracaena from the old pot and carefully examine the roots. All damaged areas of the roots must be trimmed using pruning shears, and the cut areas must be treated with crushed activated carbon or iodine.
- Place 2–3 cm of drainage at the bottom of the pot, and then add a small layer of soil.
- Place the plant in the center and gently sprinkle with soil so that it fills all the voids between the roots.
- Water thoroughly.
To help dracaena restore damaged roots, you can use one of the plant growth stimulating agents, such as Kornevin or Zircon.
Preparing for transplant
It is best to replant the plant at the end of winter or early spring. It is during this period that the dracaena will most easily transfer to a “new home”, because now the time of its active growth and emergence from the winter dormancy begins.
Choosing a pot
A pot for young dracaena, no more than 40 cm high, should have a diameter of 20 cm. Increase the size of the pot by 3-5 cm annually. 2 fingers should fit from the walls to the root system.
Buy containers made from natural materials: clay and ceramics. Plastic pots do not allow air to pass through, which leads to stagnation of liquid and rotting of the root system.
Do not transplant the plant into containers that are too large. The soil will begin to sour because insufficiently branched roots do not have time to absorb nutrients and water.
Before use, if necessary, clean the flowerpot from dirt. Then wash with warm water and laundry soap. After this, pour boiling water over it. It is especially important to carry out this procedure for clay pots, in the pores of which dirt and pathogens of various diseases accumulate.
Priming
You can buy a ready-made soil mixture for dracaena or make the soil yourself. When purchasing, choose a substrate for palm trees or soil for large non-flowering indoor plants. It is better to purchase soil in specialized flower shops and choose a good quality product.
To prepare the soil at home with your own hands, take garden soil, peat and compost in a ratio of 3:1:1. You can add a little sand, vermiculite or crushed charcoal. The proportions vary depending on the properties of the garden soil.
The tools used during transplantation—secateurs, scissors—must be clean. Soft, settled water is used for irrigation.
Before planting, take the time to sterilize the soil (including store-bought soil) and drainage. This procedure will destroy fungi that cause putrefactive and other diseases, and parasite larvae hiding in the soil. Sterilization can be carried out in the oven, microwave or simply on the stove. To do this, prepare a wide container (it will warm up better) with a tight-fitting lid; it is advisable to have a thermometer with a scale of up to 200 degrees.
- Pour some water into the bottom of the container, add the soil mixture, cover with a lid and place on the fire or in the oven.
- Stir the soil periodically to ensure it warms up evenly.
- When the temperature of the soil “porridge” reaches 95–100 degrees, reduce the heat. If you don’t have a thermometer, be guided by the characteristic unpleasant odor that occurs precisely at this heating level.
- Steam the mixture for about 20–30 minutes. Usually during this time the harmful organisms die completely.
- Be careful when heating soil with added charcoal in the microwave and oven. Coal may ignite. Be sure to add more water to this mixture.
It is better to sterilize the soil in advance, about a month before the intended transplant. She must lie down and come to life.
Do I need to replant immediately after purchase?
A flower bought in a store always needs to be replanted, but there is no need to rush into it. If the plant feels good, does not turn yellow and does not show signs of disease, it is better to wait until spring.
In any case, it is necessary to give the dracaena at least 2-3 weeks to adapt to the new conditions, and only after that proceed with replanting, otherwise the plant, weakened by the move, may not tolerate additional stress.
Care after transplant
The rules remain the same, but for a weakened plant it is especially important to maintain temperature and humidity, as well as adherence to the watering regime. It is important to avoid direct sunlight, drafts, as well as excess moisture or drying out of the soil.
Care after transplant
In the first days after transplantation, the plant will feel unwell. Its leaves droop, and the old ones fall off altogether. This is due to the fact that the dracaena has not yet taken root in the new soil. The rooting process takes two weeks, after which all signs of the disease disappear.
The main difference of this period is the introduction of fertilizing. In addition, a number of recommendations should be followed:
- Do not expose the palm tree to direct sunlight. The risk that the plant will get burned is quite high.
- Avoid drafts.
- Monitor the air temperature. It should not fall below 25 degrees.
- After transplanting, water the flower at least three times a week. The plant must receive moisture in the proper amount.
- Spray the foliage using a spray bottle.
Beginner mistakes
As a rule, dracaena care and transplantation do not cause difficulties and proceed without complications, but there are exceptions. The main mistakes are:
- The pot is not the right size. A pot that is too small will not allow it to grow and develop; too large will cause acidification of the soil, and eventually the flower will begin to poison itself.
- Abundant watering. Excessive soil moisture leads to soil mold, root rot and plant death.
- Rinsing the roots under running water. When replanting, do not wash the roots under the tap or try to remove old soil stuck inside. This procedure will severely damage the plant and most likely lead to its death. Carefully shake off what falls off easily and feel free to plant the flower in new soil.
During the first weeks after transplantation, treat the flower carefully and with care. Do not rush to water it if it wilts or if you have any doubts about its health; first try to determine the cause of the disease.
Transplanting dracaena is an important process that stimulates flower growth. It is recommended to resort to such manipulations every couple of years. In addition, placing a plant in a new container in some cases is carried out on an emergency basis. In this way he is saved from death. The main thing is to carry out all actions strictly according to the instructions and provide the palm tree with proper care during the adaptation period.
How to replant dracaena at home
When to replant dracaena
Dracaena is replanted in the following cases:
- immediately after purchase, if the plant was sold to you in a plastic pot, and you prefer ceramics;
- when the roots of the plant have taken over the entire space of the pot and begin to hang out of the drainage holes;
- if the substrate in the pot has become unusable due to chronic waterlogging or for any other reason;
- when the root system is damaged.
Dracaena transplantation at home is carried out at the end of winter or early spring: at the beginning of active growth, the plant tolerates the procedure more easily and takes root faster in a fresh substrate. Young plants need replanting more often than adults, and it is better not to bother large old dracaenas with replanting at all, just annually replace the top 5 cm thick layer of substrate in the pot with fresh soil.
Pot and substrate for dracaena
When preparing for transplantation, the question arises in which pot to transplant the dracaena. It is advisable to choose a container for this plant in the shape of a glass, and each subsequent pot should be 2-3 cm larger in diameter than the previous one: the root system of dracaena increases in volume by an average of 1-2 cm per year. It is not advisable to take a pot “for growth”, since first the dracaena will master the earthen ball with its roots, and only after that the development of ground organs will begin. As for the material from which the pot should be made, it depends only on your taste, since for dracaena there is no difference whether it is ceramic or plastic. But drainage holes for water drainage must be in the pot.
A new container should be washed with warm water and soap before use.
When choosing a substrate, keep in mind that the optimal soil mixture for dracaena should be loose, drained and slightly acidic - 6.0-6.5 pH. You will have to discard garden soil because it contains too many mineral salts. You can purchase a ready-made substrate for palm trees in a garden pavilion, or you can make the soil yourself from two parts of leaf soil, adding half a part of peat and one part each of compost and turf soil. Some gardeners believe that the substrate should contain more turf soil than leaf soil: to 3 parts of turf soil you need to add one part each of humus, river sand and leaf soil.
Transplanting a dracaena flower
A healthy plant is replanted using the transshipment method. A layer of drainage material is placed in a new pot, then a quarter is filled with fresh substrate. When preparing for the procedure, do not water the dracaena for several days to make it easier to remove it from the old pot, but without damaging the roots. Run a knife between the earthen lump and the wall of the dish in which the dracaena grows, remove the flower and look at its roots. If they are healthy, transfer the dracaena along with the earthen lump into a new bowl, but if it seems to you that some of the roots are damaged, dried out or affected by rot, carefully cut them with a sharp sterile instrument, sprinkle the wounds with crushed coal and only then complete the transplant: place the dracaena in a new pot and fill the remaining space with fresh substrate, tapping the pot so that there are no voids left in the roots, then compact the surface, water the plant, and when the soil settles, add as much more substrate as needed. However, there is no need to fill the pot to the top with soil: leave the sides 3-4 cm high. After replanting, the root neck of the dracaena should be at the same level as it was before.
Reproduction of dracaena fringe
Apical cuttings
This is the easiest way to reproduce. To achieve this, the following activities are carried out:
- At the end of spring, the upper shoots are cut off.
- Sprinkle the cut areas with crushed coal, and dry the shoots for 2–3 hours.
- Treat the base with a growth stimulator.
- Plant the cuttings in moist soil with a high sand content.
- Cover the cutting with polyethylene.
- Open the greenhouse every day and moisten the soil there.
- As soon as the first roots appear, the plant is transplanted into a permanent pot.
Water the cuttings two weeks after planting.
Air layering
To do this, cut the plant trunk a little and remove the bark from the cuts. Cover the cut area with moss or polyethylene. As soon as a shoot with roots appears at the cut site, trim it and transplant it into a separate container.
Stem cuttings
This option is more suitable for tall plants with bare trunks. Cut the long trunk into equal parts 7–10 cm long, treat the tops with paraffin and the bottom with a root growth stimulator.
Place the cuttings in water, and after roots appear, transplant them into a flowerpot.
Seeds
Soak the seeds for a day in a growth stimulator. At the same time, they need to be kept at a high temperature - +30–33 degrees.
After this, plant the seeds in nutritious soil, placing them in a warm place, and water regularly.
Rooting in water
The shoot is obtained in the same way as when obtaining apical cuttings. The resulting shoots are placed in warm water in a well-lit place until roots appear.
Rooting in soil, sand and hydrogel
These components are placed in a small container. In this case, the substrates must be constantly moistened. Place the container with cuttings in a bright place.
Step-by-step instructions for transplanting dracaena
- It is necessary to take a pre-prepared pot, before which it must be processed in warm or hot water.
- Next, you should add a layer of drainage to the bottom of the pot.
- If your pot does not have perforated holes, then you need to increase the height of the drainage layer. If there are holes, the height will be approximately 3 cm.
- Next, you need to remove the dracaena from the previous pot and clean it of the previous soil. Use a spray bottle to spray the roots. The roots should be completely cleaned and wet.
- And only after cleaning the dracaena can it be placed in a pot.
- The space formed between the roots must be sprinkled.
- After planting in a new pot, the dracaena needs to be watered and fed with fertilizers so that it can quickly begin its recovery.