Although phalaenopsis is considered almost the most unpretentious representative among indoor orchids, there are still certain subtleties and nuances in its cultivation. This is especially true for the process of transplanting a plant to a new place, when it is easy to damage.
But you will have to replant the phalaenopsis - at least after purchasing it, because store-bought flowers usually live in small shipping pots. And at home - provided that you have created all the necessary conditions for him to live a comfortable life and he is actively growing, so that he is already cramped in the old pot.
How to replant an orchid (Phalaenopsis) at home - 3 simple steps
Transplanting an orchid is not the most difficult process, but it requires great care. Today we will tell you how to replant an orchid at home in three simple steps! To transplant an orchid we will need: Pot . A clear plastic pot with holes in the bottom and sides is best for Phalaenopsis. This will make it easier for you to control the condition of the substrate and root system, and it will be easier to determine whether the orchid needs watering or not. Do not take a pot “to grow”; it should be the size of the root one. Prepare several options: larger, smaller and the same size.
Substrate . You will need bark, charcoal, moss, drainage and foam. All this can either be bought at a specialized store or prepared yourself. When purchasing a substrate in a store, it is better to buy everything separately in order to more accurately control the composition of the substrate. If you buy a ready-made mixture, choose one with a small amount of coal and moss. The substrate for Phalaenopsis should not contain soil or peat, and the bark should be of medium size (1-2 cm). Drainage can be bought not only at a flower shop, but also at a hardware store. The main thing is to rinse before use! If you decide to prepare the substrate yourself, pine bark is best suited. But you will need to thoroughly clean it of everything unnecessary - quite painstaking work. The rest is easier. The coal will remain after the barbecue, and instead of drainage, you can use ordinary pebbles from the street or from the sea, or polystyrene foam.
Tools . Scissors or pruning shears. Before use, be sure to disinfect them with alcohol or hold them over steam.
Antiseptic for the plant. Green tea, cinnamon or crushed charcoal will do. The cuts can also be coated with Maxim plant product.
You may also need bamboo sticks or flower stem holders to secure the Phalaenopsis in the pot.
Workplace . Cover it with either newspaper or cellophane or both. To avoid getting your hands dirty, use thin rubber gloves (medical).
Step 1: remove the Phalaenopsis from the pot
First of all, inspect the outside of the pot. Phalaenopsis roots may have grown into the holes in the pot. If it is 1-2 roots, just break them off carefully. But if the root entwines the pot abundantly, then you will have to sacrifice the pot.
Whether to water an orchid before replanting depends on the substrate and pot. Phalaenopsis that grows in bark and is planted in a soft plastic pot does not need to be watered. Press down on the walls of the pot until all the roots attached to them come off. If the orchid is planted in moss or in a clay pot or hard plastic pot, it is best to water the plant first. This will make it easier to remove it from the pot painlessly for the root system. If this does not help, the roots and substrate that have dried to the pot will have to be torn off by prying them off with something.
To remove the Phalaenopsis from the pot, take the orchid by the base, wiggle it in the pot, and pull it a little. And so on to the victorious end. Phalaenopsis roots are very fragile, so we do everything very carefully, carefully and without sudden movements!
Step 2: inspection and treatment of the orchid - root, base, peduncles
Clean the orchid roots from any remaining substrate. If you find mushrooms or mold in it, thoroughly rinse the roots under running tap water. The water temperature should be room temperature or slightly warmer. Please note that it is not recommended to plant Phalaenopsis with wet roots. Leave the plant for 3-5 hours until the roots are completely dry.
Inspect the root. Healthy roots feel hard to the touch and have a gray-silver-green color. Roots that have not been exposed to light will be almost white or light green. That's okay too! Bad roots will feel hollow and soft, yellow-black or brown, and dry in appearance. All dead and damaged roots must be removed. It is also better to cut off damaged roots. On such roots, the velomen (upper layer of the root) tears and part of the root will be exposed, or dangle as if on a thread (inner part of the root). If the root is broken and begins to rot and has acquired a yellow-black color, it also needs to be cut off. You need to cut off all the excess, down to the healthy green part. The cut must be treated - brilliant green, cinnamon, crushed charcoal or Maxim plant product will do. If most of the Phalaenopsis roots have rotted, be a little less selective - leave all the more or less decent-looking roots. Until new healthy roots grow, these will at least somehow support the life of the plant. Do not leave the orchid completely without roots, it may die.
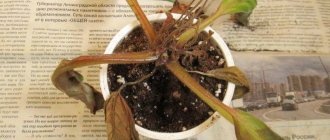
After the roots, pay attention to the base of the plant (the neck, the place where the roots and leaves grow). If there are dead leaves on the neck of the Phalaenopsis, carefully remove them. Coarsened and dried leaves prevent the orchid from developing new roots. But do not rush to remove leaves that have simply lost their turgor or have begun to turn yellow. Wait until they dry out on their own and fall off.
And finally the flower stalks. Treat the faded flower stalks of a healthy Phalaenopsis with good roots as desired. You can leave the peduncle without cutting, or cut it to a living bud (scale), or cut it completely. For Phalaenopsis with a small number of roots, it is better to trim the peduncle so that the plant does not waste energy on flowering. And old dried flower stalks can be safely cut off to the very base. The main thing is not to damage the plant. We process the cuts in the same way as the roots.
Step 3: plant Phalaenopsis in a new pot
Having selected a pot to match the size of the root, place drainage 1-2 cm high on the bottom. This will make the pot heavier and make it more stable. Also, the drainage layer will lift the roots and substrate, so you can place the pot in a container with water and not be afraid that the roots and substrate will be constantly wet. The evaporating water will hydrate the plant, which will increase the number of days between waterings. After this, place all the roots of your Phalaenopsis in the pot, including the aerial ones. Place the orchid in the center of the pot, holding the plant by the base, and gradually fill the pot with bark (substrate) from all sides. Tap the sides of the pot to distribute the bark evenly. Bark that is tangled in the roots can be pushed through with a stick.
It makes sense to place a piece of foam under the base of the Phalaenopsis, which will prevent the wet bark from coming into contact with the lower part of the neck, which can cause it to rot. We place it between the roots, hold it and continue to fill the substrate until the roots are hidden. In this case, the neck of the plant should not be very deep into the substrate.
Phalaenopsis should not wobble in the pot, as this can damage the roots. If necessary, you need to additionally fix the orchid in the pot using sticks. After making holes in the pot, secure the roots with bamboo sticks or other holders. Attach a plant with a small number of roots by the peduncle to a stick inserted vertically throughout the entire depth of the pot. The bark can be covered with a small layer of moss on top. We do not bury the Phalaenopsis neck in it, we leave a small indentation (0.5-1.0 cm). The moss will lure out new roots and retain moisture inside the pot.
If you have very dry air in your apartment and the substrate dries out quickly, you can try mixing bark with moss in a ratio of about 3/4 to 1/4, due to which the substrate will take longer to dry out. When increasing the amount of moss, it is worth adding foam balls or small pieces of pumice to the substrate so that air can flow to the roots. Please note that if the moss is constantly wet, this may cause root rot.
Phalaenopsis can also be planted in clean moss. This method of planting, for example, is used for long-term transportation. It is not advisable to keep the plant in moss at home - there is a high probability of overcooling it in the autumn-winter period. Watering Phalaenopsis planted in moss during this period should be very scarce. But in the summer, an orchid planted in clean moss takes longer to dry out.
And finally, caring for Phalaenopsis after transplantation . Do not water newly transplanted Phalaenopsis. Roots damaged during transplantation should heal all wounds. The first watering after transplantation is approximately 5-7 days. Also, after transplantation, do not place Phalaenopsis in the sun. In the future, care is no different from care before transplantation and remains the same.
Easy adaptation and lush flowering!
Follow updates on social networks
After care
Caring for an orchid after planting is an important part of the process, on which the further growth of the flower depends
To complete the process of replanting an orchid, proper care plays an important role:
- Be sure to move the pot after planting the plant to a shady place, limiting the intensity of sunlight.
- The optimal air temperature is 20 °C-22 °C.
- It is recommended to place the orchid on the windowsill on the east side.
- After transplantation, the first watering is carried out 5 days later.
- Feeding with fertilizers is allowed within a month after changing the substrate.
Preparation for the procedure
Before transplanting, pay attention to the selection of the pot - it should be 3-4 cm more spacious than the previous one. Particular attention is paid to the substrate in which the plant will take root. For young children, fine bark is suitable; for adult orchids, buy a large fraction. The soil can also be made from a mixture of moss, fern roots and tree bark, after calcining the components in the oven.
Before transplanting, the bark is soaked for 10 minutes, then the process of transferring the phalaenopsis into a new container begins.
Important! If the bark was collected in the forest, it is first boiled in boiling water to destroy pests and fungi, then dried
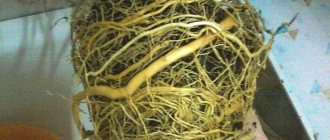
What do rotten roots look like?
The healthy underground part of the orchid is elastic, smooth, and strong. The photo shows that it has a green or gray-silver tint. When the roots rot, they soften and turn brown. Over time, if no action is taken to save the plant, mucus and an unpleasant odor appear.
In addition to a change in color and the appearance of an odor, there are other signs indicating decay of the underground part of the plant hidden in the substrate:
- formation of wet areas;
- release of an unpleasant-smelling liquid when pressed;
- thinning of roots;
- cessation of bud formation;
- unhealthy appearance of stems and leaves.
Transplantation of “babies”
If children with air layering are formed on the shoot, they need to be transplanted to a new place. If there are at least 2 roots, such specimens can be planted.
It happens that children send out arrow-peduncles. Is it possible to replant a flowering orchid: at home this does not harm, since it is possible to organize careful care and the plant will quickly recover.
Transplanting a baby orchid at home step by step:
- Cut off the peduncle on which the baby is attached.
- Cut off the stem if the plant is about to bloom. Before rooting, flowering is not stimulated, as it takes a lot of energy.
- Disinfect the cuts with charcoal.
- Pour wet bark into the pot, place foam under the cut and add substrate to the sides.
The roots are laid so as not to damage them. It’s not scary if the layering sticks up and looks out of the substrate.