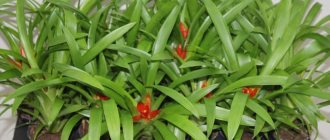
Gloxinia after flowering - what to do with the plant
Experienced owners of green spaces can tell you how to care for gloxinia after flowering. During this period, you need to properly prepare the plant for wintering. This procedure consists of several steps that must be completed so that the tuber safely survives a long hibernation.
Trimming
It is not recommended to trim the rosette immediately after the last flowers have faded. It is necessary to maintain metabolic processes in plant tissues, thanks to which nutrients are transferred from the leaves to the tuber.
Subsequently, the shoots will begin to wither on their own, and then you need to cut off the rosette, but leave a small stump 2 cm high. As a result, when it also dries out, it must be carefully unscrewed from the tuber.
Important! If you prune gloxinia immediately after flowering, this will stimulate shoot growth, which will significantly weaken the plant. In young seedlings, the rosette is maintained throughout the winter. This is due to the fact that their tubers are not sufficiently developed and are not yet able to survive the winter without additional nutrition.
Therefore, it is impossible to cut off the above-ground part of them, otherwise they will never come out of hibernation
This is due to the fact that their tubers are not sufficiently developed and are not yet able to survive the winter without additional nutrition. Therefore, it is impossible to cut off the above-ground part of them, otherwise they will never come out of hibernation
In young seedlings, the rosette is maintained throughout the winter. This is due to the fact that their tubers are not sufficiently developed and are not yet able to survive the winter without additional nutrition. Therefore, it is impossible to cut off the above-ground part of them, otherwise they will never come out of hibernation.
In this case, you need to provide the plant with proper care, which consists of a 12-hour daylight hours and regular watering.
Regenerative feeding
What else needs to be done when gloxinia fades? Before the plant goes into hibernation, it is necessary to restore the spent energy. To do this, it is recommended to fertilize with potassium fertilizers. This will allow the tuber to fully ripen and stock up on nutrients that will be needed for 3-4 months of hibernation.
Experienced gardeners recommend using potassium monophosphate for this. To prepare a nutrient solution, you need to dissolve 5 g of the product in 2 liters of settled water. After this, mix thoroughly until the components are completely dissolved. Water the plants with the resulting liquid at the rate of 150 ml per 1 pot.
Important! Fertilizers with a high nitrogen content cannot be used during this period, as they stimulate the growth of the above-ground part, which negatively affects the immunity of gloxinia. Restorative fertilizing is applied once, immediately after removing all faded buds, but in the presence of leaves. Restorative fertilizing is applied once, immediately after removing all faded buds, but in the presence of leaves
Restorative fertilizing is applied once, immediately after removing all faded buds, but in the presence of leaves.
Drying of the rosette is a sign of gloxinia preparing for hibernation
Preparing the plant for hibernation
Caring for gloxinia after flowering at home also involves observing certain maintenance conditions. Starting in September, the flower pot needs to be moved to a less lit place. In this case, the temperature should be lowered to +15 degrees. When kept in such conditions, watering should also be reduced to once a week.
All this together stimulates the process of wilting of the rosette and prepares the plant for the upcoming hibernation.
If this is not done, then some varieties of gloxinia may continue to grow. As a result, the shoots stretch, the rosette becomes deformed, and the plant loses its decorative effect. All this weakens the flower and may cause a lack of flowering next season.
Important! Gloxinia, like many tuberous plants, requires a long cool dormant period to form buds.
February, what to do...
Tubers take time to wake up. Beginning gardeners are always worried when they need to get out gloxinia nodules that have spent the winter in a dark place. The box with dormant gloxinias should be removed in the middle of winter. After a thorough inspection, live planting material is selected.
- If ripe, healthy tubers were planted for rest, then the awakening of gloxinia occurs rapidly. Dormant nodules are placed in a well-lit window in a warm room and watered. After some time, the first shoots appear.
- If some kind of failure occurs when caring for a dormant gloxinia, the nodule may wake up on its own. Even the coolness and darkness do not interfere. Such planting material must be brought into the light as soon as possible, otherwise the shoots will stretch out and problems with planting will arise. Some shoots will have to be removed.
Transfer
Gloxinia should be replanted regularly, because the old soil is not suitable for it after a year of growth. She needs fresh and fertile soil
When replanting, pay attention to where the bottom of the tuber is so as not to plant it upside down. Typically the underside is more convex, smooth and rounded, while the upper side has a slight indentation. To prevent the plant from rotting tubers, it is necessary to place a drainage layer in the planting container
To prevent the plant from rotting tubers, be sure to place a drainage layer in the planting container.
For it you can use:
- Pebbles.
- Styrofoam.
- Expanded clay.
- Pieces of ceramics.
This layer occupies 1-2 cm. The substrate is poured on top and not compacted too much; it should be quite loose. Make a hole in the center of the pot and place the tuber there. Then it is sprinkled with earth on its sides so that 2/3 of its height is in the ground. That is, the top of the tuber remains open. This must be done because the leaves of the flower appear earlier than the roots.
Then you need to create a microgreenhouse. To do this, place a transparent bag over the pot and place it in a bright and warm place. Thanks to this, moisture is maintained, so watering is not necessary. The ground should be slightly moist, even a slight drying of the top layer of soil is acceptable.
Ventilation should be carried out; for this, once a day you need to remove the bag for 15-20 minutes. When the first leaves appear, close the bag only for the night, and after 2-3 days, remove it altogether.
After the tuber germinates, at first, watering should be done carefully, in small portions, so as not to flood it. After all, the root system is not yet developed enough
It is important to remember that after planting, gloxinia develops the above-ground part faster than the roots.
The depth of planting of the nodule is of great importance. It must be completely in the substrate. If the top remains uncovered, this part may become rotten, thereby causing damage to the plant.
4-6 weeks after transplantation, fertilizing begins so that the plant develops healthy and fully blooms. Fertilize gloxinia with Kemira Lux. This powder fertilizer is diluted as follows: 1 coffee spoon per two liters of water and then watered onto moist soil 2-3 times a month. Growing, caring for and replanting gloxinia at home is not entirely easy, but if you follow all the rules of care, you can enjoy its magical flowering.
When should gloxinia be replanted?
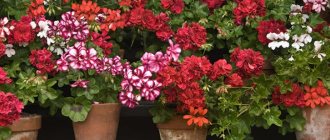
How to replant geraniums - step-by-step instructions at home and outdoors
Before sending the pot with tubers to a cool, dry place to rest, where it will remain until next spring, the plant must bloom. After completing the flowering stage, the gloxinia bush gradually fades and its leaves die off.
Flower transplantation is carried out at the very end of winter or at the beginning of spring. At the same time, it is not at all necessary for the plant to have its first sprout.
Is replanting always required after winter?
Gloxinia tubers can rot if they are in the same soil. That is why the procedure should be carried out regardless of whether there are clear indications for replacing the pot and soil.
Is it possible to replant flowering gloxinia?
Flowering plants do not like to be transplanted during flowering. But if the situation is critical and gloxinia is in danger of dying, the movement is carried out regardless of seasonality. A mandatory step for caring for gloxinia at home is replanting the flower after purchase.
Diseases and pests
Late blight is a fungal disease that appears when water stagnates in the pan, soil is too dense, excess air humidity, and also at low temperatures during the growing season.
Fusarium is also a fungal disease that appears when there is excess moisture, lack of water and fertilizers. The leaves wither, curl, and turn brown. It is worth treating the plant with fungicides and replanting it in fresh soil.
Gray rot. Its development can provoke waterlogging of the soil. The stem begins to turn black, and a gray coating and brown spots appear on the flowers and leaves. It is advisable to remove the affected areas of the tuber, and treat the rest with fungicides and replant them in new soil.
Quite rarely, but it happens that gloxinia is attacked by pests such as:
- Spider mites appear on syningia if the air in the room is sufficiently dry and there is a lack of moisture. For prevention, increase the humidity in the room and isolate the infected plant from the rest. Treatment is carried out with acaricides, and the soil is treated with drugs such as Temik or Aldicarb.
- cyclamen mite. If you notice deformed, thickened leaves covered with a layer of dust, then this particular pest has visited your plant. For treatment, it is recommended to use acaricides against ticks.
In what cases is it needed?
Gloxinia transplantation is required in several cases:
after dormancy, the plant woke up and a small sprout appeared, but leaves did not form;- when purchasing small sprouts in an inappropriate container for the life of the plant;
- when purchasing tubers that have not yet been planted in the soil;
- in emergency situations, when the plant is susceptible to pests (spider mites, mealybugs) living in the soil - in this case, you need to remove the tubers from the contaminated soil and completely clean them of its remains, disinfect the tubers by soaking them in a solution of potassium permanganate or means - Epin and Zircon , remove damaged parts of the tuber with a knife and dry with wood ash;
- in cases of development of fungal diseases of the plant.
Planting or transplanting a gloxinia tuber (step by step)
Towards the end of February, gloxinia tubers wake up. This is exactly the time when they need to be replanted or planted in a new flower pot. There is also an active sale of gloxinia tubers and seeds in stores. But there are no flowering plants there yet.
Sometimes I allow the next awakening of a gloxinia tuber in the same pot without replanting. The plant itself will tell you when it needs to be transplanted into new soil.
We leave the gloxinia to grow in the same pot
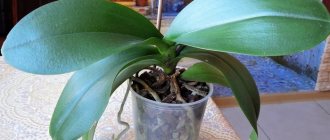
In front of me is a pot in which a young gloxinia sprout has appeared. This indicates that the tuber overwintered safely and began to sprout.
The velvety leaves of young shoots seem perfect
It is important not to spoil them by pampering them in the warmth and pampering them with feeding. It is more correct to create Spartan conditions for them by moving the pot on the windowsill closer to the glass
And in order to prevent the plant from getting too cold, I place the pot with it on a foam stand (for example, on a packaging trough or on any foam block).
Here are pictures that clearly show how a young shoot of gloxinia grows. Until recently (in winter), the tuber was not even visible.
I wrote about how it feels during the dormant period in the article “How to preserve a gloxinia tuber in winter?” At the end of February (sometimes later) his awakening begins, which cannot be missed.
The price of a mistake is frail, elongated shoots (at best) or the death of the plant from drying out of the tuber (at worst).
Transplanting (planting) gloxinia in a new container
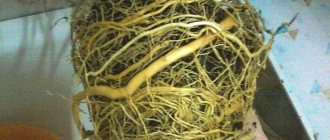
This year I bought new gloxinia tubers. Terribly shaggy due to remnants of old roots. First of all, the tubers had to be “shaved”. Tear off some of the dried roots with your hands, and cut some with nail scissors. The sawdust and shavings in which the purchased tubers were stored were shaken out and removed with tweezers.
Tubers prepared for planting should be as bare as possible (almost like a potato tuber) and strong, not flabby. I heard and read that it is possible to confuse where the top of a tuber is and where its bottom is. In order not to plant gloxinia upside down, you need to leave the part of the tuber on top where there is a small depression. At the bottom there will be a more rounded and sometimes convex part.
Those tubers sold in stores usually already have tiny sprouts or the beginnings of sprouts. Therefore, there are no problems.
It is better to plant such tubers in moist soil and water it as it dries. Then there will be a gradual return to life. It’s hardly worth working on tubers that are completely unviable.
Unless, of course, these are particularly valuable plants.
When planting tubers, it is better to take smaller pots. The bottom part is occupied by drainage. I use expanded clay or charcoal, which remains after sifting wood ash. The depth of the drainage layer allows you to regulate the volume of the pot to some extent.
Some amateur gardeners leave the crown of the gloxinia tuber above the soil level. I almost completely cover it with soil, but do not cover the shoots. This imposes a number of obligations on me: when watering, you cannot soak the upper part of the tuber.
It is worth mentioning what the soil mixture should be. First of all, loose and nutritious. I add hydrogel granules to it so that there are no problems with drying out. It is advisable to take into account one “cute” detail: the soil, for the first time increased in size from the swollen hydrogel, noticeably rises and tends to crawl out of the pot. It has to be either lightly compacted or all excess removed.
At the very end, you need to sign the variety and place the pot with the newly transplanted (planted) gloxinia on the windowsill. As soon as a strong sprout appears, the pot can be moved closer to the glass.
Source
Brief description of indoor plant
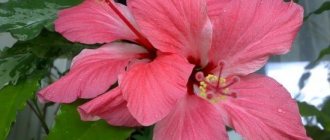
The Gloxinia flower is one of the representatives of the large Gesneriaceae family. The botanical name is inspired by the German word Glocke, meaning “bell.”
The second name - Sinningia - was given to the flower in honor of the German botanist W. Sinning. Previously it was used exclusively to refer to tuberous forms, whereas the former was used more widely to include tuberous varieties. Today both names are equivalent.
Gloxinia is a perennial herbaceous plant that “flew” to our windowsills from tropical Brazil. In most varieties the tuber, which is beige when young, later turns brown; in some natural forms it is replaced by a scaly rhizome.
The stem is succulent, erect, covered with sparse hairs. The leaves are ovate, velvety, dark green; Thanks to the protruding veins, they look “quilted”. Located opposite. The size of the leaf blade depends on the variety and can reach 20 cm. Forms with hairless leaves are occasionally found.
Bells; the color, size and degree of sponginess depend on the variety and are distinguished by an enviable variety. The petals usually have an uneven color: the throat is lighter than the edges. It may be whitish or yellowish even with dark petals; sometimes it is also “decorated” with spots or strokes of a darker shade. Peduncles solitary. Easily pollinated. The seeds are small.
Possible difficulties
Quite often, gardeners are faced with problems growing gloxinia. Here are some possible difficulties and their solutions:
- If suddenly your plant begins to stretch out, then a lack of light or an excessive amount of nitrogen fertilizer is affecting it.
- If synningia begins to grow more slowly and the flowers begin to curl, then the problem is a draft, cold wintering, abundant watering or low air temperature.
- The leaves turn yellow - excessive watering or lack of nitrogen fertilizing.
- If you water gloxinia with too hard water, it can cause chlorosis of the leaves.
- Direct sunlight negatively affects the foliage, leaving burns on it.
- Curling leaves indicate that the room is dry and hot.
- If the flower lacks phosphorus, the leaves turn red.
- The lack of flowering may be due to excess nitrogen fertilizing.
If you properly care for your Brazilian beauty, she will delight the eye with a bright and rich bouquet.
Gloxinia with its appearance can enliven the interior of any room. This is possible thanks to flowers that are shaped like gramophone pipes and come in a variety of colors. To keep your green pet happy for a long time, it needs to be replanted periodically - most often this is done at the end of winter.
Preparation: soil and pot
When transplanting gloxinia, only fresh substrate should be used. It must be sterile, permeable to moisture and air, and nutritious. A ready-made soil composition or one selected independently is suitable for this.
As a ready-made substrate, you can take the composition for violets and begonias, since these are related plants. Expanded clay or pebbles can be used as drainage. To prepare the soil yourself, you need to take:
- One part of leafy soil.
- One part of peat.
- Half of one part of sand.
Second option for soil composition:
- Four parts of leafy soil.
- Two parts of turf land.
- Two parts of humus.
- One part sand.
The acidity of the soil should not exceed 7 pH, otherwise gloxinia will grow slowly and buds will not form well on it. If the soil was produced independently, it must be disinfected by thoroughly steaming or a solution of potassium permanganate.
Advice: You can also use the ready-made drug "Maxim", strictly following the attached instructions. Otherwise, there is a risk of infection of the plant through the soil. The pot with gloxinia should be shallow and wide. When choosing a pot, you need to consider the size of the tuber itself:
- If the tuber is small, no more than 2 centimeters in diameter, then 100 gram plastic cups are ideal.
- If the tuber has a diameter of 2 to 4 centimeters, then you need to choose a pot with a diameter of up to 9 centimeters.
- If the diameter of the tuber is more than 4-5 centimeters, the diameter of the pot should exceed the size of the tuber by at least 4 centimeters. It should also be taken into account that gloxinia will bloom faster in a cramped pot.
Preparing for transplant
When moving a flower from one pot to another, it is important to first find out how to transplant gloxinia correctly. Compliance with basic requirements will avoid many problems
Choosing a pot
When choosing a planting container for gloxinia, it is important to take into account the characteristics of the root system of the flower. The roots spread out to the sides of the tuber, so it is recommended to select a low but wide pot. The depth of the pot should allow the drainage layer needed by the flower to be placed in it
The depth of the pot should allow the drainage layer needed by the flower to be placed in it
Of all materials, it is better to choose ceramics
The depth of the pot should allow it to accommodate the drainage layer needed by the flower. Of all materials, it is better to choose ceramics.
Important! Before planting, the container should be washed, dried and disinfected.
The flower feels most comfortable in a low, wide pot.
Selection and preparation of soil
The soil for indoor gloxinia needs to be light, loose, air- and moisture-permeable. Its acid value must be neutral so as not to provoke rotting of the tubers. Of the universal ready-made mixtures, soil for violets is most suitable.
You can prepare your own soil mixture from sand, leaf and peat soil in proportions 1:2:2. The soil should be disinfected by heat treatment.
Drainage
Delicate tubers of flowering gloxinia require a drainage layer. The following components can be used for it:
- expanded clay or pebbles;
- ceramic shards;
- Styrofoam.
If you choose a pot that is too deep, the height of the drainage layer will help compensate for this disadvantage.
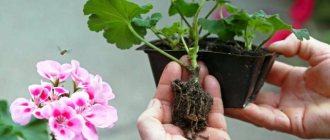
Tuber preparation
Preparing gloxinia for moving to a new pot begins with a thorough inspection of the tubers. Dry roots are removed from them and washed in water, removing any remaining soil, after which it becomes possible to assess the condition of the tissues.
Any parts of the tubers that look unhealthy are removed with a sharp, disinfected knife. The sections are sprinkled with crushed activated carbon or any fungicide. The tuber treated in this way is left in the open air until the next day.
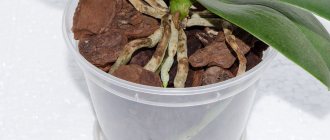
Note! It is recommended to wrap root tubers that look lethargic for 3 days in a damp cloth so that they are saturated. If at the time of transplantation the tuber still has not sprouted, but looks healthy, it is placed in a plastic bag with peat soil and left in a sufficiently warm and lighted place. If at the time of transplantation the tuber still has not sprouted, but looks healthy, it is placed in a plastic bag with peat soil and left in a sufficiently warm and lighted place
If at the time of transplantation the tuber still has not sprouted, but looks healthy, it is placed in a plastic bag with peat soil and left in a sufficiently warm and lighted place.
Leaves hatch within 2 weeks
Why replant gloxinia
Moving an indoor flower to a new pot may be necessary in different situations. Cases when it is necessary to replant gloxinia:
- primary planting of young tubers;
- picking seedlings into an individual container when germinating a flower from a seed;
- replanting a plant from a purchased container;
- the need to change the planting container after hibernation.
Bright gloxinia flowers will decorate any windowsill
Also, transplanting gloxinia from one pot to another may be necessary if the flower is infected with a fungal disease or in order to combat insect pests.
Fuchsia propagation
There are several options for propagating fuchsia:
- Cuttings
- Seed propagation
- Propagation using leaves
Propagation of fuchsia by cuttings
The propagation period for fuchsias by cuttings occurs in February-March, less often in August-September, for those varieties that grow slowly. The length of the cuttings is about 5-7 cm, they take root in a preferably loose medium: it can be sand or water. After 20-25 days, roots will form, which means you can transfer the seedlings into pots at 7-9 cm. The soil mixture must contain sand, humus, leaf and turf soil. The proportions should be the same.
To get a lush, luxurious bush, you need to plant cuttings in such a way that there are several in one pot. The young ones will bloom the same year.
Propagation of fuchsia by seeds
When propagated by seeds, artificial pollination is necessary for their maturation. By mixing different varieties of fuchsias yourself, you can get many new hybrids that will delight the eye with their bright, beautiful shades.
Propagation of fuchsia by leaves
Propagation of fuchsia at home using leaves involves the following scheme: you need to tear off the stems in tandem with the most developed leaves and place them in loose soil no deeper than 1 cm. Then they can be covered. A plastic or glass lid is suitable for this. In order for them to grow well, they need to be sprayed every day. The water should be boiled and warm. As soon as small rosettes appear at the very base of the stem, you can begin replanting into small pots.
The main purpose of reproduction is to increase the number of plants.
Features of care after planting
Home care for gloxinia after planting:
- The flower needs regular fractional watering. Water should fall on the entire surface of the earth, but not on the leaves or the top of the tuber. Use settled warm water.
- They try to avoid cold drafts, sudden temperature fluctuations, and pea turns. In the first 1–2 weeks, the plant will adapt to the new location.
- Gloxinia should receive as much light as possible, but if the pot is on a south-facing window, it needs to be shaded during the day. The optimal length of daylight is up to 14 hours.
To grow a beautiful flower, you need to follow the regularity and rules of replanting. The procedure cannot be performed in early autumn and during the period of active flowering; the ideal time is the end of winter or the moment when the plant fades and loses its leaves.
Gloxinia is a very elegant and delicate plant. It fits perfectly into any interior. How to care for this delicate creature at home? What problems and diseases does this plant have? How to properly replant and propagate it? You will find out the answers to these and other questions in this article.
Rules for cuttings at home
Cuttings are one of the most common and easiest methods for propagating flowers. The method is based on the fact that when the apical cutting is cut and rooted, it forms a new tuber, and the old tuber, in the absence of a growth point, produces new shoots. Another advantage of this method is that the rooted plant can bloom in the same year.
Propagation of a plant by apical cuttings is used to rejuvenate the plant if it is sick, stretched out or does not want to fall asleep. Because when the plant is no longer young (more than 2 years old), its tuber needs rest. In this case, we cut off the apical cutting, re-root it and reduce watering of the mother plant. Thus, gloxinia will go into hibernation.
Attention: Indoor and greenhouse plants can be propagated from apical cuttings at any time of the year. However, gloxinia should be provided with an acceptable temperature of 20-25 ºС, as well as sufficient lighting. If there are no such conditions, then it is better to propagate it in spring or summer
If there are no such conditions, then it is better to propagate it in spring or summer.
Gloxinia: varieties with names, descriptions and photos
There are many varieties of gloxinia given to us by nature. Two of them have taken root in indoor floriculture: royal gloxinia (Gloxinia regina) and beautiful gloxinia (Sinningia speciosa). Thanks to active breeding work, many varieties and hybrids have appeared within each species.
By size, gloxinias are divided into standard (25-35 cm), compact (15-25 cm), miniature (5-15 cm) and microminiature (5 cm or less) species. For example, the popular Gloxinia Avanti is a series of hybrids with compact bushes that are not prone to stretching and at the same time abundant.
According to the position of the petals in the bud, gloxinias are divided into double and simple. The gloxinia sponge is more attractive, but it is more difficult to open the buds. Due to demand, more and more varieties of sponge are appearing. For example, a black man, which is distinguished by the rich purple color of its petals. White double varieties include large-flowered High Light and marshmallow pink Triumph Tender.
Gloxinia Yesenia, a standard Dutch hybrid with crimson petals that has become very popular, also boasts a large double flower. Simple varieties are not inferior in beauty and popularity. For example, Gloxinia Kaiser Wilhelm with dark purple petals bordered by a light white stripe. Gloxinia Rosalinda, a variety with simple snow-white petals bordered by a wide crimson stripe, is also not losing ground.
Based on the color of the petals, gloxinia is distinguished into plain, calico and tiger. Gloxinia Madonna is an example of solid color: a large-flowered snow-white plant. Gloxinia Empress is a popular variety in indoor floriculture with a simple flower and can be classified as calico. Its white petals are covered with small purple specks. Another gloxinia calico, Zaznoba, is decorated with larger grains. Gloxinia Shagane is an example of brindle coloration. In addition to specks, it has a wide stripe along the edge of the petals.
Gloxinias also differ in the shape of their buds: goblet-shaped, tubular, funnel-shaped, gramophone and unusual shoe-shaped. Among the variety of varieties, everyone will be able to choose a suitable “pet”.
How to seat?
Gloxinia can be propagated and planted in five ways:
petiole
- To grow a flower from a leaf, you need to take one leaf from the bottom of the plant in June-July.
- Place the leaf stalk in a container of water so that it is immersed in water by 1.5-2 centimeters.
- Do not change the water, but add it periodically.
- Soak the leaf in water until young roots form on the cuttings.
- After this formation, plant the young shoot in the ground to a depth of 2-3 centimeters. For better rooting, cover the cutting with a glass jar or plastic bag.
Watch a video about the propagation of gloxinia by leaf cuttings:
Stem cutting
Cut off the lower lateral shoot with several leaves from an adult gloxinia. Place it in a container of water until roots form, as in the case of a leaf. After the roots appear, plant the plant and root it by creating a greenhouse effect using glass or a bag.
Leaf
- At the very base of the rosette, cut off the sheet.
- Cut the leaf blade from the back side across the protruding veins in thickened places.
- Place the sheet on moistened soil and press the cut points into the soil.
- Create a greenhouse effect using film.
- In the places of the cuts, roots will soon appear, and then small nodules, which then need to be planted according to the standard pattern.
Read more about gloxinia leaf propagation here.
By dividing the tubers
- Only large tubers that have two or more shoots are subject to division. It is cut with a knife so that there is a sprout on each part.
- The sections should be sprinkled with charcoal and dried for 3-5 days.
- Plant in moist soil, just like whole tubers.
Seeds
The seeds of the plant are formed through artificial pollination. On the second day after the bud blooms, you need to transfer the pollen to the flower using a small brush. Seeds ripen in boxes within 2 months. Gloxinia seeds are moistened and covered with glass until young shoots form. 2 weeks after germination, the glass is removed and the seedlings are exposed to light.
We talked in more detail about how to grow a flower from seeds in this article.
There are a number of rules for caring for gloxinia at all stages of its growth and development.
Growing temperature
This indicator may vary under different conditions:
- at the stage of tuber germination, the temperature should be − +25°C;
- after rooting - +18оС - +22оС;
- at the early stage of the growing season - not lower than + 18 ° C;
- during the active growing season - from + 22 °C to +25 °C.
Air humidity
Gloxinia feels good at air humidity of 50%, not lower. If it is not possible to organize such conditions, then the acceptable limits of this indicator are 70-80%. To increase humidity levels, place the pot with the plant on a tray:
Do not spray the above-ground part of the plant, as the gloxinia will get sick, brown dry spots will appear on the leaves and it will die.
Watering
When watering, it is recommended to use only soft water (rain, melt, boiled, filtered). Water from a tray or along the edge of the pot so as not to get on the plant. Water for irrigation should be 2-3 degrees warmer than the air temperature. 30 minutes after watering, the remaining water should be drained from the pan.
Winter care
Particular attention should be paid to young gloxinia in winter. Taking into account the fact that the tuber of a young plant can dry out during storage, it is not sent into hibernation. But a lack of light can negatively affect the flower; for this it is necessary to create artificial lighting. The syningia must be illuminated for at least 12 hours per day.
It is also worth observing the temperature regime. The room temperature should not exceed 20°C. If the apartment is hot enough, then all the energy will be spent on the growth of the stem, and not on the mass of the tuber.
Water much less often than in summer and do not forget about waterlogging the soil. If gloxinia bloomed once, then it also needs special care. The plant should be moved to a north window and watered occasionally so that the Brazilian beauty is in a half-asleep state. At the end of winter, when daylight hours become longer, place the flower in a sunny place.