Plants » Flowers
0
555
Article rating
Kira Stoletova
Reproduction of clematis allows you to obtain new young specimens of these plants. The culture has gained its popularity due to its low maintenance requirements and high decorative qualities, suitable for use in landscape design. Let's look at how to carry out the procedure at home.
Pink clematis - garden decoration
Propagation by cuttings
Propagation of forsythia by cuttings - how to propagate in summer
Propagating clematis by cuttings is one of the fastest ways. Clematis cuttings can be carried out in spring, summer and autumn. Each period has its own characteristics. Each of them is discussed in detail below.
Propagation by cuttings
Propagation of clematis in spring
In spring, cuttings of vines are made with green shoots. This process can be combined with spring pruning. The procedure is carried out in May or June in the southern parts, in June and July in the Middle Zone.
For cuttings you need to prepare: a knife, pruning shears, soil, a cutting board, stimulants for root formation, a container, a bag.
Detailed master class on how to make green cuttings:
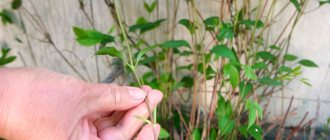
- To obtain a cutting, you should choose a plant that is at least two years old. It must be strong. No more than a third of the shoots can be cut off from a bush. The optimal shoot option for rooting is a length of 90 cm, elastic and flexible. If there is no time to prepare the cutting for planting immediately after pruning, it can be placed in water.
- Cutting cutting. The cutting is cut off from the central part of the shoot. The twig is laid out on the board. Then you need to cut off with a knife from below 2-3 cm from the internode in the middle part of the shoot. The bottom of the branch is cut 5 cm below the internode. The leaves on the sides are also removed.
- Preparing containers. It is necessary to prepare the container and fill it with soil. It is best to prepare peat and sand in a 2:1 ratio. The soil must be poured with boiling water for disinfection.
- Processing cuttings. The cuttings are treated with a root formation stimulator according to the instructions. Then the shoots are deepened into the soil by 0.3-0.5 cm and watered.
- Creation of necessary conditions. Watering should be regular, room temperature 20-22 °C. It is forbidden to keep cuttings in direct sunlight.
If everything is done correctly, the roots will begin to grow within a few weeks. It takes one season to grow a cutting.
Note! In autumn, the container is placed in the cellar for wintering.
How clematis propagates by cuttings in summer
Some gardeners are wondering how to propagate clematis from cuttings in the summer. In summer, cuttings can be done in any month. However, those specimens that are cut at the end of summer will take root much more difficult. Cuttings of clematis in summer include several stages. Each of them must be done carefully in order to subsequently obtain a beautifully flowering plant. Description of how to cut clematis in summer:
- Soil preparation. It is not worth planting cuttings in soil purchased from the store. The soil is prepared independently in two layers. The first layer is disinfected sand, the second is sand, peat and black soil in equal proportions. The soil should be loose and well breathable.
- How to root clematis cuttings. It is necessary to cut off not very long and healthy shoots. The length should be 50 cm. Cutting is done from a bush that is four years old. Cuttings are taken from the middle part of the shoot. The planted shoot should have one or two buds. From the internode there should be 3 cm from the bottom and 2 cm from the top. The cut is made at an angle of 45°.
- Soak the cuttings in a root formation activator solution for 5-6 hours.
- Disembark. This can be done in a plastic cup. Holes are first made in it. The cutting is planted so that the internode at the bottom is half covered with soil. Sand is sprinkled on top and covered with plastic wrap. Every day it is necessary to remove the film for ventilation and moisten the soil with a spray bottle.
Autumn propagation of clematis by lignified cuttings
In autumn, cuttings can be carried out as follows:
- Cut cuttings 40 cm long.
- Spray with copper sulfate.
- Soak the cuttings in a solution of potassium permanganate for disinfection.
- Trim cuttings. The bottom cut is made 4 cm from the internode, the top cut is 1.5 cm.
- Soak in growth activators.
- In cups, dissolve half a tablet of activated carbon in the hydrogel and immerse the cuttings in the composition up to the node.
- Cover the tops of the glasses with cut plastic bottles.
Rooting cuttings in plastic bottles
Rooting is done as follows:
- Keep the cut cuttings in a diluted root growth activator.
- Cut a plastic bottle in half.
- Fill the bottom cut portion of the bottle with soil.
- Plant the cutting in the soil.
- Replace the top of the bottle and wrap it with tape.
- The bottle is buried in the ground to the level of the poured soil.
- After two weeks, the shoot is ventilated by unscrewing the plug for 20 minutes.
- After the shoots appear, the cork is removed.
How to root a vine in a bottle
How to care for clematis from cuttings
Clematis are responsive to feeding. Every two weeks, feed them with complete mineral fertilizer (“Nitroammofoska”). A month before the onset of frost, exclude nitrogen from the fertilizer so that the plant finishes growing and prepares for winter.
In the fall, dig the pots into the ground, cover them with peat and provide shelter. Next spring, young plants can be planted in a permanent place.
Illustrations for the material: Oksana Kapitan, Yulia Astanovitskaya, Oleg Kulagin.
You can find more useful tips on growing clematis in our selection of materials >>>>
When is the best time to propagate clematis?
Cuttings of phlox in summer: propagation
The specific time for propagation of the vine will depend on the chosen method:
- in the spring it is necessary to prepare and root green shoots;
- woody cuttings are prepared at the end of the summer season;
- In the spring, the layers are folded back and secured. In the future they will be dug into the ground;
- propagation by dividing the bush is carried out in the spring;
- The seed method is used either in spring or autumn.
Note! Everyone decides for themselves which method to choose. All of the above methods are quite time-consuming, except for dividing the bush. The process of preparing and rooting plants takes at least a year.
Harvesting cuttings
Cuttings are cut from the middle of the shoot. It is worth cutting cuttings with one internode and a pair of buds. The length of the stem should be 3-4 cm at the bottom, and 1-2 cm at the top. Before planting, the cuttings are soaked in rhizome formation activators.
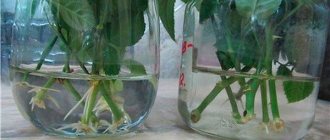
How to root a cutting in water
The cuttings are placed in clean water so that the lower part is lowered by 2-3 cm. The leaves should not touch the water.
Rooting a plant in water
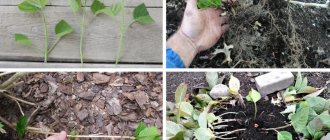
Transplantation into open ground
Planting in open ground is carried out in April-May. In the first year of growth in open ground, the plant should not be allowed to bloom, otherwise it will waste its energy.
How to transplant a vine into open ground
Growth regulators
To speed up the emergence of roots in cuttings, they are treated with growth regulators. These include: heteroauxin, rootin, sodium humate. They are soaked for several hours.
Growth Activators
Recommendations and common mistakes
To ensure that clematis cuttings obtained in the spring are suitable for planting, you should follow some recommendations from experienced gardeners. The list of main rules for the success of propagating a plant vegetatively looks something like this:
- Cuttings from an adult plant should be cut obliquely, at an angle of 45 degrees. This increases the area where roots appear.
- When planting shoots in the ground, add water in which they were rooted. This will help reduce the time it takes for roots and callus to form.
- When propagating and growing cuttings in open ground, do not forget about disease prevention. Several times a season, sprouts should be sprayed with Fitosporin.
- For better growth and root formation, it is useful to treat clematis cuttings with zircon and heteroauxin once a month. This increases the likelihood of successful reproduction.
- It is recommended to carry out preparations for rooting on cloudy and cool days. Best in the evening.
Read more How to transplant clematis to another place in the spring
Despite the fact that propagating clematis by cuttings in the spring at home is a simple process, many beginners make mistakes when doing it. Most often they are as follows:
- Gardeners allow clematis cuttings to bloom in the first year of growth. This is how the plant wastes its energy. Budding on young shoots should not be allowed. It is better to pinch them and remove all flower stalks.
- Propagation and rooting of cuttings is carried out in sunny areas. Young plants should be protected from direct rays. Bottles and cups with seedlings should be placed in places with diffused lighting or artificial shading should be created for them.
- They stop paying attention to the cuttings. Young shoots often attract the interest of snails and ants, who can destroy them literally in one day. You need to check the sprouts regularly, and at the first sign of pests, immediately apply measures to combat them.
- The shoots are rooted in imperfectly clean containers. If the container is not washed well enough, the cuttings selected for propagation may rot and deteriorate.
- They use unsuitable materials for winter shelter. It is best to insulate clematis with sawdust, spruce branches, and gauze. Create conditions such that moisture is well retained inside the bed, but at the same time air circulation is ensured.
Advantages and disadvantages of clematis propagation methods
Advantages of growing from seeds:
- small-flowered clematis are propagated from seeds;
- planting material can be purchased at any garden store. It is also possible to assemble them yourself;
- Plants grown from seeds bloom larger.
How to propagate mock orange - in spring, summer
Disadvantages of the seed method:
- the process is very labor-intensive and requires a lot of attention;
- There is no guarantee that newly grown clematis will transmit the characteristics of the mother bush.
Advantages of propagation by layering:
- Even novice gardeners can propagate in this way;
- there is a one hundred percent guarantee that the new plant will retain the characteristics of the mother bush;
- This method can be used at any time of the year, except for the flowering period and in hot weather.
No disadvantages have been identified in this method.
Note! The advantages of propagation by dividing the bush are simplicity and reliability. Cuttings can be considered one of the most effective methods.
Clematis can be propagated in four ways. The best option is cuttings. It is both effective and simple. The most difficult is the seed method. There is a high probability that the result will not be exactly what was expected. In any case, everyone decides for themselves which option to choose. In the end, the flower will definitely grow, but when it will bloom is individual.
How to use clematis in landscape design?
Clematis are traditionally used in gardens for vertical gardening - creating flower screens and hedges. They picturesquely decorate the walls of buildings, entwining fences, creating elegant floral panels. This is a great plant for decorating gazebos, outdoor verandas and patios.
But not everyone knows that clematis is an incredibly living and plastic material from which you can “sculpt” whatever your heart desires! It all depends on the support you offer him. For example, how do you like this idea - a huge pink or purple flowering ball on an emerald green lawn? I think it's amazing! So choose the appropriate supports to suit your taste and give your clematis direction!
This wonderful plant can take the form of a flowering arch, pyramid or column. With its help you can decorate trees with magnificent flowering garlands. In the end, deprive it of support - and it will creep along the ground, turning into an original ground cover carpet!
For a greater decorative effect, you can combine clematis of several colors next to each other - matching or contrasting. Give free rein to your imagination and create real living masterpieces with your own hands!
