15200
Cuttings are a method of propagating plants using cut woody or non-woody shoots. Dried, deformed, infected branches are not suitable for rooting. This method is ideal for propagating many flowers and garden shrubs, since it does not cause much trouble, and the result exceeds all expectations. The gardener gets enough seedlings to decorate the local area, window sills and a nice present for friends.
Hydrangea bush near the fence
Flower growers give many practical recommendations about propagating hydrangea by cuttings in spring and autumn. Each of them contains information on the selection and timing of procurement of planting material, rules for cuttings of various types of hydrangeas.
Timing for harvesting cuttings
The timing of cuttings directly depends on the planting material. For propagation in late spring (from May to June), young growths are suitable - the tips of shoots no more than 10-15 cm long. A similar rule applies when propagating spirea by cuttings. From late June to early July, shoots with a woody base are selected for rooting. In summer they are better suited for planting. In autumn, material with bud ovaries is used. It takes root better than others in substrates and produces abundant roots. On some cuts, flower ovaries can ripen and produce abundant color even at the rooting stage.
Cutting shoots
The optimal time for harvesting is spring. It is at this time that the active movement of sap along the trunks begins. Hydrangea shoots receive the maximum amount of nutrients in spring. In this regard, the regenerative potential of the cutting and the chances of rapid growth of the root system increase.
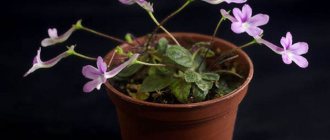
Hydrangea propagation
Garden hydrangea propagation by cuttings
There are several ways to propagate hydrangea: division, cuttings, layering, grafting and seeds. The last two are unreasonably complicated and require a lot of time. In addition, when grown from seeds, selected varieties may lose their qualities. Propagation by layering also has a disadvantage: the number of branches that can be used for this is very limited. Therefore, gardeners prefer two methods of propagation: cuttings or dividing the root system.
The second of them is used before the start of the growing season. Most often, hydrangeas are propagated by dividing the bush during spring replanting. The plant is watered, then dug up, the roots are washed, pruned, divided into parts and planted. This method is suitable for all types of hydrangea, with the exception of paniculata.
How to propagate hydrangea by cuttings: selection of planting material
When choosing hydrangea cuttings, gardeners take several criteria as a guide:
- The condition of the cortex is taken into account. Completely lignified branches have difficulty putting out roots, while young ones quickly produce root buds.
- The location of the cuttings is taken into account. Basal shoots take root 3 times better than lateral shoots and are less susceptible to diseases. Preparations selected from the sunny side take root worse than shady shoots.
- A month before the collection of planting material, the mother bush is stopped fertilizing with nitrogenous agents, since a high concentration of this element accelerates the decomposition processes in the cuttings.
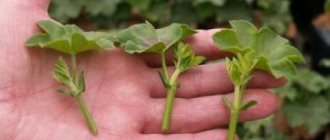
- Inspect the condition of the foliage. Branches with small leaf blades take root faster. In this regard, large leaves are cut in half.
- Planting material is cut only from a healthy flowering bush no older than 10-12 years.
Selection of planting material - Not least important is the preparation time. Experts recommend pruning in the morning, since at this time the plant is maximally saturated with moisture.
- The shoots are no more than a year old.
Growing hydrangea from cuttings is quite simple. To do this, select planting material that meets the following characteristics:
- size no more than 15-20 cm in length;
- thickness no more than 7 mm;
- the presence of short internodes;
- pronounced growth buds;
- at least 4 developed buds.
Similar criteria are taken into account when selecting garden and indoor planting material. In this way, it will not be difficult to obtain several specimens of indoor hydrangeas, caring for them at home is no more difficult. House bushes grow more restrainedly, unlike garden ones, but you can admire the flowering from the end of April.
Processing hydrangea cuttings and rooting methods
You can grow any type of hydrangea from cuttings: tree-like, petiolate, paniculate and even large-leaved. To do this, it is necessary to properly prepare the planting material. A couple of days before cutting, indoor plants are removed to a shaded place, and garden shrubs are covered with covering material. If there is an ornamental plant growing on your site, about which you know a lot about planting and caring for, then it is worth collecting cuttings from it in order to acquire new attractive bushes for landscaping the area.
After the hydrangea has settled in partial shade, begin cutting the planting material. To work with the plant, use only professional disinfected tools. Secateurs or garden shears are suitable. For cuttings, shoots with several pairs of nodes are selected. The branches are separated from the trunk with an oblique cut.
Large leaves are cut by ½ to reduce the outflow of nutrients into the crown of the seedling.
The collection is placed for a couple of hours in solutions of biostimulants such as Epin or Cyclops. If this is not possible, the sections are powdered with any root formation stimulator: “Kornevin”, “Heteroduxin”. Thanks to them, the procedure for growing from cuttings takes half as much time. The stems are sprayed with a weak solution of manganese to give them flexibility and disinfection.
Rooting in water
Before rooting hydrangeas with cuttings, you need to select a suitable substrate or prepare an aqueous nutrient solution.
Modern gardeners practice the following methods of rooting hydrangeas:
- in water;
Sequencing - in the soil substrate.
Rooting hydrangea in water is quite simple. Moisture is a favorable environment for the growth and development of filamentous processes. Thanks to this method, a novice gardener will be able to monitor and control the process of formation of the root system. Water itself is not a nutrient medium for plants, so growth stimulants and liquid fungicides are added to it.
Sequencing:
- Preparation of a nutrient solution from water and cinnamon (1 tablespoon of mixture per 200 ml of liquid).
- Containers with dark or opaque walls are used as containers, since in the dark the root buds hatch faster.
- Place cuttings in containers, but no more than 2-3 cuttings for every 200 ml of water. The lower part of the stem is immersed in liquid to 1/6 of the total length.
- Throughout the entire period of forcing the rhizomes, the water in the containers is not changed. As the moisture evaporates, add a warm, filtered solution.
- Autumn cuttings are rooted in shaded areas, spring cuttings with a large number of leaves are rooted on the sunny side.
- To avoid rotting of the planting material, experts recommend regular aeration of the solution throughout the entire forcing period.
Roots 2-5 cm
After the plant has produced several roots ranging from 2 to 5 cm in length, it is transplanted into slightly acidic soil.
Planting in the substrate
The following mixtures can be used as soil:
- planting cuttings in vermiculite and river sand in proportions 1:1;
- perlite, garden soil, peat and river sand in proportions 1:1:1:1;
- vermiculite, garden soil, peat, river sand in proportions 1:1:1:1 with the addition of 1 g of citric acid.
Woolen ropes are laid out at the bottom of the planting boxes in increments of 5 cm. The ends of the ropes are lowered into containers with water, and one of the substrate options is poured into the boxes. Thanks to the wicks, the soil will be optimally moistened and the rhizomes will not rot.
The bottom is wrapped in rags to better warm up the root buds and speed up the growth of the root system.
The blanks are evenly placed over the entire area of the box with an interval of 10-15 cm at an angle of 45°. The cut should go 2-3 cm into the ground. The container is placed on an illuminated area. As necessary, add water to the container, and if swollen buds are found on the shoots, fertilize the hydrangea.
Growing sprouts
When planted correctly, the seedlings take root within a month, after which they are planted in individual peat or plastic pots. Seedlings can be kept in them for up to 3 months before planting in open ground or moving to a larger pot for home growing.
Caring for hydrangea seedlings
The plant is easy to care for; you need to follow all the rules for growing.
Seedling care
Watering mode
Hydrangea loves moisture very much, but at the same time it is not recommended to over-water the soil. The soil should be moderately moist throughout the entire depth of the roots.
Additional Information. In Europe, scientists named the hydrangea Hydrangea, which means “water container” in Greek.
The plant needs to be watered regularly and abundantly. The optimal regime for an adult bush in central Russia will be 2 buckets per week. In dry weather, watering is doubled.
Rare, abundant watering during dry periods is not very favorable for hydrangea.
Top dressing
For lush flowering, the plant needs to be fed. In spring, when the frosts have ended, hydrangea is fertilized with any special complex product: Bona Forte, Agricola Aqua, Flower Paradise, Pokon. You can also prepare your own fertilizer: mix 20-25 grams of ammonium sulfate (urea), 30-40 grams of superphosphate, 35 g of potassium sulfate.
In cool regions, to improve plant resistance, young foliage is sprayed with Zircon, Epin-extra.
Stage 2 of feeding geraniums occurs at the beginning of budding. Dilute a mixture of 45 grams of potassium sulfate and 80 g of superphosphate.
Stage 3 of feeding occurs at the end of summer, beginning of autumn. Up to 20 kg of compost or rotted manure is added to each bush.
Preparing for winter
Not all types of hydrangeas need to be insulated for the winter. The paniculate variety can withstand temperatures down to minus 30 degrees. The tree type is less frost-resistant; only young shoots can freeze. In this case, hydrangea is easily restored. These two species just need to be earthed up a little before winter.
The large-leaved variety is more capricious. Flower buds of this hydrangea are formed on last year's shoots. If they are exposed to frost, there will be no flowering next year. Therefore, it is recommended to prepare this variety for winter (carefully insulate it). These measures are especially required for the middle zone and cold regions.
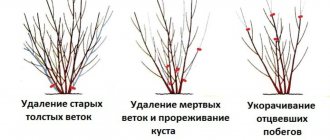
Specifics of cuttings of various types of hydrangea
In order to propagate hydrangea as efficiently as possible, it is necessary to take into account its typological features. For example, cuttings of paniculata hydrangea are carried out in the spring, and cuttings of tree hydrangea are carried out in the fall.
When preparing large-leaved varieties for transplanting, their leaves are always cut by half, and when planting in open ground, the tops of seedlings are cut 10 cm from the ground for better rooting and tillering. When collecting planting material from paniculata hydrangea in the fall, lignified shoots are selected for cutting.
Video about 3 ways to grow new seedlings.
Growing from cuttings is a popular way to propagate hydrangeas. It does not require much time and effort, and the percentage of shoots rooting is relatively high. The most suitable time for cuttings is late spring. During cosmetic pruning of a bush, gardeners not only give it the desired shape, but also collect planting material. Over the summer, the cuttings take root, undergo adaptation and become suitable for autumn planting in open ground, followed by wintering under cover.
When to cut hydrangea - in spring or autumn?
This question haunts many gardeners, as there are many points of view about the optimal time of year. The answer is simple, cuttings of hydrangea are possible both in spring and autumn, but there are some nuances regarding technology and the external appearance of the cuttings. In the spring, cuttings that are green or semi-lignified should be propagated, but in the fall - exclusively woody ones. The processes themselves are also different, because it is the autumn version of propagation that is considered more troublesome, because a very “young” plant should be protected from winter frosts by transplanting into containers, and only planted in a permanent habitat in the spring.