Advantages and disadvantages of autumn cuttings
The formation of clematis bushes occurs in the fall. Pruning is mandatory for this type of plant. This improves development and growth, promotes the spring awakening of the buds. During shaping, many branches remain; they are cut into petioles, which can be used for planting and propagating plants.
Benefits of planting in autumn:
- plants harden and get used to temperature changes;
- autumn seedlings outstrip spring bushes in growth;
- in rainy times there is no need to waste water for irrigation;
- In the fall, gardeners have more free time for pruning than in the spring, when massive work is underway.
In the spring, the branches have not yet grown back after the autumn pruning; you can overdo it with pruning. In addition, in the spring the buds swell and the sap moves along the branches. At such a time, it is better not to disturb the vine.
The disadvantage of autumn cuttings is that you may not predict early frosts, and the seedlings will freeze before they have time to take root. It is more difficult for cuttings to take root in autumn than in summer. In the summer, they are rich in biostimulants; they stimulate the appearance of buds.
Recommendations and common mistakes
Following simple recommendations helps to successfully propagate an ornamental plant in the fall. Experienced gardeners advise:
- take only lignified shoots from young and healthy bushes for cuttings;
- cut the stems at least 30-40 cm long;
- Thoroughly disinfect the containers and soil for the culture before planting the shoots.
Cuttings cannot be germinated at air temperatures of about 30 °C or higher. In such conditions, the culture does not take root and dies before it takes root.
You can wet the soil in containers with cuttings without eroding it at the roots by spraying
Methods for propagating clematis
Clematis rarely produce seeds; the seed method is labor-intensive and rarely produces seedlings. If the seeds take root, the bush still loses its maternal properties. Clematis can be propagated in several ways. The most common is the method of cutting cuttings from clemis.
Cuttings of clematis in autumn
To propagate clematis by cuttings in the fall, you need bushes 3-4 years old. After pruning the bush, choose strong, healthy branches. It is better not to use tops with buds. Cut the middle part of the shoot without buds, but with 2 nodes and a couple of buds at the base of the leaves. For pruning, use a sharp knife or pruning shears; it is better to work with gloves. Growing clematis from cuttings is a simple method of propagation, but it will take more than one year of the plant’s life to wait for abundant flowering.
Reproduction of clematis by layering
In May or early summer, 2-3 long, healthy shoots are selected from the bush. Place them in small grooves to a depth of 8 cm; you can secure them with a hook or clothespin so that the shoot does not bend. When watering the bush, the place of the cuttings is watered abundantly. When the shoots grow to 15 cm in length, the ground around is covered with mulch. By autumn, new plants can be replanted.
In mid-autumn, all leaves and part of the shoot up to the first developed bud are removed from the pruned branches. The branches are tied and placed in dug grooves. A layer of peat is poured onto the bottom of the holes and on top of the shoots; the material retains moisture and is breathable. Fill the ditch with earth and compact it. In spring, this place is well watered and fed with mineral supplements. When seedlings appear, the soil is mulched with moss and humus. Next fall, the plants are planted on the site.
Hilling method
In the summer you can grow cuttings for autumn planting. To do this, in June a box without a bottom or top is placed on the growing branches. Add soil regularly until the structure is completely filled. The part of the branch with two developed buds should remain uncovered. During this procedure, the soil is watered abundantly. By autumn the cuttings will be ready for planting. Cut the shoots at a height of 20 cm from the ground. Spud the bush around the bush with nutritious soil 15 cm high and cover it with insulation for the winter.
Dividing the bush
Autumn division is safer than spring division. You cannot dig up a plant when the buds have begun to awaken and the bush has begun to develop.
Divide five-year-old clematis into small bushes. The bush is dug out of the ground and shaken off. The rhizome of an adult plant is powerful and long; bushes often have to be undermined. The entire root is washed in water to see where to separate. Carefully separate into several bushes. All shoots are cut back to the second buds and planted in a new location.
You may be interested in:
Planting and caring for tree peony in open ground It seems that no one needs to be told how beautiful and fragrant the peony is. Many summer residents...Read more...
Attention!
Clematis does not tolerate root trauma well, so it is better to use this method as a last resort.
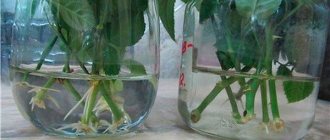
Reproduction in water
The same process of cuttings, only the roots are placed in water until roots appear. To transplant young plants in September, you need to cut off the branches and put them in water around July. The leaves are left, only those that are in the water are removed. Immerse part of the shoot so that one internode is in the liquid. Do not place the container in the light; if this is not possible, then wrap the container in paper. At room temperature, roots will appear in 30-40 days. When the roots are 5-6 cm long, the seedlings are transferred to greenhouse soil. You cannot keep the roots in water - they will get tangled and the buds will dry out.
When can you take clematis cuttings in the fall?
Breeding is most often done in May or June, but autumn cuttings of clematis are also allowed. It is at this time that the plants are pruned, so there is quite a lot of planting material left, which is a pity to throw away. Reproduction requires a lot of effort, since the plants are already weakened, which means they will take root worse.
Read more The easiest ways to propagate clematis from cuttings in summer
Specific dates depend on the climate of the region. Typically, autumn pruning in the Moscow region and other regions of the middle zone is planned for the end of October, i.e. on the eve of the first frost. In the Urals and Siberia, the timing of cuttings is usually shifted to the first half of October. In the south, work can begin before mid-November.
Features of autumn breeding
Proper pruning of branches, trimming petioles, their care and soil influence the further development of clemitis. Incorrect cutting or excessive watering can destroy the young growth.
Preparation of cuttings
It is better to trim cuttings during the period of bud formation. Basically this is the end of spring - beginning of summer.
Sequence of cutting cuttings:
- the cut is made over 1-2 sheets;
- take the middle part of the branch;
- cut at an angle of 45 degrees 5 cm below the first node and 2-3 cm above the second node;
- large leaves are removed;
- place 1/3 of the petiole in water;
- shoots are placed in a dark place for 9 hours in a growth stimulator: rootin, sodium humate, heteroauxin;
- then wash the branches under running water.
Soil preparation
Clematis prefers an alkaline habitat. Soil with high acidity is limed. Prepare light, moisture-absorbing and breathable soil:
- The composition used is: sand, humus, peat (1:1:1).
- A mixture of river sand and sphagnum moss.
- Garden soil, peat, humus 1 part, 0.5 part sand, 20 g superphosphate per 5 kg of mixture.
- You can root petioles in coconut fiber, perlite, and vermiculite.
Attention!
Any soil mixture must be filled with a solution of potassium permanganate for disinfection - 4 g of the substance per 9 liters of water.
Planting and caring for cuttings
To achieve abundant flowering, you should not plant clematis in a sunny place, it is better to choose partial shade. Do not plant the plant near an iron fence or near the walls of a house. Water from the roofs should not flood the bushes. Do not grow vines in drafts and windy areas.
To root woody cuttings, seedlings of low-flowering and wild varieties are taken. The branches are cut in August, 8-12 cm long with two nodes. After the shoots take root in the water, they are planted in boxes for rooting. The lower part of the petiole is deepened by 3 cm. To keep the buds from drying out, the node is deepened by 1 cm. The distance between seedlings is 6 cm, and between rows is 15 cm.
To actively grow the root system, you need care for clematis:
- temperature in the room is 19-22 degrees;
- For the first three weeks, the plants are watered a little daily, then once every 10 days is enough;
- seedlings need high humidity, they are sprayed 3 times a month;
- regular ventilation of the room;
- Once every 8 days, the petioles are sprayed with zircon, a plant growth regulator.
- After rooting the cuttings, the film is removed, they are picked in the spring, and planted in the garden in the fall.
Attention!
Air temperatures above 30 degrees are detrimental to young animals.
Preparation of cuttings
Before you start cutting clematis in the fall, it is important to choose the right bushes. Shoots that meet several requirements are suitable for propagation:
- well lignified;
- no dry parts;
- no breaks or other damage;
- without signs of disease and pests;
- the age of the plants is from 3-4 years (it is also better not to use too old clematis bushes).
The finished cuttings should be quite long - about 30-50 cm. It is not worth making short shoots, since they are weaker and may not take root. Preparation of layering for cuttings looks like this:
- Take scissors or pruning shears, disinfect the blades with a 1% solution of potassium permanganate or any fungicide (dilute according to the instructions).
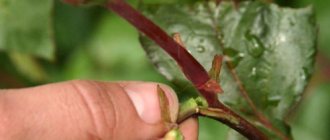
- The shoots are cut slightly above the second bud relative to the surface of the ground.
- For cuttings, take shoots that have at least two buds or leaves, as well as at least one node.
- The lower part is cut at an acute angle (diagonally), retreating 3-4 cm from the edge. You can also make a horizontal cut, but then the distance from the knot should be small - about 2-3 cm.
- Leaves are shortened by at least half. The lower foliage should be completely removed when cutting clematis in the fall.
The length of the cuttings must be at least 30 cm
Important! To take cuttings from clematis in the fall, shoots with one node are taken. But it also happens that the internodes are quite short. Then you should get shoots with two nodes; they should have at least 2-3 buds.
How to root a shoot
You can grow clematis cuttings in greenhouses, greenhouses, tunnels and in boxes on window sills. If bushes are pruned in the fall, the cuttings must first be rooted and planted in the ground in the spring. There are several ways to grow petioles.
Plastic cups
In a transparent plastic glass you can clearly see what is happening to the roots of the plants. Application of cups:
- covered with nutrient mixture;
- small holes are made in the container for drainage;
- water the ground;
- dig in the petiole so that the node is half covered with soil;
- Before the cuttings root, cover the glasses with film.
When the time comes to plant plants from cups, the seedlings are transferred to the hole along with the soil in which they grew.
You may be interested in:
Propagation of chrysanthemums in autumn: cutting method Cuttings are one of the most effective ways of propagating garden chrysanthemums. The main advantage of the method…Read more…
The soil
The petioles are planted in the soil mixture in a film greenhouse. A cardboard box is dug into the ground. The soil must be clean of weeds and harmful microorganisms. It is better to make the soil two-layer. The first layer - pour peat and sand for drainage with the addition of humus, cover everything with sand on top. Spill with manganese solution. For rapid rooting, seedlings are treated with heteroauxin or sodium 2 g per liter of water for 8-10 hours, washed, and transferred to the soil.
Water
Use a wide-necked container for rooting shoots. Pour water, immerse the twigs so that only the ends are 1 cm immersed in the liquid. The container is placed in a dark place. As the water evaporates, it is added to the previous level. When the rhizome is 4-5 cm, the shoot is planted in a greenhouse.
Bottles
Resourceful gardeners have come up with a way to root flowers using two-liter plastic bottles. At the same time, space is saved and cuttings take root faster.
The bottle is cut in half. An earthen mixture is poured into its lower part, the seedling is deepened, watered from above, and covered with the second part of the bottle. The joining place is connected with tape, the plug is closed. The mini greenhouse is buried in the ground to the level of the soil in the bottle. After a couple of weeks, the greenhouse is ventilated - the plug is unscrewed for half an hour a day. When shoots appear, the bottle is left open and drainage holes are made.
In addition to bottles and cups, plastic bags, pots, and containers are used. Mostly these containers are located in flower beds or greenhouses.
Conditions for rooting cuttings in the substrate
In clematis that bloom on last year's branches, cuttings begin before flowering in May or in July after flowering. In mid-summer, green petioles are planted in pots, boxes or directly into open ground. At the end of August, vine shoots are cut and healthy shoots are rooted only in closed ground.
Prepared shoots can be immediately planted in fertile soil:
- Individually - cups, bottles, pots.
- Planting in a common cuttings - in this case it will not be possible to monitor the rooting process. The soil is made in two layers: first 20-25 cm of substrate, then 5 cm of perlite or sand. The earth is leveled, compacted and moistened.
How to graft clematis. Clematis grafting
Large-flowered varieties and forms that are difficult to root are propagated by grafting. This method is also indispensable in breeding work when it is necessary to obtain planting material of a new hybrid form, rare variety or type of clematis. There are several options here.
For successful grafting on the roots, it is important to comply with the following requirements: the roots (rootstock) must be large, thick, cord-like (as, for example, in violet or spreading), at least 15-20 cm long, with as many well-developed side branches. In addition, they must be in a state of active growth (with white tips). Under these conditions, fusion occurs faster and the grafted cutting begins to grow. The roots are prepared as follows. Plants aged 1-2 years are planted in 2-3 liter containers. Make up a light earthen mixture. When the plant has formed a sufficiently developed root system, the lump is shaken out, the roots are washed in water, the largest ones are cut off for grafting, and the plants are planted again in the container (to further obtain roots). Green cuttings for grafting (scion) should be taken from well-developed young healthy plants during the period of active growth, that is, in May-June. They are cut 4-6 cm long with one knot at the top. The leaves are shortened by half. The binding material (bast, elastic rubber, etc.) is cut into pieces 22-25 cm long and divided into thin strips 5-6 cm wide. The most common grafting is split or butt (the latter is less labor-intensive and takes root better). A cut is made on the cutting from the top node to the bottom end (2.5-3 cm) and on the root. Both components (cuttings and roots) are placed cut side to side and tied. If the cutting and the root have different diameters, then on the thicker one a cut of a smaller section (narrower) is made so that the width of the cuts of the scion and rootstock coincides. The lower end of the cutting should be left blunt, without sharpening it at the end. In this case, after fusion, its own roots form at the blunt end of the cutting. Grafting is usually 80-100% successful, but the larger the root size, the higher the survival rate. Vaccination is usually done indoors, but it can also be done outdoors, but always in the shade. The grafted cuttings are collected in groups of 2-3 (the lower ends of the strapping should be at the same level) and planted in 1.5-2-liter flowerpots. When planting, long roots are not cut off, but smoothly arranged in a spiral. They are covered with a light earthen mixture to the lower end of the grafting (tying); the soil level should be 4-5 cm below the top edge of the flowerpot. The free space is filled with sawdust, moss or peat, lightly compacted, the plants are covered with glass half-liter jars and the top is watered abundantly. During the period of fusion of the scion with the rootstock, increased air humidity is needed. Flowerpots with grafting are installed in a greenhouse or greenhouse under whitened frames. Fusion usually occurs after 2-3 weeks, but the jars are removed later when the grafts begin to grow. Plants are sure to provide shade. In the south, it is better to keep grafts in winter in flowerpots in a closed greenhouse. In regions with cold winters, greenhouses must be insulated, for example, by filling the flowerpots with sawdust and making double frames. You can leave the grafts in a cool greenhouse or conservatory. In spring or autumn, they are planted in a permanent place, making sure to bury the grafting site along with the first pair of buds (the first node) into the soil. Plants form their own roots, develop well and bloom. It should be noted here that many flower growers vaccinate in winter. The literature describes several options for relatively simple and effective methods of vegetative propagation of clematis - by dividing the bush and layering. They are widespread among amateur gardeners, who can easily use them in their garden. However, these methods are not suitable for mass propagation due to the low yield of planting material obtained.
Click "Like" and follow us on Facebook!
Clematis: planting and care after planting
As you have probably already noticed, caring for clematis is a fairly simple task that any amateur gardener can easily handle. However, the first year of caring for clematis should be the most difficult, because during this time you need to be as sensitive and attentive to the plant as possible. This way you can provide him with a good future and the real title of king of your site.
As already mentioned, at first, clematis will feel very uncomfortable in a new place. Therefore, for the first few weeks it will have to be shaded so that, against the background of general stress, the plant does not receive several sunburns.
This must be done until the clematis loses all signs of lethargy. The best way to shade are arcs through which you can stretch special agrofibre, which will perfectly protect clematis from the sun. This will also help the plant not to become a victim of strong winds.
However, the most delicate topic for clematis is watering. In the first year after planting, they need to be monitored especially closely so that there are not too many of them, but at the same time, not too few. This means that along with drying out the soil, it should not be allowed to become excessively waterlogged. As they say, you need to stick to the golden mean.
On average, the plant is watered only once a week, however, if the weather is hot outside and, especially if you have not mulched, the number of waterings must be increased to two or three times a week. When autumn comes, on the contrary, you need to reduce watering.
As we have already mentioned more than once, mulching is a procedure no less important than watering. This simple process performs many useful functions and is therefore highly recommended.
The benefit of mulching is that on hot days it prevents moisture from leaving the soil around the plant too quickly. In addition, we will not tire of repeating, mulching is the best protection against weeds currently available, so if you haven’t done mulching yet, it’s not clear what are you waiting for?
Also in gardening, you need to pay great attention to the proximity of different plants, since neighbors can not only look very nice together with your plant, but may also help it cope with some difficulties. For example, flowers such as marigolds or calendulas are among the best neighbors for clematis, because they provide amazing protection against many insects
Along with watering and mulching, it is necessary to regularly loosen the soil
For example, flowers such as marigolds or calendulas are among the best neighbors for clematis, because they provide amazing protection against many insects. Along with watering and mulching, it is necessary to regularly loosen the soil.
It is especially important to do this after watering or after heavy rain. With this procedure, oxygen will flow much better to the roots and speed up the growth of your clematis
Even if you have a layer of mulch, don't assume that the weeds will just go away. Unfortunately, they will still appear, and your direct task is to exterminate them at the first opportunity.
And, of course, it is necessary to mention pruning, because this is, in principle, one of the most important procedures. It is she who directly decides how your clematis will grow in the future.
In the very first year after planting, pruning follows a very simple pattern: you simply cut the shoots at a level of twenty to thirty centimeters above the ground. In all subsequent years, pruning is carried out according to a more complex pattern, which is determined by the pruning group of your clematis.
There are three of these groups in total, and knowing which one your clematis belongs to is incredibly important. The last procedure is covering clematis for the winter.
Clematis is not a plant that tolerates cold very well, and therefore it is simply necessary to take care of protection. This procedure is especially important in the northern regions. By the way, it is also much better for them to buy clematis of the third pruning group, because covering them for the winter is so simple that it’s just a pleasure
The last procedure is covering clematis for the winter. Clematis is not a plant that tolerates cold very well, and therefore it is simply necessary to take care of protection. This procedure is especially important in the northern regions. By the way, it is also much better for them to buy clematis of the third pruning group, because covering them for the winter is so simple that it is just a pleasure.
Cuttings
As a rule, gardeners propagate clematis by cuttings in the summer. In principle, this can be done in the cold season (including using parts of stems that have already partially become lignified and obtained as a result of winter pruning), but in this case it is necessary to be able to work and grow seedlings in a heated greenhouse. Summer cuttings are rightfully called “green”, since planting material is obtained from non-lignified shoots of the current year.
Cutting clematis cuttings
As a “mother plant,” it is preferable to use a bush that has been growing in a permanent place for at least 3 years, selecting no more than a third of the young shoots for propagation. The stems are cut off at the moment when the clematis is experiencing the budding phase. At this time, plant tissues contain a large amount of biologically active substances. The specific timing of cuttings depends on the plant variety, as well as climatic conditions. In the middle zone, summer residents usually begin the procedure no earlier than the beginning of June. Shortly before cutting the stems, clematis is fed on the leaves with a complex mineral fertilizer with a low content of nitrogen compounds (this subsequently promotes more active rooting of the cuttings).
For propagation, it is better to choose those shoots (or parts thereof) that do not have flowers. The stem is considered ready for cutting if it does not break when bent.
To obtain planting material:
- select suitable stems from the bush and cut them off just above the second bud from the ground;
- the tops are separated, and the shoots themselves are cut so that each part has one node (that is, two buds and two leaves). If the internodes are short (4-5 cm), the cuttings may have two nodes;
- Each cutting is cut obliquely from below (3-5 cm below the node), and horizontally from above (2-3 cm above the node). Plastic sheets are shortened by half. If there are two nodes, the lower pair of leaves is completely removed.
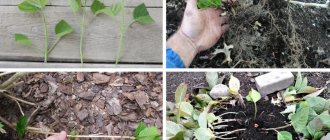
At the same time, prepare a place for planting cuttings. Seedling boxes about 30 cm deep (as in the photo) or glasses are used as containers. They are filled with a substrate consisting of two layers. The lower one (15-20 cm) is a mixture of pure river sand with humus or peat in a 1:1 ratio, the upper one (3-5 cm) is sand or perlite. The soil in the container should be well moistened.
Cuttings can be rooted in boxes or glasses with nutrient substrate
Then proceed like this:
the lower sections of the cuttings are treated with a growth regulator (“Kornevin”, “Sodium Humate”, etc.), using the drug according to the instructions on the package; carefully take each cutting by the part left above the node and immerse the lower cut obliquely into the planting substrate until the node (or the lower of two nodes) is 2-3 mm below the surface
Carefully squeeze the substrate around the stem; The cuttings are planted in a common box at a distance of 5-8 cm from each other, or 2 pieces per glass. It is recommended to water the plantings with a foundation solution to protect against fungal diseases; the containers are installed in a greenhouse, in which a constant temperature (22-25 degrees) and high humidity are maintained
The structure must be ventilated daily and shaded from direct sunlight.
The rooting process usually takes 5-6 weeks. If clematis cuttings are carried out correctly, during this time each plant should have several roots. Towards the end of the rooting period, young bushes are gradually “weaned” from greenhouse conditions in order to prepare them for planting in open ground.
The percentage of rooting of “green” cuttings is quite high (up to 90% depending on the clematis variety)
Unfortunately, most summer residents do not have the opportunity to grow young plants in heated winter greenhouses. Therefore, already in the middle of summer, young clematis begin to be planted in open ground. In the fall, the plants are trimmed (if they already have an above-ground part) and covered with a thick layer of mulch, and in winter they try to cover them with snow as much as possible. In this form, about 60% of seedlings successfully survive wintering. By spring, each plant already has about 10 roots 20-30 cm long. This is complete material, ready to be moved to a permanent place.
Useful tips from experienced gardeners
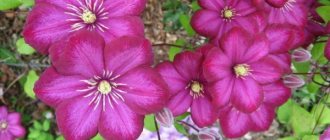
Even inexperienced gardeners grow soft pink clematis
- It is better to use a sharp knife as an equipment; a pruning shear can deform the shoot.
- The cut is made at an angle of 45 degrees, thereby increasing the area for the formation of roots.
- For rooting in water, take perfectly clean bottles, otherwise the risk of shoots rotting increases.
- For planting, a disinfected soil mixture is recommended, which can be disinfected by calcination in the oven or watering with a solution of potassium permanganate.
- Before planting in open ground, the bushes are hardened off by exposing them to fresh air for a short time.
- If seeds are used, they must be stratified.
How to propagate clematis. How to propagate clematis?
The dazzling beauty of flowering clematis is one of the reasons that encourages gardeners to breed these amazing perennials. Despite the fact that the propagation of such demanding plants is often accompanied by a significant investment of time and effort, even a novice gardener can get excellent results with the right approach. In what ways can clematis be propagated, what recommendations and conditions should be followed? We will talk about all this in this article.
Basic rules of reproduction
These beautiful flowering vines are propagated in several ways, using:
- seeds;
- cuttings;
- layering;
- parts of the mother bush (divisions).
Another popular method is plant propagation using grafting. It is often used by breeders when breeding rare varietal vines.
The method of propagating clematis by seeds is the least popular among gardeners. This is due to the fact that varietal plants do not pass on their qualities to their offspring through seeds, as a result of which the results of the work carried out by the grower may not at all live up to expectations.
The seed propagation method is applicable only to species (wild) plants.
Vegetative methods of propagating clematis are considered the simplest and most effective, in particular cuttings and rooting of layering. These methods have the highest effectiveness and allow you to obtain young, healthy plants that have all the varietal characteristics of the parent bush.
Propagation of clematis by dividing the mother bush is a method used only by experienced gardeners. An incorrectly performed procedure not only seriously injures the plant, but also often leads to its death.
When propagating clematis in one way or another, you should take into account the current time of year and the recommended timing of the procedure. So, sowing the seeds of these beautiful flowering plants is carried out in spring and autumn, layering begins to take root in the summer, and dividing the bushes begins either in the fall or early spring (in the middle zone). Clematis cuttings are usually harvested in late spring or early summer (the best time is late May or early June).
Another condition that must be taken into account when starting to propagate clematis is the climatic features of your region. The timing of the planned procedures, as well as the selection of the most suitable varieties, depend on this factor. Thus, it is better not to plant or breed heat-loving and whimsical varieties of clematis in regions with a harsh climate, for example, in the Urals or Siberia. For these regions, frost-resistant zoned varieties are recommended that are able to take root and bloom in unfavorable conditions (“Gypsy Queen”, “Bella”). Planting and propagation of clematis in regions with harsh climates begins at the time recommended for a particular variety.
To obtain vegetative planting material (cuttings, cuttings), you should use strong, well-developed, sufficiently mature and healthy bushes. Too young (less than 3 years old), weakened, flowering, diseased or damaged clematis cannot be used as mother plants. Damage that occurs during the procurement of planting material can sharply deteriorate the health of these beautifully flowering vines and even cause their death.
How to cut branches correctly?
It is not without reason that summer is considered the most suitable period for cuttings, since at this time the bush is densely overgrown with young shoots and there is a good choice among all the branches.
Proper preparation of cuttings includes the following steps:
- select shoots suitable for propagation on clematis;
- cut the branches you like so that 5–8 cm remain from the base;
- Use a sharp knife to separate the tops - you won’t need them later;
- cut the shoots into several parts so that each fragment contains one internode containing at least two buds and two leaves; if there are several nodes, then the lower pairs of leaves must be completely removed.
Transplanting young clematis into open ground
A suitable place is chosen for planting a young plant. Well lit, but not in the sun, protected from the winds. When planting next to a hedge, you should retreat 0.5 m for normal root development.
How to propagate mock orange - in spring, summer
Acidic soil is neutralized with ash or dolomite flour (200 g per sq. m). Heavy soils are dug up with peat and river sand. Dig a planting hole with a depth and width of 60 cm. Drainage from pebbles or gravel is laid at the bottom with a layer of 15 cm. The planting hole is filled 2/3 with a mixture of sand, peat, humus, fertile soil in the ratio 1:1:1:1.
Important! Clematis does not tolerate soils with close groundwater.
The best time to plant young clematis is late April-early May. The root system of the plant is soaked in the Kornevin solution for 2-3 hours. In the center of the planting hole, make a hill on which the seedling is placed, evenly distributing the roots in a circle.
The planting is covered with earth. The root collar should be 12-18 cm below the soil level. It is better to cover the first two buds as well - this will increase the winter hardiness of the bush and promote tillering. Planted clematis is watered abundantly, taking care not to expose the root collar.
Planting young clematis
Growth regulators and other gardening recommendations
Cuttings take root much easier if they are soaked in one of the growth stimulants before planting.
| Drug name | quantity | Dilution in water (ml) | Processing time (hours) |
| "Heteroauxin" | 1 tablet | 2000 | 1-2 |
| "Zircon" | 2-3 drops | 300 | 8-18 |
| "Kornevin" | 1 g | 200 | 2-3 |
| Sodium humate | 0.5 g | 1000 | 8-12 |
For the full formation of the root system, plants are sprayed with the addition of immunomodulators “Kreazitsin” and “Domotsvet”.
Features of breeding and timing
Clematis can be propagated by young cuttings at any period of active growth of the bush. In regions with a warm climate, cuttings are taken at the end of May - June; in northern latitudes it is better to do this in June or July. It would be more correct to focus on the life cycle of plants - the optimal time for preparing material for rooting is considered to be the budding period, and you can also take cuttings when the first flowers appear.
For rooting, only elastic shoots are used, so preference should be given to cuttings that will not break from mechanical stress.
Many gardeners wonder whether it is possible to take cuttings from clematis at the end of summer. It is possible that any warm period, including August, is allowed for propagation of this vine, but such specimens will have a harder time taking root, and you will have to wait much longer for roots.
When is the best time to propagate a plant?
The nuances of growing vines include the exact time of planting in open ground. Gardeners have empirically identified 2 suitable time periods:
- In the spring.
- In autumn.
Both options require compliance with the accompanying conditions, a combination of air temperature and soil moisture
In the spring, it is important to transfer the seedling before the heat sets in, and in the fall, before the cold begins. Both methods are equivalent; if you follow simple planting rules, they give the expected result - a healthy, flowering plant.
Gardeners practice soaking seedlings before planting - for an hour, in water, with the addition of potassium permanganate (potassium permanganate). A temporary “place of residence” of clematis is acceptable in any suitable place in the garden or plot.
Reproduction is carried out in spring or autumn, to choose from. But experts consider autumn to be more preferable. Clematis is propagated using seeds, layering, cuttings or dividing the bush. The first method is more often used for plants with small inflorescences; for the rest, cuttings, division and layering are used.
in spring
For the planting procedure to be successful, you will first need to dig a hole of sufficient depth. A drainage layer (at least 15 centimeters) must be created at the bottom. Broken brick or large crushed stone will do. The mixture itself for clematis seedlings is prepared in several ways. For example, they mix fertile soil with rotted manure, wood ash, and sand. Superphosphate is added to the soil as a fertilizer. Everything is thoroughly mixed and poured into the pit.
in autumn
Experienced “clematists” call September, and not October, as the time period for autumn planting, as is customary for some other plants. If the required deadline is missed, it doesn’t matter. The seedling will overwinter in the utility room, cellar or basement, and in the spring it will go into the ground.
The plant is capable of growing steadily in one place for 3 decades if the planting point is correctly (and immediately) determined. Sunbathing in open space is contraindicated for seedlings, and even adult clematis. It should also not be planted close to the walls of buildings (fences or fences). The liana is not durable - strong gusts of wind can easily tear off flowers or break the stem.
A correctly and timely planted plant will grow stronger over the winter, gain strength, and with the arrival of warmer weather it will begin to delight with large and frequent inflorescences. In the fall, clematis is transplanted or propagated. To do this, divide the bushes or the layering method.
The summer period is used for cuttings of clematis. This is better than purchasing a “pig in a poke” - cuttings from private owners or gardening partnerships with an unknown future. And cheaper too. To do this, choose the period from May to July (the exact period depends on the climate zone).