Phloxes are relatively easy to care for, are distinguished by a huge variety of flowering and the ability to decorate any area. There are several ways to propagate them vegetatively, allowing you to increase your collection of your favorite flowers. This article will answer the question of whether phlox can be propagated by cuttings and will tell you how to carry out such a procedure.
How do phlox reproduce vegetatively?
Experienced gardeners say that the most convenient way is to propagate phlox from cuttings in the summer.
All types of vegetative reproduction have a number of advantages:
- full-fledged flowers grow from small parts;
- the appearance of the mother plant does not deteriorate;
- minimal risk of plant disease;
- A simple technique suitable for beginners.
Phlox Drummond is a wonderful representative of the genus
Therefore, cutting phlox in summer is the best method of propagation.
Types of cuttings and its advantages
Each gardener chooses the method that suits him most. There are main types:
- propagation by stem cuttings;
- leafy;
- root.
The essence of each of them is approximately the same. The difference is in the origin and size of the cuttings used. In any case, propagating phlox from cuttings gives a similar result. Among the advantages of such propagation of phloxes it is worth highlighting:
- from small parts of the plant large, full-fledged phloxes are obtained;
- the decorative properties of the mother plant are preserved;
- This method itself is quite easy and is suitable even for beginners.
It is worth talking about each type of cutting separately.
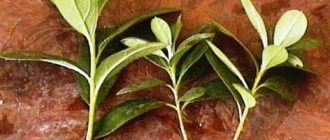
How to propagate phlox from leaf cuttings
How to propagate clematis - propagation by cuttings in summer
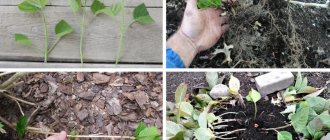
It is necessary to cut the leaf to 10 cm in length. In this case, there should be an axillary bud on a small segment of the stem. The cuttings need to be planted in soil sprinkled with 10-15 cm of sand on top. You need to immerse the plant in the soil while the leaf remains above it.
Important! A prerequisite after planting cuttings is the greenhouse effect. To create it, the box is covered with polyethylene. When the plants take root, that is, after two weeks, the shelter can be removed.
You need to moisten the soil several times a day. A sprayer works best for this. It is important not to let the soil dry out - it should be slightly moist.
Phlox cuttings
The best time for planting and transplanting
It often happens that you really liked the variety of phlox from your neighbors or friends, and they agree to share it with you. When is it better to replant mature bushes, or to plant purchased planting material on the site?
Experienced gardeners do not recommend doing this in the middle of summer, when plants grow very slowly. Summer replanting can provoke an attack by pests on a weakened bush and its drying out.
Phlox tolerate transplantation best and actively develop after it in late April - early May.
Spring is the best time to plant
Also considered a suitable time is the very end of summer until the first days of September, when buds begin to form on the root collars. But before digging, the top of the bushes must be trimmed.
In any case, after transplanting, the plants must be watered regularly, avoiding drying out the root system.
If it is not possible to get the desired bush at a time favorable for planting, then it should not be planted immediately in place, but dug into loose soil to a depth of 25 cm. Before the onset of cold weather, the buried plant should be mulched and planted in the spring.
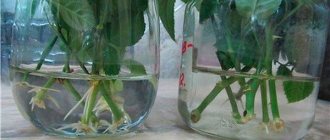
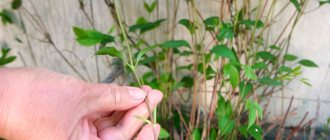
How to propagate phlox from stem cuttings in summer
Propagation of geranium at home, when to plant so that it blooms in summer
Plants are propagated with full stems in early June. The stems chosen for cuttings must be strong and free from disease. They are wrapped in slightly damp newsprint and set aside in a cool place for a couple of days.
After this, the stems are divided into parts. There should be two knots on each segment. Next, the lower leaves are cut off completely, and the upper leaves are left in half.
Propagation of phlox by stem cuttings
The cuttings are placed in a summer seedling box or directly in the ground in rows.
How to grow phlox from stem cuttings
For a week and a half, the plants need to be watered with warm water a couple of times a day. Within three weeks, roots and first shoots will appear. To increase growth efficiency, phlox should be rooted in a bed prepared for seedlings.
Recommendations and common mistakes
In order for propagation by cuttings to result in the production of new viable plants, it is necessary to follow a number of rules and recommendations:
- Planting material takes root better if harvested in cool, cloudy weather.
- In hot weather, stems and leaves for cuttings are cut from phlox growing in the shade.
- Before planting, they are stored in a container where high humidity is created using a wet cloth.
- They are immersed in the stimulant solution for 10 hours.
- Instead of Kornevin, you can use aloe juice mixed with water in equal proportions.
When propagated by cuttings, the roots are planted so that the thick end is located in the soil above the thin one.
Phlox rarely gets sick, but under unfavorable weather conditions and poor agricultural practices, they are affected by fungal and viral infections. In this condition, the plants cannot be used as a mother bush. Inexperienced gardeners make mistakes:
- Water the bushes excessively.
- They are planted in large shade or in a wetland.
- Excessively deepened.
- Disembarkation deadlines are not met.
- They do not pay attention to diseases of the mother bush when collecting material for cuttings.
- Too much fertilizer is applied to the plants.
Propagation by root cuttings
How to propagate gooseberries in spring, summer and autumn
This method is used in extreme cases, for example, if nematodes have settled on the plant, or it begins to rot. The plant must be at least three years old. Propagating phlox by root cuttings will preserve the variety and increase the number of flowers.
Important! The best period for root cuttings is autumn, because at this time there is a large amount of nutrients in the soil.
How to properly cut phlox roots
At the very beginning of autumn you need to remove the plant from the ground. The largest roots are suitable for division. They need to be divided into pieces of 6-7 cm and planted with the thin end down. Then the cuttings are covered with a layer of sand (about 5 cm) and slightly moistened. The box is removed into a room without access to sunlight. Recommended temperature is about 12-15 °C. To stimulate shoot growth, the temperature is raised to 20 °C after 3 weeks.
Phlox root system
When the first shoots appear, the plant is taken outside so that they get used to the warmth. It is important to avoid direct sunlight on the plants.
Towards the end of spring, you can transplant the phlox into the garden bed. You can replant the plant into a flowerbed after a year.
Caring for perennial phlox
These plants are surprisingly unpretentious and resistant to diseases and weather conditions. But for abundant, long and lush flowering, they still need to create certain conditions.
Selecting a location
It is best to plant phlox in areas raised above the general ground level. They do not like damp lowlands with stagnant moisture.
Alpine hill is an excellent place for low-growing phlox
You should choose places sheltered from the wind, in partial shade. Dense shade or constant sunlight is not suitable for them.
You should not plant them under large trees, which will take away nutrients and moisture from the phlox and hide them from the sun. And, of course, you need to take into account the height of the plants and their color, which should be harmoniously combined with other flowers in the flowerbed.
Flowerbed with phlox of different varieties
Soil preparation
The roots of phlox are powerful and branched, but lie at a shallow depth - up to 30 cm. Therefore, it will not be difficult to provide them with the optimal soil composition. It is enough to dig it up on the bayonet of a shovel and ensure a slightly acidic or neutral reaction. Why add 200 g of quicklime per square meter to excessively acidic soil.
For adequate nutrition, a 20-centimeter fertile layer is sufficient:
- Sand should be added to clay soil to make it loose;
- Loam is mixed with ash, mature humus and bone meal at 100 grams per square meter;
Wood ash is a good fertilizer for perennial phlox
- Peat is added to sandy soil.
In addition to this, the plants are moderately fed with complex fertilizers (5 times per season) and watered regularly.
Planting schemes
When planting perennial phlox, you need to leave free areas between plants, taking into account their growth and growth.
- Make a distance of 40 cm between low-growing and groundcover varieties;
- Between plants of average height – 50 cm;
- Between tall ones - from 70 cm.
Keep in mind that the plants will grow a lot over a few years.
Advice. It is advisable to mulch these gaps with chopped straw, dry humus, sawdust or peat to retain moisture in the soil and limit the growth of weeds.
Summer care
All phloxes need is regular watering at the root, periodic loosening and weeding.
It is advisable to water the plants at the roots
To increase bushiness, they can be pinched over 4-5 pairs of leaves. And for longer flowering, fading inflorescences should be cut out in a timely manner.
The best time for cuttings is at different times of the year
Phlox can be propagated at any time of the year, with the exception of winter:
- For propagation in spring, cuttings are harvested towards the end of May. The best stems should be selected. The cut cuttings are placed in boxes with wet sand. Then they are removed to a dark place. After the roots appear, the plant is transplanted into open ground. It is important to find a place where there is no direct sunlight.
- Propagating phlox in mid-July is the best option for cuttings, because the plant blooms best during this period. Cuttings are cut without inflorescences. The best time of day for cutting would be early morning. You can take cuttings every week. When propagated in summer, the plant takes root within 3 weeks.
- In autumn, the plant is cut from mid-September. During this time, phloxes produce a large amount of cutting material. For planting, choose clay soil. The cuttings are placed in a greenhouse to overwinter - this way they are more likely to take root and be ready for replanting next year.
Important! Thus, the best period for increasing the number of flowers is March-April. At this time, the soil is saturated with a large number of nutrients. September is also good due to the abundance of minerals.
Cutting methods
There are several ways to propagate phlox cuttings. Moreover, each method gives good results: the survival rate of this plant is quite high. The choice of method depends on the time of year.
Stem cuttings
This breeding option is used from late May to mid-July. The survival rate of planting material obtained at this time is almost 100%. Please note: stems cut before the budding period, at the stage of active growth of young stems, will take root best. An additional advantage will be their flowering by the end of summer. Planting material can be planted in open ground, a glassed-in veranda or a cold greenhouse. The material is obtained from young shoots, which are carefully cut off. The stem is divided into several parts so that each segment has two internodes. The lower cut should be located under the lower internode. All leaves are carefully removed from it, and the axillary buds are preserved. The top cut should be located 0.5 cm above the second internode. The top leaves are cut in half. After this, the resulting planting material is immediately placed in the ground.
In August - September you can also use this technique. Only, not the entire stem is used as seedlings, but only that part that has not yet become lignified. At the same time, it is better to plant the phlox cuttings obtained at this time in a greenhouse. There they are left to overwinter, and in the spring they are transplanted into open ground in a school for growing. You can even get planting material from a gifted bouquet. For slicing, the upper non-lignified part with two internodes is used. If the bushes are transferred to a greenhouse in the fall, then there is a chance to receive planting material even in March. To begin with, the bush is transferred to a warm room in February and provided with standard care. Within a month, young stems will appear that can be used for cuttings.
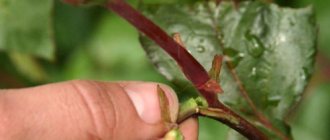
Side shoots
Side shoots of phlox appear in August – September. It is quite easy to cut them: they simply break off along with the “heel”. Such shoots have only 1 - 2 internodes, so there is no need to cut them. They are simply placed entirely in the soil. At first (before rooting), the seedlings require standard care. For the winter, mulching is used in cold greenhouses: young shoots are covered with a layer of dry foliage (up to 10 cm). After wintering, the mulch should be removed, young shoots should be gradually hardened off and transplanted into open ground in May.
Growth shoots
This propagation method is used infrequently. In April, phloxes begin to grow rapidly. If the bush needs thinning, then you can propagate the flower from the resulting cuttings. The procedure is standard: growth shoots are carefully broken off with a “heel” and planted according to the usual pattern. Thus, two problems are solved at once: a heavily thickened bush is thinned out, removing about 50% of the growth shoots, and high-quality planting material is obtained. It is placed immediately on open beds. By the end of summer (with proper care), the young plant usually blooms.
Leaf cuttings
This method is used in mid-summer, when the leaves have fully developed. The technique is quite simple:
- the scutellum 1 cm long, together with the axillary bud and leaf, is carefully cut off with a sharp knife (a blade can be used);
- it is placed in a box with fertile soil and sprinkled with sand;
- the shield is placed vertically, and the axillary bud is buried no more than 1.5 cm;
- instead of watering, the leaf is carefully sprayed with warm water;
- the boxes are covered with glass and kept at a temperature of 25 - 280;
- the greenhouse is opened in the fall, when the seedlings take root and young shoots appear;
- For the winter, the box is transferred to a cold greenhouse, and in the spring the seedlings are transplanted into a schoolhouse.
The survival rate with this method of reproduction reaches 80%.
Root cuttings
This technique is not particularly popular among amateur gardeners due to its labor intensity. It is usually used when it is necessary to divide a bush. The rhizomes of this flower are capable of restoring lost ground stems, for example, after freezing. Therefore, there is a chance to get new specimens from the roots. Usually up to 50% of root cuttings germinate. Another reason to choose this particular technique is the opportunity to save the plant from stem nematodes. Pests do not parasitize the roots, so there is a chance to save valuable specimens. For prevention, the roots are treated with a 0.5% thiophos solution before planting.
The breeding procedure is carried out in the fall. The bush is dug up, and the non-lignified long thick roots are carefully separated from the main rhizome. They are cut into pieces up to 5 cm long. The standard soil mixture for growing these flowers is poured into the seedling box in advance. The chopped roots are laid obliquely with the thick end up. After which they are sprinkled with earth and sand on top (layer up to 4 cm). The boxes are placed in a cold, dark greenhouse and kept at a temperature of +2-30 all winter, not forgetting to constantly moisten the soil.
Towards the end of winter, the box is transferred to a warm greenhouse, gradually increasing the temperature. In March, after the appearance of young shoots, they must be accustomed to light. After the onset of warm weather, the seedlings are transferred to the school for growing. If this method of breeding phlox is planned, then dividing the bush can be done in early spring before the period of active growth. Then you will not need to worry about storing the chopped roots; they are immediately placed in the ground or germinated in a greenhouse. To do this, first the boxes are kept in a dark place at a temperature of 10-150 for about two weeks. Then they are transferred to a warmer place and wait for the young shoots to appear.
A variety of vegetative propagation techniques allows gardeners to choose the most suitable one. From early spring to late autumn, various cutting methods can be used for propagation.
How to propagate phlox by dividing a bush
Only mature bushes, aged 3-4 years, can be divided.
Phlox root division
You need to finish planting phlox before the end of the first ten days of September, otherwise the plant may simply not grow.
The bush is carefully removed from the ground. After this, the stems must be shortened by half. If the roots of the plant are excessively long, then they are cut off to 15 cm. After clearing of excess soil, they are divided into 3-4 parts using a knife or shovel. Moreover, each piece must have at least 8 vegetative shoots, because next spring buds will grow from them.
Important! If the roots begin to dry out, they are placed in water for 7 hours and then planted in the garden.
Varieties of phlox
This plant has more than fifty species, and only one of them, Drummond's phlox, is an annual. However, there are not many evergreen phloxes.
In most of them, during the cold period, only the roots remain viable, and the above-ground part dies off. With the onset of warmth, new stems and leaves grow from the buds.
Phlox bloom very luxuriantly. If you choose the right varieties with different flowering periods, you can admire their beauty for several months in a row throughout the warm season.
The color of the flowers is very diverse from white to purple. Their sizes, petal shapes, and stem height also differ.
Based on these characteristics, phloxes are divided into three main groups: bush, loose-turf and groundcover.
Bush phlox
They are distinguished by the absence of dissections on the petals, and are divided into two subgroups:
- Low-growing - up to 60 cm high. They bloom in May - June. The most popular phloxes are Candy Twist, Adorable, Thick, Hairy.
Phlox low-growing thick-leaved
- Tall - up to 180 cm high. Phlox is distinguished between Spotted, Paniculate, and Smooth. Planted in the background, they decorate flower arrangements in early summer and early fall.
Phlox tall paniculata
Loose turf phlox
These plants rise 30-50 cm above ground level. They bloom from the end of spring for a little over a month. This group includes the shoot-bearing and splayed phloxes.
Phlox splayed
Ground cover phlox
These creeping plants are distinguished by the earliest flowering periods - from April to early summer. They can decorate an alpine hill, a retaining wall, or become a beautiful border for a flower bed.
The most common are Snow, Dwarf, Star, Awl-shaped phlox.
Phlox subulate
This is a rather arbitrary classification, since breeders have created many interspecific hybrids that can form their own groups.
Popular varieties
It is impossible to list and show all the known varieties and hybrids of this plant - there are already more than one and a half thousand of them. When choosing phloxes for your garden, focus not only on the decorative properties and color of the flowers, but also on the height of the plants and the timing of flowering.
Look at photos of some popular varieties among gardeners. Perhaps some of them will appeal to you too.
Pinky Hill
Blue Paradise
Kandy Stripes
Juliglut
Natasha
Bright Ice
Wilson
Tapestry
The Dragon
How to propagate phlox by layering
Mother bushes are covered with moist and loose soil and very often watered abundantly. The shoots that find themselves underground gradually take root and grow. Closer to August, the plant is transplanted to the main bed, where it continues to grow.
Plant propagation is a long and difficult process. You can choose any cutting option that you like best, be it propagation by root or stem cuttings. It is also worth remembering that if phlox is propagated by seeds or other methods, the plant may simply not take root. Therefore, vegetative propagation is the best option since the chances of plant survival are usually 90%.
Do I need to prune when replanting?
Some gardeners recommend cutting the phlox tops at a height of 7-10 cm. This will reduce the evaporation of moisture by the plant through the leaves, and leave it for the needs of the development of the root system. Other farmers are confident that healthy foliage, participating in photosynthesis, will help the perennial to more easily endure the stress of replanting, and there is no need to completely remove it until the first frost.
In any case, damaged, yellow leaves must be removed from the plant.
Excessively long phlox roots are also trimmed when replanting. Their optimal length for a young division is 10-12 cm.
Phlox without trimming @ Lesley, chaoticallycreative.com
When to replant phloxes in the fall to another place, replanting dates
The time it takes to transplant phlox depends on several factors.
Firstly , any phlox is ready for transplantation fifteen days after the end of flowering.
Secondly , it matters where phloxes grow - in what region, in what weather conditions.
Thirdly , any planting work must be completed no later than two weeks before the onset of frost.
Phloxes are replanted starting at the end of August. Such terms are suitable for gardens in the Moscow region, central Russia, and the Urals. If the weather is warm and dry, the deadline can be postponed until mid-September.
In Siberia and the Urals, as well as in the Leningrad region, transplantation is carried out in August.
The air temperature recommended for transplanting phlox is at least +10 degrees, the weather on the day of the work is windless and cloudy. Many summer residents use the lunar calendar to make the work more successful and the bush to take root faster. Lunar cycles compiled by astrologers represent the best time to carry out work.
Gardeners who appreciate the convenience and accuracy of the lunar calendar note that plants grown in accordance with it grow faster, bloom more actively and produce more harvests.
You can get acquainted with favorable and unfavorable days according to the lunar calendar by following the link:
Phlox planting dates:
Fire flower and neighbors
Phlox are beautiful on their own, but some gardeners consider their appearance rustic and group them with other plants. One of these “neighbors” may be silver conifer; the bushes grow well next to low-growing daylilies and roses. In the latter case, the choice of colors is important: the queen of the garden in rich tones will look good against the background of snow-white or soft pink phlox.
Golden rules of landscape design: do not mix plants of cold and warm shades, do not combine several species with variegated, spotted petals. White phlox against a background of dark flowers will most likely “disappear”, but the opposite option, dark against a white background, will look very interesting.
A group of the same color, but in different shades, looks good; the gentle play of plants planted sequentially will create an interesting “carpet” in a single color scheme.
An example of landscape design with phlox.
Diseases and pests
Phlox have difficulty resisting spotting and powdery mildew. Signs of the disease may include spots on the leaves and curling. Diseased plants should be removed and the bushes should be treated with Bordeaux mixture. It can be sprayed on healthy phloxes for preventive purposes in the spring. Plants may also be attacked by nematodes or threadworms. This attack can live in areas where strawberries previously grew. The diseased plant will have to be eliminated along with a lump of earth, the soil will be disinfected with lime.
The following insecticides are recommended for therapeutic and preventive spraying of plants:
samdizajner.ru
Phlox in landscape design
Flowers look good both in single plantings and as part of compositions. The edges of lawns and flower beds and alpine hills are planted with awl-shaped phloxes. Panicle phlox can be used to disguise old borders, water tanks and other unsightly but necessary objects.
Compositions from this plant can be used to divide the garden into zones. If you sow the lawn with phlox instead of grass, you will get a bright colored carpet. Medium-sized bushes are used to decorate garden paths.
Phloxes in the garden. Landscape design example.
What needs to be added to the planting hole?
If you have loam, be sure to add raising agents, because phlox likes to grow in loose, airy soil, where there is a lot of air. In sandy areas, phlox grows faster than in clay areas.
You can add sand, but this is not the best leavening agent; it is best to use compost. All this rotted organic matter will loosen wonderfully.
If you do not have such compost or humus, then you can use some packages from the store. It can be Cialite, Perlite, Vermiculite, all of this is on sale. You can apply fertilizer at the same time by mixing everything.
Any complex granular fertilizer can be added to the planting hole; it can be used with the “autumn” prefix. Someone will say that phloxes are very unpretentious plants and all these additives are useless. But if you still don’t apply fertilizer, then you don’t require such lush flowering from the phlox, so that there are large caps and strong stems. If you add all this and make the soil tastier for them, you will simply be surprised how much your phloxes will change their appearance. They will become strong, healthy, and such plants are less damaged by diseases.
The only exceptions are nitrogen fertilizers; if you overdo them, powdery mildew will torment your phloxes. Therefore, complex fertilizers are preferable to manure, since if you overdo it with nitrogen, powdery mildew is right there, therefore, as mentioned above, rotted compost.
Red phlox. Photo by euhenialove.
Reproduction by layering and... leftovers
The method of propagating phlox by layering is very simple. We cover the phlox bushes high with fertile soil.
After a while, roots begin to appear on the stems covered in this way.
Then, when the roots have developed well, we carefully release the cuttings from the ground, cut them off and plant them in the ground.
There is another method of reproduction, it is even simpler. When digging up a phlox bush for subsequent division or replanting, we trim the roots, leaving a good half of them in the ground, and fill the hole from under the removed bush with fertile soil and water it.
If we carry out this procedure in the spring, then after 3-4 weeks young plants will appear in this place, which have grown from the roots left behind. In the future, they can be dug up and, after dividing, transplanted to a new place. If you start propagating with residues in the fall, then the shoots will appear, of course, in the spring of next year. In August we dig it up, divide it and plant it in a growing bed for further growing.
Seedlings become full-fledged only by the fall of next year.