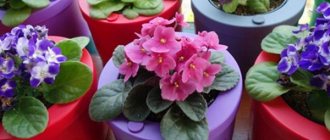
The appearance of violet babies
I have already told you about a simple way to root a violet leaf in water and about transplanting a rooted violet cutting into a cup with soil. After some time, the cuttings will produce babies. You will have to wait from three weeks to three months for new violets to appear. Leaf cuttings can form one to five new plants.
When most violet babies produce several pairs of leaves, they need to be separated from the mother leaf and transplanted one at a time into separate cups. So let's talk about how to separate and transplant the babies.
How I drop the kids off in a cup
When planting, I make sure that the rosette does not go deep into the soil, otherwise numerous side children will begin to grow, which will affect the growth and flowering of my favorite. I fill the roots with soil and lightly tamp them with my fingers. Be sure to carefully water the baby with warm water. How to water planted violets? For one container of 80-100 ml you will need no more than 3 teaspoons of water. You should not overly moisturize, as the delicate roots will not cope with the abundance of moisture and will begin to rot.
The finishing touch is the inscription on the glass with the name of the variety. This ensures that particularly valuable items do not get lost or mixed up.
Transplanting violet babies
My leaf cuttings rooted in water and were planted in the ground on July 16th last year. Each of the two leaf cuttings produced more than two babies.
- Pruning plants (Part 1): is it necessary to prune? Why trim?
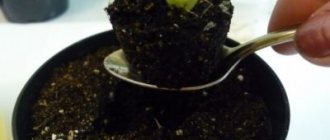
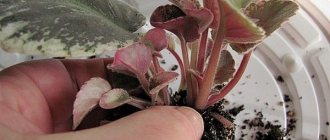
To make it easier to remove the plant, I carefully knead the glass with my fingers and take out the entire bush along with the earthen lump. Freeing the children from the now unnecessary cuttings, I hold the mother leaf with the fingers of one hand by the lower part of the petiole near the roots, and with the fingers of the other hand I immediately separate the entire bunch of young violets.
Now we need to disassemble this bunch into separate rosettes: I take one baby by the base near the roots and try to carefully separate it from the rest. During this manipulation, the lower leaves sometimes break off from the children, but this is not scary: the main thing is that the rosettes with roots are preserved.
Based on the number of rosettes obtained, you need to prepare cups with a volume of 80-100 ml: make drainage holes, put small pieces of foam in the cups, and pour the prepared soil over the drainage layer, filling the cups to three-quarters of the height.
To speed up the rooting of violets, I need a little hydrogel: I make a hole in the center of the soil and put half a teaspoon of swollen hydrogel granules in it, then I plunge the roots of the children into the hole and sprinkle them with soil. The baby needs to be seated so that the center of the rosette is half a centimeter below the edges of the cup.
If there is not enough soil, add it, but do not bury the center of the rosette: it should be above the surface. Now all that remains is to water the planted violet and plant all the others in the same way.
As you can see, there is nothing complicated in the transplant procedure. By the way, it is not at all necessary to put hydrogel in the soil. I used it to speed up the rooting process and provide moisture to the violets. I wish you all success in growing indoor plants.
- Photo of clivia cinnabar
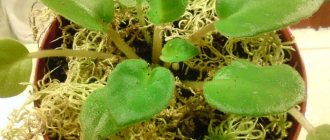
Seating baby miniature violets.
Today I will tell you how to plant miniature violets. This article is for people who are just starting to get into miniatures; there is nothing new here for experienced collectors. I will simply tell you in detail, step by step, and show you how I do it.
The main character of this article is a cutting with children of the Optimara Rose Qartz variety. Many people are afraid of such small plants, but I dare to assure you that there is nothing scary or terrible about it, although the first time I was also very scared: my hands were shaking, my forehead became wet from nervous tension, but then I got used to this size of the children. You never know what you can do till you try. I usually start planting the babies when they have 4 or more leaves. In this case, I was a little delayed, there was no time.
I start by preparing what is needed for seating.
Substrate.
Part 1 – “Green World”
Part 1 - “Elite Vermion” (now it has deteriorated, so I took 0.5 and 0.5 “Flower Happiness” for violets).
After cleaning these 2 parts of the substrate from lumps, sticks and other debris, I place them in a heat-resistant glass pan with a lid and put them in the microwave for 10 minutes. If the soil is dry, then I moisten it a little and press it down. After this, I pour it into a bowl and let it dry for 1 - 2 days.
Then I add it to the bowl
0.25 parts - finely chopped moss
1 teaspoon crushed charcoal
For rooting cuttings and for children
0.5 parts - vermiculite
1 part - perlite
I mix all these components, you should get a very loose, airy substrate.
Next, I prepare a solution with which I water the substrate during all plantings and transplants of violets, both miniature and standard.
For 1 liter of water you need:
1 ml – “Zircon” (promotes the growth of the root system)
1 ml - “Fitosporin” (it protects plants from all kinds of rot). I buy Fitosporin in the form of a paste and dilute it according to the instructions on the package.
It turns out to be approximately the same color as in the cup in the photo.
If you have few plants to replant, you can take less water and dilute the preparations in proportion.
Next I take a 5 cm pot. I stick a regular narrow adhesive plaster on it with the name of the variety and the date of planting. It may not be very beautiful, but it is clearly visible. The kids are all small, especially when you are planting many varieties, so I make the inscription in red for miniatures, blue for semi-minis, and green for trailers.
Then I carefully remove the whole family from the pot.
I separate the mother cuttings from the children.
If you want to get more children, the cuttings already have roots and can be planted back and put back in the greenhouse.
Next, I carefully separate the bunch of kids; you can help yourself with this with a toothpick. It is better to carry out this procedure when the substrate in the pot is a little dry, and not immediately after watering, then the substrate easily crumbles from the roots and it is easier and easier to separate the mother leaf from the children and the children from each other.
Here I got 4 children. But now I leave no more than 3. So, I prepare 3 pots for the children with the inscription.
First I will plant the largest one, with a well-developed root system.
I put moss in the bottom of the pot, about a third of it, and apply it a little.
I add some substrate.
Then, exactly in the middle, I place this small rosette, holding it with 2 fingers, and begin using a coffee spoon (the tool is as small as the plants) to add the substrate from all sides to the very top. You cannot apply or compact the substrate, it must be loose.
Using a soft brush, shake off everything that gets on it from the rosette.
Next, I water the solution until a few drops flow out of the pot.
Now we will plant the baby without roots or with very small roots.
I do everything the same as in case 1, only I pour the substrate to the top of the pot. I make a small depression in the middle, put the baby there and sprinkle it.
After that I water it with the solution. Substrate donkey.
I add as much as needed to the top. And again I water it a little.
Even without roots, the children begin to produce new leaves after 2 - 3 weeks. All 3 children have been imprisoned.
Now a few words about greenhouses. I don’t like the mini-greenhouses that are sold in the store, for the reason that the lower part of the greenhouse is not transparent and the lid does not fit very tightly. In completely transparent greenhouses, light penetrates to the plants from all sides: both from the lamp and daylight. Therefore, if I seat a lot of children, then I take a rectangular cake maker; they come in rectangular, square and round. If there are very few children, then you can take a cut-off 5 liter plastic water bottle.
You can cover it with transparent cling film. If the cake pan has a bottom, and in our case the lid is not transparent, then I also cover it with cling film.
Now let's take the cake bowl
At the bottom I put 4 layers of paper towels, covering the entire bottom, this is necessary so that excess moisture is absorbed into them
Then I put the babies in the greenhouse, close the lid and put them on the top shelf of the rack under the lamp.
You can forget about the children for 10 days. If there is strong condensation in the greenhouse, then I ventilate it a little. If the children in the greenhouse begin to appear new leaves, then it can be taken out of the greenhouse and sent to an independent life. Usually, this happens after 2 - 3 weeks.
I store the remaining soil in plastic food containers with a lid, just in case.
Don’t be afraid to seat miniature children, it’s only scary the first time. Look at these photos. I planted such tiny children, and after 2 - 3 months they were almost adults.
If, especially with miniatures, the children are very small, then you can plant 2 of them in one pot, and then, when they grow up, give each one its own pot.
And this baby already wants to bloom, it is one of the two presented above.
I bought some trailers as cuttings. So, I planted them in the same way, and then, when they grew up in small pots, I planted 3 to 4 of them in flat pots.
If something is not clear, ask.