Hydrangeas have always been a favorite ornamental plant for any style of garden design. They are planted everywhere by gardeners - from hedges to neat potted plants. If you're new to gardening, Hydrangea paniculata is a great flowering perennial plant for new gardeners to grow. They bloom for a very long time, are easy to care for and adapt to a wide range of climate conditions. In this article, we will provide a detailed guide to growing this ornamental shrub.
Description of the flower shrub Hydrangea paniculata
This species was first described in 1861 by Philipp Franz von Siebold, a German physician and renowned plant collector. This flowering shrub can be found in nature in the cool temperate and subtropical regions of Japan, China and on Sakhalin Island.
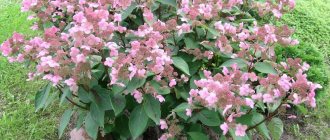
Among the entire species composition of the genus Hydrangea, it is Hydrangea paniculata or G. paniculata that most often grows in the form of an erect deciduous shrub 1.8 - 3 meters high and wide, with curved branches. But some varieties can also develop into a small branched tree 3 - 6 m tall.
The leaves of the plant are dark green, elliptical, 7-15 cm long, located opposite each other on the stem, although whorls of three leaves may form on the branches.
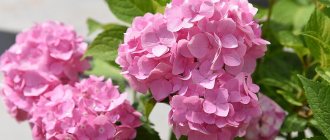
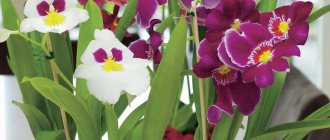
Hydrangea paniculata flowers are either sterile or fertile. Each flower panicle consists of small fruiting flowers of a yellowish-white hue and large showy sterile inflorescences framed by showy petal-like sepals. They change color as fall approaches, gradually turning pink and eventually brown. The flowering season of Gotrensia paniculata is from the second half of summer to September and beyond.
Depending on the variety and season, the colors of the flowers change. The flowers bloom in white or cream, changing to pink or red as the days get shorter and the nights get cooler as autumn approaches. In mid-autumn the petals turn brown and can persist throughout the winter.
Unlike other species of the genus Hydrangea, Hydrangea paniculata changes the color of its flowers due to its natural characteristics, lower temperatures and the maturation of the bush. The color of flowers of this species cannot be changed by changing the acidity (pH) of the soil.
Currently, more than 50 cultivated varieties of this species have been bred in nurseries. Most of them are very popular among gardeners and flower lovers.
Care after landing
The growth and development of the seedling after planting will depend on further care. It's not complicated, but there are a few subtleties you need to know about.
Watering . In autumn, hydrangea no longer needs regular watering. An exception is made only if the weather is very dry and hot. There is no need to over-moisten the soil. If you overwater, the bark on the branches will crack, after which the plant will overwinter much worse or may even die.
Treatment for diseases . To prevent the bush from getting sick and suffering from pest invasion in the spring, carry out preventive treatment. You can start working on it after all the leaves have fallen off the hydrangea. Use a three percent solution of Bordeaux mixture or any fungicidal copper-containing preparation for treatment. Shelter for the winter. Hydrangea can withstand frost. Even temperature drops to -35-40°C are not scary for her. Therefore, there is no need to cover adult plants for the winter.
You just need to cover them with peat. Transplanted bushes, on the contrary, need shelter for the winter. But there is no need to rush to cover young seedlings, as they can resist. Work can begin only with a cold snap or even with the onset of the first frosts. Tie the branches of the bush with twine, then wrap them with spunbond. If the bush has long branches, carefully bend them to the ground and secure them with metal staples. Then the plant is covered with spunbond, and a dense layer of spruce branches is laid on top.
Planting Hydrangea paniculata in open ground
The tree species of Hydrangea is quite easy to grow and can grow in harsh conditions. What do you need to know before planting shrub seedlings?
Soil requirements
This ornamental plant is not picky about the composition of the soil, as long as it is rich in organic matter and well-drained. The shrub can grow well in acidic and slightly alkaline soils. Many inexperienced gardeners often wonder: is it possible to grow Hydrangeas paniculata on clay soils? Yes, provided the soil is well drained and does not remain wet for a long time.
Some varieties may have their own requirements for soil composition. You need to ask the seedling sellers about this.
Lighting requirements
Hydrangea paniculata thrives in a few hours of sunlight, especially during flowering season. In good light, the shrub will bloom beautifully and profusely.
In more southern, hotter climates, it should be provided with shade in the afternoon. The plant is also well suited for light partial shade, but may die in a heavily shaded area of the garden.
Temperature and humidity
These plants have excellent frost resistance compared to many other types of Hydrangeas. During the dry season, it is important to water the plant well to prevent heat stress. Moisture is usually not a problem as long as proper watering is maintained.
You might be interested
The best perennial bush flowers for the garden: features and selection rules
The best 30 varieties of Hydrangea paniculata with names and photos
The best shrubs for hedges
How to plant Hydrangea paniculata seedlings
For planting, it is better to choose three- or four-year-old seedlings. Before purchasing, inspect them for damage to the root system and the general condition of the bush.
Additionally, consult with the seller regarding the growing conditions for this variety.
The optimal time for planting Hydrangea is the beginning of spring, after the end of frost. If your region has warm winters, you can plant seedlings in the fall.
How to properly plant Hydrangea paniculata:
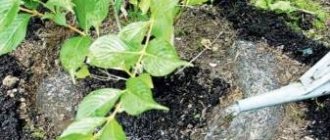
- Dig a hole twice the size of the seedling's root ball. The hole must first be well moistened. If your soil is clayey, it is worth laying a layer of drainage at the bottom of the hole - fine expanded clay will do.
- Prepare an earth mixture by mixing a bucket of garden soil extracted from the hole, high-moor peat (2 liters) and vermicompost (also 2 liters). You can also add hydrogel, which will retain moisture longer between waterings (good for drier climates). Clay soil can be loosened by adding a little vermiculite to the mixture.
- Fill the planting hole halfway with the prepared soil mixture.
- We pull the seedling out of the container and place it together with the earthen ball in the hole.
We fill the voids with our soil mixture. - We compact the planting site, simultaneously forming a depression around the seedling for watering.
- The planting site must be watered abundantly and be sure to be mulched (the simplest mulch option is pine needles or small spruce branches).
- Vermicompost can be replaced with complex fertilizer for Gothensias or for seedlings. You should not add manure or humus, otherwise the root system of the seedlings will rot.
Some gardeners recommend adding fallen pine needles to the planting mixture instead of peat in a 50/50 ratio.
If you want to plant several Hydrangeas paniculata in a row, you need to know the size of an adult plant of this variety. This is necessary to determine the distance between the planting holes. This distance will be equal to the width of an adult bush.
A new way to plant hydrangeas, suitable even for dry places - video
How to grow a gorgeous hydrangea? Proper planting and care. Paniculata and large-leaved - video
By fulfilling all the planting and care requirements of the crop, you can count on lush and long-lasting flowering of hydrangea. If you have not yet planted this shrub on your site, be sure to do so. The majestic caps of inflorescences stay on the plant for a long time and will greatly decorate any corner of the garden; an additional bonus can be the pleasant aroma of some varieties.
Further care for paniculata hydrangea
In the first year, you need to pay a little attention to your bushes until they get stronger. Afterwards it will be much easier to care for them. What you need to know about caring for a flowering plant - read our tips.
Moisturizing Hydrangea paniculata
Woody shrubs do well in slightly moist soil. Be careful not to overwater as this can cause root rot and other diseases. On the other hand, letting the soil dry out too much can cause the foliage to wilt and ultimately damage or kill the plant.
Fertilizer
You should start feeding your flower plants at the beginning of the growing season. In garden centers you can find a well-balanced fertilizer prepared specifically for Hydrangeas, with the addition of microelements necessary for the flower. In spring, you can use fertilizers with a large amount of nitrogen.
Mulching
Spread a 5-7cm layer of organic mulch under each Hydrangea paniculata. Chopped leaves, tree bark or shavings, pine needles, and peat moss are suitable. Mulch will prevent weeds from germinating and help maintain soil moisture. In winter, it will protect the roots of the bush in winter from heaving of the soil, which is subject to alternate freezing and thawing. It is preferable to use pine needle mulch; it will additionally acidify the soil around the plants.
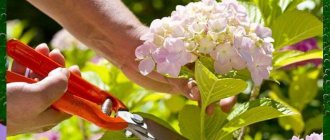
Pruning Hydrangea paniculata
By proper pruning, this plant can be shaped into a small tree or a compact shrub with many flowering stems. Many gardeners choose another option.
In the photo, Hydrangea paniculata in the form of a shrub and tree
How to prune a woody plant?
- Formation of shrubs . Flowering occurs on the current season's growth, so do some formative pruning as needed in early spring. The bush will produce larger clusters of flowers if you thin it back to five to ten main stems, no more. Remove excess side shoots and dead branches.
- Tree formation . To do this, select one main stem. Trim competing stems. Starting at ground level, remove all shoots that grow from the main stem to about three-quarters of its height. Constantly check for shoots at the base of the plant and remove them as they appear. Your main stem will continue to grow along with the foliage above, taking on the appearance of a trunk. It may take two or more years for the tree to mature.
In addition, in early spring we recommend trimming the entire plant to about a third of its total height. You can also remove any thin side branches, as well as any wood that is not showing signs of life.
Transfer
If you need to move the shrub to another place, replanting does not require much effort. This should be done in summer or early autumn. Start by trimming the roots before repotting to reduce the effects of stress.
- A couple of days before replanting, use a shovel to cut a small circle around the stems of the bush, cutting off the longer roots.
- Prepare the planting hole as described above.
- Carefully dig up your bush, trying to minimally disturb the root system. It is not advisable to remove old soil from the roots. Further actions are similar to planting a seedling.
- When repotting, make sure the plant is well hydrated.
Hydrangea paniculata care calendar
- Early spring . If desired, prune as above. Feed plants with a fertilizer high in nitrogen and phosphorus (such as 15-30-15) to encourage growth and future flowering. Finish replanting before the leaves bloom.
- Mid spring . Mulch plants after the soil begins to warm to maintain moisture and reduce ground temperatures. Monitor for powdery mildew and treat if necessary.
- Summer . Regular watering is mandatory at the beginning of summer, when Hydrangea uses the most water. In the middle of the season, hydrangeas begin to bloom. It is worth feeding the bush and monitoring soil moisture.
- Hydrangea paniculata in autumn . Flowering is over, but brown flowers still remain on the stems. Here you can decide what to do next - cut off the faded stems or leave them for the winter, bringing zest to the winter garden. There is no need to fertilize.
- Winter. If your shrub blooms in the first year, it is advisable to cut off all faded inflorescences so that the young stems do not break under the weight of snow.
Photo of a bush with dried flowers in winter (flickr.com)
Before winter frosts, you need to mulch the roots with pine needles or spruce branches.
General information on care requirements
- Flowering: from mid-June to October from four to five years of age.
- Planting: in spring before buds ripen or in autumn.
- Lighting: bright light or partial shade.
- Soil: fertile, neutral, without any admixture of lime or other alkalis, clay soils or red soil are preferred.
- Watering: abundant and regular, the soil at the base of the rhizome should be moist all the time.
- Fertilizers: fertilizers are applied 4 times per season: in early spring - organic matter with a high nitrogen content, during budding and in mid-summer - full mineral fertilizer, and in autumn - potassium-phosphorus fertilizer.
- Pruning: sanitary and formative pruning is often carried out, and, if necessary, rejuvenating pruning, at the end of March.
- Reproduction: most often by layering and cuttings, less often by seeds.
- Pests: aphids, spider mites, root-knot nematodes, snails.
- Diseases: white and gray rot, powdery mildew, peronospora, septoria, chlorosis, ring spot virus.
How to care for paniculate hydrangea?
In general, the plant is unpretentious. Grows well in environmentally unfavorable areas. It is not afraid of swampy and clayey soils. The shrub feels great in the shade and under the scorching rays of the sun. The bush is suitable for cultivation in any climate. Increased frost resistance allows you to grow flowers in the conditions of the Russian north. Some varieties can withstand temperatures down to -30 degrees.
How to propagate Hydrangea paniculata
The best option is cuttings. The branch should be free of flowers and ideally at least 15 cm inches long. Remove leaves from the lower half of the stem.
- Fill a container with drainage holes with a soilless mixture of 80 percent moistened peat moss and 20 percent perlite.
- Dip the cutting in rooting hormone powder and stick it into a pot of well-drained potting mix.
- Stick the cutting into the pot 5 cm deep. Cover the pot with film to maintain the microclimate in the container, but make sure that the cover does not touch the cutting itself. Stick a few sticks around the cuttings in the pot so that the covering does not touch the seedling.
- Place the pot in a warm place with indirect sunlight. Keep the potting soil slightly moist.
- Hydrangeas take root very quickly; within two to three weeks the cuttings should send out roots into the ground.
- Keep rooted plants indoors or in a greenhouse during their first winter.
- Next year, take the plants outside for the spring and summer and don’t forget to water them. Bring them back indoors for another winter before the first frost.
You can confidently plant them in the garden in their third year, in spring or fall.
Summer cuttings are also practiced, in which the cuttings are planted directly in open ground. You can learn more about this type of propagation and some tips for indoor propagation in this video
Reproduction by lateral branches
- Select a healthy branch from the outside of the bush and bend it to see if it reaches the ground.
- Remove leaves where the branch will touch the ground. Carefully remove the bark of the branch with a knife where it touches the ground.
- To speed up the rooting process, sprinkle the cleaned area with Kornevin.
- Dig a small groove 7 cm deep in the ground. Gently bend the branch to the ground and place it in the groove, pressing the end with a stone or something heavy.
- Cover the branch with soil, leaving the top exposed. Leave the cuttings alone to allow the roots to develop and don't forget to water.
- When signs of rooting and new growth appear, the branch can be cut off from the parent bush.
Separating a young plant from its parent can be a shock to the seedling, so leave it in the ground for a few more weeks until it is at least 10cm tall. After separating the young shoot, you can dig it up for replanting.
Reproduction
Hydrangea propagation can be done in the following ways:
- Seeds.
- By cuttings.
- By layering.
- Offspring.
Let's take a quick look at each of the methods:
- Hydrangea seeds do not require pre-sowing preparation, so they can be sown immediately in seedling boxes. Seeds should not be planted in the soil. Immediately after sowing, cover the box with glass or plastic wrap. At the same time, of course, do not forget that the soil must be moist. We are waiting for the sprouts and carrying out further planting in the ground. Planting paniculata hydrangea in open ground from an indoor pot in the summer is done in the same way.
- The simplest and most successful method of propagation is cuttings. In most cases, semi-lignified cuttings are used for this purpose, and summer is considered the most successful time for cuttings. However, you can also cut paniculate hydrangea in spring and autumn - only in this case woody cuttings are used.
- Many gardeners propagate hydrangea by layering, but this method is relatively unproductive. To do this, you need to bend the young outer flexible branches from the growing bush and pin them to the ground (in a hole 15 cm deep) with brackets, tying the ends of the branches to pegs.
- Offshoots or children are side shoots that the plant sends out from the buds near the root collar. They are in the ground, so they quickly grow roots. Their upper part sprouts near the mother bush and soon turns into a young plant. The offspring that appeared this year can be separated from the adult bush in the fall before the onset of frost. But they are not planted in open ground, but grown in pots and only planted in a permanent place in the spring.
In all of the above cases, when planting in the ground (except for seed propagation), at the very bottom of the hole, on the underside of the shoot, you must first make an oblique cut several centimeters long and insert a match into the cut. This tissue damage will accelerate the formation of roots in this area. All that remains is to sprinkle the bases of the shoots with a light mixture of soil and peat, regularly moistening the soil.
Diseases and pests of Hydrangea paniculata
The most likely disease that can appear on a shrub is leaf spot. It is caused by a fungus. Although the foliage may look unsightly, spotting does not harm the plant. This disease only appears in the leaf tissue, so after the leaves fall in the fall, it no longer affects the plant. Be sure to remove fallen leaves from the area (fungal spores will overwinter on them).
Pests
Insects generally rarely attack Hydrangea, although some beetles may nibble on the leaves. They usually do not affect flowers, and small numbers of insects feeding on leaves are not a problem. You may notice minor slug damage to leaves, which is recognizable by the irregular, uneven appearance and slime on the leaf surface, especially on young plants.
Pest and disease control
Hydrangeas, like all plants, can be affected by various diseases and pests. If the owner of the garden wants to have healthy, flowering plants, he must take care of medicines for them.
What diseases can affect paniculata hydrangea, and what remedies can be used against them?
Powdery mildew on hydrangea leaves
The most common disease of this plant is powdery mildew .
To rid him of this scourge, you need to use a solution of foundationazole with water, in proportions of 20-25 g per 10 liters. Another remedy is Bordeaux mixture 80-100 g per 10-12 liters. water.
Another scourge of hydrangea is aphids .
Regular garlic, from which the tincture is made, will help cope with it. The process of its preparation consists of crushing 250 g of peeled garlic and pouring 8-10 liters of water. The tincture sits for two days, then add 50 g of softened laundry soap, mix well - and the medicine is ready.
You need to spray the plant with this mixture once a week until there is no trace left of the pest.
All parts of hydrangeas contain cyanogenic glycosides - toxic substances. Be careful when handling these plants.
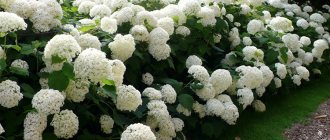
Hydrangea paniculata in garden landscape design
Due to its frost resistance, this plant perfectly complements the landscape at any time of the year. He continues to delight us with flowers, even when other plants have already faded.
The plant can be shaped into a large tree and used as a focal point. Shrubs can be used as hedges. Hydrangea goes well with other perennial flowering plants.
Beautiful cone-shaped flowers will also be a wonderful addition to any bouquet, either in a composition with other flowers or alone.
Step-by-step instructions for planting hydrangeas in the fall
In order for hydrangea to take root after autumn planting, it is recommended to use step-by-step instructions, which involve sequentially performing the following steps:
- choose a suitable place for planting, given that in sunny areas the plant quickly fades and is dangerous for children and animals, as it can cause an allergic reaction;
- dig a hole;
- apply fertilizer by adding a soil acidifying agent: vinegar solution or sulfuric acid;
- pre-water the seedlings in pots;
- in a hole, make a mound from a mixture of soil, humus, sand and peat and plant a seedling, so that the soil reaches the level of the root neck;
- compact the soil around the seedling, adding a little soil after the soil settles;
- water the plant;
- mulch the hole using sawdust, peat or coniferous tree bark.