- October 20, 2018
- Flowers
- Elizar Krivov
In almost every house on the windowsill you can see a colorful and bright plant - the indoor violet, which is also called Saintpaulia. This plant blooms every spring with delicate, elegant flowers, and the palette of colors is so rich, varied and deep that it amazes with its beauty. Violets do not require special care and do not cause allergies. They fit perfectly into any apartment interior. To make these indoor flowers pleasing to the eye and bloom for a long time, you need to know just a few rules. How to grow violets yourself?
Temperature, humidity when growing violets
The indoor violet is a flower that loves warmth. The most ideal temperature for its growth will be from 20 to 25 degrees Celsius. In such conditions it blooms and grows profusely. If the temperature is above thirty, this can have a detrimental effect on the flower. It will become dull, the flowers will become small. If you have a purebred violet growing on your windowsill, then the characteristics of its variety will disappear.
To lower the temperature in the room and prevent the flower from dying, you should resort to all known methods and tools that you have at hand. For example, turn on the air conditioner or use a fan. Or resort to the simplest method - ventilate the room.
Violet is a flower that does not tolerate sudden changes in temperature, scorching sun and cold drafts. As for keeping violets in the winter, at this time the temperature in the room should be from 16 to 20 degrees, but not lower.
To create good conditions for growing violets at home from leaves, you need to pay attention to the natural conditions in which the flower grows. And these are warm regions with high air humidity. If the indoor microclimate is dry, then it is best to purchase an air humidifier. It is inexpensive and does not take up much space. It is not recommended to spray violets. Such moisture can cause fungal disease in the plant.
Reproduction by leaf fragment
This method is used for rare species or when the leaf blade is damaged. To prevent the disease from spreading further, the leaf is removed. All rotten areas are removed, and a healthy piece can be planted.
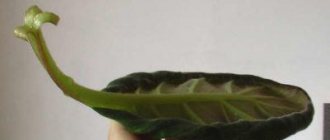
Selecting a leaf and preparing for germination
For propagation, a horizontal cut is made on the top of the leaf. Before planting, the resulting material is left in the air for 10-15 minutes to stop the juice and the cut area is treated with charcoal.
Optimal conditions for germination
For quick rooting, use a “breathing” substrate. The room temperature should be maintained in the range of 22-25 ℃. Illumination of plantings for 12 hours is a prerequisite for high-quality planting material.
Stages of work step by step
Part of the leaf should be planted in light perlite soil. The cut is deepened by 1-1.5 cm. To maintain the required humidity, the container with the planting is covered with polyethylene or glass. The method allows you to quickly obtain a large amount of planting material, from which many seedlings will then grow.
Note! The growth of a baby occurs from each vein of a violet leaf
Aftercare
Caring for plantings involves timely watering and creating the most comfortable conditions. Failure to comply with the temperature regime can lead to the falling of inflorescences, and subsequently to the decay of the species.
Which lighting should you choose?
Both natural and artificial lighting are perfect for violets, but it should be diffused, since direct sunlight is detrimental to the leaves of the plant. They burn out and fall off. In order for the violet to feel comfortable and grow, the daylight hours for it should be from 10 to 14 hours. If you grow Saintpaulia with thick and dense leaves, then the daylight hours for it should be longer.
If a situation arises when it is necessary to extend daylight hours, it is better to resort to the help of artificial light sources. Fluorescent lamps, LEDs, and so on are ideal for this. Just remember to rotate the plants to avoid bending. In this case, the bushes will be compact, dense and attractive.
Possible problems
In order to understand why there are problems with the root system, let’s figure out what could be the cause and how to fix it.
| Signs of the disease | Causes | Solution |
| Root rotting - wilting, loss of turgor. |
| How to save a violet if the roots have rotted, what to do and what is not recommended:
|
| Vascular bacteriosis - the appearance of brown spots on the leaves. |
| By controlling the temperature and timely application of fertilizers, the plant will recover within a year. |
| Late blight - if the plant withers, while the soil is moist. |
|
|
| There are white grains on the roots - the plant is infected with scale insects. | Buying an infected plant. Distributed through a common tray. They love light, breathable soil. It is quite difficult to detect due to its similarity to perlite granules. | Treat 3 times every 10 days with the drug:
Carefully monitor the condition of the plant and inspect the ground for the presence of scale insects during replanting. |
How to choose a violet leaf?
The viability of the future plant directly depends on the choice of planting material. Professionals in growing indoor plants do not recommend taking leaves located at the base of the flower (the lowest ones) for propagation. Ideal leaves would be taken from the middle of the bush.
Experts also advise placing the planting material in warm water with potassium permanganate before planting. This must be done so that the leaf comes to its senses and complete disinfection occurs. After this treatment, the leaf trunk is carefully trimmed. Here you need to leave a trunk 3 to 4 cm long from the base of the leaf.
Why might you need to rejuvenate a violet?
Over time, violets (another name for Saintpaulia) lose their decorative appearance, because plants, like all other living organisms, tend to age
It is important to know how to renew a violet. After all, only the first 2-3 years will delight Saintpaulia with abundant flowering
Blooming violets decorate our lives
The leaves of the lower tier of young plants live only 1 year. Then they curl up and die. The stem may become bare and woody. The inflorescences become small and inconspicuous, the former beauty disappears.
All this suggests that the violet is far from young, it’s time to renew it. This old lady can get her second wind. And if rejuvenation is carried out, then Saintpaulia will again delight with abundant flowering.
Only young violets delight with large flowers
Beginning flower growers have a question: how to prune a violet so that it blooms more? Leaves are cut with scissors or simply removed by hand without waiting for them to dry. If the violet has grown greatly in the pot and has become lush, such pruning is very useful: it promotes abundant flowering in the future.
Another good question: should you pluck the bottom leaves of violets? If the leaves are juicy and fleshy, this will not cause harm. But if the plant is weak and the leaves are already old, then the conditions are unsuitable. Saving leaves or, conversely, cutting them off will not help. An emergency transplant or taking a healthy leaf for propagation is needed.
Attention! The older the violet gets, the more it becomes like a palm tree, which has a bare stem and a flowering crown.
Growing violets in water
How to grow violets in water? It's a simple process. Growing violets at home from leaves is a rather labor-intensive process, but as a result you will get a beautiful and healthy plant. The leaf that is selected for violet propagation should be placed in a container of water as quickly as possible. The liquid must be either well settled or boiled. Only in such a liquid can the condition of the plant be clearly visible; this will allow timely care for it and observation of the formation of rhizomes.
Before placing the flower in a container, the latter should be washed well, or better yet, sterilized. To avoid the formation of mud and algae, you should use bottles with dark glass.
Rooting of leaves occurs according to the following scheme:
- Bury the leaf in a container with liquid by 1-2 centimeters.
- The cutting should not come into contact with the walls of the vessel; for this, the sheet is secured with paper or a plastic lid.
- Be sure to add 1 tablet of activated carbon to the water. It helps fight pests and fungi that may form in the water.
Violet roots begin to appear after two to four weeks, depending on the plant variety. If rotting of the cuttings occurs, then the place with rot is carefully cut off. Next, dry the plant a little and place it in liquid. When the roots become stronger, the violet is planted in the ground.
Features of growing different species
Variegated
They have variegated leaves and look decorative even without flowers.
This variety is more whimsical than the usual Uzambara violet.
This is expressed in the presence of additional requirements on how to raise these capricious beauties at home:
- It is better to propagate by children rather than cuttings;
- does not like high nitrogen content;
- They bloom most often in the 2nd year;
- requires a lot of light due to lack of chlorophyll in the leaves.
Fragrant
This is a perennial plant , found naturally in forests and on mountain slopes.
Features of growing in a garden plot:
- prefers sunny or slightly shaded areas;
- loose and slightly acidic soil is required;
- has a strong pleasant aroma;
- propagated by seeds and vegetatively.
Fragrant violet.
Horned
It got its name because of the horn-like shoot behind the flower. Horned violet can be grown both at home and in the garden :
- flowering from spring to late autumn;
- moderate watering;
- in central Russia it can winter in the ground;
- has a wide range of colors.
Planting a violet leaf in the soil
Now let's look at how you can grow a violet by planting leaves and stems in the soil after propagating it in water. To make the plant feel comfortable, you should use small containers to fill with soil. Let's look at this process step by step:
- Stage 1. It is necessary to fill the container 1/3 with drainage, then cover it with earth.
- Stage 2. Plant the leaf with roots shallowly in the ground.
- Stage 3. The soil around the leaf should be compacted and watered.
- Stage 4. Cover the violet with a plastic bag (under the bag the plant will live until the cuttings form shoots).
- Stage 5. Young violets are planted in different pots.
Now you know how to plant a violet leaf in a pot.
How to plant in a pot?
When transplanting, it is forbidden to touch the root system of a young crop. It is recommended to completely remove the cutting from the temporary container with a clod of earth and plant it in ready-made moist soil with a dug hole. The width and depth of the planting hole are equal to the dimensions of the previous pot.
If several daughter rosettes are formed at the rooting site, each of them should be transplanted in turn. The appearance of a large number of children occurs when choosing a strong cutting. Each future rosette should grow at least 2 leaves and grow to 2-5 cm in diameter. Only after this can the procedure of separating daughter plants from the cuttings be carried out and then planting them in the ground.
Let's consider the method of separating the baby. On the mother cutting, using a sharp knife, cut off the baby with developing roots and transplant it into a ready-made container with loose soil. The remaining shoots are cut off as they develop.
Growing violets from leaves in soil
If you adhere to the opinion of experienced flower growers, they advise planting violets directly in the ground, as the plants are stronger and more resilient, and they also produce more children. How the process of growing violets occurs is discussed below.
To make it easier to plant violets in the soil, you can buy synpolia soil at a specialized store. The following disintegrants must be added to it:
- Styrofoam;
- vermiculite – perfectly loosens the soil and absorbs moisture;
- sphagnum moss;
- perlite is the main one, it is always used in growing violets.
Rooting of violets in the soil occurs according to the following scheme:
- The stem of the leaf must be pulled to the side and broken, then it is cut off at an acute angle.
- It is necessary to release the stem and leaf into the manganese solution for a few seconds.
- Then leave to air dry for about thirty minutes.
- A disposable cup is filled with warm, moist soil.
- Plant the violet leaf and stem and compact the soil around it.
- There is no need to water the plant.
- It is worth covering the glass with the flower with plastic wrap. Watering is carried out once every seven days. In order for the violet leaf to take root faster, it does not need to be fertilized additionally.
Everything about violet roots: photos and descriptions
Violets react sharply to improper watering and poor-quality soil, so special attention should be paid to the roots.
They are located on the surface of the substrate, not growing much in depth. Healthy roots should be white or white-yellow in color without any plaque. Below you can see what a healthy violet root system is.
Photo of the root system.
If your violet's roots are light brown, but the violet looks healthy, this means that the roots are not damaged, but they are finishing their life cycle. But if they are dark brown or black, the plant needs to be saved.
Stages of development
Under natural conditions, violet roots are located on the surface of the earth , between stones and in rock crevices. Under such conditions, the plant is often damaged.
At the same time, survival requires quickly growing new roots to obtain nutrients and continue life. Old roots die off.
By growing violets in a limited space, we artificially prolong the life of old roots.
But still, as the plant itself matures, the root system, which has a short lifespan, is also renewed.
As the lower leaves die off on the stem, you can notice the formation of a new root system.
IT IS IMPORTANT TO KNOW! Obsolete roots are not able to fully absorb incoming nutrients.
It is also possible to artificially rejuvenate the roots, which will have a positive effect on the growth and development of the plant. To do this, the violet is replanted at least 2 times a year with the removal of old roots.
Separation of children when propagating violets from leaves
After the children appear at the base of the violet stem, they begin to replant it. Small plants are divided so that each baby has at least two leaves and approximately an equal number of roots.
To avoid injury to the violet before separating the children, the ground needs to be watered. As can be seen from the article, if you follow simple rules by planting a violet leaf in the soil, you can get a strong plant. It will delight its owners with beautiful flowers and healthy foliage.
This article discusses two methods that answer the simple question of how to grow a violet from a leaf. Maintaining order will give you strong plants, but you decide for yourself which method of growing violets from leaves to choose. Both methods are good and do not require special knowledge and skills. The main thing is not to rush and follow all the points one by one.
A few more nuances that answer the question of how to plant violets with leaves:
- When planting a plant in the soil, do not forget to make holes in the bottom of the container so that excess moisture can be drained out freely. This must be done to avoid rotting of the plant’s root system.
- The film must be removed periodically to ventilate the planted plant.
Various ways to propagate Saintpaulia
Despite its external fragility, violet is considered an unpretentious flower, so it reproduces easily and quickly. Even the most inexperienced gardener can achieve success in this matter.
Violet reproduces in several ways:
- One of the simplest and most common methods is propagation by leaves.
- A method that is used less frequently, but quite popular, is propagation using stepchildren. Some types of violets can reproduce only by this method, for example, chimera violets.
- Reproduction using peduncles is used quite rarely. If the peduncle is cut correctly, it is possible to obtain young shoots.
- The seed method, which requires special knowledge and skills, is therefore used by specialists to develop new varieties. By crossing different plants, breeders manage to obtain the most unusual color shades and flower shapes.
- The most accessible and well-known method is the propagation of violets by shoots from leaves. After mastering this method, you gain access to more complex manipulations with plants. This method allows you to get a flower with the same shade of petals. The plant adapts quite quickly, actively grows and soon produces the first buds to delight with its flowering.
Popular articles Blue Mountain spruce
The optimal period for the propagation of Saintpaulia is spring and summer; it is at this time that the plants actively grow and form young shoots. In order to get healthy children, you should choose a strong plant without signs of damage or disease. The healthier the mother plant, the stronger the offspring will be.
When is the best time to replant violets?
If Saintpaulia has begun to bloom worse, and its stem in the lower part has become noticeably bare, it’s time to think about replanting. When growing on a windowsill, without additional lighting, it is advisable to have time to transplant the rosettes before active spring growth begins, that is, in December, January or February. February can be considered the deadline for transplanting violets, since in March the day becomes equal to night and timely transplanted plants are ready to bloom again. Violets grown on a rack with additional lighting can be replanted at any time. Even flowering rosettes. You just need to remove all flower stalks and buds at least a day or two before.
What is the right pot for violets?
We still hear discussions about the benefits of ceramic pots and the dangers of plastic pots. Without debunking myths, I will say that real professionals use ordinary, lightweight and, as a rule, inexpensive plastic pots.
As for size, for miniaturists this issue is practically not worth it - mini-varieties of Saintpaulia do not need successive transfers from a smaller pot to a larger one as they grow. They are transplanted into pots of the same diameter in which the violets grew before. Some people gravitate towards very tiny containers with a diameter of 5 cm, but I prefer standard “tall” pots with a diameter of 5.5 cm. Despite the fact that the difference in diameters seems insignificant, the volume of such pots can differ by a third.
The maximum size for semi-miniature violets can be considered 6 cm (the volume is 60% larger than with a diameter of 5 cm). In such pots it may be easier to maintain uniform soil moisture, but the rosettes may grow larger, which will be their disadvantage.
What do the roots of Saintpaulia tell you?
Transplanting violets (Saintpaulias) is an excellent time to inspect the root system. Based on its condition, you can analyze its care and understand whether the mixture for planting was prepared correctly last time. The most common mistakes that can be identified at this stage are too large a pot, excessive watering and a lack of cultivators in the soil mixture. Ideally, the lump of earth should be completely penetrated by thin roots, and the living white tips of new growing roots can be visible on its outer part. If on the third day after watering the soil remains excessively wet and pieces fall off the roots, which are difficult to identify, or the soil has a characteristic sour smell, this is a signal to change the care regimen. In this case, it is better to use not a traditional transplant, but complete re-rooting.