Daylily is a real decoration for any flower garden. Nowadays you can see it more and more often in public areas. With proper and competent care, it will delight others with luxurious flowers for a long time. But since it is a perennial, from time to time it needs to be transplanted to another place. Therefore, novice gardeners sometimes have a question about when to replant daylilies, so that the replanting takes place as unnoticed as possible.
The daylily is very similar to the lily, but there are also many differences. It has a wide range of sizes, shapes and colors. Perhaps there is no shade that was not present in its color scheme.
How to choose the right place to transplant daylilies
In order for daylilies to take root in a new place, choose it correctly:
- The plant loves the sun. Find an area away from large canopy trees or lush bushes. It shouldn't be in a low place. But for daylilies with dark buds - purple, violet, burgundy - slightly darkened areas are also suitable;
- The plant does not like places with high groundwater levels. Therefore, a drainage layer is needed at the planting site to avoid stagnation of water;
- Perform a soil analysis correctly (see the paragraph on the soil requirements of daylilies).
Features of seasonal transplantation
When to replant gooseberries to a new place
When can you divide daylilies and plant them? The answer is very simple: when the need arises.
Daylilies can be transplanted at any time of the year, except for snowy and frosty winters.
Well preparation
For your information! Transplantation can be combined with reproduction.
Transplantation in autumn
When transplanting daylilies in autumn, it is important to choose the right timing, since:
- the bush needs time to take root before frost;
- Planting too early will not allow the plant to recover from flowering and store nutrients.
Note! Plants take root for at least 3 weeks.
The advantage of autumn replanting is the opportunity to choose suitable plants. In autumn, flower buds appear on the bush; they are clearly visible and it is easy to avoid damaging them when replanting.
The renewed daylily will bloom next season.
Nuances of summer transplantation
Before replanting a daylily in the summer, you need to remember some rules that will help the bush comfortably survive the “moving”.
Summer replanting has almost no effect on the well-being of the bush. You should try not to disturb the root system of the plant by pulling it out with a clod of earth. You should limit yourself to simply trimming the rotten roots and sprinkle the sections with ash. Dividing the bush in summer is not recommended.
At high air temperatures, it is better not to touch the daylily. The transplant is carried out in cloudy weather or in the evening.
Important! When it is possible to replant daylilies in spring or autumn, it is better to abandon the summer procedure.
Spring transplantation of bushes
The advantage of spring transplantation is that cuttings with a developed root system begin to bloom in the same year, and their survival rate is high. An undeveloped root system will allow the bush to bloom only next year.
When asked about the timing of transplanting daylilies, when is it best to do this, preference is given to spring work. Their advantage is that the seedling has a lot of time to settle into a new place.
The division of bushes is carried out when the soil has sufficiently warmed up, this is the end of April - beginning of May. The shovel should go into the ground with a bayonet in order to easily dig up the rhizome of the entire bush. After inspection, the rhizome is divided into parts, slightly shortening healthy roots and cutting out rotten ones. The resulting seedlings can be stored for a month before planting.
Transplanting a blooming daylily
When the daylily blooms, it can be replanted. When transplanting, the flowering plant will in any case receive stress. To alleviate its condition, the daylily should be watered abundantly and then dug up with a large lump of earth, in no case dividing it into sections. In a new area, the bush is covered, for example, with lutrasil for 2 weeks, and the soil moisture is maintained.
To ensure rooting, you will have to sacrifice stems and peduncles. They take a lot of strength from the bush, leaving no vital energy for rooting. The stems are trimmed at a distance of 15 cm from the root collar.
The appearance of young leaves means that the plant has taken root in a new location.
When and how to transplant a daylily depends on the climatic factor, the need for the procedure and the desire of the gardener.
What you need to know when growing daylilies in one place for a long time
- If you decide to grow daylilies in one place for a long time, then you need to prepare the place according to the 40*40cm or 60*60cm scheme;
- Dig a hole twice the size of the root ball and add loose soil to the center. Spread the roots and place them in loose soil. If the roots are too long, you can trim them to 15 centimeters. Sprinkle with soil and compact lightly. The root collar of the plant should rise a couple of centimeters above the ground;
- After planting the bush, you need to water the ground underneath it generously; the plant should be watered daily for 14 days, then as the soil dries out. And after a month, add mineral fertilizers.
The plant loves the sun
Care
We will learn further how to care for daylilies after transplantation.
After the procedure, it is important to provide the plant with the most favorable conditions for rapid rooting. The daylily needs to be watered daily over the next two weeks. High soil moisture promotes rapid adaptation. In the future, watering is carried out less frequently - only as the top layer of the substrate dries.
After watering, loosen the soil to provide air access to the roots.
A month after transplantation, mineral fertilizers containing nitrogen dissolved in water are applied. Feeding will help the flowers turn green faster and grow lush foliage.
When is the best time to transplant and propagate daylilies?
The most suitable time for transplanting and dividing daylilies is spring, the period of leaf growth, and autumn (in this case, you should not delay replanting, since the plants need time to take root).
If necessary, replanting is permissible at any time during the growing season, with the exception of very hot weather.
Bushes with large roots, transplanted in the spring, will bloom this season. If the root system is weak, then flowering can only be expected next summer.
Even flowering bushes can find a new home. If you want to move daylilies in the summer, during flowering, do not cut off the rhizomes or divide the bushes. This traumatizes them. Carefully remove only the rotten roots and treat the cuts with ash.
The autumn deadlines depend on the variety and climate zone, the range is from mid-October to mid-November.
It is better to do spring and summer transplants in the evening, and autumn ones - during the day, as the air becomes cooler.
Recommendations
Recommendations from experienced gardeners will help the daylily to take root well in a new place and delight with beautiful flowering for more than one season.
Here are 13 tips for replanting daylilies.
- If you decide to plant a daylily in the shade without finding a better place for it on the site, you cannot expect the flowers to demonstrate their high decorative qualities. But for dark varieties, relative shade will not be an obstacle to beautiful flowering. If the result is not satisfactory, look for a sunny area. Regarding daylily, flower growers say that the lighter the plant variety, the more sun it needs.
- You should not plant daylilies in low-lying areas. The fact is that flooding on it is not uncommon, and this leads to rotting of the roots of the plant. But it also happens that there is simply no other place on the site, in which case it should be strengthened with drainage.
- A slightly acidic substrate will provide the daylily with good flowering. Neutral will also work. Saturate the soil with organic matter to keep the soil fertile. The daylily will be grateful to such soil and will delight you with bright, lush buds.
- The best soil for the plant is loam. Sandy loam is also suitable, but with the condition of introducing nutritious humus.
- Do not carry out replanting work during the day - active sun, even such a patient plant as daylily, can lead to stress. In the evening, in cloudy weather, or early in the morning, the transplant will be successful.
- If the climate in the region is harsh or there are forecasts for a cold autumn, do not delay replanting; do it in August.
- After transplanting, do not skip watering. Even if there is no drought outside, the weather is moderate, still water the transplanted bush every day. Do this daily for two weeks, you can extend this period to 3-4 weeks with rare skips of watering. If the soil moisture is high, the plant will quickly adapt to the new location.
- After watering, be sure to loosen the soil - this will provide air access to the rhizome.
- A month after transplantation, the daylily needs to be fed with a mineral fertilizer containing nitrogen.
- Flowering shrubs are replanted only if it is absolutely necessary. For example, construction is underway on the site, and the safety of the flowerbed is at risk. Of course, you can’t wait for the daylily to take root well during flowering. At this time, the plant spends energy on forming flowers, and there is simply no energy left to adapt to new conditions.
- If the transplant takes place during flowering, and you cannot bear this moment, then you will have to sacrifice the flowering stems of the daylily with buds. This will give the plant strength to adapt. Cut the stems 15 cm from the neck of the rhizome.
- Monitor the condition of the flower after transplantation. The fact that it has successfully taken root is eloquently indicated by the appearance of new greenery.
- Daylilies tolerate even strong gusts of wind well, so there is no need to install supports for them unless absolutely necessary. Even newly transplanted flowers rarely need this.
If all the recommendations are followed, all the rules are studied, neither the algorithm nor the timing of transplantation are violated, the flowers will definitely take root. The plant can be called modest and unpretentious; it can withstand drought under certain conditions, and can also withstand frost.
But you shouldn’t attribute everything to its durability: help the flowers, protect them from external aggressive conditions, and they will not refuse to bloom beautifully.
See below for more information on caring for daylilies.
Methods for propagating daylilies
Dividing the bush
1 Scheme for dividing a daylily bush; 2 Scheme of planting a division.
Option 1
Dividing the bush is the easiest way to propagate daylilies. It is used for daylilies 5-7 years old.
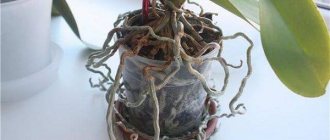
To do this, dig up the daylily, carefully shake off or wash off the soil.
Very old specimens are dried in the shade for 24 hours and then cleared of soil. The roots are carefully separated by hand so that each division has a part of the root collar with buds.
Very long roots are shortened by 1/3.
From a 5-year-old bush you can get up to 20 divisions, which bloom in 2 years. (see diagram 1)
The divisions are planted at the same depth as adult plants and watered. (see diagram 2)
Option 2
Scheme 3. Method of vegetative propagation of daylily by obtaining new shoots from the mother plant
This method of division is used in early spring, when the shoots do not exceed 5 - 10 cm.
Soil is raked from the roots of the transplanted specimen.
Using a sharp knife, cut the stem just above the root collar (you cannot leave a tall stump, as the buds will begin to grow too late).
After 3-4 weeks you can get up to 6 new shoots. After 1-2 years the bush is divided. (see diagram 3)
Option 3
Varieties of daylilies with a loose bush can be divided into 2-4 parts with a shovel (the decorative appearance of the bush is preserved and the division blooms in the year of planting).
Option 4
As an option, you can cut off part of the daylily from a large mother specimen with a shovel. As a rule, cuttings take root well, and the queen cell does not need to be dug up.
Planting daylilies in autumn
The first step in planting daylilies on your site is to determine a suitable location for the flower. Daylilies should be planted in open, sunny areas. Wild unpretentious varieties can tolerate partial shade, but modern hybrids are more capricious and require illumination for at least 6-8 hours a day.
On a note. Daylily with flowers painted in burgundy, cherry and other dark shades can fade in bright sun. Such plants can be placed in the lacy shade of trees or artificially shaded from the sun.
The soil type for daylilies is neutral or slightly acidic, with a pH level of 5 to 7 units.
- Loam or sandy loam enriched with humus is an excellent soil for perennials.
- Heavy soils are corrected by adding sand and peat in the amount of 10 kg and 2-3 kg per 1 sq. m. meter of area, respectively.
- Sandy soils are fertilized with well-rotted manure or compost up to 8 kg per square.
Important! Do not apply fresh manure under the daylily! Excess nitrogen leads to an outbreak of fungal diseases.
The site is prepared several days before planting: it is dug up and fertilizers are applied. If the site is located in such a way that in the spring there is a threat of stagnation of melt water, drainage grooves are dug around the flower bed, and the flower bed itself is raised above the soil level by 18-25 cm. When planting, crushed stone or expanded clay is poured into the bottom of the holes in a layer of up to 4 cm as drainage.
Preparing daylilies for planting
If the perennial bush was purchased with a closed root system, it is removed from the pot and immersed in water for several hours (4-5). You can add any growth stimulant to the liquid: Epin, Zircon, Heteroauxin. The roots of the flower are saturated with moisture, and it is visually easier to determine which roots are dead. They are cut off. The tips of healthy fleshy and light roots are cut off.
If traces of rot are found on the roots of the daylily, the affected parts are cleaned back to healthy tissue. The plant is soaked in a rich pink solution of potassium permanganate or in Fitosporin for about half an hour.
The long leaves of the plant are cut at a height of 25 cm so that they do not interfere with planting and do not evaporate moisture, weakening the daylily.
Operating procedure
Planting daylilies in the fall should be done in the following sequence:
- A hole for the perennial is dug, about 30 cm deep, and drainage made of crushed stone or expanded clay is poured onto the bottom.
- Add 80 g of superphosphate and a glass of wood ash to the soil removed from the pit and mix thoroughly.
- At the bottom of the hole, pour a small mound of soil with fertilizer. A flower is placed on this mound, spreading the roots along the slopes of the earthen hill. The hole is filled with soil, pressing it tightly against the roots.
Important! The root collar of the daylily is covered with 1.5-2 cm of soil, no more! - The planted perennial is watered abundantly, spending at least 10-15 liters of water per bush.
- After watering, the surface of the earth is mulched with peat, straw or wood shavings. Mulch will not only protect the soil from drying out and make it possible to reduce watering, but will also protect the roots of the flower from early frosts. The mulch layer should be 5-8 cm.
Daylily bushes are placed at a distance from each other, at least a meter. The gardener needs to remember how widely the daylily grows.
Video about planting daylilies from nursery experts
Methods of propagation of especially rare varieties of daylilies
Cuttings
At the end of flowering, from 1 to 5 shortened shoots (rosettes) appear on the peduncle from dormant buds. They are suitable for cuttings when 4-6 pairs of leaves have formed on the rosette and callus has appeared (these are cells that can give rise to a whole plant). (see diagram 4)
4 Diagram of the formation of a rosette with callus on a daylily peduncle
Such a shoot is cut off with part of the peduncle and the leaves are shortened by 1/3 and planted in the ground. With this method, up to 90% -100% of cuttings take root.
Air layering
This type of vegetative propagation is used in daylilies if a rosette has formed, but flowering is not completed, and the seeds have not ripened.
In this case, a linen bag (cover) with a mixture of peat, sand and garden soil in a ratio of 2:1:1 is placed on the peduncle at the base of the rosette. It is watered and sprayed daily. During dry periods - 2 times a day. When roots form, the rosette is separated from the mother plant and planted in the ground.
Seedlings obtained from cuttings and air layering bloom in the second year.
Daylilies delight us with their luxurious flowers
Easy care, trouble-free rooting and luxurious appearance make daylilies the favorite flowers of novice gardeners. After all, daylily is a flower of joy and good mood!
Description of the plant
Daylilies belong to the Asphodelaceae family, the subfamily of Daylilies and have another name - Krasnodnev.
The name of the genus Hemerocallis, to which this plant belongs, is determined by one feature - each red-day flower opens its petals in the morning and closes in the evening. Forever. However, the number of flowers and the duration of flowering of the plant allow you to continuously enjoy bright, inimitable daylilies for a month.
Interesting! Confucius, a Chinese philosopher, advised the use of daylilies as a remedy for melancholy.
A brief description of the daylily comes down to the following data:
- Refers to herbaceous, rhizomatous plants.
- The roots are fleshy, powerful, cord-like. In places thickened, sometimes forming stolons.
- Leaves are broadly linear, entire, large, arched or straight.
- The flowers are very large. The standard range of colors is yellow, red, orange. Varietal flowers have a much wider range of colors - pink, burgundy, lilac, dark brown, purple. The flowers are six-parted, funnel-shaped, with a small tube. Daylily inflorescences consist of 2-10 flowers. 1-3 flowers bloom simultaneously on one peduncle. Each flower blooms for one day. In some plant varieties, flowers bloom in the afternoon or late afternoon. The average flowering time of the plant is 25-30 days.
- Peduncles are tall, up to 1 m, sparsely leafy, rising above the leaves. According to the height of the peduncles, daylilies are conventionally divided into low-growing (up to 30 cm), medium (from 30 to 60 cm), semi-high (peduncle height from 60 to 90 cm) and tall - peduncle height more than 90 cm.
- The fruit is a triangular seed capsule containing a small number of black, shiny seeds.
Daylilies can be grown for decorative purposes, either in single plantings or in combination with other plants. Tetraploid varieties look very luxurious in flower beds and flower beds. Daylily bushes grow quickly, the flowers are much larger than those of traditional plants, and have a variety of colors.
Interesting! In many countries, daylily buds and flowers, fresh or dried, are used in cooking. And in India it is customary to eat leaves and tubers of plants.
Which daylilies overwinter best?
These perennials thrive in temperate climates, but are still sensitive to frost and severe temperature changes. This is why many daylilies need shelter for the winter.
Source: Depositphotos
Daylilies of American and Australian selection especially need careful preparation for winter.
According to susceptibility to low temperatures there are:
- Low-winter-hardy evergreen daylilies. They grow well in the southern regions. In areas with cold winters, they require careful shelter or storage in the basement.
- Winter-hardy deciduous daylilies. Such flowers winter well unprotected. This category includes traditional, as well as many species varieties.
- Medium-winter-hardy semi-evergreen daylilies are the result of crossing the previous two species. In warm winters the foliage of these plants remains green, but in severe cold they die.
For evergreen daylilies, the danger is not so much the frost itself as the lack of snow cover and spring temperature changes. When a thaw occurs, they, retaining up to 5 cm of green mass, easily begin to grow. Frosts that follow, as a rule, lead to the death of the emerging buds. The situation is different with semi-evergreen daylilies, but it is advisable to protect them from frost.
Growing conditions
Daylilies are not capricious when planting and caring for them and do not require close attention. They grow equally well in shade and partial shade. However, in a lighted, sunny place, plants bloom more luxuriantly and brightly. In the shade, the colors become faded; daylilies bloom later and close their petals earlier.
It is worth noting that some plant varieties whose color shades are closer to dark tones (burgundy, dark lilac, dark brown) are best grown in partial shade; in the sun, their main varietal feature - individual colors - loses its uniqueness. In partial shade, daylily colors become more saturated and vibrant.
In some hybrid plant varieties, the flowers open fully only under bright sunlight. Therefore, when planting daylilies, pay special attention to the recommendations for planting the variety you have chosen. In total, daylilies should be exposed to sunlight for at least 6-7 hours a day.
The beginning of the growing season for daylilies is early. The first green leaves appear almost immediately as soon as the thermometer reaches a positive level at night.
Experienced gardeners plant daylilies in open ground in spring or autumn. But, like all plants, krasnodnevs easily tolerate spring planting, get sick less, and gain color earlier. The recommended distance between plants is 40-60 cm.
Interesting! Some varieties of daylily do not have seed pods, that is, they are sterile. This phenomenon was discovered by Dr. Stout at the end of the 19th century.
It is not for nothing that gardeners consider daylily to be a long-lasting plant - some specimens can grow in one place without replanting for up to 12-15 years. Therefore, before planting, carefully choose a suitable place so as not to disturb the flowers with an unscheduled transplant.
Before planting daylilies in open ground in the spring, familiarize yourself with some of the requirements that are the key to active growth and abundant flowering:
- Daylilies love sunny, well-lit places. The exception is varieties with dark shades of flowers - they fade from too bright sunlight. Therefore, it is advisable to plant them in places where the plants will be in the shade during the midday hours.
- Loose, light and fertile soil should retain moisture well. However, flowers do not like prolonged stagnation of water.
- The composition of the soil should be neutral or slightly acidic.
- It is not advisable to grow daylilies near trees and shrubs. It is difficult for plants to compete with these crops for moisture and nutrients. Flowering will be sparse and sparse, flowers become smaller over time, and varietal characteristics are lost.
The soil for growing daylilies in open ground is prepared in advance. Too heavy soil needs to be lightened - add a little sand and compost, dilute acidic soil with lime, chalk or wood ash, add complex mineral fertilizer to the poor soil. Dig up the area using a spade bayonet. Don't forget to pick out the roots of the weeds. Leave the beds alone for a few days.
Interesting! Based on the duration of flowering, daylilies are divided into diurnal (bloom during the day), nocturnal (buds bloom in the afternoon or late afternoon) and with a long flowering period (buds bloom in the early morning and the petals close only after a day).
Daylily is a plastic, soft plant. It quickly adapts to any changes and growing conditions. However, without following the rules of agricultural technology and the recommendations of experienced gardeners, it will be difficult to achieve long and lush flowering. Only proper planting of daylilies and proper care will help you grow these beautiful and unique plants.