Violet or Saintpaulia is an elegant and delicate flower that requires special care and attention. One of the important conditions for growing a healthy flower is replanting.
To preserve its decorative qualities and ensure its full development, the plant should be replanted in a timely and correct manner. Let's take a step-by-step look at how to transplant Saintpaulia yourself and without mistakes .
When should a violet be replanted?
Several factors indicate the need to replant the plant:
- A white coating appears on the ground. This indicates that the soil has poor air permeability. Also, the presence of a white coating indicates oversaturation of the soil with minerals. As a result, the roots begin to rot and the plant loses its attractiveness.
- The root ball grows too much and is visible on the surface of the soil, under the leaves. This interferes with the growth and development of the flower.
- The soil is depleted , has become dense, and the plant does not receive any nutrition.
- Violet leaves turn brown ; fertilizing does not help.
- The plant has grown and part of the bare stem has appeared. The transplanted flower will be more magnificent and beautiful.
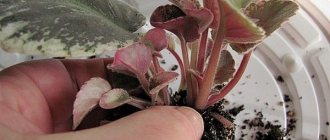
- New “babies” have appeared that need to be separated from the mother’s outlet.
The appearance of any of these signs indicates that it is time to change the Saintpaulia container.
In this video you will be told about the importance of replanting violets with changing soil.
Transfer time
For violets to take root better, spring is . At this time of year, the plant has enough natural light, and the temperature for transplantation is optimal. As a result, Saintpaulia will tolerate a change of “place of residence” well.
September and October are also recommended for replanting capricious violets into new pots. In the summer heat, it is undesirable to touch the plant . At high temperatures, the transplant will cause him unnecessary stress. The same applies to the winter period. Due to a lack of sun and uncomfortable temperatures, the plant may not take root and die.
Optimal conditions for the transplantation procedure are ten-hour daylight hours and a temperature of +18 degrees . If you still need to replant Saintpaulia in winter, you need to install special lamps for additional lighting and ensure the required level of humidity in the room.
Beginning flower growers often ask whether it is possible to replant a blooming violet. Transplanting Saintpaulia during flowering is resorted to only in emergency cases .
If a plant is exposed to a disease or is attacked by pests, it must be replanted immediately, regardless of flowering or time of year. The violet is also replanted if it is too flooded , which can cause the roots to rot.
Important! After transplantation, flowers or buds should be removed so that the plant directs all its energy to rooting and not to flowering.
Under normal conditions, the flower is not touched during the budding period. Flowering indicates the plant is in good health. Since it blooms, it has enough nutrients. Therefore, replanting can be delayed until flowering is complete.
Some gardeners rely on the lunar calendar for transplanting violets. It indicates favorable periods for planting, down to the day.
Rejuvenation of an old plant
Over time, Saintpaulia begins to lose its decorative effect. The stem becomes bare, leaves fall off, flowers appear rarely and in small quantities. The plant noticeably stops growing. In this case, rejuvenation is performed. So, how to plant an old violet:
- if the bare area is small (3-4 cm), and the stem remains green : it will be enough to transplant the violet into a new pot, deepening the entire bare part into the ground;
- damaged leaves are removed;
- landing is carried out in compliance with all rules;
- if everything was done correctly, the violet will grow very quickly. Her appearance will noticeably improve.
- The flower is cut with a sharp knife at ground level. It is advisable to do this in one go;
Transplanting violets after purchase
After purchasing a violet, you need to carefully inspect it, remove dried buds, flower stalks and leaves. Store-bought flower pots usually contain a peat mixture that contains no nutrients. Therefore, after purchase, the plant should be replanted as soon as possible .
To do this, prepare a new substrate by mixing high-moor peat with vermiculite. This mixture will be moderately sour and loose. If you wish, you can purchase ready-made soil for violets .
After transplantation, the plant is covered with film to obtain a greenhouse effect . After 7 – 10 days, the film can be removed.
If the flower was purchased not in a store, but from familiar flower growers, you don’t have to rush to change the pot. In this case, the young plant is not immediately replanted, giving it time to develop the root system.
How often to replant
In flowering perennials, the root system develops quickly . The plant quickly draws all the nutrients from the soil, and it becomes depleted. The roots begin to peek out of the drainage holes or above the ground. The violet needs to be replanted at least once every 7–8 months.
Timely transplantation of Saintpaulia into a new pot will help prevent diseases , and the violet itself will delight with beautiful flowering.
How to choose a pot
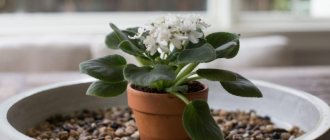
Shallow pots are chosen for relocating Saintpaulias , since the roots of these flowers develop from the bottom up. A height of 10 cm and a diameter of 9 cm will be sufficient. If the plant is planted in a larger pot, it will intensively develop roots and entangle the earthen ball, and there will be no strength left for flowering.
A pot made of clay or plastic is suitable for violets . A clay pot provides good air permeability and maintains soil moisture at the roots. In such a pot, the plant is less likely to get sick and be attacked by pests. The downside of these pots is that they are heavy and not cheap.
A plastic flower pot is lightweight and easy to care for. Its disadvantage is poor air circulation. To fix this, holes are made with a nail in the bottom and side walls.
In this video they will show and tell you what pots and soil to plant violets in.
Capacity requirements
Violets do not need deep pots. Their root system expands upward, so the maximum depth of the container is 10 cm. As for the diameter, depending on the age and size of the flower, you need to purchase a container of 5-9 cm. For miniature varieties, a container with a depth of 5 cm and a diameter of 4 cm will be sufficient.
Particular attention should be paid to the material of the container. The most common options:
- Plastic. Inexpensive and easy to use material. Light weight allows you to place the pots on glass shelves or fragile window sills. In stores you can find a wide variety of shapes and colors, patterns, textures. The only drawback is the lack of ventilation. If the manufacturer does not provide holes for air and drainage in the container, they must be made using a very heated nail. It is best to purchase a special container for violets. Such models are equipped with a convenient drainage system.
- Clay. Clay containers are quite heavy and bulky, so they are not suitable for fragile flowerpots and glass shelving. On the other hand, they retain heat well, retain water at the roots and allow the required volume of air to pass through. Such a pot can be purchased if the buyer’s budget is not limited.
It is convenient if the container is transparent. The owner will be able to control the size of the root system and replant in a timely manner.
What soil to plant violets in
To independently prepare soil that is best suited for violets , you will need the following components in equal parts:
- two parts of leaf soil;
- part of coniferous soil;
- part of the peat;
- part of the turf land;
- some river sand;
- a handful of charcoal.
Advice! For better results, vermicompost can be added to the soil 2 weeks before transplanting.
The prepared substrate must be disinfected. To do this, it is steamed in the oven or doused with boiling water. After the soil has cooled, you can begin replanting the Saintpaulias.
Preparing the plant
Before transplanting a violet, it should be prepared for the procedure . The soil in the pot is moistened so as not to damage the roots of the plant. There is no need to fill the pot with water until dirt forms; the substrate should remain loose.
The violet is carefully removed from the old flowerpot, trying not to stain the leaves. Some of the root shoots are cut off and large leaves are removed . These manipulations activate the rejuvenation of the flower.
Preparing the soil and plants for replanting
Before you begin the procedure, you need to prepare a pot of suitable size and a special nutrient soil for violets or a soil mixture you have compiled yourself.
Crops prefer light, slightly acidic soil, which contains: 5 parts chernozem, 3 parts peat, 1 part coarse river sand. It would be correct to add sphagnum moss, perlite and brick chips or expanded clay as drainage. The total mass of additives should not exceed the final amount of sand used.
Regardless of whether the soil will be used purchased or prepared, it must be disinfected with a solution of potassium permanganate. 10 days before the event, it is useful to add the EM-1 preparation to the ground, and right before the start of replanting, add vermicompost to the moistened, loose substrate.
A few hours before the procedure, the soil should be watered so that it does not stain the leaves of the plant in the process and remains crumbly. The flower itself in its previous pot is also watered abundantly so that it can be easily removed from it.
The plant removed from the container must be carefully examined, and then all damaged parts of its root system must be carefully cut out. If the rhizome has grown and its volume significantly exceeds the size of the above-ground part of the violet, then 2/3 of the root shoots can be cut off without fear of harming the health of the flower.
If signs of rot are detected on the surface of the root, fragments damaged by it must be removed to healthy tissue and the wounds treated with charcoal. If the root system is dead, then you can save the flower by rooting the rosette in water with a dissolved root-forming agent, such as Epin or Kornevin - they have proven themselves more than others among flower growers and gardeners.
Three methods of transplantation
Depending on the purpose or reason for the procedure, there are three methods , each of which has its own advantages.
Complete substrate replacement
This type of plant replanting is resorted to when the violet stops growing and developing, does not bloom and looks unhealthy . This is a signal that the plant has used all the microelements and the depleted soil can no longer nourish it.
Complete removal of old soil involves cleansing the root system . It is inspected and dried, rotten and damaged parts are removed. As a result, the root part is significantly reduced, and the plant can be planted in a pot of smaller diameter.
Expanded clay is scattered on the bottom as the first layer . Then a small amount of soil is poured on which the violet is laid out, carefully straightening its roots. Next, fill the remaining soil until it comes into contact with the lower leaves. The soil is mulched with vermiculite.
To check whether the soil is well compacted, shake the pot with the plant. compact the soil again .
To maintain soil moisture for the first day, the plant can be covered with plastic film .
This video explains in detail how to properly transplant a violet.
Partial soil replacement
Partial replacement is carried out every time a healthy plant needs to increase the pot . To do this, part of the soil is removed, but the earthen ball around the roots is not touched.
The violet is removed from an old pot in which the soil has been previously moistened. Having transplanted it into a large pot, add the prepared nutrient mixture and tamp it down with a teaspoon.
Transshipment
Transshipment is used when it is necessary to urgently relocate a flowering plant or replace a container that has become cramped with a more spacious one.
The violet is carefully removed from the container along with the earthen lump. Drainage and part of the prepared soil are poured into the new pot. Then the used container is inserted, and the space around it is filled with soil. After this, the unnecessary pot is removed and a flower is placed in its place. All that remains is to carefully level and compact the earth.
How to get roots?
Getting roots in water
Rooting violet leaves by dipping them in water speeds up this process.
For a novice gardener, it will be useful information that it is better to take settled or boiled water, this allows you to:
- notice the slightest changes in the condition of the leaf cuttings;
- prevent leaf rotting;
- see the appearance of roots and small rosettes in time.
Before dipping a leaf of indoor violets into water, the container must be thoroughly cleaned and the reusable container must be sterilized. Glass cups, preferably made of dark glass, are suitable; if there are none, the container can be wrapped in paper or material to prevent light from entering, which provokes the formation of algae on the walls.
The diving procedure is carried out in the following order:
- the leaf is lowered into water to a depth of 2 cm;
- the leaf plate must be fixed so that the end of the petiole does not touch the bottom and walls of the cup; this can be done using paper with a hole made in it;
- to avoid the appearance of greenery on the bottom and walls of the container, add activated carbon to the water;
- the water will periodically evaporate, it needs to be renewed to the previous level by adding the same clean or boiled water.
The appearance of the first roots occurs within 2-4 weeks, mainly depending on the variety and condition of the plant.
If at the end of the period, instead of roots, traces of rot become noticeable, you should remove the petiole and cut off the rotten part. After this, the cut can be treated with activated carbon powder and again placed in water, which was previously changed, and the container was cleaned of traces of infection.
As soon as the roots become noticeable, reaching a length of 1-2 cm, it means it’s time to take the leaf out of the water and replant it in the ground.
Interesting! Sometimes gardeners do not remove the leaf from the liquid until small rosettes appear. For an inexperienced person, it will seem difficult, because the leaf may weaken or die.
For planting, you need to take small plastic cups or small pots with drainage holes, which are filled with fine expanded clay and then with soil.
The main rule is not to deepen the planting material too much, this leads to a long germination of rosettes. The propagation leaf loses all its strength and the process may stop.
After planting the leaf, the soil is slightly compacted and watered, and the container is covered with polyethylene to create greenhouse conditions.
The covering should be removed when the small leaves of the young rosettes become noticeable; this usually takes 2-3 weeks.
Getting roots in the soil
Growing violets from leaves is possible immediately by deepening them into a special substrate. To do this, the upper part of the leaf must be shortened slightly, and the cutting must be deepened 1/3 into the ground.
The plant should be kept in moist soil, adding small portions of water once every few days. While the violet is in greenhouse conditions, it needs to be ventilated from time to time. The plant is transplanted into a separate pot when the young rosettes have reached 2-3 cm in diameter.
Interesting! It is practiced to grow violets from leaves in perlite, but under such conditions the result does not guarantee success. It is usually used as a soil additive and is not capable of retaining moisture on its own.
Planting young rosettes
When replanting violets after propagation, you need to do this so as not to damage the young root system. When replanting a rosette into a permanent pot, it is transferred with a lump of earth and the missing soil is added. Fine drainage is poured onto the bottom.
When propagating violets by leaf cuttings, several rosettes may appear on one of them. This happens when the leaf is healthy and strong enough. All formed rosettes must be placed separately, carefully separated from each other. Each rosette should produce two full-fledged leaves and reach a diameter of 2 cm.
Each child must be separated with a sharp knife so that there are roots on it. Daughter rosettes are cut off as they grow.
Reproduction by leaf fragment
Rooting of violet leaves can occur by using one of its parts. This method allows you to get a young plant if it dies. It is best to take the top third part. Before rooting the leaf, it needs to dry out a little, and then treat the sections with activated carbon.
Part of the leaf goes as deep into the soil as possible; for quick rooting, the composition must contain marsh moss; it retains moisture well and has disinfecting properties.
Important! From one leaf you can get several fragments for propagation; this makes it possible to grow an even larger number of children and select the strongest ones from them.
How to seat children
It is important to know how to plant young shoots so that they take root. Young rosettes are distributed into pots with a diameter of 6 cm after two pairs of leaves have appeared on them. To prepare the soil, use vermiculite, peat and chopped sphagnum.
The babies are separated from the mother's rosette along with a large leaf. Then they are seated in separate containers at a shallow depth. The soil is moistened , and before rooting, containers with young plants are placed under a lamp.
This video will tell you when it’s time to separate violet babies from the mother leaf and how to do it.
Important questions before you start
Is it the right time to breed?
In most cases, all manipulations with the plant are carried out in spring and summer. This period is the most favorable; violet tolerates such procedures less traumaticly.
There are cases when a certain variety of violet gets sick and there is no way to save it, then the propagation procedure should be started at any time of the year. If the outcome is good, you can get a new young and healthy plant.
Which sheet is better to take?
Leaf propagation does not often lead to any difficulties. Having chosen the appropriate time, which falls on the active phase of violet growth, it is necessary to cut off the petioles along with the leaf that has reached a length of 5 cm. It is better to choose planting material in the second or third row from the surface of the earth. When choosing, you need to pay attention to the condition of the sheet plate; it must be durable, without visible damage and natural color. If the violet leaf has a stalk that is too long, it is shortened by cutting it at an angle.
After the leaf is cut, it is left on the surface for 20 minutes to allow the cut to dry. Taking leaves from the very bottom row is a wrong decision; it is much more difficult to obtain high-quality material from them.
Interesting! Nowadays, shopping in online stores is practiced, even for plants. In this case, the resulting sheet may not be of very good quality. He will be lethargic and not look very good. This can happen with material brought from work or from guests. A long journey and lack of moisture for more than a few hours quickly deteriorates the condition of the leaf cuttings. You can bring planting material back to life by immersing it in boiled water at a temperature of 35-40 degrees for several hours, and throw in a couple of potassium permanganate crystals.
Care after transplant
To ensure that transplanted plants do not experience stress and recover faster, they need to be helped with proper care . It is necessary to maintain optimal temperature, soil moisture and lighting.
After transplanting the perennial, adhere to the following rules for 2 weeks:
- cover the plant with film ; when condensation forms, remove it for a couple of minutes for ventilation;
- the flower pot is left in a warm place (24 degrees) ;
- Saintpaulias provide sufficient lighting, but protect from direct sunlight .
Possible errors during transplantation
Knowing how to replant Saintpaulia correctly, you can avoid mistakes and prevent the death of the plant . The most common mistakes made when performing this procedure are:
- The planting depth is chosen incorrectly . Too deep and the roots will rot; too high and the rosette will sway.
- Choose a pot with a large diameter. The plant will not be able to bloom; it will try with all its might to develop the root system.
- The substrate is not prepared correctly . It should not be too dense and oversaturated with nutrients.
- They use soil from greenhouses and greenhouses , which contains pest larvae and fungal spores.
- When watering, water is not poured under the root, but poured into the center of the outlet . This leads to the death of the plant.
This video talks about mistakes when rooting indoor violet cuttings.
Transplanting violets at home requires preparation and
adherence to certain rules .
However, the reward for good care will be a healthy plant that pleases the eye with lush flowering. Read more about when to repot indoor plants here.
Plant rejuvenation
In order to make an old plant bloom profusely, it can be rejuvenated. Signs of aging will be a trunk exposed at the bottom, which becomes clearly visible. When rejuvenating, you can remove some of the roots and leaves and then plant them in a smaller container. But usually only the above-ground part is preserved, cutting off the stem with the leaves that have dried on the bottom using a sharp, disinfected knife.
The plant is wilted a little and then lowered into a glass of water. When a good root system is formed, the plant is planted in a prepared container.
Transplantation is carried out in the same way as when rooting a plant using the step-by-step instructions. You need to take another container, since the root system is small and until it fills the container, the violet will not bloom. You can remove some of the leaves and propagate the plant you like with them.