Rejuvenation process
The plant renewal process itself does not take much time. If you do everything correctly, the flower will again regain its decorative properties and will be pleasing to the eye.
Update methods
There are several ways to rejuvenate indoor Saintpaulias at home:
- Through cuttings. A leaf is taken from the main bush, placed in water, and soon roots appear on it. The disadvantage of this method is that it is time-consuming, since it will take about 2 years to grow a new bush from a leaf.
- This method is suitable if the bare part of the stem does not exceed 3 cm and is green in color. You can rejuvenate a violet by deepening the stem. This method is simpler and painless for the plant. Professionals advise practicing this method rather than waiting until the violet grows strongly and more radical measures are required.
- For old Saintpaulias, whose trunk has already become very coarse and brown, a different method is used. You need to root the cut off stem of an old violet in water.
Step-by-step instruction
The first method is the most common. Many had to bring home leaves and sprout roots on them:
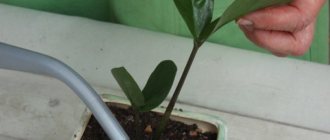
You need a glass of warm water, where crushed activated carbon is added for disinfection to eliminate diseases of violets. A leaf is placed in the container (preferably 2 or 3, since not all leaves germinate). After 1-2 weeks, roots will appear
It is important to ensure that the stems do not rot. The cutting is placed no more than 1.5 cm into the soil
In a month, a new shoot will appear on it.
The main stages of the step-by-step instructions for rejuvenating violets using the second method are as follows:
- First, the plant, along with the root and soil, is removed from the pot.
- Excess lower leaves are removed from the trunk.
- Using a sharp knife, cut off half of the clod of earth.
- In a new pot, drainage with a substrate is placed and the plant is placed there.
- The earthen lump around is filled with substrate and covered with it on top.
- The transplanted flower is watered with water at room temperature and covered with half a plastic bottle or a transparent plastic bag. The main thing is to create a mini-greenhouse for the flower.
After some time, the plant stem sprouts new roots that will nourish the flower.
How to renew a violet with a long stem?
This method is suitable for an old plant when the trunk is not capable of producing new roots:
- The violet is removed from the pot along with the soil.
- The lower leaves must be removed, leaving no more than 6 leaves, since the plant will be weakened and at first it will not have the strength to feed a lot of green leaves.
- Using a knife, cut off the stem 3 cm below the beginning of leaf growth and sprinkle it with activated carbon.
- The rough brown skin is carefully scraped from the violet stem to the green surface, after which it is dried.
- The cut off top of the flower is placed in water.
In a few days, the renewed old violet will take root. When they reach a length of about 2 cm, the violet is planted in an earthen mixture and a greenhouse is made using a transparent container.
Additional recommendations
A pot for replanting violets should be chosen the same size or slightly larger, with a drainage hole in the bottom. The container must be lined with drainage material; the soil must be neutral. Water the plant with warm filtered water.
When renewing violets, new soil and a new container are used; florists do not advise mixing old soil with new one.
Following these recommendations and proper care will make the transplant as beneficial as possible for the plant.
Saintpaulia rejuvenation methods
There are 3 ways to rejuvenate your favorite varieties of violets:
- Planting a leaf.
- Digging in the stem.
- “Blowing off the head” of a violet: re-rooting of the rosette.
Rejuvenation through leaf planting
This is the most common method of propagation and rejuvenation of violets. To do this, use a sharp knife to cut off the petiole with the leaf blade and place it in water so that the water does not touch the leaf. You need to add a crushed tablet of activated carbon to the water.
After 2-3 weeks, roots will appear at the edge of the petiole and the leaf, together with the formed roots, can be transplanted into light soil.
You can do without the intermediate step of soaking the leaf petiole in water. To do this, perform the following manipulations:
- dip the petiole cut into the root stimulator;
- cut the leaf by 1/3 (if the leaf blade is large)
- planted in a moist, nutritious, light substrate;
- cover the top with a cut plastic bottle or plastic bag to create a greenhouse effect. Once every 2-3 days, the greenhouse is opened slightly for ventilation.
Note! This method is practically fail-safe, but you can get a new flowering plant no earlier than 2 years after the start of rooting.
You can get a renewed plant much faster using other methods.
Digging in a Saintpaulia stem
A special feature of the violet is that roots form not only at the buried leaf, but also at the stem buried in the ground. This feature of Saintpaulias is used when the plant “sticks out” from the ground by no more than 1-2 cm. That is, the violet resembles a palm tree on a short trunk. But this trunk is quite viable: green, not overgrown with dead scales and cuttings from removed leaves.
For this:
- cut off (or break off with your hands) the lowest layer of leaves;
- Sprinkle the bare stem down to the lower leaves with a layer of fertile soil or moss.
Carefully smooth out the poured soil.
Remember! Violet does not like compacted soils, so actively pressing down new soil is not recommended.
Unfortunately, only attentive violet owners can see this phase of the plant. Most people begin to think about the reasons for the aging of Saintpaulia when its stem, protruding from the ground, grows to 5-6 cm.
Then comes the phase of radical surgery. Amateur flower growers call it “removing the head of the violet,” and professionals call it re-rooting the rosette.
Re-rooting a violet rosette
The very last phase of Saintpaulia development is when the shredded rosette leaves, curled, limp and spotted, barely grow on the tall brown stem. As a rule, lovers part with their pets without regret at this time, complaining about their capriciousness.
And even novice flower growers are quite capable of correcting this deplorable situation of the violet!
To do this you need to follow simple steps:
- Trim the stem of the violet, without removing it from the pot, at ground level.
- Tear off the lower and diseased leaves as close to the trunk as possible, leaving no more than 6-8 upper, central leaves, trying to ensure symmetry.
- Using a sharp knife, clean the stem from brown dead growths - remnants of petioles - to healthy green tissue.
- Remove all buds and flowers, if any.
- Leave the top to air dry for 30-40 minutes. Some recommendations suggest sprinkling the cut areas with crushed activated carbon. I didn’t sprinkle it, but I placed the cut violet in Kornevin’s solution for 20 minutes.
- Prepare a light substrate for rooting the cut top of the violet, consisting of turf soil, sand and perlite in a ratio of 1:1:1.
- Pour the moistened substrate into the pot and lightly press it down.
- Make a depression in the center with a diameter equal to the diameter of the stem.
- Place the violet in the hole, deepening it to the lower leaves.
- Lightly water the substrate, being careful not to get water on the leaves.
- If the room has dry air, you can place the seedling in a mini-greenhouse made from a cut plastic bottle or plastic bag. To prevent rotting of the seedling, it is recommended to make 5-6 holes in the film or regularly open the greenhouse for ventilation.
Note! A violet that is going through a period of rejuvenation is not fed with nitrogen fertilizers! They cause rapid growth of green mass, which in the absence of a root system can destroy the plant.
To activate root growth, potassium and phosphorus fertilizers are used, and they need to be applied at the initial stage of rejuvenation in a proportion half that recommended by manufacturers.
Violet does not like spraying its leaves, but at a time when there is no root system, foliar feeding and spraying with antidepressants: HB-101, Epin, etc. help it a lot.
Usually after 3-4 weeks the rooting of the top occurs.
By way of repetition, here are the main points of rejuvenation:
Signs of the need for a transplant and methods
Recommendations on how to make a violet bloom at home
When the owner decides to take a responsible step, he needs to learn the basic rules and steps on how to replant a violet at home step by step. Below are 3 options and also describe in what situations they are recommended. A partial change of soil is sufficient in most cases. To make sure of this, you need to water the violet well first. If the soil does not stick to your hands, but moves freely from the walls of the container, then you need to add more soil. To do this, you need to take out the flower and shake off the soil without affecting the main lump. A violet is placed in a larger container, and the free space is filled with new soil.
Note! This method allows you to replant as carefully as possible without damaging the root system. Partial soil replacement
Partial soil replacement
This option is chosen in case of rotting of the roots, significant exposure of the stems, as well as acidification of the soil. After the violet is taken out of the pot, the soil is shaken off as much as possible. If the roots are damaged, they are carefully cut off and the cut areas are powdered with crushed coal. Depending on the volume of the roots after completion of the procedure, the size of the pot is determined.
The main advantage of this method is that it is possible to inspect the roots, remove damaged areas and replace the soil.
Complete replacement of land
Transshipment
This method is mainly used when a flower transplant is urgently required, namely:
- for children with a poorly developed root system;
- for a flowering plant;
- if the rosette is 3 times larger in diameter than the pot.
Preparing the pot
Important! Do not compact the soil with your hands. This will disrupt water and breathability
In order for the soil to lie more densely, as it is filled, it is necessary to periodically knock on the walls.
There are certain reasons why replacing the soil in a flowerpot is necessary. Transplanting violets at home is required in the following cases:
- purchasing a young specimen. The acquired beauty should be replanted after quarantine measures have been taken;
- the appearance of a white coating on the soil surface, which signals its salinity;
- “sprouting” of roots through the drainage hole of the flowerpot;
- the appearance of a depressed state, growth arrest, death of leaf blades;
- reproduction of young shoots that need to be planted.
Many beginners are interested in how to properly transplant a violet at home so that it receives all the necessary nutrients and feels great.
Professionals use several transplant methods. The most affordable way is to transfer the individual into a larger pot. The procedure is as follows: the plant is carefully removed from the flowerpot and, without destroying the earthen clod, transferred to another container. The sides and top are sprinkled with prepared, disinfected soil. This method is only suitable for young animals that are characterized by intensive growth and have not had time to deplete the soil.
There are several ways to transplant a plant.
- Replacing old soil. This may be during soil acidification or wilting of the bush, when the soil is completely removed from the roots, washed under running water and planted in new soil. In this method, you can inspect the root system and remove rotten roots to a living area. If during the work many roots are removed, then the pot can be left the same or take less.
- Partial soil replacement.
- Transshipment. When the clod of earth remains completely on the bush.
Before planting violets, you should find out how and when you will need to start replanting the plant. There are 2 main ways. The first involves a complete replacement of the soil, and the second - a partial one. Indicators of soil condition, the appearance of the flower and its development will help determine when and what kind of violet transplant is required.
Violet planted in a flowerpot
Care after transplant
After about 2-4 weeks, roots appear on the transplanted cuttings. When they grow 2 cm, the shoots are transplanted into a plastic cup. When germinating cuttings in the ground, this period is shortened.
It is very important to provide favorable conditions for establishment and further growth. Violets are light-loving plants
Your pet will feel most comfortable on a window facing east.
It is not recommended to choose west and north. On northern windows you may never wait for flowering. But on the south side the plant will need shading, since too much light can cause the leaves to burn out.
It is better to place flower pots on the windowsill because violets love natural light. If such conditions cannot be created, then the place must be equipped with fluorescent lamps.
Attention! Direct sunlight is not recommended. They have a detrimental effect on Saintpaulia, as well as draft and cold
To form a rosette evenly, the container must be gradually rotated so that the foliage turns towards the light source. But it is not advisable to change the location of the room itself: plants are very sensitive to this.
Watering violets, like other indoor flowers, depends on the air humidity in the room. If the house is humid, reduce watering to once a week. In dry rooms, watering is carried out two to three times a week. Air humidity changes depending on the season. This must be taken into account when watering.
With proper care, violets bloom very beautifully.
Violet does not like excess moisture. Therefore, it is recommended to pour water into the tray. In this case, the plant will take the required amount of liquid on its own.
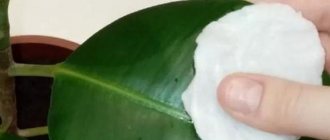
Water for irrigation should not contain heavy salts. It is recommended to stand, and the temperature should be at room temperature. The leaves are periodically washed with running water, but they should not be wiped to avoid damaging the hairs. The foliage dries out naturally. During this time, exposure to the sun's rays is not allowed - otherwise a burn may occur. Therefore, such water procedures should be done in the evening or at night. By morning the leaves will have time to dry completely.
As can be seen from the above, rejuvenating violets at home is a painstaking process and requires patience. But if the plant is provided with good conditions, its splendor will certainly delight everyone around it.
What to do with stepchildren?
How to replant a violet at home: step-by-step instructions and recommendations
The formation of stepchildren in violets is far from uncommon. Stepchildren are plants that form in the axils of the leaves. They take a lot of energy from the plant, spoil the appearance and delay flowering.
In the future, the broken off stepsons can be rooted for propagation of transplanted flowers. For rooting, take stepsons with 3-4 pairs of leaves.
The reason for the formation of stepchildren is, first of all, too nutritious soil with a high nitrogen content. Another unpleasant reason for their appearance may be infection with diseases. The plant tries to survive by any means and leaves as many offspring as possible.
Getting ready to move
Before planting violets at home, you need to take care of the soil: you can purchase it in specialized stores or form it yourself. For this you need peat (1 part), soil for violets (3 parts) and a little sand. Additionally, drainage is needed: expanded clay or pieces of polystyrene foam are suitable. We also add vermiculite to supply the roots with oxygen.
Now let's talk about pots for violets.
- The first rule: they must be washed and cleared of any remaining salt deposits.
- Second: the size of the pot is three times larger than the Sempolia.
- Third rule: it is preferable to choose plastic pots due to the fact that they keep the soil moist longer. However, this rule is advisory in nature.
Before transplanting, the violet must be watered so that the soil is slightly moist. This will make it easier to remove the flower from the pot. When watering, try not to wet the leaves.
External factors
Guide on how to plant violet from a leaf at home
External factors also play a role in the flowering process. Both heat and cold can destroy a flower. High temperatures above zero will cause the color to dry out. The heat will quickly dry out wet soil, harming the roots. On days like these, when the thermometer remains at high levels, you should spray or place a container of water next to the pot.
Low temperatures threaten the plant with the fact that it will not be able to survive the dormant period. The temperature should be kept above 17 °C.
Important! The most dangerous thing is sudden temperature changes. The painless difference should be no more than 3 °C
Caring for violets
Caring for violets is not difficult - as already mentioned, they grow in almost any conditions, the most important thing is nutritious soil and the absence of direct sunlight. Caring for violets comes down to the following:
this plant loves moisture, so violets need to be watered little by little, but often enough; if possible, provide them with bottom watering by simply placing pots with holes in the bottom in trays with water - this way the flowers will always receive the amount of water they need; It is recommended to periodically add liquid fertilizer for violets to the water for irrigation, diluting it in the required proportions
It is especially important to feed your violets during budding and flowering; Do not under any circumstances spray water on the violets, even if it seems to you that they are hot - plants with shaggy leaves do not tolerate this procedure well, the leaves become stained and die; if you feel that the air is too dry, just place containers of water next to the violets - you can use ordinary deep bowls, this will be enough.
As you can see, caring for violets is not difficult at all, and even a novice flower lover can handle them.
A few final tips
- Do not rush to remove the “babies” from the mother’s leaf. Let them grow at least three pairs of leaves.
- Remember the rule: first the mother sheet is separated from the group of “children”, and only then the “children” themselves are separated.
- When planting “babies”, as well as when transplanting adult violets or transshipment, be careful not to deepen the growing point. This is the “Achilles heel” of Saintpaulia, primarily susceptible to rot and pests.
- Do not plant completely white “babies” from variegated varieties, even if they look large. Wait for green leaves to appear.
- Carry out transshipment only when the earthen coma is completely entwined with roots.
- If your violet is more than three years old, it is better to “rejuvenate” it by re-rooting it, with complete pruning of the root system. This will preserve the varietal characteristics of the plant.
The title photo of the article is studia.marmelad.
Content
- 1. Transplanting adult violets 1.1. When to replant Uzambara violets
- 1.2. Preparing for transplant
- 1.3. Transplantation or transshipment: what is the difference and what to prefer
- 1.4. Transplant technology
- 1.5. The nuances of transplanting “palm-shaped” Saintpaulia
- 1.6. Transshipment Saintpaulia
- 2.1. How to deal with white "kids"
Usambara violets, or Saintpaulias, are transplanted urgently and as planned. Diseases that cause emergency transplants are described in the article: “Diseases of Uzambara violets.” Immediate replanting is also necessary when plants are damaged by some Saintpaulia pests, for example, soil mealybugs. When and how to replant Saintpaulia as planned?
How to rejuvenate violets at home?
Violet rejuvenation at home can be done in several ways:
- adding soil;
- replanting with deepening of the exposed trunk;
- rooting the cut top.
What you may need when replanting a plant:
- light soil for Saintpaulias containing sphagnum, perlite, peat and charcoal;
- drainage: foam;
- expanded clay;
- sphagnum moss;
- perlite
clean pot; sharp knife or scalpel; activated carbon or charcoal powder.
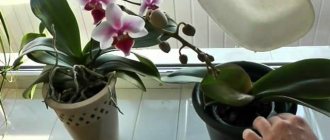
Replanting with deepening of the bare trunk
The violet is about 4 years old. It blooms, the upper leaves are large and elastic, but the picture is spoiled by the bare stem of the plant. In this case, you will need a new, larger pot and fresh soil.
What needs to be done during such a transplant:
- Disinfect a knife or scalpel and peel the Saintpaulia stem down to green tissue;
- Sprinkle the wet trunk pulp with crushed charcoal and leave to dry;
- Break off or cut off all unnecessary leaves;
- Place a drainage layer and some fresh soil in the new pot;
- Carefully remove the plant from the old pot with a lump of earth and place it in a new pot;
- Add fresh soil to the border of the lower leaves, water the plant and place it in a greenhouse for 2-3 weeks.
Transplantation with deepening.
Adding soil
The simplest and least depressing method for the plant. Suitable for violets whose lifespan is no more than one and a half years, when the lower tier of leaves has either lost its decorative effect or has already been removed by the owner. A small bare stem has formed between the soil and the crown of the flower.
The violet update occurs as follows:
- Cut off or break off the remaining lower leaves;
- The trunk at this age will be green, so there is no need to strip it;
- You can cover the stem with sphagnum moss, or you can simply fill it with fresh soil to the border of the lower leaves;
- Moisten the flower (do not overfill it!) with warm water.
Rooting the cut top
The plant is more than 5-6 years old. Its bare trunk became horny and bent under the weight of the crown. In nature, this is exactly how Saintpaulias reproduce: they grow with their trunk to the ground, taking root and forming a new plant. This method will not work at home because the pot is too small. In this case, you can use the method of rooting the Saintpaulia crown.
What should be done:
- From the old violet, only the “head” is left - the top of the crown with 5-6 leaves. Since the plant suffers greatly during such a transplant, there should be the bare minimum of foliage, the rest is broken off;
- Stepping back 1.5-2 cm from the border of the leaves, use a sharp knife to make a clean, even cut;
- Strip the stem of the old cork layer, sprinkle with charcoal or activated carbon and leave to dry;
- Then there are two options: place the flower to take root in water, making sure that the stem does not touch the container. After a couple of weeks, the plant will produce new roots and can be planted in the ground. Or you can immediately plant the plant in a clean pot, cover it with fresh soil, moisten it and put it in a greenhouse for 3 weeks.
Photo of how to rejuvenate an old violet at home step by step.
ADVICE! There is no need to rush to part with the stump of an old plant: with proper care, stepsons of new violets will grow from it, which can later be replanted and get full-fledged violets.
During replanting, the soil is only slightly moistened. You should refrain from watering for the next two weeks, as the root system is not formed and a damaged stem can easily rot. To prevent this from happening, the plant is placed in a greenhouse for a month - this will allow the transplanted Saintpaulia to maintain an optimal microclimate.
Composition of the nutrient substrate
Violets love light, acidic soil, including:
- chernozem – 5 volumes;
- peat – 3 volumes;
- coarse river sand – 1 part.
It is necessary to add undecomposed high peat or sphagnum moss, perlite and vermiculite, and brick chips to the composition. The total amount of additives should not exceed the amount of sand taken. For drainage, use expanded clay and pottery shards. You can use store-bought soil for Saintpaulias.
Regardless of how the soil is obtained, it must be steamed and disinfected with potassium permanganate. You can revive the soil by adding EM-1 2 weeks before use, or just before planting a little vermicompost. Before use, the soil must be moist but free-flowing.
How to prepare violets for rejuvenation
To rejuvenate the plant, prepare a sharp knife, expanded clay, soil and a small flower pot in advance. Choose the pot correctly: for miniature varieties with a diameter of 5-6 cm, for the rest - 7-10 cm.
During the rejuvenation of violets, many gardeners use all kinds of root formation stimulants, such as Kornevin. I’ll say right away that its use is not necessary. With it or without it, the result is always the same. Violet roots grow well without any rooting agents.
Step-by-step instructions for rejuvenation:
- Carefully remove the violet from the pot along with the earthen lump. Lightly shake off the soil from the roots.
- If your violet has grown to several bushes, as shown in our photo, separate them from each other.
- Completely remove all roots. This is necessary in order to update the old root system to a new one. After all, with old roots, the renewed rosette will be less able to absorb nutrients from the soil and grow accordingly.
- Tear off the flower stalks and leaves of the lower tiers. Leave only healthy and elastic leaves, throw away the rest without regret. The result should be a neat and compact outlet.
- As you can see in our photo, there is rot on the root system. Therefore, we trim the lower part to healthy tissue. This is what it should look like:
- The next step is to clean the stem, removing all stumps and rot. Leave to dry for 30 minutes.
Which soil to choose
To successfully transplant Saintpaulia, you need to prepare new soil and a suitable container.
You can buy soil at a specialty store or prepare it yourself.
You can find out how to choose soil for Saintpaulia and whether you can make it yourself from the material at our link.
The second option is preferable in the case of breeding rare varieties of flowers.
To create a universal substrate for violets, you will need turf soil, sand, humus and turf in proportions of 2: 1: 1: 0.5, respectively.
A prerequisite for preparing the mixture is its sterilization. The soil needs to be calcined in the oven for two hours, heated in a water bath, or use another method as desired.
Such soil can be used only on the fourth day.
The result should be soil with a fairly loose and airy structure and a slightly acidic pH. Before planting violets, the soil can be additionally shed with a weak solution of potassium permanganate for disinfection.
Varietal violets, for example “Dance of the Galaxy” and “Chimera”, are especially demanding on the substrate.
Method 1: deepen the trunk
If the violet has reached 4–5 years of age and has a bare trunk at the level of 3–4 centimeters, you need to think about its rejuvenation
In this case, it is important that the trunk is green and healthy, then the plant will tolerate the procedure well
Sequential steps to deepen the Saintpaulia root:
- Carefully remove the plant from the old pot.
- Remove old dried leaves.
- Using a sharp knife, cut off half of the earthen ball with the root system.
- Place the violet in a new pot. Place drainage in it in advance and add substrate.
- Sprinkle the bare stem down to the lower leaves. Avoid getting soil on the leaf petioles, otherwise they may rot.
- Water the violet and create greenhouse conditions for it, for example, place it under film.
Over time, the bare stem that you covered with soil will begin to grow roots. They will provide additional nutrition to the plant and ensure active growth and flowering. This method is considered the most humane; the violet is practically not injured. Therefore, do not bring the plant to a critical state when rejuvenation is required by rooting a rosette.
General information about the development periods of violets grown at home
It is easy to identify the main life cycles of Saintpaulias:
- rooting of planting material using a cutting, a fragment of a leaf grown from a shoot seed, or the germination of roots from a stepson (a shoot formed in the axil of a leaf or at a stipule);
- laying of flower buds, formation of a peduncle, flowering;
- increasing green mass;
- maturation - exposure of the lower part of the stem, critical growth of the rosette.
The old flower looks unpresentable, and the soil becomes poor, salty, and compacted
For your information! The trunk of the old Saintpaulia becomes bare over time, and flowering becomes scarce. The condition of the leaves deteriorates, spots appear on them, a border that is not typical for the species, and irregularities.
The period when a violet is considered old
Flower growers determine the stages of natural aging of a potted plant by the length of the bare stem:
- for the initial stage, length 2 cm;
- advanced stage - a trunk more than 2.5 cm long.
When young plants age, measures must be taken immediately to save the species.
Rejuvenation of violets by transplanting with deepening of the stem.
If the length of the bare stem of a violet does not exceed 1-2 cm, and the stem of the plant is green in color, then rejuvenation of violets is carried out by replanting with deepening of the stem.
This is done like this: - remove the old Saintpaulia from the previous pot;
— we break off the lower leaves of the plant that have lost their decorative effect;
— using a knife, carefully scrape off the outer coarsened layer on the resulting stem just a little;
- using a sharp knife, cut off half of the earthen clod from below;
— place the plant in a prepared new pot with drainage, covered with fresh substrate; - add fresh substrate to the pot from the sides and top of the earthen clod, sprinkling the bare stem of the plant to the lower leaves;
— water the transplanted violet and place it in a mini-greenhouse.
After some time, the bare stem of the transplanted violet, sprinkled with substrate, is covered with new roots, giving the plant additional nutrition. As a result, the rejuvenated Saintpaulia begins to grow actively and blooms beautifully.
When should a violet be replanted?
Several factors indicate the need to replant the plant:
- A white coating appears on the ground. This indicates that the soil has poor air permeability. Also, the presence of a white coating indicates oversaturation of the soil with minerals. As a result, the roots begin to rot and the plant loses its attractiveness.
- The root ball grows too much and is visible on the surface of the soil, under the leaves. This interferes with the growth and development of the flower.
- The soil is depleted , has become dense, and the plant does not receive any nutrition.
- Violet leaves turn brown ; fertilizing does not help.
- The plant has grown and part of the bare stem has appeared. The transplanted flower will be more magnificent and beautiful.
- New “babies” have appeared that need to be separated from the mother’s outlet.
The appearance of any of these signs indicates that it is time to change the Saintpaulia container.
In this video you will be told about the importance of replanting violets with changing soil.
Reproduction by stepsons
Despite the fact that violet cuttings are recognized as the most effective method of propagation, it is not suitable for all varieties of the crop. For some species, such as chimeras, using this method will lead to a loss of individual qualities. Therefore, pinching of violets is used.
What should a stepson be like?
The lateral stepsons that have formed in the axils of the flower are subject to transplantation. The length of the planting material must be at least 3 cm.
Pruning violets
Optimal conditions for germination
The most acceptable temperature for germination of this species is from +18 to +20 ℃. Because of such requirements, many gardeners often have problems caring for seedlings. The plant can survive only a one-time drop in temperature to +12 ℃
It is important not to forget that violet is a heat-loving plant and in winter takes on a “tired” appearance. In winter, it is advisable to move the flower to a northern or western windowsill
Stages of work step by step
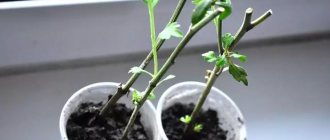
For rooting, children use water or a light substrate. The development of the stepson in water occurs in stages:
- Manganese is added to a dark glass container for disinfection.
- The baby is lowered into purified water. It is enough to pour 1 cm of liquid.
- As in the case of rooting with leaves, monitor the water level, preventing moisture evaporation.
- Transplantation into the ground is carried out only when the radicular rosette reaches 8-10 cm.
To carry out rooting directly into the ground, use only a breathable, light soil mixture. The working material is vermiculite without adding soil.
Additional Information! Do not press down the soil; this may damage the base of the stepson.
To speed up the rooting process, create a greenhouse climate for the future violet - cover the container with a bag or any other transparent material
Daily ventilation is extremely important
Aftercare
Due to the fact that the stepson is initially a more developed planting material, caring for it will not be difficult. The main requirement is to maintain a normal level of illumination for 12-14 hours. In the first days after planting, the room temperature must be maintained around +18 ℃. After rooting, it must be raised to +25 ℃.
Interesting information! Wick irrigation has proven itself to be excellent. It allows you to “supply” water to the flower in a standardized manner without harming the leaves.
Wick watering method
Typical mistakes during reproduction
When propagating violets, it is important to avoid mistakes. They will lead to the fact that the plant will not take root and will grow poorly.
The most common mistakes made by beginners:
- After planting, the young animals begin to be fed early. According to the rules, fertilizers are applied no earlier than every month.
- Winter is not the best time to separate plant parts; they grow poorly and there is not enough ultraviolet light for photosynthesis. In winter, the leaves increase daylight hours to 12 hours.
- Cuttings are cut only with a disinfected new blade or a sharp knife. When the tissues are damaged by hands, the cuttings rot.
- When propagating by part of a leaf, loose, but not too nutritious soil is needed. The sprout takes everything it needs from the mother leaf.
- Do not allow a large number of roots to form in the water. When planted, most of them die.
- The planted rosette should not have less than 3 leaves; this amount is optimal for the formation of the root system.
Knowing how to grow a violet from a leaf at home, you can assemble your own collection of violets
It is important to take into account the peculiarities of plant propagation methods, as well as purchase complete planting material from healthy violets
Diseases and pests
With proper care, the violet grows strong and healthy, but sometimes it is attacked by pests and diseases.
Pests
Often, a change in its appearance indicates that a plant has been attacked by pests:
- a white cotton-like coating on violet cuttings is a mealybug infection (to combat, the leaves are treated with a soap solution with a few drops of machine oil; infusions of calendula, garlic or tobacco);
- quickly drying flowers and yellow pollen on violet leaves - an attack by California thrips (limit nitrogen fertilizers; increase indoor air humidity; treat thick leaves with a soap solution with kerosene, garlic infusion, alcohol);
- the upper leaves of the violet curl and long villi appear on the leaves - damage by cyclamen mites (remove the damaged parts of the flower; insecticides are used for treatment).
Diseases
Common diseases of violets are manifested by symptoms:
- violet does not bloom - underdeveloped root system, excess nitrogen, little light.
- Spots on violet leaves - watering with cold water, draft, sunburn.
- Reduced leaf turgor – lack or excess of moisture:
- if there is little moisture, water the violet and cover it with film for 2 - 3 days;
- excess can lead to root rot, which can cause the violet to die. Examine the roots of the violet and blot them with a napkin. The rotten parts are removed and the trunk of the plant is inspected: if it is healthy, the violet is transplanted into a smaller pot; if it begins to rot, the plant is re-rooted. If the roots are intact, the flower is transplanted into new soil, covered with film and not watered for several days.
- Violet buds do not bloom - the air in the room is very dry (put an open jar of water next to the violet);
- Small leaves in the center of a violet rosette - very bright lighting or dry air (shade the flower, place an open jar of water next to it);
- Drying edges of violet leaves - soil soaking, lack or excess of certain nutrients (re-root the violet, adjust fertilizing).
- White coating on violet leaves – powdery mildew (fungicides are used);
- Yellow or red spots on the leaves - a lack or excess of certain nutrients; when the yellow spot has a round shape and is located on the side of the window, sunburn is suspected (damaged leaves are removed, the flower is shaded or rearranged).
- Saintpaulia violet leaves rot for various reasons:
- excess moisture or fertilizers (remove damaged roots, reduce watering, adjust fertilizing);
- the physiological process of leaf dying (leaves affected by rot are removed in a timely manner);
- incorrectly selected soil (add vermiculite, sand, increase drainage);
- moisture getting on the leaves during watering (they immediately get wet);
- fungal diseases - fusarium or gray rot (observe the temperature regime; do not over-moisten the soil; use insecticides);
- the room is too hot or cold; dry air (find a more suitable place; adjust the temperature; use humidifiers).
Cats and violets
We hasten to say that the popular horror story about the danger of violets, which cats are so partial to, is somewhat exaggerated: the flower is considered conditionally safe for animals.
However, all lovers of animals and plants must know:
- All cats tolerate toxic substances that enter the body in completely different ways. This generally applies to all plants, food from the owner’s table, etc., so the argument “...but the neighbor’s cat eats cacti” is not very good.
- If you notice that your cat accidentally feasted on potted flowers, and then did it again and again, it’s time to make your cat’s flowerbed. Animals need vitamins and cleansing of the digestive system, and let not homemade violet flowers help with this, but cereals, catnip, thyme, etc.
Let touching curly flowers with leaves that are pleasant to the touch live in your home as long as possible! Violet is a joy at home, and looking out the window through a bright, cheerful “hedge” immediately becomes much more pleasant even on a bad day.
- Indoor flowers and plants for the kitchen - choose unpretentious, useful and beautiful
- How to get rid of midges in flowers
- Kitchen design and decor - site guide
- 12 super ideas for crafts for the home and kitchen
- Kitchen panels - ideas and instructions
- Kitchen wall decor - 12 super ideas
- Kitchen design and decor - site guide
Signs of violet aging
The serious age of a violet can be determined by the following signs:
- blooms sparingly;
- small flowers;
- crooked rosette;
- bare stem;
- problems with leaves: dark spots, a border unusual for the variety on the edge of the leaf blade, curled, limp leaves even with sufficient watering;
- shrinking of central leaves.
Sometimes the same signs can be observed even in young (2-3 years) Saintpaulias. The reason for such early aging may be the soil.
Carefully examine the earthen ball in which the violet grows.
If you see that:
- there is a white coating on the surface of the substrate (precipitated salts contained in the irrigation water);
- the soil has compacted, i.e. there are no air sinuses, so necessary for the violet to breathe the root system;
- the chemical composition of the soil has changed - it has become acidic from the “wrong” water;
- the root system is cramped in the container,
then the time has come for active action to save the young but already sick violet.
Why are violets rejuvenated?
As mentioned above, the trunk of the flower becomes coarser and thickens, the violet becomes like a palm tree. And this is just one reason why it is necessary to rejuvenate her. The trunk lengthens and becomes coarser, and the leaves and flowers become smaller. This negatively affects the well-being of the flower.
At some point, the plant stops blooming altogether, it “falls asleep.” Elongation of the bare trunk can occur in both old and young plants, and this is a consequence of human intervention, because the lower leaves have to be torn off regularly.
Eggshell
Shells can be used as fertilizer in different ways:
- water the violets with a solution infused on the shell;
- use as drainage;
- add shell powder directly to the substrate.
Before use, the shells must be washed well and dried thoroughly. After this, grind and store either in a glass jar with a lid or in a paper bag.
Eggshells contain a lot of calcium, which the plant needs to grow. In addition, calcium regulates soil acidity.
Violet is a very delicate flower. Without fertilizers you cannot get abundant flowering. Each gardener decides for himself whether to use chemicals or natural fertilizers prepared at home with his own hands. There are a lot of traditional methods, but we recommend using only those proven by experienced flower growers. And then your violet will delight you with beautiful and lush flowering for a very long time.
If the violet has grown greatly: what to do, how to thin it out?
A compact and neat violet bush will fade gracefully and elegantly, and an overgrown violet hints at the need for its rejuvenation. To do this, it is necessary to prune the bush in a timely manner:
- excess leaves (the largest, damaged or lost turgor);
- stepchildren;
- faded flower stalks.
If the violet has grown greatly in a pot, it may need a larger pot: the ideal diameter is 10 cm. It happens that several stepsons have grown from the main trunk, and the gardener missed this moment. Stepchildren need to be carefully cut and placed for rooting.
If the compact shape of the flower cannot be restored, it is recommended to cut off its crown, root it and form a new rosette as desired.
Rooting the crown in water.
How to seat the “babies” Saintpaulia
Beginning violet growers, when they see the friendly shoots that have appeared, can’t wait to start planting them as soon as possible. But haste can cause serious harm. Wait until the “babies” acquire two or three pairs of leaves.
IN THE PHOTO: Such “babies” can be seated.
How to deal with white "kids"
Variegated varieties often produce chlorophyll-free offspring. Its white leaves are completely devoid of green fragments. This is normal. Colorless “babies” can reach decent sizes, but under no circumstances should they be transplanted.
IN THE PHOTO: It would seem that it’s time to start seating, the size allows. But the small amount of chlorophyll in the leaves will not give the “babies” a chance to survive on their own.
The processes located near the mother leaf are completely dependent on it and receive nutrition at its expense. If you plant a white “baby”, it will die very quickly: in the absence of chlorophyll in the foliage, the process of photosynthesis does not occur. Be sure to wait until the colorless “babies” begin to grow leaves with green fragments, and only then plant them.
IN THE PHOTO: The variegated “babies” in the photo have quite green leaves, they are healthy and strong. It's time to decide on an independent life!
Preparing for seating
It is best to seat the “babies” in disposable plastic cups with a volume of 80–100 ml, preferably transparent. This makes it more convenient to observe the development of the root system.
For each “baby” you need to prepare a separate glass. In order for the plant to subsequently form a beautiful, even rosette, each specimen must grow in a separate container. Drainage holes should be made in the bottom of the container to remove excess moisture when watering.
The soil mixture used is the same as for rooting cuttings: light, airy, moisture-permeable, based on high-moor peat.
Seating technology
1. We take out the mother sheet with the “babies” from the cup. Shake off the soil as much as possible. Holding the sheet with one hand, we take the “babies” in the other. We begin to slowly swing and pull them, separating them from the sheet.
IN THE PHOTO : Separating the “babies” from the mother leaf.
2. We take turns separating the “babies” from the general pile. Take your time: when taking them apart, hold them with your fingers at the base of the stems, closer to the roots. As a rule, the leaves of the “babies” are intertwined with each other. Gently untangle them.
3. We inspect the root system of the disassembled “babies” and clean it of the remnants of torn roots.
IN THE PHOTO: Disassembled “babies”.
4. Place the “babies” in prepared containers with drainage and poured soil. It is important to plant strictly in the center : in the future this will make it easier to transplant the young plant into a permanent pot.
IN THE PHOTO: “Children” of Uzambara violets are transplanted into individual cups.
Sometimes it happens that during disassembly the “babies” are partially or even completely deprived of their roots. Don’t be upset and, especially, don’t rush to throw them away. The Saintpaulia root system recovers very quickly. It is better to plant the “kids” in moist sphagnum or, if available, in the Jiffi-7 peat-humus tablet.
5. We put the “babies” in the greenhouse, not forgetting to ventilate them. After a few days, you can remove the lid and start watering the plants little by little.
Seating a large number of “children”
On a healthy, strong leaf, from three to five “descendants” can form. They grow the same way, so they are seated at the same time.
Some varieties of violets are particularly fertile. They form up to eight to twelve “children” on a leaf, but such offspring are small in size and grow reluctantly. In this case, they are carefully separated from the parent plant by the entire “family,” which is divided into several groups, depending on the number of “children.”
Each group is seated in a separate glass. In such a “kindergarten”, children easily take root and grow quickly. When an acceptable size is reached, they are seated one at a time.
It happens that the “baby” is significantly ahead of its neighbors in height, and next to them looks like Gulliver among the Lilliputians. It must be planted individually, without waiting for the others to grow up. The “accelerated baby” receives all its nutrition from the mother leaf, while others receive nothing to grow.
Technology for separating and planting large “babies”
1. We take out the leaf with the “babies” from the cup and, holding it with one hand by the stalk near the roots, with the other hand we begin, carefully swinging it, to pull out the desired “baby” from the general pile. They do the same with the others, leaving only the undergrown ones on the leaf.
IN THE PHOTO: The largest “babies” should be planted without waiting for those who are stunted to grow up.
2. We place the sheet with the remaining “baby” in the old place and add a little soil.
IN THE PHOTO: “Babies” left to grow up.
How to care for the planted “babies” of Saintpaulia in the future, read the publication: “Uzambara violet: first steps.”