Which pot is suitable?
The roots of this tuberous plant develop horizontally, so for gloxinia they choose pots that are wider than they are tall .
The size of the container should not be too large so that excess wet soil does not become a source of fungal infections. It is best if the diameter of the pot is only 4-6cm larger than the diameter of the tuber.
To ensure breathability, you should choose a ceramic planting container without a continuous layer of glaze .
Selection of a pot for gloxinia
When choosing a container, you must proceed from the size of the tuber. For adult crops, wide and deep pots are used. This will not only simplify plant care, but will also contribute to the active development of the root system. When using small containers, the plant must be replanted regularly.
Choosing a pot for planting a houseplant
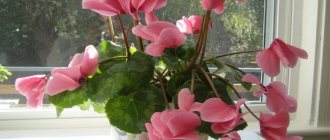
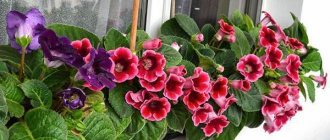
Gloxinia is a popular indoor plant. Despite the fact that it is necessary to carefully select the soil for its cultivation, the flower is often used to decorate the room. Ready-made mixtures or self-prepared soil are suitable as substrates.
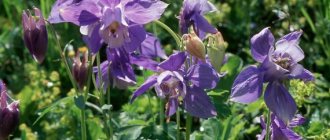
Gloxinia flower: planting and care at home
Optimal soil
Basic soil requirements for gloxinia: moisture and air permeability, nutritional value, slightly acidic reaction and sterility .
A suitable soil mixture can be purchased at a flower shop - this is soil for violets , related to gloxinias.
Options for self-prepared planting substrates:
- Planting gloxinia in vermiculite - one part of peat and leaf soil with half of sand or vermiculite;
- one part of turf soil, humus, sand and two parts of leaf humus.
Before planting, the prepared soil must be sterilized .
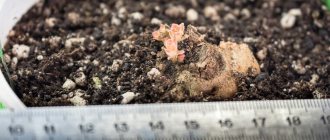
Tuber: diagnosis, preparation
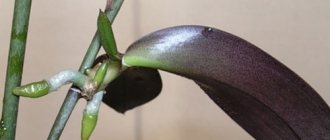
A tiny sprout that appears from the upper recess of the tuber in February or March, less often in January , signals readiness for planting.
The tuber is completely freed from old soil and the remains of dried roots from the previous season. They carefully inspect, identifying even the slightest signs of damage, rot or mold. If such damage is found, the affected areas are removed , the injured areas are sprinkled with charcoal powder and allowed to dry for 24 hours .
If the tuber is limp, wrinkled in moistened (but not wet) vermiculite for the same period . The advantage of such a substrate is its guaranteed sterility, sufficient moisture capacity and environmental friendliness. If the sprouts are barely noticeable, you can completely cover the tuber with vermiculite. Formed sprouts should be left on the surface.
A tuber that does not germinate for too long should be awakened . To do this, it is carefully inspected, possible damage is removed, washed and placed in a plastic bag, at the bottom of which there is a handful of damp, light soil. Tie this bag tightly and place it in a very light and very warm (24 to 26 degrees) place. Sprouts appear in about two weeks.
Tubers completely ready for planting and immersed for 20-30 minutes in a solution of fungicide or potassium permanganate , making sure that the antiseptic does not get on the tender sprouts. You can also carry out pre-planting treatment with a root formation stimulator .
What kind of land is needed for gloxinia
Soil for spathiphyllum - what kind of soil is needed for a flower
The abundance of flowering and the presence of immunity to diseases depend on the quality of the earthen substrate. What soil is suitable for a gloxinia flower? The following compositions can be used as nutritional mixtures:
- Turf soil, soil soil, peat and sand.
- Peat, sapropel, river sand, vermiculite and lime flour. This composition can be obtained using a ready-made soil mixture - Biosoil "Ecoflora".
- Turf soil, river sand, peat, sphagnum, charcoal and microfertilizers. These substances are present in the ready-made soil “Gardens of Aurica”.
Ready substrate for indoor flowers
Land for gloxinia is selected depending on the crop variety. Very often, preference is given to ready-made nutrient substrates. The most common mixture for begonias is “Garden of Miracles”.
Soil level
The prepared soil mixture is poured onto the drainage layer and the tuber so that it is covered with soil only two-thirds of its height .
A feature of the development of gloxinia is the advanced growth of leaves - the roots grow noticeably later. Therefore, you need to water the planted tuber moderately and carefully, especially making sure that water does not fall on the rosette of young foliage.
When a short stem is formed, add soil so that it covers the tuber with about a centimeter layer.
Read more about how to care for gloxinia at home.
Basic soil requirements for gloxinia
For full growth and flowering, the soil is prepared independently or purchased ready-made. Primary requirements:
- looseness;
- softness;
- hygroscopicity;
- breathability.
A prerequisite is the presence of a complex of microelements and peat. It is the peat content that provides the soil with looseness and water permeability. To prepare fertile mixtures, low-lying peat obtained from marshy areas is used. It is not used in its pure form; when wet, it provokes rotting of the root system.
The addition of perlite is welcome. But it should be borne in mind that it is applied in granules and no more than 1/5 of the entire soil mixture.
Among ready-made soil mixtures, “Violet”, “Begonia”, “Saintpaulia” are recommended. Suitable ones are “Garden of Miracles” and “Fart”.
Reference! Coconut fiber has proven itself to be excellent. It does not contain nutrients, but it perfectly retains moisture and increases breathability. The fiber is crushed and added in a ratio of 1:8.
When choosing a new, unfamiliar soil mixture in stores, it is necessary to carry out tests for the experiment: plant no more than 1-2 plants to check the condition of the flowers in the future. You should definitely check the quality. The soil should not contain debris, plant debris, mold, or seeds of other plants.
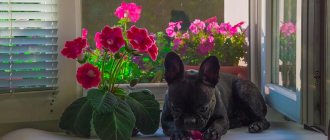
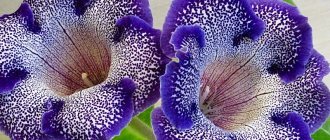
Photo
Next you can see a photo of Gloxinia planting:
The process of growing gloxinia cannot be called easy and problem-free, so it is important to know the basic rules of care. On our website you will find articles on how to propagate a plant and a detailed description of possible diseases and pests.
Preparing the soil yourself
When preparing the composition yourself, you must adhere to the following proportions: fertile soil, deciduous soil, peat and sand in the ratio 1:1:1:0.5. Experienced gardeners advise mixing the soil with hydrogel, which acts as a “sponge” and perfectly maintains the required level of moisture for a long time. When watered, it swells and releases moisture to the plant gradually, preventing the soil from drying out. During preparatory work, dry granules are mixed with the soil mixture in a ratio of 1:2. To increase fertility, you need to add rotted manure or humus, but not more than 50 g per 1 kg of the finished mixture.
A drainage layer of fine crushed stone, expanded clay or polystyrene must be provided.
When choosing land, it is necessary to take into account that only the one on which nothing has been grown for at least a year is suitable. The most suitable soil is from under deciduous and coniferous trees. Sometimes sphagnum moss and charcoal are added for looseness and feeding. It is better to use several types of soil at once: leaf, turf, coniferous. There are several ways to prepare soil for gloxinias.
- To 1 part of the finished soil, add 2 parts of peat, 1 part of perlite, sphagnum or vermiculite. Mixed with 1/3 part of charcoal.
- 1 part vermiculite and perlite are added, 6 parts soil, moss and charcoal 1/2 parts each.
- For 3 parts peat – 1 part soil and vermiculite, 1/2 part charcoal.
- For 1 part of soil - 5 parts of peat, 1/2 parts of hydrogel, charcoal, superphosphate.
To increase fertility, it is necessary to mix the soil with a large amount of fillers and leavening agents. You can add vermicompost in a 1:1 ratio, use vermiculite, coconut fiber, and peat as leavening agents.
Before planting, the soil must be sterilized to prevent the occurrence of diseases and pests.
How to place the tuber?
After hibernation in February-March, the buds on the tuber begin to wake up and the first shoots appear. If it was stored in a pot in the soil, you should take it out and get rid of the old soil, carefully shake off the tuber.
Important! It is necessary to destroy all pests and diseases that may have formed during the winter in the pot. To do this, dip the tuber in a solution of potassium permanganate or any other fungicide for about half an hour.
More information about gloxinia diseases and methods of treating them can be found here, and more details about diseases of the plant’s leaves can be found in this material.
Also, to accelerate the formation of small roots on the surface, you can treat the tuber with a solution of a root growth stimulator. The solution is prepared according to the manufacturer's instructions. The tuber is placed in the soil substrate with the indentation facing up and sprinkled with a layer of soil no more than 1 centimeter. A drainage layer must be laid on the bottom : brick chips, foam plastic or expanded clay.
Disinfecting the soil before planting a flower
Having found out which soil is suitable for gloxinia, you need to familiarize yourself with the basic principles of soil disinfection before planting a flower.
Methods for soil disinfection:
- steaming in a water bath;
- calcination (the soil is kept in the oven for 10-20 minutes);
- freezing (repeat twice);
- using fungicidal compounds.
Note! Potassium permanganate (manganese) also has a pronounced disinfecting effect. It is enough to prepare the solution and treat the soil hot.
Reproduction
Many videos have been made on the topic of how gloxinia reproduces, but not everyone has the patience to watch them.
Many gardeners prefer to quickly read the necessary material and get down to business right away. There are several ways to propagate gloxinia, so you can always choose the most convenient one:
- Tubers. For gloxinia, propagation by this method is ineffective - the tubers often rot. A large tuber is cut in half, the sections are sprinkled with coal, planted in pots and waiting for germination.
- Peduncle. It is better to use a peduncle with a pollinated flower. Pinch off the buds from it, and place the peduncle with the tip 1 cm deep in water. The roots will appear in about a month. Then plant according to the general scheme.
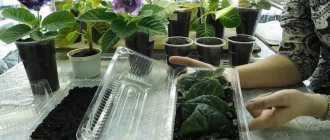
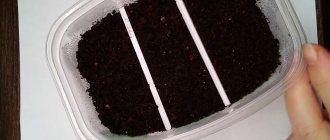
- Leaf petiole. Using a sterilized blade, cut off the petiole, dry for 10-20 minutes and plant in a light soil mixture containing sphagnum, or place in boiled water. Cover the top with a transparent bag and ventilate every day. Roots will appear in 10-12 days. At this stage of propagation of gloxinia by leaf cuttings, the petiole sprouted in water should be planted in sterilized soil and a microgreenhouse should be arranged, covering the pot with the top of a 1.5- or 2-liter plastic bottle without a lid.
- Seeds. The same soil mixture is prepared as for planting an adult plant, but with a small addition of turf. The soil is disinfected in a microwave oven for 10 minutes. Seeds are sown, scattered over the surface of the soil mixture, and covered with polyethylene. They will germinate in about 2 weeks. From this time on, the microgreenhouse should be ventilated daily and monitor the humidity - the film retains moisture well, but you should not lose vigilance. Ventilation begins at half an hour and increases the time by 10-15 minutes every day. When 2 true leaves appear after 50-60 days, it’s time to pick them into separate pots.
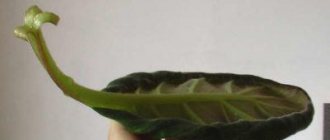
- Leaf. To propagate gloxinia by leaf, material from an adult plant is used. Using a sterile blade, the leaf is cut from the petiole, cut into several parts and stuck into the soil mixture with the cuts, supporting the particles with pieces of polystyrene foam so that they do not fall. Cover with a bag and ventilate daily until rooting and germination. Plant when the seedlings are strong enough.
Selection of ready-made substrate
You don’t have to think too hard when choosing ingredients for planting cacti. Ready-made soil for these plants can be purchased at most stores that specialize in selling indoor plants.
The advantages of this choice are obvious. It is not always possible to find ingredients suitable for creating a mixture. The origin of gravel is not always known, and there may even be doubts about its composition. Therefore, sometimes it is better to purchase a ready-made substrate compiled by specialists. However, we must remember that the basis of most ready-made soils is peat, and its high content is undesirable for cacti
When choosing a ready-made substrate, you should pay special attention to this ingredient.
The best soil composition for cacti can be considered:
- based on lowland peat;
- classified as “fertilized”.
The need for fertilizing
As it grows, the soil, even the most nutritious one, is gradually depleted. After 2-3 months, in order not to replant the flower and not injure the root system, it is necessary to feed the plants. This should provide them with the necessary microelements and nutrients that are lacking in the soil. For this purpose, organic fertilizers, mineral fertilizers and complex mineral fertilizers are used. For full growth and flowering, they are periodically alternated. It is important to monitor the condition of the plants to prevent overfertilization.
How to plant gloxinia correctly?
Beginning flower growers are sometimes confused about which end to plant the tuber. Here you should look at it carefully. The small depression in the center is the tip from which sprouts will appear in the future. But the bottom is presented in the form of a convexity (on the back side of the recess). It is this that must go deep into the soil.
Having decided on the top, you need to add good drainage to the bottom of the flowerpot - it will protect the gloxinia from rotting. Pour soil on top and dig a shallow hole in the center. Place the tuber there and cover with substrate.
It is worth noting that the tuber cannot be completely “buried” - the top should remain on top. The planted gloxinia is watered along the edge of the pot and placed in a warm and bright place.
Possible failures when growing gloxinia
A tuber has not formed - this can happen when planting a very long stem cutting or if the cutting was planted very deeply and was watered abundantly.
The buds turn black and die - the reason is a lack of micronutrients and shortened daylight hours.
Redness of the leaves is a lack of phosphorus.
Yellowing of leaves - lack of nitrogen or overwatering.
Leaf discoloration is a magnesium deficiency.
Curling leaves - insufficient air humidity.
Spotting (non-infectious). There are yellow or brown spots of indefinite shape on the leaves - too bright lighting, drafts or watering with cold water.
Curling of flowers, slowing down of plant growth - temperature below +15 degrees.
Curling of the edges of the leaves and their arching, the formation of deformed flowers and shortened pedicels is an excess of moisture in the soil.
Rotting of petioles and buds - excessive soil acidity, excess nitrogen fertilizers, waterlogging of the soil.
The plant does not bloom - insufficient lighting, lack of nutrition, dry or cold air, improper maintenance during the dormant period, excess nitrogen fertilizers.
The importance of choosing the right size
It is better not to plant small tubers in containers that are too wide. This will lead to the fact that gloxinia will increase its root and leaf mass, postponing flowering for a long time (you can find out more about why gloxinia does not bloom and what to do about it here).
In a pot with a diameter of less than 9 centimeters, gloxinia will feel cramped , there will be little soil and it will often dry out.
Due to the lack of sufficient space, the plant may begin to wither and shed its leaves.