Gloxinia attracts gardeners with its bright green leaves with a velvety surface and beautiful gramophone flowers. Like any indoor plant, it has its own growing characteristics. Follow the five rules of care and you will admire the abundant flowering of this beauty all summer long.
Content
- Place for gloxinia
- Soil for gloxinia
- Planting a tuber
- Growing temperature
- Air humidity
- Watering gloxinia
- Feeding with fertilizers
- Gloxinia flowering
- The rest period of gloxinia
- Reproduction of Gloxinia
- Growing problems
- Gloxinia diseases
- Gloxinia pests
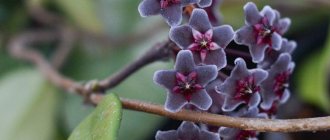
From a botanical point of view, Gloxinia Sinningia, the taxonomy of Gesneriaceae has changed, but among flower growers, their favorite flowers are still called Gloxinia, Gloxinia and Gloxinia. Therefore, in order not to create confusion, we will keep the outdated name, but remember that its name is Sinningia the Beautiful - a popular indoor plant, unpretentious, blooming profusely.
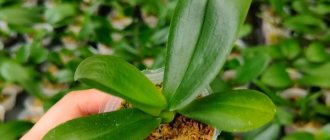
Transplanting gloxinia in spring
Before transplanting gloxinia to a permanent place, you need to make several picks. This is necessary for the seedlings to develop normally.
Picking into the ground
Picking is carried out in several stages:
- The seedlings are transplanted for the first time a month after emergence. At this stage, the seedlings are planted several at a time in new pots. They are carefully dug out with a spoon and planted together with the soil. Then spray the soil with water.
- The seedlings are transplanted the second time when they reach up to 2 cm. At this stage, each bush is planted separately.
- The third transplant is carried out to a permanent place.
Adult bushes also need regular replanting, which is usually done in the spring. It is best to do this in the second ten days of February or early March.
Additional Information! Under no circumstances should flowering gloxinia be replanted. This can lead not only to problems with flowering in the future, but also to the death of the flower.
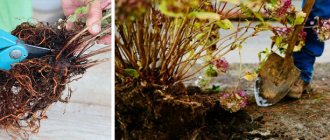
Transplant process:
- Remove the roots from the pot and rinse them in water.
- If there are damaged or rotten parts of the tubers, they need to be cut off.
- Plant in a pot with new soil and dig in the plant.
At the end of planting, water generously with warm water.
Growing gloxinia from seeds at home is not easy, but it is quite possible. If you take into account all the nuances, you can grow healthy seedlings.
Place for gloxinia
Gloxinia is photophilous, but it is better not to place it in direct sun, especially in the flowering phase, the flowers quickly fade and the flowering duration is greatly reduced.
In the spring, when the sun is not yet too hot, it will feel good on a southern window, but with the onset of June-July (depending on the climate zone), the plant will need to be moved to eastern or even western windows, or shaded from direct sunlight.
I do this: until the gloxinia grows and lays buds, it is in the brightest place, and when the first flowers bloom, I put it in a less lit and cooler place.
Gloxinia is a long-day plant; for normal growth and development it needs 12-14 hours of lighting of at least 5000 lux. With insufficient lighting, especially during the period of early growth, the plants become very elongated, which subsequently negatively affects the number of buds laid. There will be few of them, or maybe none at all. After the tuber has rooted and the leaves appear, the lighting should be as bright as possible, then the plant stem will be shorter, a lot of buds will form and gloxinia will delight you with abundant flowering. The intensity of the color of future flowers also depends on the illumination; in bright light, the flowers have a rich color, and in low light the color is noticeably paler.
Gloxinia line 'Brocade'
Gloxinia line 'Brocade'
Gloxinia line 'Brocade'
Gloxinia flower - home care
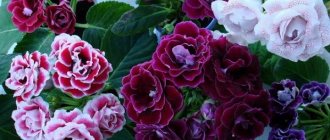
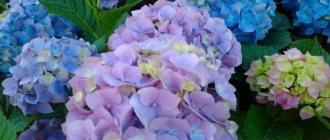
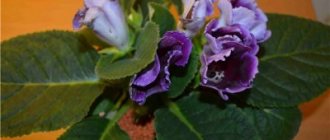
Indoor gloxinia is a wonderful tuberous perennial with velvety, juicy, rich green leaves. Its bell flowers are simple or double, crimson, pink, snow-white, lilac, speckled, frilly or two-colored, reaching 7 cm in diameter and 5 cm in length. In order for lush-flowering gloxinia to grow in the house, it is important to provide it with the right conditions when caring and growing:
- The flower needs space and diffused bright light. Direct sunlight is harmful to it.
- The plant requires 12-14 hours of daylight. During long nights, it will be necessary to organize lighting.
- Gloxinia - how to care for it and find out if the flower has enough light: if the leaves are arranged horizontally and the stem is short, then everything is in order. If they stretch upward, the lighting is insufficient.
- The plant does not like drafts - if it lives on a windowsill, you should forget about constant ventilation.
- You cannot spray gloxinia; it does not tolerate drops getting on the leaves. At the same time, the plant needs high humidity; this can be easily achieved by placing a container of water next to it.
- During the growing season, the plant is happy with normal room temperature; in the resting phase, it needs a cool temperature of -10°C. Gloxinia will tell you how to care for it - overheating causes its leaves to stretch upward, but if they fall below the level of the flowerpot, the flower freezes.
Soil for gloxinia
You can use a mixture of leaf, peat soil and sand (1:1:0.5), but the composition may be different, the main condition is that the soil is loose and breathable. Acidity pH 5.5 - 6.5; gloxinia grows poorly on more acidic soils and for this reason pure, non-deoxidized peat is not suitable for it. Before planting the plant, I strongly recommend disinfecting the soil. Now I use the drug Maxim (1 ampoule per 2 liters of water).
Wide and shallow dishes are more suitable for growing gloxinia. For young tubers, pots with a diameter of 7-10 cm are suitable, and for larger and older ones 11-15 cm. Pots can be either plastic or clay.
Seedling care
On days 2-3 after emergence, the film is gradually removed from the container. In this case, the temperature in the room where the gloxinia seedlings are located is lowered to +18…+20 degrees. Otherwise, the seedlings are stretched.
1st pick. It is carried out 1 month after germination. At this time, one rosette of full leaves should appear on the plants. The first picking is carried out if the gloxinia seedlings are thickened. If the seeds were planted at a sufficient distance from each other, the first pick is skipped. Gloxinias dive into soil of the same composition as the soil for sowing seeds. The distance between seedlings is 2 cm.
2nd pick. It is carried out 2 months after germination. By that time, young gloxinia should have two pairs of leaves. The picking is carried out into the soil of the same composition as before at a distance of 4-5 cm. This stimulates the growth of seedlings.
3rd pick . It is performed when the plant has three pairs of leaves. Picking is carried out at a distance of 10 cm or in separate containers for each gloxinia.
To successfully grow young gloxinia, the correct conditions must be observed:
- temperature + 20 degrees;
- a large amount of diffused sunlight;
- in the hot season, spray at night;
- watering as the top layer of soil dries.
If the young gloxinia has received proper care at home, it will bloom 5-6 months after germination. Young gloxinia does not need rest at home in winter, and therefore it continues to grow all winter.
Planting a tuber
In February - March, less often January (it all depends on the storage temperature) the tuber begins to germinate. If it was stored in a pot with old soil, you need to take it out and clean it of the remnants of last year’s roots and soil. Disinfect in a pink solution of potassium permanganate (30 min) or in any fungicide solution. For faster root formation, the tuber is soaked in a heteroauxin solution for 18-24 hours (making sure that the solution does not get into the recess of the tuber), but this is not necessary. The tuber is planted in the ground with the depression upward and sprinkled with soil no more than 1 cm. There must be drainage at the bottom of the pot (foam plastic, expanded clay, crushed stone chips, etc.). The higher the pot, the more drainage (up to 1/3).
During the period of tuber germination there are always the greatest losses and they are associated with waterlogging of the soil, as a result of which the tuber rots. Since the development of roots is preceded by the formation of the above-ground part, watering should be very careful along the edge of the pot or into the tray and only until the soil is lightly moistened. To avoid unwanted losses I do this:
I plant the tuber in moist soil level with it, place the pot in a bag and place it in a bright place without direct sunlight (22-25 degrees). I ventilate once a day for 10-15 minutes. After the first pair of leaves appear, I open the top of the bag and acclimate the young plant to room conditions for 3-4 days, then remove the bag completely. As the stem grows, I add soil and cover the tuber by 1-2 cm. While the plant is in the bag, there is no need to water it, the soil remains evenly moist and loose, increased air humidity and heat are maintained, the roots grow faster and there is almost no loss.
When to pick gloxinia
Gloxinia can often be found in flower beds. Its flowers, shaped like bells, are distinguished by a variety of shades. The short stem and the fleshy leaves bordering it, which have a velvet texture thanks to the fibers, are almost invisible under the rich bouquet of large flowers.
The plant owes its unusual name to the German scientist Benjamin Peter Gloksin, who devoted his life to biology. Another name for the flower is Sinningia. In some varieties of gloxinia, the flowers inside are covered with bright specks, while in others they can be decorated with contrasting colored frills along the edge. Flowers can be smooth or velvety, which also depends on the variety.
Growing temperature
At the stage of tuber germination after a dormant period, it is necessary to maintain a temperature of about +25 degrees. After rooting and with the beginning of the growth of the vegetative mass, the temperature is reduced to +22 degrees during the day and +18 at night. Lowering the temperature is necessary so that in conditions of insufficient light (in February-March there is not enough light) the plants do not grow too rapidly and do not stretch out. The temperature does not need to be reduced, but in this case the plants need additional lighting.
During the growing season, the temperature should not fall below 18 degrees Celsius. Lower temperatures (from +15 - +20) slow down the growth and development of the plant. The optimal temperature for the growth and development of gloxinia ranges from +22 to +26 degrees.
During the active growing season, a short-term increase in temperature to +28 degrees is allowed, but at higher temperatures few buds are formed. If elevated temperatures persist for a long time, then gloxinia begins a period of stagnation, i.e. growth and development stop, and blooming flowers last no more than 3 days. Thus, we can conclude that high temperatures for gloxinia are even more destructive than excess lighting.
Gloxinia line 'Avanti'
Gloxinia line 'Avanti'
Gloxinia line 'Avanti'
Tips from growers
If you want gloxinia to grow well and delight you with its lush and bright blooms, then you need to listen to the following recommendations.
- Plants should be placed freely on window sills and not be too dark.
- Yellow leaves and dried flowers should be carefully removed.
- Do not allow water to stagnate in the pot - the roots will begin to rot.
- Feeding gloxinia is necessary only during the flowering period; during dormancy, you cannot feed the flower.
- If the leaves begin to curl, the buds fall off, and the plant itself withers, it means that it has been affected by mites or thrips. The affected areas of the bushes are cut off, and the plant itself is treated with special insecticides.
If necessary, with the onset of autumn, the tubers are dug up, dried and placed in bags. Store in a dark and dry place at temperatures up to +15 degrees. In early March, gloxinia is planted in new soil.
By strictly following these recommendations, even a novice plant grower can easily grow this flower on his own at home.
Air humidity
Air humidity should be in the range of 70-80%, but gloxinia feels good even at a lower humidity of 50%, however, even lower humidity is undesirable, the plant develops poorly, growth slows down and deformation of the leaves occurs. The edges of the leaf blade are bent downwards.
To increase air humidity, you can place the plant on trays with wet expanded clay, moss, water, but gloxinia itself cannot be sprayed because brown, dry spots form. However, away from light and drafts, gloxinia tolerates water treatments very well. At night, you can take it into the bathroom, spray it or wash it with warm water and leave it there with the doors closed and the lights off until the water on the leaves has completely dried.
Watering gloxinia
For irrigation, you need to use soft water (melt, rain, filtered or partially boiled), chlorinated tap water must first be left for at least a day.
It is better to water from a tray or carefully along the edge of the pot, avoiding water getting on the leaves and in the center of the tuber (where the sprouts come from). in most cases, not from the roots, but from above, from the growing point, the tuber begins to rot. The water for irrigation should be warm, but if gloxinia is at a temperature of +18 degrees, this does not mean at all that you need to water it with water at a temperature of +25 degrees, nothing good will come of it. The water should be 2-3 degrees higher than the ambient air temperature. 20-30 minutes after watering, drain the remaining water from the tray.
Between waterings you need to dry out the soil. It is necessary to reduce the frequency of watering in rainy, cloudy and cold weather. At this time, the soil does not dry out for a long time, and the roots can rot from excess moisture.
Types of fertilizing
Among the variety of choices, the main ones stand out, which are suitable for feeding gloxinia.
Organic fertilizers
The main advantage of organics is naturalness. It contains three key elements for active plant growth: nitrogen, phosphorus and potassium. In addition, they contain humic acids, which increase the immunity of home flowers and accelerate the processes of root formation and gas exchange.
Organics are absorbed more slowly by the plant than other types of fertilizers.
Thanks to such fertilizing, the soil structure becomes looser and its air permeability increases.
Organic fertilizers include:
- manure;
- bird (chicken) droppings;
- compost;
- silt;
- sawdust and tree bark;
- peat.
Bird droppings
To feed gloxinia at home, it is convenient to use manure or bird droppings. Both are available in specialty stores.
The composition of chicken manure is richer than manure. Due to its organic form, its nutrients are not washed out of the soil for a long time and are well absorbed by plant roots.
Litter increases the resistance of flowers to bacterial and fungal diseases and eliminates mold on the soil surface. The element in question has a high nitrogen content, so it should be used sparingly.
To prepare a solution based on manure, take one part of the concentrate and mix it with 10-12 parts of water until completely dissolved.
To prepare a mixture from litter, use a ratio of 1:25-30.
Mineral fertilizers
These are inorganic compounds that contain essential elements for plant growth. They are produced in three types:
- Liquid (concentrate).
- Solid (powder, granules).
- Tablets, capsules, sticks.
Feeding with fertilizers
After planting the tuber, there is no need to feed gloxinia for the first 1.5 - 2 months. Fertilizers are applied an hour after the main watering, along the edges of the pot, making sure that the solution does not get on the leaves or at the growing point. It is advisable to do this in cloudy weather or in the evening, so that after feeding the plant is not in the sun. Fertilizing with complete mineral fertilizer alternates with organic fertilizers every two weeks, but the first fertilizing should be mineral.
Lack of iron in gloxinia (photo by Tideya)
You can feed once every 10 days, but then make the solution concentration weaker.
Before the appearance of buds, organic matter is alternated with nitrogen: (potassium nitrate, ammonium nitrate). With the appearance of buds, organic matter is alternated with phosphorus: superphosphate, potassium phosphate), if this is not done, dormant vegetative buds will awaken, which will lead to a suspension of the normal development of the plant.
- Nitrogen fertilizers cause increased vegetative growth; if they are in excess, flower buds are almost not formed. Excess nitrogen can also cause root rot. For this reason, nitrogen fertilizers are given only at the beginning of growth.
- Phosphorus fertilizers - enhance flowering, but their... excess causes premature aging of leaves and leads to chlorosis of the plant.
- Potassium fertilizers improve flowering. Excess leads to the formation of shortened peduncles, yellowing of the lower leaves, and deterioration of flower color.
- Microelements - affect the size of flowers, their color and the number of buds.
Organic fertilizers for tuberous flowers
Bird droppings
Manure is a very potent fertilizer and when using it, the concentration should be strictly observed. Pour 1 tablespoon of litter into 2 liters of water, close the lid and place in a warm and dark place. Over the next 3-4 days, stir with a stick until fermentation begins (bubbles appear on the surface). After the fermentation process is complete (about a week), the bubbles disappear, solid particles settle to the bottom of the jar, and the solution becomes lighter. It is now ready for use.
250 ml of concentrated solution is poured into 1 liter of water and mixed well; the plants are watered with this solution after preliminary moistening. (one hour after the main watering).
You can simply buy ready-made organic fertilizer.
Mineral fertilizer for tuberous flowers
for 10 liters of water take:
- 10 g simple superphosphate
- 10 g potassium chloride
- 4 g ammonium nitrate
- 5 g magnesium sulfate
- 0.1 g ferric chloride
- 0.07 g boric acid
- 0.004 g copper sulfate
- 0.05 g manganese sulfate
- 0.008 g of zinc sulfate.
If you can’t or are too lazy to look for everything separately, then just buy phosphorus-potassium mineral fertilizer and microelements.
I use Uniflor - flower, Uniflor-bud or Baby (dry, granulated for peppers and tomatoes) as phosphorus-potassium, Uniflor - growth, Uniflor - green leaf as nitrogen and Uniflor-micro as microelements.
After flowering, feed 2 times with potassium-phosphorus fertilizers with an interval of 14 days. This will help the tuber regain strength and survive the dormant period well.
Gloxinia hybrids F1
Gloxinia hybrids F1
Gloxinia hybrids F1
Land for gloxinia at home
Indoor gloxinia is picky about the soil composition, the optimal acidity pH is 5.9-6.9. The mixture should contain nutrients and allow water and air to pass well to the roots of the plant. When planting a flower, it is best to purchase a ready-made substrate for violets or begonias in the store. If you decide to prepare soil for gloxinia at home yourself, then you need to mix two parts of leaf soil, one each of humus soil and sand. Before planting, the soil is sterilized - a vessel with soil is placed in a large container of water and boiled over low heat for 1.5 hours.
How to water gloxinia?
When growing gloxinia, it is important to know how to care for it and how to water it correctly. Moisten the plant by pouring water into a tray or from above along the edges of the pot so as not to get on the foliage and flowers. In this case, you need to use settled warm liquid at room temperature. It is important to know how often to water gloxinia so as not to overwater the plant, which can be detrimental to it. Moisten the bush when the top layer of soil dries out. During the growing season it is watered more abundantly; from the first days of August the procedures are reduced.
Transplanting gloxinia at home
Every year at the end of the dormant phase, gloxinia needs to be moved to another pot. The procedure is carried out at the end of winter in February. How to care for gloxinia at home - transplantation:
- Remove the tubers from the pot along with a lump of soil and transfer them to a new container with a diameter of 9-12 cm.
- A layer of drainage should be poured onto the bottom of the vessel. Deepen the tubers to ½ their height, gradually adding and compacting the soil mixture.
- When the shoots from the rhizome grow to a height of 2-3 cm, you need to keep 3-4 pieces on the bush, pinching the remaining ones.
- A day after pinching, the tubers are sprinkled with substrate so that a layer of soil of 5-10 cm is formed above them, and watered.
How to feed gloxinia at home?
Before caring for gloxinia in a pot, it is important to find out what fertilizers you need to feed the plant and how often. If you neglect to add supplements, problems may arise - the buds become smaller, the color of the flowers fades, growth slows down, and as a result, the decorative appearance of the bush suffers. Feeding begins when the plant comes out of dormancy and a shoot hatches from the tuber. Stop feeding when the bush has completely faded. Gloxinia, how to care - fertilizers:
- Feed the flower once every 10 days, using complex fertilizer for flowering plants - 2 g/l.
- It is useful to alternate mineral supplements with organic ones. Mullein is suitable as the latter - its concentrate is diluted in water 1:12.
- In summer, the plant often becomes deficient in boron, causing its leaves to become jagged. In this case, you need to take care of the gloxinia - foliar spraying with a 2% borax solution.
How to care for gloxinia after flowering?
Caring for gloxinia after flowering must be done correctly so that the plant will delight you with lush inflorescences next year. The first budding ends in May-June. Gloxinia - how to care after flowering:
- After the first flowering at the beginning of summer, you need to cut off the stem and all the leaves, leaving 2-4 lower leaf blades on the bush. Stepchildren are formed in their sinuses, the 2 strongest ones are retained, and the rest are removed.
- At this time, you need to feed the plant with fertilizer for growth, and a month later (when buds appear) for flowering.
- Often repeated flowering is more sparse than the first. Sometimes the culture pleases with bells all summer without interruption.
- When the plant has completely bloomed, reduce watering and stop feeding.
- When the ground half of the plant turns yellow and dries, the tops are removed, leaving a 1.5 cm stump on the tuber. The plant is placed in a dry place with good ventilation and a temperature of +12-+13°C.
Caring for gloxinia in winter
In November-December, the plant begins a dormant period. Gloxinia flower - winter care:
- The tubers are cleared of soil and disinfected with a fungicide.
- Store them in boxes, sprinkled with perlite or vermiculite.
- Twice a month, the substrate should be moistened to 1/3 depth with a solution of water and fungicide.
- The optimal storage temperature is +10 - 12°C, the dormant period will last about 3 months - until the end of February.
- You can store gloxinia, pruned for the winter, directly in the pot, without removing the tubers. You need to place it in a dark, cool place. Moisten the flower once a month to prevent the roots from drying out.
Gloxinia flowering
In a properly grown plant, buds are formed after the third or fourth pair of leaves. Their quantity depends primarily on the mass of the tuber and growing conditions (light, temperature, humidity).
Gloxinia can bloom again (for example, hybrids “Avanti” and “Brocade”) if the first flowering was early. In this case, the above-ground part (stem and leaves) is cut off, leaving a shoot about 2 cm high. Soon, gloxinia develops side shoots of the second generation (second growth) on which buds are laid, the plants bloom, but not as profusely as during primary flowering. Flowers are smaller in size.
Repeated flowering is not typical for all species and varieties of gloxinia; for example, the side shoots of the summer generation of the Kaiser Friedrich variety develop slowly, by the end of summer they manage to acquire leaves, but do not enter the budding and flowering phase.
Is it necessary to feed gloxinia?
The question disappears if you trace the life cycle of the plant. During the growing season, it goes through transformations from a flat-round tuber to a profusely flowering bush with large thick leaves. The maximum size of the plates is up to 25 cm long with a width of 15 cm. On one adult gloxinia rosette, 10-12 buds can open at the same time. In some varieties the corolla reaches 12 cm.
Of course, the supply of batteries is stored in the tuber. But it is, first of all, intended to ensure that gloxinia safely endures the dormant period.
Without additional fertilizing, when replanted annually in a fresh substrate, the plant will survive, but this will affect its health or decorativeness:
- the bush will be weak;
- tolerates stress worse;
- gets sick more often, is affected by pests;
- development slows down;
- Fewer buds are formed;
- the corollas become smaller;
- the color becomes somewhat faded;
- there may not be a second wave of flowering at all;
- the tuber is depleted, the next season it comes out of hibernation worse, and sometimes does not survive until spring.
The rest period of gloxinia
In the fall (September - October), when it becomes clear that the soil does not dry out for a long time after watering, watering is reduced, and after the leaves begin to turn yellow or dry out, they stop watering altogether. After the above-ground part of the plant completely dies off, the tuber goes into a dormant state, which lasts 3-4 months depending on the storage temperature.
Tubers are stored in several ways:
- The pot with the tuber is placed in a cool place with a temperature of +10 to +15 degrees. During the winter, the soil is slightly moistened several times so that the tubers do not dry out and become very wrinkled, especially if the tubers are small, they are stored worse because they dry out quickly. If the storage temperature is higher, then you need to moisten more often.
- 2 weeks after the above-ground mass has completely died, the tubers are dug up, cleaned of remaining roots and placed in damp sand and stored in a cool place. This method is convenient because at any time you can easily remove the tubers from the sand and inspect their condition.
This is how I store them: I dig up the tubers, place them in damp sawdust or sand and store them on the bottom or middle shelf of the refrigerator door.
Once a month I take out and inspect the tubers; if the sawdust dries out, I lightly moisten them and place the tubers there again. According to literary data, as well as based on data from Internet resources, storage temperatures below +8 degrees are detrimental for gloxinia. Based on my many years of experience, I cannot agree with this, the refrigerator is only +5, but I have never had any losses. The main condition is not to over-moisten the substrate in which the tubers are stored; it should only be slightly damp, and the sand can be completely dry.
Peculiarities
Gloxinia belongs to the Gesneriaceae family, America is considered its homeland, and the flower received its name in honor of the botanist Benjamin Peter Gloksin. Its second name is sinningia.
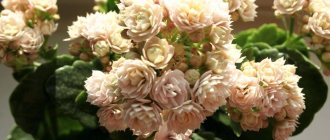
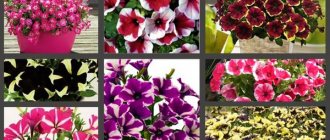
This is a small houseplant that produces large, bell-shaped flowers in a wide variety of colors. Their border can be smooth and terry, monochrome or multi-colored. For example, the hybrid Gloxinia “Avanti F1” has white flower petals, but the Sinningia “Hollywood” has dark purple petals.
These indoor bushes look very stylish and bright; their leaves also have different patterns on their surface depending on the variety being grown.
The key features of this chic indoor bush are:
- possibility of growing indoors or in special greenhouses;
- the presence of a tuberous root, which, if necessary, can be stored underground in the same way as regular potatoes;
- Regardless of the variety, the leaves always grow in the shape of a rosette, and their surface is covered with small fibers;
- Gloxinia's stem is short but very thick;
- the tone of the flowers themselves depends only on the variety of gloxinia.
Compared to other indoor plants, Sinningia always stands out favorably with its lush and incredibly bright flowering.
Reproduction of Gloxinia
Gloxinias are easily propagated by seeds, leaf and stem cuttings, part of the leaf blade, peduncle and tuber division. Seed propagation is mainly for gloxinia species; you can get a lot of young plants at once and it is not advisable for varietal and hybrid ones; Character splitting may occur at the genetic level, which manifests itself in the external appearance of the plant. There is no guarantee that you will receive a plant with the original parental characteristics.
Sowing Gloxinia seeds
Sowing is carried out at the end of January - February (with mandatory additional lighting with fluorescent lamps) or in March. Seeds germinate in the light, they are sown superficially on a moist substrate (the composition is the same as for planting tubers), lightly pressed against it and covered with glass or film. The bowl with the crops is placed in a bright place. At a temperature of 24-26 degrees, germination begins 12-14 days from the moment of sowing; at lower temperatures it takes up to one month or even longer. Caring for crops comes down to maintaining temperature and humidity, preventing the soil from drying out. If there is a need to moisten the soil, this should be done from a pallet. There is no need to water from above because the seeds are small and can be easily washed off with water.
About a month after the appearance of the cotyledons, you can make the first pick, especially if the crops are thickened. They dive according to the 2*2 cm pattern into light soil. Another month, after the first pair of true leaves appear, the young plants are picked again or immediately planted in separate pots with a diameter of 6 cm (cactus). The temperature is maintained at least +20 degrees. Gloxinia tolerates picking well, and after it begins to grow intensively.
I do this: if the seeds are granular, I place them at a distance of 4*4 cm from each other in order to avoid picking in the cotyledon phase in the future. I put the bowl with the crops in a transparent cake box, and they remain there until 1-2 pairs of true leaves appear. After that, I plant them in separate pots and again put them in this mini greenhouse for 2 weeks for rooting and survival. In the future, I will accustom them to the open air of the room and, if necessary, transfer them to larger pots. My seedlings bloom 4-5 months after germination. Gloxinias grown from seeds may not have a dormant period in the first year, and will vegetate (continue to grow) all winter.
How to get gloxinia seeds
On the second day of flowering, after the flower blooms, take a soft brush and transfer the pollen to the stigma. The next day, to better guarantee pollination, repeat this procedure. If pollination has occurred, the perianth falls off after a few days, the ovary begins to grow, and along with it the receptacle noticeably thickens. The former flower, now an unripe dark green fruit, does not dry out for a long time. Seed ripening lasts 1.5 - 2 months and it is uneven, i.e. the seeds do not ripen at the same time in the box. After the fruit (box) opens, bring a piece of paper and, tapping the peduncle, shake out the seeds. After a couple of days, collect the seeds again. The seeds are very small, dust-like. Germination remains for 2-3 years. Germination is good. Normally, a plant should have no more than 3 seed capsules. If the plant is young or the tuber is of insufficient weight and size, limit yourself to one fruit and remove the excess ones.
Vegetative propagation of gloxinia
Vegetative propagation is the most common method; it is the simplest and most accessible. If rooting occurs in spring or in the first half of summer, then flowering can be seen from the resulting young plants in the same season.
Propagation of gloxinia by leaf cuttings
In the budding phase or during flowering, cut off the leaf of the lower tier of the rosette (young, upper leaves should not be taken). It is desirable that the petiole be short and thick; the size of the resulting tuber will depend on the diameter of the petiole. Next, you can proceed in a way convenient for you:
- Immerse the cutting in water to a depth of 1 - 1.5 cm and hold it until roots form (there is no need to change the water, just add if necessary), then plant it in the ground to a depth of 2-2.5 cm. For better survival of the cutting in the soil, it can be cover with a jar or bag.
- The cuttings are dipped in charcoal powder and planted in moist soil. Cover the top with a glass jar. At a temperature not lower than +22 degrees, rooting occurs within 2-3 weeks, then the jar can be removed. A little trick: if you only have one leaf, but you need to get two tubers, split the base of the petiole lengthwise to a length of 1 - 1.5 cm; after rooting, 2 smaller nodules will form.
Propagation of gloxinia by stem cuttings
If a gloxinia tuber has many side shoots, leave 1-2 and break out the rest. Stem cuttings are essentially finished plants, but without roots. They are rooted in the same way as leafy ones and they bloom in the same season.
Reproduction of gloxinia by leaf blade
- Cut off the large leaf at the base of the rosette. On the back of the leaf blade, make cuts across the protruding veins in the thickest places. Place the sheet on moist soil, press it to the soil in the places where the cuts are made and cover it with a bag or place it in a greenhouse. Roots will soon appear in the places where the cuts are made, and then nodules will form. It is important to maintain high humidity.
- The leaf plate is cut crosswise into 2-3 parts depending on the size of the leaf and each part is planted in soil or sand, covered with a jar or bag to maintain moisture. Root at a temperature not lower than +22 degrees. Optimal is about +25.
Reproduction of gloxinia by peduncle
It should be mentioned that not all gloxinia varieties can be propagated in this way. Some varieties take root well with peduncles, while others do not take root at all.
After the corolla has withered, the peduncle is broken out and placed 1 - 1.5 cm in water and care is taken that it does not touch the walls of the vessel. Do not change the water, add as it evaporates. After about a month, roots and a nodule form on it. After this, the peduncle is planted in moist soil to a depth of 1.5 - 2 cm. Care as for leaf cuttings.
Reproduction of gloxinia by tuber division
Large tubers that have more than two sprouts can be divided. The tuber is cut into pieces so that each of them contains at least one sprout. Sections of parts of the tuber are sprinkled with crushed charcoal, dried for 3-4 days in a dark place at room temperature and then planted in moist soil. Further care is similar to caring for a whole tuber after planting.
How to get seeds?
In order to obtain seed material, you can choose one of two methods.
- Contact a specialized store . There, gloxinia seeds are presented in an unusually wide range, with both classic and hybrid varieties. A great advantage is that propagation in this case will be quick and simple, because the seeds are already completely ready for further use.
- Personal collection of seeds . The main difficulty here is that you first need to manually pollinate the flowers themselves. For these purposes, during direct flowering, pollen is added to the pistil of a flower from another plant. It is advisable to use flowers of different colors for this procedure. A few days after the procedure, the corolla dries out, and a seed pod appears in its place. Its formation and maturation can take up to 56 days.
As soon as the first signs of opening of the box appear, it is carefully cut off with sharp scissors and placed in a dry container. After complete opening, the seeds are carefully poured into a clean container for further use.
The best time to sow seeds is February. Therefore, pollination of plants must begin in late November - early December.
Possible failures when growing gloxinia
A tuber has not formed - this can happen when planting a very long stem cutting or if the cutting was planted very deeply and was watered abundantly.
The buds turn black and die - the reason is a lack of micronutrients and shortened daylight hours.
Redness of the leaves is a lack of phosphorus.
Yellowing of leaves - lack of nitrogen or overwatering.
Leaf discoloration is a magnesium deficiency.
Curling leaves - insufficient air humidity.
Spotting (non-infectious). There are yellow or brown spots of indefinite shape on the leaves - too bright lighting, drafts or watering with cold water.
Curling of flowers, slowing down of plant growth - temperature below +15 degrees.
Curling of the edges of the leaves and their arching, the formation of deformed flowers and shortened pedicels is an excess of moisture in the soil.
Rotting of petioles and buds - excessive soil acidity, excess nitrogen fertilizers, waterlogging of the soil.
The plant does not bloom - insufficient lighting, lack of nutrition, dry or cold air, improper maintenance during the dormant period, excess nitrogen fertilizers.
Gloxinia diseases
- Tuber rotting. Occurs when overwatering. At the initial stage, the disease is manifested by a decrease in leaf turgor; after watering, turgor is not restored. If the tuber is severely damaged, gloxinia droops completely. Leaf cuttings need to be cut and re-rooted. If the tuber has rotted away from the growing point, then the rotten parts are cut off to healthy tissue, disinfected in a strong solution of potassium permanganate or another fungicide, powdered with crushed coal and dried for 2-3 days, after which they are planted again in moist soil.
- Late blight. It is the most common disease of the Gesneriaceae family. It develops quickly and leads to the sudden death of gloxinia. It begins with slight wilting, then the growth of the stem stops and its color changes. After watering, the leaves wither even more, the base of the stem begins to rot, spreading to the petioles and leaves. An attempt to preserve the plant is unsuccessful; cut leaf cuttings do not take root and quickly turn black and rot. The plant must be destroyed along with the soil.
- Fusarium. The plant becomes infected through the soil. Leaves turn brown, curl and wilt. Dark stripes and cracks form on the stem. The defeat of a plant by fusarium is promoted by excessive watering and constant soil moisture.
More details fusarium
Planting Gloxinia
For planting, choose shallow, wide pots. Gloxinias prefer to grow in breathable and nutritious soil. The soil can be purchased at the store, or you can prepare it yourself using leaf soil, sand and a large amount of peat, you can add perlite.
Before planting, the soil must be calcined and watered with a solution of manganese or fungicides. For these flowers, it is very important to avoid conditions that lead to rotting of the root system and tubers, so drainage must be used when planting.
Plants are planted in winter, from late December to mid-February, in which case you will get a flowering plant in May-June. Before planting, the tubers are briefly disinfected in a solution of manganese or fungicides, then dried.
When planting, large tubers are cut in half, leaving live buds on each part, and the cut points are sprinkled with ash.
Plant the tuber in a small hole in the soil and deepen it so that it protrudes above the surface of the soil in the pot. At first, gloxinias are not watered, and then conditions are created for comfortable flower growth.