Many people consider gloxinia to be a rather capricious plant, but this is not so. It doesn’t have many growing requirements, and it also reproduces easily.
- History of Gloxinia
- Features of growing gloxinia or sinningia
- Classification of Gloxinia by size
- By color
- dividing tubers
History of Gloxinia
Already at the end of the 18th century, the South American plant Gloxinia, named after the famous naturalist Peter Gloxinia, won the hearts of European collectors. Later in England, the Brazilian specimen was thoroughly studied, assigned to the Gesneriev family and officially named Sinningia - in honor of the scientist Wilhelm Sinning. And so it has been since then: in scientific circles it is called Sinningia, among the people - Gloxinia.
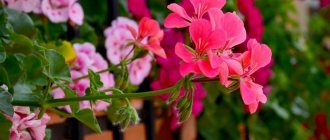
Gloxinia Yesenia will surprise us with its beauty
Gloxinia is one of the most popular indoor plants from the Gesneriaceae family.
Terry gloxinia Yesenia wins the hearts of those who saw the spectacular plant for the first time, and even experienced gardeners. Velvety purple bells sparkling in the sun rise above the dark foliage and decorate window sills from May to September. Numerous varieties of hybrid gloxinia come from wild species and cultivated varieties bred by breeders earlier. Plants with new qualities and unique corolla colors appear very often. This is facilitated by the popularity of the culture, as well as the relative ease with which even amateurs can breed a new hybrid. Terry varieties are the most spectacular and in demand by flower growers all over the world.
Classification of Gloxinia
To size
❀ Standard gloxinia: a rosette with a diameter of 25–40 cm. One of the largest synningias was about 60 cm in diameter and had about 100 flowers that bloomed at the same time! The diameter of the pot is 10–20 cm.
❀ Compact cloxinia: rosette diameter 15–25 cm, can produce up to 50 buds on one plant. The diameter of the pot is 10–15 cm.
❀ Miniature and microminiature gloxinia: diameter from 5 to 15 cm (gloxinia varieties Colorado Sunset, Ozark First Born). The diameter of the pot is 6–8 cm.
In catalogs you can see the definition of “semi-miniature” gloxinia: most likely, this is a way to emphasize the compactness of the rosette, by analogy with Saintpaulias.
1 photo - Gloxinia Pink Fairy Tale. 2. photo - gloxinia tidea violet, 3. photo - gloxinia Tigrina red
By color
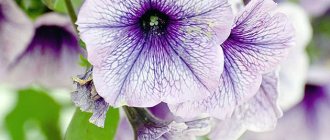
❀ The color range of synningias is varied: flowers are found in white, lavender, red, purple, with tints and transitions. The varieties with specks, a multi-colored halo or a light yellow throat, with a contrasting border (they are conventionally called tigrina) are unusually beautiful.
Gloxinia Cherry
❀ There are “calico” (covered with specks of one or several colors), single-color and two-color varieties.
❀ Based on the shape of the flowers, there are simple (one row of petals, usually 5-8 pieces) and double (more than one row of petals) varieties.
Features of gloxinia variety Yesenia
Yesenia is an industrial variety of Dutch origin.
As a rule, such plants are unpretentious, display their characteristics well during vegetative propagation and, of course, amaze with their magnificent flowering. The happy owners of Gloxinia Yesenia confirm that their favorite has all the listed qualities.
A plant with a flat-round tuber hidden underground forms low shoots above its surface that rarely grow longer than 8–10 cm with succulent oval leaves. Both the stems, petioles, and leaf blades are densely pubescent. The buds appearing in the center of the rosette are no exception.
By the time the densely burgundy bells bloom, the flower stalks reach a height of 15–20 cm, and the entire plant – 25–30 cm. Therefore, gloxinia connoisseurs classify the variety as a standard one.
A striking feature of gloxinia variety Yesenia is the shape of its flowers. As soon as the petals emerge from the opening sepals, the buds become subtly pink. The resemblance to a rose remains when gloxinia appears in all its splendor.
The large flower consists of two or three layers, which gives the corolla a spectacular terry appearance. The inner side of the petals is painted in a thick crimson, purple, and sometimes almost black color. The outside of the bell is much lighter; the same pinkish tone can be seen deep in the neck of the flower, closer to its base.
The variety is characterized by bouquet flowering. That is, on the plant at the same time from 3 to 10 bells open, like brocade, flashing in the light with hundreds and thousands of bright sparks.
If optimal conditions are created for the flower, flowering continues from May until the end of summer.
Substrate for gloxinia
The soil should be breathable, but at the same time sufficiently nutritious. Approximate composition: leaf humus, high-moor peat, baking powder (perlite) in a ratio of 2:4:1. It is advisable to add superphosphate - 1 tsp. per 10 liters of soil. If the peat is fibrous and light, raising agents are not needed.
When growing with wick irrigation, when water or nutrient solution from the container rises along the cord, more raising agents are added to provide the roots with enough oxygen.
Know-how from the Nevsky House of Violets: to retain moisture, add 0.5 parts of Seramis clay granulate to the substrate.
Gloxinia lighting
Sinningias are suitable for any side of the window, except the south, and a place protected from drafts. Whether a plant is properly lit can be determined by its external signs.
❀ If there is enough light: the plant is compact, the leaf petioles are short, the leaves do not stretch upward, the rosette is symmetrical, the flowers are fully open.
❀ If there is not enough light: the trunk lengthens, the rosette folds the leaves, the color of the leaves is pale and unsaturated, the leaf blades are thin, the peduncles are long and drooping, the flowers are poorly
❀ If there is too much light: light spots appear on the foliage, the leaves are hard and the rosette is “thickened”, the leaves do not straighten out, the flower stalks cannot get out from under the leaves. It is necessary to shade the plants with parchment paper attached to the glass or hang blinds.
❀ To grow gloxinia on a shelf, 12–14 hours of lighting is required. If the lamps are new, they emit brighter light - this must be taken into account. Good results are achieved by growing under Osram Lumilux Daylight 865 and Osram Fluora or Osram Natura lamps. The distance from the socket to the lamp should be 18–30 cm.
Gloxinia, or Sinningia
Description
Gloxinia is a herbaceous perennial with a root system in the form of a large tuber. Some species are stemless, while others have shoots that can stretch up to 70 cm. The shoots are quite soft and creeping. The height of the plant in its natural environment does not exceed 25 cm. Indoor varieties can be even tiny (up to 5 cm in height)
Above the soil surface there is a dense leaf rosette, which consists of rather large petiolate leaves. The length of the leaf plate reaches 20 cm. It has an oval or ovoid shape with a solid edge and a pointed end. The dark green, velvety leaves are thickened, with a prominent central vein visible on them.
Humidity and watering of gloxinia
Recommended air humidity is not lower than 20%. With insufficient humidity, the rosette and leaves become smaller, the tips of the leaves dry out, the buds do not open and dry out.
The leaves of Sinningia are pubescent, so they are not sprayed, but washed to remove dust under running warm water, removing excess moisture with a paper towel. Do not place the rosette in the light until it dries completely, otherwise the drops in direct sunlight will cause a burn on the leaves.
Water the plants after the top layer of soil has completely dried - in the morning, without getting on the leaves, evenly wetting the soil. It is better not to water them in the evening, as the temperature will drop at night and there is a risk of rotting of the roots and tubers.
It is possible to water both from above and into the pan, but then the drainage must conduct water. Synthetic winterizer is excellent: it is chemically neutral and conducts water and air; many use sphagnum moss as drainage.
When planting, you can stretch a synthetic thread - a wick 0.2-0.4 cm thick - through the holes in the bottom of the pot; along it, moisture will rise into the soil, and it will be better wetted.
Water for irrigation is used at room temperature. If fertilizers are applied during watering, the temperature should be several degrees higher - this way the nutrients will be better absorbed.
The soil
Gloxinia needs light and loose soil, which you can make either yourself, or take soil from under a birch or linden tree, or purchase a special substrate and add the same amount of ordinary soil to it. It is also permissible to add a little perlite, sawdust or soil disintegrants.
The bottom of the pot is filled with good drainage, be it pebbles, crushed stones or small stones, and one or more holes are needed in the bottom. In this case, the water will saturate the soil well during watering and easily leave the pot through the drainage and a special hole.
Read here Abutilon: 130 photos and video instructions for caring for and growing indoor maple at home and in the garden
Temperature for gloxinia
Optimal air temperature is +18…+23 °C. The plant can withstand +30 °C, but this will become a strong stress for it, loss of turgor or blackening of leaves, rotting of roots is possible. If this does happen, you need to root the leaf just in case, check the condition of the tuber: remove it from the pot, free it from dead roots, plant it again and monitor watering.
Diameter of the pot It should not be much larger than the tuber (3-4 times). In large pots, moisture stagnates, roots develop poorly and the tuber may rot. Conversely, in a pot that is too small, the earthen ball dries out quickly and the growth of the plant slows down. It's better to use plastic ones.
You cannot plant several tubers in one pot.
Growing problems, diseases and pests
Gloxinias are most susceptible to the following fungal diseases:
- tracheomycosis;
- late blight;
- powdery mildew;
- gray rot;
- phyllosticosis;
- chlorosis;
- root rot;
- anthracnose;
- rust mushroom.
This crop is also affected by insect pests. Gloxinias often suffer from whiteflies, scale insects, thrips, mealybugs, cyclamen and spider mites.
How to deal with them
Fungicides, insecticides and various chemicals are effective in combating plant diseases and pests. But if gloxinia is affected by any fungal infection, this means that proper care for this plant was not carried out. It is necessary to maintain temperature conditions, monitor humidity, feed on time and water according to a certain schedule.
Gloxinia varieties and species differ significantly from each other. But the requirements for caring for this crop do not depend in any way on its varietal. If you approach this matter responsibly, the flower will delight you with abundant blooms every year.
Fertilizers for gloxinia
Sinningia should be fertilized a month and a half after planting. Flowering is promoted by mineral fertilizers with a high content of phosphorus and potassium; nitrogen and microelements are required for active growth. Phosphorus fertilizers are used to feed already grown plants that are ready to flower, otherwise their growth will slow down.
Fertilize during the growth and flowering period every two weeks, alternating mineral and organic fertilizers. Foliar fertilizing with vermicompost infusion (according to the instructions) gives excellent results - it is sprayed on the upper and lower surfaces of the leaves in the afternoon, when it gets cooler. If rotted manure is added during planting, you should avoid fertilizing with liquid organic fertilizers.
Winter “sleep” and storage of gloxinia tubers in winter
At the end of November, with decreasing daylight hours, Sinningia stops blooming and gradually dries out. After the above-ground part dies, the tubers are dried at room temperature and placed for winter storage in a dark and cool place, but not in the refrigerator. The best temperature for storage is +10...+16 °C; at a lower temperature the tuber can freeze, at a higher temperature it can “wake up”. To save space, you can store the tubers in a zip bag.
All collectors have different storage methods: wrapped in a napkin, in vermiculite, in coconut substrate, peat, Seramis granules and even in sawdust. You can store the tubers in pots, but make sure that the soil does not dry out and water them with water at room temperature at least once a month, otherwise they will dry out and die.
Twice a month they check the condition of the tubers and make sure that condensation does not settle on the bags. The dormant period lasts about 3 months depending on storage temperature.
Caring for gloxinia during the dormant period
At the end of September, the flower begins its dormant period.
The above-ground part gradually dies off. For the gardener, this is an important signal - it’s time to prepare a dark, cool corner for the green pet, where the temperature will not exceed 10–15 °C. To prevent rot and other problems, gloxinia tubers are treated with a fungicide and dried before storing for winter storage.
The tuber can be removed from the soil, wrapped in sphagnum or placed in sawdust. In this form, gloxinia is sent for “wintering” at least until February. When it’s time to “wake up”, the plants are transplanted into a pot of a suitable size. Large tubers can be divided with a sharp knife. In this case, the cut areas are sprinkled with charcoal powder.
Since over the past year the soil in the pot has accumulated a lot of salts, has become compressed and lost a lot of nutrients, it is reasonable to replace it with a new substrate.
Gloxinia beauties in the home collection - video
Planting gloxinia tubers
When sprouts appear on the tuber (no more than 1 cm), this means that it has “woke up” and is ready for planting. You can speed up the awakening by placing it in a zip bag with the addition of a small amount of peat, in a warm, bright place. To stimulate awakening, you can soak the tuber before planting in a solution of Epin or Zircon.
The tuber is cleaned of dead roots and tissues, the cut areas are treated with activated carbon and dried. You can use any bulb dressing before planting. Drainage is poured onto the bottom of the pot (or padding polyester is placed), approximately 1/5 of the height of the pot, then soil to 2/3. The tuber is placed in the middle so that a small part of it and its sprouts protrude on the surface.
Later, after germination, you can completely cover the tuber with soil.
Important: if you stored the tubers dormant in a pot, you need to replace the soil with fresh one.
MASTER CLASS: Reproduction of gloxinia
Dividing gloxinia tubers
From a divided tuber, depending on its size and the number of dormant buds, you can grow about three full-fledged plants.
In spring, the sprouted tuber is cut into pieces with a sharp knife so that each has 1-2 strong sprouts. The cut areas are sprinkled with crushed coal and dried for 10–15 minutes.
The cuttings are planted shallowly so that the shoots are outside. This is a risky method - it is better to use the shoot separation method.
Propagation of gloxinia by stem cuttings
If the synningia “woke up” early, the emerging sprouts can be cut off from the tuber when they grow to 3–5 cm and planted in separate pots, covered with a bag. You can root them in water, planting them in the ground after the roots have appeared. Such plants bloom profusely already in mid-summer.
Propagation of gloxinia by stem cuttings
Valuable varieties can be propagated by cutting off the upper part of the shoots, but it is advisable that a tuber and at least two pairs of leaves remain in the ground. The top is rooted in water or directly in the soil. They also root a part of the shoot with at least two pairs of leaves without a tip.
Propagation of gloxinia by cuttings of a whole leaf or part of a leaf
Leaf cuttings can be rooted in cooled boiled water until a tuber forms or directly in the ground, like Saintpaulia cuttings. If you propagate in the fall, it is better not to send the planted cuttings to rest.
If the gloxinia leaf is very large, it can be divided into two fragments by cutting out a semblance of a leaf from the upper part - then two or more tubers will be obtained from one gloxinia leaf.
Reproduction of gloxinia by part of a leaf
It is advisable to plant leaf fragments of gloxinia in soil with a predominance of peat and perlite and place them in a greenhouse for rooting. After 1.5–3 months, “babies” form on the planted leaf; they are planted when at least three pairs of leaves appear. Some will already have tubers by this time, while others will form them after planting. Carefully separate the babies from the leaf so as not to damage the nodules, if any. If the gloxinia plant does separate from the tuber, it is better to replant it and leave the tuber - another specimen will grow from it.
After the children are separated, the gloxinia leaf can be left for re-rooting. Usually after 3-4 months the leaf dries out.
You cannot place plants in greenhouses/bags in direct sunlight - they will cook!
Reproduction of gloxinia by peduncles
When the gloxinia flower fades, the peduncle is removed and placed in a container with water. After 3–5 weeks, roots and a small tuber form on it. It is planted in a sterile earth mixture (perlite, perlite + vermiculite, moss), and after a month the leaves of the young plant will appear on the surface of the ground.
Propagation of gloxinia by seeds
Gloxinia seed pods set in the case of self-pollination only in simple varieties, since terry varieties do not have stamens. Sinningias can be pollinated independently. It is better to do this in the morning, on the 5th–7th day after the flower has fully bloomed. If pollination has occurred, a fruit is formed that ripens for 2–3 months.
Ripe gloxinia seeds are sown in a plastic container on moistened peat soil, without sprinkling on top. Seedlings sprout quite quickly. They are picked in the phase of two pairs of true leaves.
Gloxinia seedlings: 1 photo - two days old, 2. photos - two months old, 3 photos - before picking
When gloxinia seedlings grow up, they are planted in separate pots with a diameter of approximately 6–8 cm. They bloom in suitable conditions after 3–5 months.
First flowering of gloxinia seedling