Features of wintering
Attention : Winter for adult indoor gloxinia is a period of rest. A plant that has bloomed at least once and managed to grow tubers enters a state of dormancy. The larger the tuber, the better it is stored. A young specimen of the first year of life may not fall asleep for the winter.
When to retire? This should not be done forcibly. This gloxinia has a small tuber less than two centimeters in diameter, which can dry out and die in winter conditions without watering. A young plant needs special care during the winter season:
- Ensures correct temperature conditions . Indicators should not rise above +20°C. If the room is too hot, the stem will stretch to the detriment of tuber growth.
- Water less often than in the summer season (read about how to properly water and feed gloxinia for long flowering here). Otherwise, waterlogging will lead to rotting of the roots.
- Organize lighting . Daylight should last at least 12 hours a day. In the absence of additional lighting, the flower becomes very elongated. To prevent this, the room temperature is reduced to +18°C. Or, at the end of February, the long stem is cut off, leaving only the lower leaves.
Read in detail about what needs to be done next after the gloxinia has bloomed, and from this article you will learn about the features of flower care at home.
Features of care after winter
After the end of the wintering period, gloxinia begins its growing season. After the first shoots have appeared, the plant is removed from the pot and the tubers are cleaned under running water. It wouldn’t hurt to keep the root system in a weak solution of potassium permanganate. This will be especially useful for those flowers that have rotted or rotted over the winter; also carry out this operation with those tubers that are being transplanted for the first time.
The next step is to plant gloxinia in the substrate. First, fill it with expanded clay and soil up to the middle of the pot. We place the tuber itself in the center and fill it with soil. Gloxinia should be watered often, but in small portions. After 2–3 weeks, you can start feeding the plant. Also, do not forget about adding complex microelements in small, non-concentrated doses.
There are 3 stages in this matter:
- Before flowering, add nitrogen fertilizer, alternating it with a small amount of compounds containing potassium and phosphorus.
- During flowering, we reduce the share of nitrogen fertilizers and increase the share of phosphorus in the fertilizing. This will promote the growth of flower stalks.
- After flowering, potassium should predominate in the nutritional composition to allow the tuber to stock up on nutrients.
Important! The part of the plant from which young shoots have emerged should remain above the surface to prevent them from rotting.
Sometimes the plant may not “wake up” in time after winter. One possible reason could be a very short rest period (less than 4 months). For example, during a dry winter, the root may dry out. In this case, you need to put the flower in the light and water it in small doses. After some time, gloxinia will return to normal and begin to “wake up.” Another reason may be the fact that a very young plant was placed for the winter, which did not have time to form a tuber by that time, or it rotted over the winter.
Another, unfortunately, very common cause of the problem can be a rhizome of too low quality, the strength of which was only enough for one season. This option is often found on purchased tubers, which may simply be old or infected with various diseases. To find the cause of the problem, you need to dig out the root itself. If it is very wrinkled, it is most likely dead. If not, then carefully cut the tuber.
Did you know? According to scientific research by Thai scientists, keeping gloxinia at home is the best method of combating oxygen starvation.
A healthy root should have a slightly yellowish or pinkish tint. In this case, dry the incision and treat it with an antiseptic. Next, gloxinia will need time to “awaken”. If the cut on the root is brown, then such a root will no longer be able to be revived. But if a brown tint is observed only on one side, then remove the completely rotten part and plant the tuber in new soil. Such a plant can still be saved.
Video: planting gloxinia in substrate
Rest period
When should gloxinia be removed for the winter, for rest? Typically, the plant goes into a midnight state in September-October, which marks the start of the dry season in their homeland of South America.
In the case when the plant has faded and does not want to fall asleep, it needs help. If gloxinia does not go on vacation on time, the flowering dates will shift, which should fall in the spring and summer months.
To prevent this from happening, at the beginning of autumn, faded gloxinia begins to be prepared for wintering. If flowering is late, wait until it ends. After complete independent death of the above-ground part, the tuber is ready for storage. If everything is done correctly, gloxinia will begin to wake up no earlier than January - February .
Tuber storage
After completing the preparatory measures, the tubers of adult gloxinia are removed from the soil for subsequent storage. It is convenient to do this using the transshipment method:
- Transfer the earthen lump from the pot into a large, wide container.
- Use your fingers to gently knead the soil and divide it into several parts.
- Remove the tuber and remove any remaining soil from it.
Important!
Then the tuber is washed well under running cool water and dried. You cannot send it for storage wet. This leads to the formation of rot.
Methods and conditions for storing tubers
Different methods are used to overwinter gloxinia at home. A plastic bag with a mixture of wet sawdust and washed and heated river sand in the oven is suitable for storing the developed root. The mixture is slightly moistened. Otherwise, the tubers will turn sour due to lack of air and too much water.
The prepared mass is poured into the lower part of a thick bag. Then the prepared tuber is placed in it and covered with the remains so that it is completely hidden from view. After this, the bag is put away in a place suitable for wintering.
The premises for successful preservation of tubers in winter must meet the following requirements:
- lack of intense lighting;
- air temperature not lower than +3 degrees and not higher than +15 degrees;
- humidity from 60 to 90%.
These conditions are closest to the natural ones under which gloxinia overwinters in its homeland. The easiest way to create the necessary microclimate is to place bags of bulbs in the bottom drawer of the refrigerator intended for vegetables. This option for storing gloxinia is suitable if there are few plants.
Important!
The disadvantage of this method is that the air in the refrigerator becomes very dry. Therefore, you should regularly check the condition of the soil in the bag and, if necessary, moisten it.
Another suitable option is to place bags of tubers on a glazed but not heated loggia or balcony. In this case, the air should not warm up above +20 degrees. Otherwise, the tubers will leave the resting stage ahead of time.
You may be interested in:
Storing calla lilies in winter at home after digging in the fall How to store calla lilies in the winter at home after digging in the fall should be studied in detail by those who are…Read more…
If the house has a cellar with considerable depth, where the temperature is maintained in winter at +5 degrees, gloxinia roots are placed in it. It is ideal if in such a room there is no fungus or mold on the walls and constant humidity is maintained. In such conditions, there is no need to additionally moisten the soil in the bag. It will always be in optimal condition.
If there is no space in the refrigerator, a suitable balcony or cellar, bags of tubers are placed under the bathtub. In this case, the conditions for humidity and light are met, only the temperature remains high.
The tubers are periodically inspected during storage to avoid the formation of rot. If traces of damage by putrefactive processes appear, the damaged areas are cut off to a normal tuber and the sections are sprinkled with ash or crushed activated carbon.
Important!
If the bulbs were purchased in the fall, they are immediately sent for storage. First place for a quarter of an hour in a pinkish solution of potassium permanganate for disinfection and dry.
Storage in soil
It is much easier to care for a flower in winter if you do not remove the roots from the soil. Preliminary preparation in this case is carried out in the usual way. Then the container with the root system in it is moved to a colder room. You can put it on the floor near the balcony door, but there should be no heating devices nearby. This ensures the optimal temperature.
Another option is to take the pots out to an unheated glassed-in loggia or move them to the cellar. Any room where the temperature will be significantly lower than that created during the growing season is suitable.
The top layer of soil is sometimes moistened with water. You should not water the soil too much, but you should not allow the soil to dry out completely. This is a good way to store tubers in the bathroom. For additional cooling, it is recommended to occasionally place pieces of ice on the surface of the soil.
Advantages and disadvantages of storage methods
The proposed methods for preserving the viability of tubers are used in accordance with the age and condition of the plant. They have their pros and cons:
- young gloxinia is left in the ground for the winter, this is more likely to prevent the tuber from drying out;
- if there is no suitable place to place pots or there are a lot of flowers, then the off-ground method is more suitable;
- when placing tubers in bags, the risk of rot formation increases, so they are often checked;
- It is most convenient to keep bags of gloxinia in the refrigerator in winter;
- if there is no suitable room or large refrigerator, it is optimal to store the roots in the bathroom;
- Gloxinia purchased in the fall can be preserved using a soilless method with mandatory preliminary disinfection.
Detailed description
To maintain the viability of adult tubers, gloxinia must be properly prepared for winter rest:
- In September-October, after flowering, place gloxinia in a less lit place, for example, on a northern windowsill. Provide temperature +15°C. Feed once with potassium fertilizer. Gradually reduce watering. Moisten the soil with small portions of water no more than once a week.
- When the leaves begin to dry, stop moistening the substrate. You cannot immediately cut off the above-ground part of the plant. You need to allow the nutrients to gradually move into the tuber from the stem and leaves. If you cut off green foliage, vegetation processes may resume.
- After the upper part has completely died off on its own, cut it off, leaving a small stump one to one and a half centimeters high.
How to prepare a plant for wintering
In the fall, when the plant begins to prepare for rest, and most often this happens in September or in the first half of October, the leaves begin to fade and gradually fade. It is during this period that it is necessary to begin preparations for the dormant period: we reduce the frequency of watering to a minimum (once every two weeks), and also stop any growth stimulation (applying fertilizers first). Along with the leaves, the roots also die. By mid-October, all that remains of the flower is the bulb that formed over the summer. It is necessary to store it in the future so that after winter you can again admire the luxurious flower.
Storage methods and conditions
When the preparation is completed, you need to send the tuber for the winter. Storage methods:
- Leave the tuber in the pot . You can sprinkle it with river sand. Cover the flowerpot with a saucer, place in polyethylene and place in a cool place with a temperature of +10 to +15°C. Make sure that the tuber does not dry out completely. Lightly moisten the soil by spraying several times during the winter.
- Two weeks after the aerial part has completely died off, dig up the tuber . Clear away any remaining roots. You can wash it in water, dry it and treat it with Fitosporin. Take a plastic bag with a zipper and pour slightly damp sawdust or river sand or crushed peat into it. Or take a mixture of substrate and vermiculite. Rinse the sand first and place it in a hot oven.
- Place the tuber in a bag . Store in a box in a cool place at a temperature of +10 to +15°C. The middle or bottom shelf of the refrigerator door will do. Remove and inspect the tuber monthly. If the substrate is dry, spray it with warm water and return the tuber to its place. Avoid excess moisture.
If the grower has several gloxinias, make labels indicating the variety and the date of sending for wintering.
Important : If the tuber is purchased in the fall, it is disinfected with a special agent and stored without substrate.
As a result of violation of storage conditions, tubers may wake up ahead of schedule , without resting for even two months. In this scenario, it is recommended to choose one of the following options:
If the sprouts that appear are tiny, you don’t have to remove them. Reduce the amount of moisture received.- Cut off young shoots. Return the tuber to its resting place. In the spring, plant it in a pot with new soil (read about how to properly prepare soil for indoor gloxinia here, and from this article you will learn how to choose the right pot for gloxinia, as well as the features of planting and watering the plant). Place in a warm and bright place.
- Plant the plant in fresh substrate. Light with fluorescent lamps. In this case, there is a risk of getting a weak, very thin gloxinia. In this case, at the end of February, you should remove the top of the stem, leaving only the lower leaves. Cut tops can be rooted. After some time, gloxinia will give new shoots.
- Keep the awakened plant in cooler conditions at a temperature of +18°C. Provide good natural light. This way you can avoid the active growth of gloxinia.
How to care in winter?
In winter, plants that have not gone to rest require care. They are watered and, if possible, the daylight hours are extended using fluorescent lamps.
You can learn more about the features of caring for gloxinia here.
What can I do to make her wake up?
Tubers stored during the dormant period should be cleaned of soil residues, washed in warm water, and checked for integrity. Existing damaged areas should be powdered with charcoal. The tubers need to be dried. To restore overdried tubers:
- soak for a day in a solution of Epin or Zircon;
- It is recommended to leave soft tubers wrapped in a wet cloth for 3 days;
- Place the tubers in moistened vermiculite.
When examining the stored tubers, you will notice that some have sprouted. Then it must be removed from the bag and planted in fresh substrate.
What to do if you wake up early in November?
The pot with gloxinia that has woken up ahead of time can be moved to the window, watered and conditions for further growth can be created (it is advisable to organize additional lighting). You can make it simpler: remove the sprouts that appear.
Doesn't retire
In gloxinia that does not retire, the part located above the ground becomes elongated, and the plant loses its attractiveness. In the future, it will not be possible to obtain good flowering, since for the correct development of the tuber it requires a rest period of 2 to 4 months.
It is recommended that such gloxinia be forcibly retired. To do this, in early October you should cut off the leaves and stem of the plant without waiting for them to dry out on their own. Pots should be placed in a cool, dark place.
Dutch gloxinias should not be forced to retire: grown from seeds, they have a tiny tuber (it has not had time to develop).
Having sent such a plant to rest, due to the death of the tuber, you may not wait for it to wake up. After the flowering of such gloxinia ends , it is necessary to trim the stem above the first pair of leaves. Shoots will appear from the axils and you can continue caring for the plant as usual.
Useful video
We recommend watching a video about the features of the gloxinia dormant period and preparing it for winter:
We also recommend that you familiarize yourself with our materials about the rules and subtleties of the gloxinia reproduction process:
- seeds;
- leaf;
- cuttings.
Preparation for winter and pruning
If the plant is young, then gloxinia does not need to be pruned in the first year for the flower to gain strength.
If the plant has dropped all its leaves, you need to trim its stem so that the height of the remaining small stem above the ground is no higher than one centimeter.
Then, for a month, the plant is supplied with a minimum amount of moisture and is not fed. And only after this the tubers are carefully dug out of the ground and put away.
If you properly care for gloxinia bulbs during the hibernation period , they can survive until the next season. After proper rest, the plant will begin to produce new shoots and roots.
Before wintering, cut the leaves and stem to 1 cm high
Awakening
The rest period lasts four to five months. By the end of January, you can expect awakening in the form of the first sprouts. When this happens, you should return the plant to the pot with fresh soil and place it in the brightest place (we wrote about what size pot is needed for the healthy development of gloxinia here). They deepen it just a little bit. The sprout should rise slightly above the soil layer, or be on par with it. In the first seven days, no watering is done, then they start with moderate doses of moisture, gradually bringing it to normal.
Stimulation of growth is not done until February, so that the tuber does not waste its strength , because the larger it is, the more abundant the flowering will become. Excess shoots are removed, leaving three or four pieces when they reach a length of five centimeters.
You can use them for propagation by rooting them in a jar, like a small greenhouse, periodically hardening and ventilating them.
Attention! If it turns out that the tuber is affected by rot after hibernation, then you need to disinfect it using the above method.
Can also be placed in the root for recharge.
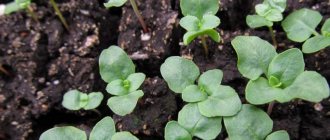
Reproduction of gloxinia from seeds
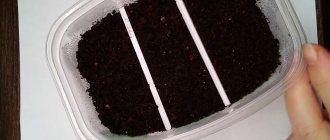
Growing gloxinia from seeds is probably the most difficult and time-consuming way. To plant seeds you will need soil:
- Peat.
- Dernova.
- Sheet.
A little sand is added. Before direct planting, the resulting mixture is steamed. The easiest way is to put it in a bag with holes and steam it in the microwave at high temperature for about 10 minutes. Seeds are planted in a plastic container, evenly distributed over the entire surface. Then cover with film. If everything is done correctly, the sprouts will hatch in one and a half to two weeks. The flower needs to be ventilated for half an hour every day. It does not need frequent watering, thanks to the moisture in the greenhouse. Each time the ventilation period is slightly extended. After 1.5-2 months the first leaves will appear, which means you can start picking. Replant carefully (without damaging the root system) in plastic cups. It is recommended to take the sprout with a small amount of soil on the roots.
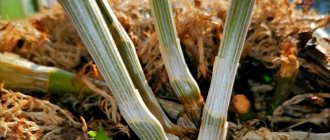
Vegetative propagation. Dividing Gloxinia tubers.
After the dormant period has passed and the shoots formed on the tubers have reached 2 cm, they can be divided into parts. It is desirable that each part has a shoot or a pecked bud. It is advisable to sprinkle the cut area with charcoal. We air dry the slices for several hours and plant them in the soil.
Recommended soil mixture composition: 1:1:1 (turf soil, leaf soil, sand). Sterilize the mixture before use. It is desirable that the soil mixture is moist. After we plant the plant in the soil, we do not water it. We water the transplanted plant the next day. There is no need to feed the plant; we care for it like an adult plant.
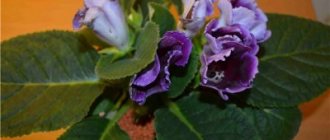
Types of indoor gloxinia
Gloxinia has about 20 species, as well as many different varieties. The most common types include:
- The most common variety is perennial or speckled. The peculiarity of the species is that the leaves below are colored reddish. The flowers are bell-shaped. Flowering begins in autumn. The height of the plant does not exceed 70 cm;
- Royal Sinningia is one of the most prominent representatives of the genus. The height of the species does not exceed 10 cm. The leaves are wide and dark. Silver veins are clearly visible on them. Flowering occurs in summer. The axillary flowers are large in size and rich purple in color;
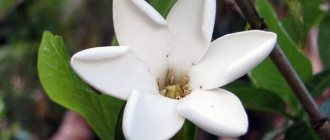
The most unusual type of gloxinia is the Low-growing one, with flowers 2-3 cm in size.
- Beautiful - a variety that looks like a royal one. However, the leaves are lighter in color. The flowers of the plant are violet and purple in color;
- Gloxinia tiny is the shortest species. Its height is about 2.5 cm. There is one small velvet flower on one peduncle. Flowering occurs in summer.