Ways to propagate a plant
The most recognized methods:
- Reproduction by leaf petioles.
- Propagation by seeds.
- Reproduction by dividing the tuber.
- Reproduction by peduncles.
Attention : A common method of propagation is rooting the leaf petiole.
How is it propagated by seeds?
Propagation by seeds is the most labor-intensive option for planting gloxinia. But plants grown in this way are characterized by increased vitality. Seeds can be purchased or collected from other flowers.
The landing procedure consists of several stages:
- Prepare the soil as when planting from leaf cuttings.
- Mix gloxinia seeds with sand.
- Scatter them over the surface of the soil without covering them with soil on top.
- Moisten the soil with a spray bottle.
- Cover the container with the crops with a plastic bag or glass.
- Install the structure in a warm, well-lit place. Recommended air temperature is 23°C.
- Shoots will appear within 2-2.5 weeks. After 2 leaves appear, the seedlings should be planted, for example, in plastic cups.
- After 7-8 months the plants will begin to bloom. To stimulate lush flowering, the first buds should be pinched off.
Reference! It is recommended to sow in winter, in January-February.
Preparation
It is better to propagate synnengia by leaf in early summer, because... Fresh leaves have more strength at a given time. In addition, a young plant has a greater opportunity to form a tuber .
Preparation for propagation and cultivation at home:
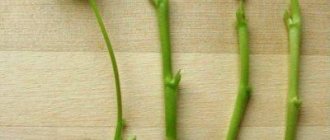
- From a healthy adult plant, cut a leaf taken from the base. (Petiole length is up to 5 centimeters.)
- Cut the petiole exactly across with a sterile blade or a sharp knife, so as not to introduce microbes and damage the plant itself, dip the tip in the phytohormone solution.
- Before planting, disinfect the soil with a solution of potassium permanganate or spill boiling water.
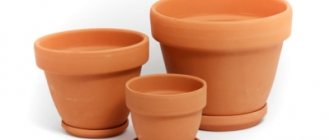
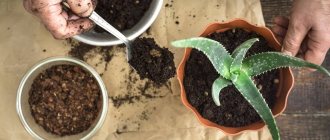
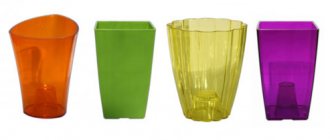
Choosing a pot
The pot in which the plant will be placed should have a diameter 4-5 centimeters wider than the tuber itself. Both clay and plastic pots are suitable for growing. The shape can be absolutely any. It is better not to plant tubers in a pot that is too wide or too narrow . If the container is too narrow, the plant will often dry out, since there is not enough soil in it. If, on the contrary, it is too wide, the plant will increase its leaf and root mass, postponing flowering for a long time.
You can read more about the rules for choosing a pot for gloxinia here.
Soil selection
The soil must be loose and have liquid permeability. Many gardeners prefer soil for violets. You should not use regular peat with a high degree of acidity, because gloxinia will grow poorly and will not produce flowers. Optimal:
- 1 part leaf soil;
- 0.5 parts of river sand;
- 1 part deoxidized peat.
Read about proper soil preparation for gloxinia in a separate article.
Reproduction of Gloxinia by leaf
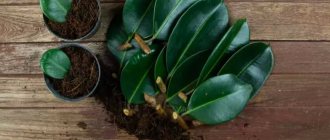
Propagating gloxinia at home using its leaves is the most common and reliable method (vegetative propagation). A healthy adult gloxinia has many large, succulent leaves. But for rooting, we choose a young leaf with a short stump, no more than 2 - 3 cm. If the cutting is too long, it must be cut with a clean blade to a length of 3 cm. Reproduction by leaf is best done in late spring or summer.
Rooting into the substrate
You can root the prepared leaves directly into the substrate. To do this, use small disposable cups measuring 50–100 ml, fill them with soil for flowering plants, moisten it and carefully bury the end of the cutting 1 cm into the soil. The glass is covered with a jar or bag to create a greenhouse effect. Place the glass on a bright, warm windowsill and wait for the roots to appear. Typically, the leaf takes root within a month. When small sprouts appear, the greenhouse can be opened. After a couple of months, several babies will form on your leaf. Then the leaf is carefully cut off, and the young seedlings are planted in small pots for further growing of the flower.
Recently, flower growers have begun to use peat tablets to root gloxinia leaves. It is better to immediately place the tablet in a small disposable cup, without soil, and soak it well with warm water. Using a toothpick or match, expand the upper recess in the peat and carefully, without pressing too hard, place the stem of our leaf. Create a greenhouse by covering the glass with a bag or jar and wait for the root to appear. In about a month, maybe earlier, roots will appear. Then, carefully transplant the leaf along with the tablet into a pot of soil. It is better to tear the mesh on the tablet to make it easier for the gloxinia roots to grow.
Rooting in water
You can root young gloxinia leaves in water, placing them in small glasses with 1 - 2 cm of water, no more. Use settled, warm water, preferably 2-3°C above room temperature, or boiled. The glass with leaves should be in a well-lit place, but not in the sun. Water is added and changed occasionally. When stable roots appear, the leaf with roots is planted in the prepared pot. In one and a half to two months, your seedling will have babies. Then the leaf that has served its time is carefully cut off.
Sometimes it happens that a leaf, having taken root and given you a nodule and a baby, is still strong and healthy. It can be reused. To do this, cut out a fragment with a cutting from it and try rooting again.
Propagation of gloxinia by leaf cuttings
To propagate gloxinia by cuttings, take a cutting of a young leaf, preferably during the formation of buds on the flower. The procedure and methods for rooting cuttings are the same as rooting gloxinia with a leaf. (see above)
This may be interesting: Gloxinia (sinningia) - growing and care at home
Reproduction of gloxinia by leaf fragments
If you only have one gloxinia leaf, but it is large and healthy, you can get several copies of your favorite flower from it. An old sheet is not suitable for this. Cut a clean, healthy leaf blade into fragments. To do this, use a clean and sharp knife. Plant each part of the leaf with a piece of cutting or central vein in prepared, well-moistened soil, preferably in a separate small disposable cup. Cover with a plastic bag to create a greenhouse effect. Place on a well-lit, warm windowsill. Watch. If the soil is dry, moisten it. In less than a month, your plantings will have roots. As soon as the first toy leaves emerge from the soil, the greenhouse can be opened and let the young bushes get used to indoor conditions.
In the same way, you can root leaf fragments in peat tablets. Place the tablets tightly in the container, add warm water in small portions to the bottom of the container so that the dry tablets do not float, wait for half an hour so that they are properly moistened, drain off the excess water. In the upper part of the peat washers, use a match or a toothpick to make holes into which you carefully insert your leaf fragments. Close the container with a transparent lid. Place it in a warm, bright place. Make sure that the tablets do not dry out, moisten them by adding water to the bottom, do not pour water on the plates - gloxinias do not like this. After a month, all fragments should take root. Start opening the greenhouse slightly, let the new shoots get used to room conditions and develop faster. When the first leaves appear, the tablets can be transplanted into pots with soil. It is better to carefully cut the mesh on the tablet so as not to damage the roots and allow them to develop more easily in the future. If you were given only one small leaf of the treasured gloxinia variety, then it can be used as follows. Using a disinfected sharp knife or scalpel, make cuts on the veins of the leaf, place it in a greenhouse on a damp substrate with the underside, flat, and press lightly. The greenhouse is covered and placed in a warm, bright place. Make sure that the soil does not dry out and the temperature is 23 - 25 degrees. After a couple of weeks, small rosettes of leaves will appear along the edges of the cuts. So, from one small gloxinia leaf, with effort, you can get several new flowers.
You can use the same leaf in another way. Divide your sheet in half by cutting out the center vein. Cut each half of the leaf into pieces with a clean tool between the side veins; there can be a lot of them, up to 10 or more pieces. Plant each part of the leaf as described above.
Causes of root rotting during leaf propagation
- Perhaps, when planting, you put a lot of pressure on them, pushing them into the ground, and damaged them. You can not do it this way. It is better to use a toothpick or match to make a hole in the soil or peat tablet, place the cutting in the hole and carefully press the soil against it.
- If direct sunlight shines on your greenhouse, it will have a detrimental effect on cuttings that have not yet taken root. It is necessary to ensure that the lighting is diffused and the temperature does not exceed 25°C
- If, on the contrary, our greenhouse is in a dark place, and the seedlings simply do not have enough light. Move the container with the cuttings to a brighter place near the window or under a phyto lamp.
- You may have cut the cuttings with a poorly disinfected knife. Or they simply broke off unsuccessfully from the mother plant. Cut new cuttings and try to do everything without errors.
- You may have used old leaves for propagation. It is best to use young leaves during the formation of buds or flowering of gloxinia.
- If the soil under the cuttings was constantly waterlogged, they rotted. Gloxinia does not tolerate high soil moisture.
- The timing was wrong for rooting the cuttings. The best time for this is spring or early summer.
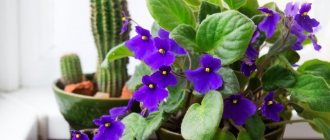
This may be interesting: Violet or Saintpaulia - home care
Step-by-step instructions on how to propagate correctly?
- We make drainage holes in a plastic cup and fill it with soil.
- We moisten the substrate and make indentations there at an angle of 45º using a pencil or an ice cream stick. (You can simply place the leaf in the soil at a 45º angle).
- We press down the earth around. We place the sheet so that the bottom surface faces the wall of the pot, and the base of the plate does not touch the soil.
- Cover the top of the glass with a bag without damaging the leaf.
- We place the mini-greenhouse in a bright, warm place without the risk of direct sunlight. The soil temperature should not fall below 16ºС.
- We ventilate the greenhouse once a day and water it when the soil dries out.
We recommend watching a video about propagating gloxinia using leaves:
Dividing and planting tubers
The method is less reliable than cuttings or sowing seeds. The reason is that gloxinia is usually propagated by dividing the tuber before planting in the spring, until the injured tissue is well healed and there is a high risk of rotting.
The operation is performed on adult tubers that have reached a diameter of at least 4-5 cm. They are taken out of the pot, the soil is shaken off, and they are examined. To breed gloxinia, choose one of the following methods:
- Sometimes the tuber itself “asks” to be divided into parts - it becomes clumsy, growths appear that are easy to break off with your hands.
- After the shoots hatch, the underground stem is cut with a sharp knife or blade so that each section contains a growing point.
Before planting, the wounds are dried for a day and powdered with fungicide mixed with crushed coal. Planted in a light substrate. A third of the tuber should remain above the soil surface.
The bottom of gloxinia is convex, and on the top of the head there is a depression similar to a small funnel.
The container is covered with transparent material. Contain in the same conditions as leaf cuttings. It is easier to observe the development of roots through the walls of a plastic cup.
Until a rosette with 2 pairs of leaves grows, watering is done very carefully. Better - through the pallet. If water is given from above, literally use a spoonful under the tuber, trying not to wet its top or sprout.
Home care
In the first 1.5 - 2 months, the plant does not need to be fed. In the future, you can feed once every 10 days, but the concentration of the solution should be weaker.
Gloxinia is fed in cloudy weather or in the evening. An hour after watering, we apply fertilizer, trying not to get it on the leaves or at the growing point. Make sure that after fertilizing the plant is not in the sun .
Before the buds appear, organic fertilizers alternate with nitrogen fertilizers (ammonium nitrate); after the buds appear, organic fertilizers alternate with phosphorus fertilizers (potassium phosphate, superphosphate).
- Nitrogen fertilizers promote vegetative growth, but excess nitrogen can cause root rot. Therefore, such fertilizers are given only at the beginning of growth.
- Phosphorus - enhance flowering, but excess phosphorus leads to chlorosis of the plant.
- Microelements - affect the color and number of buds, the size of flowers.
Limited fertilizer - bird droppings.
After the third or fourth pair of leaves, young buds appear. The amount depends on the conditions and weight of the tuber. If the first flowering was early, gloxinia may bloom again . In such a case, cut off the above-ground part (flowers, leaves), leaving a shoot 2 centimeters long. Repeated flowering is not typical for all plant species and varieties.
In the fall, when it is clear that the soil does not dry out for a long time, we gradually reduce watering, and when yellowness appears on the leaves, we stop watering completely. When the above-ground part of the tuber dies, the plant enters a dormant period that lasts 3-4 months.
Tip : The tuber pot is placed in a cool place (+10 - +15 ºС). During the winter, the soil is moistened several times; if the storage temperature is higher, it needs to be moistened more often.
You can read about the wintering features of gloxinia here.
How to separate children?
When there is confidence that the “babies” will be able to grow further on their own, it is necessary to separate them from the so-called “mother”. If the child is alone, the leaf is simply broken off. If there are several, then you need to take them out and carefully separate them so that the main tuber remains near the leaf.
Next, future gloxinias are planted in separate small pots.
There is no need to worry about the fact that they will not accept without a root - very soon they will have their own tuber. Here is a simple answer to the question “how to breed gloxinia.”
Watering
During active growth, gloxinia is watered with settled water at room temperature , but you need to be careful, since the plant does not tolerate moisture due to its susceptibility to fungal diseases. Depending on the storage location, during the dormant period, watering is reduced or not moistened at all.
How to water young shoots?
Young shoots need to be watered with soft water (melt, rain, partially boiled). When watering, make sure that water does not get on the leaves or in the center of the tuber. Water is 2-3ºС warmer than the ambient temperature. We reduce watering in cloudy, cold, rainy weather, as well as during the dormant period.
Thus, now you know how to propagate gloxinia from leaves at home. When breeding Sinningia, it is very important to be patient and carefully care for the grown flower. Then, with careful care, creation of suitable conditions and timely feeding, the plant will delight you with delicate and velvety flowers, and will also reproduce successfully.
Reproduction of gloxinia from seeds
Buying seeds of your favorite gloxinia varieties will not be difficult - there are a huge number of them on sale. It is better to choose seeds in granules. Pay attention to the timing of seed germination and the beginning of flowering. Usually it happens within 4 – 6 months. If you sow gloxinia in late autumn or winter, the period indicated on the package will greatly increase. Therefore, it is better to sow the seeds in early spring, then in the summer you will admire the first gloxinia flowers.
Gloxinia seeds are sown in ready-made universal peat-based soil, which is placed in plastic containers with a transparent lid. Gloxinia seeds are very small, so they are simply scattered evenly over the surface of well-moistened soil and not covered with anything on top. Close the lid of the container and place it in a bright, warm place to germinate the seeds. It is necessary and important to ensure that the soil does not dry out.
Seeds sprout
Shoots do not appear very quickly, sometimes you have to wait almost a month for them. When 3 - 4 true leaves appear, the seedlings need to be picked. You will have to dive the little ones more than once. The number of pickings depends on the varietal characteristics of gloxinia, sowing density and the created growth conditions. The first picking is done into the new substrate, 10-15 pieces at a time, carefully, trying not to damage the roots and neighboring specimens.
The second and third picks of gloxinia are made in separate small disposable cups with a volume of 50 - 100 ml. When the young rosettes grow up and become strong enough, they can already be accustomed to room conditions and hardening. There is no need to fertilize, because each time they were placed in a new nutrient soil. You need to water little by little, you can use a syringe by lowering the needle into the soil. At the age of 10 weeks, our pets can be transferred to their own small pots with a diameter and height of about 10 cm.
Peat tablets
But, it is better to use peat tablets for germinating gloxinia seeds, which are placed in plastic containers, well moistened so that the moisture wets the entire peat cylinder, and the purchased granules or seeds are placed in the recess at the top of the tablet. The container lid is closed. The greenhouse is placed on a bright windowsill. When small gloxinia sprouts appear, the peat tablets are placed in containers with soil, preferably in disposable cups of 50–100 ml. It is advisable to carefully tear the mesh of the tablet to facilitate root germination. When gloxinia grows and gets stronger, it will need another transplant - to a permanent place in a small pot, up to 10 cm in height and width.
The seed germination temperature should be 22-24°C. In order for the seedlings to have enough light, it is necessary to take care of purchasing a phyto lamp or other daylight lamp so that our plantings are illuminated for 12–14 hours. Otherwise, our sprouts will stretch out greatly. With proper care, propagation of gloxinia from seeds gives good results. In just 6-8 months you will be admiring the flowers you have grown. To make the rosettes of the bush more powerful, the first buds must be plucked off. Then the bush will be more decorative and lush.
Keep in mind that gloxinias grown from seed can be very different from each other.
Getting your own seeds
Gloxinia seeds
If, for some reason, you are not satisfied with purchased seeds, or you want to try growing your own hybrid, then you will have to go a long way from pollination to collecting mature gloxinia seeds. Pollen must be transferred from one flower to the pistil of another, using a piece of sterile cotton wool. After some time, the corolla fades. The future seed capsule will remain on the peduncle, in which, depending on the conditions of detention and the variety of gloxinia, the seeds will ripen within 6 - 9 weeks.
This may be interesting: Crossandra - care and reproduction at home
It is necessary not to miss the moment of opening of the seed pod. It is carefully cut off over a dry container, since the seeds are very small, brown, and can spill out of the box and get lost. You still need to be able to collect them. The shape of the gloxinia seed is oval-pointed. After you have collected the required number of seeds, you must decide when to plant them. Continue to follow the instructions for propagating indoor gloxinia by seeds (see above).
Preparing the soil for planting
The best soil composition for gloxinia is a mixture of leaf soil, peat, sand or vermiculite in a ratio of 2:2:1. In addition, expanded clay removes excess moisture. Charcoal in small quantities reduces soil acidity. It is important that the substrate for planting is light, breathable, and not waterlogged, otherwise the plant will grow poorly or die.
Dimorphotheca from seeds: 5 useful growing tips
Before planting, the soil must be treated with a disinfectant for flowers against insect larvae.
How to care for sprouts
Gloxinia from seeds at home - how and when to sow
It is necessary to water as the soil begins to dry out. Planting cups should have drainage holes to remove excess moisture. Water should not stagnate in containers, as in such soil the roots will rot faster than they can grow.
Additional Information! If flies appear above the pots, you should start turning on the fumigator to scare them away.
Low concentration fertilizing is applied 2 months after planting. It is recommended to carry out this procedure in the evening or on a cloudy day.
Possible errors during reproduction
Reproduction of gloxinia is a relatively easy undertaking, but in some cases certain problems may arise if certain recommendations for rooting and caring for sprouts are not followed.
With improper watering, little lighting, and low temperatures, the roots can rot. This can also happen to them due to infection with pathogenic microorganisms. Leaves may begin to wither if they do not receive enough moisture, but the same thing can happen due to its abundance.
There are many ways to propagate gloxinia; which one to choose is up to each gardener to decide personally. The simplest and safest method for the plant is leaf propagation.
Gloxinia has faded - what to do, pruning: useful tips
Gloxinia has faded
If a small creature has nothing to prune, then pruning a large plant must take place. Moreover, if late autumn has arrived, and this representative of the flora has a clearly defined dormant period. So, Gloxinia has faded - what to do? Here are some helpful tips:
- Pruning involves removing all leaves and stems.
- As a result, only the tubers remain, and the pot with them is placed in a dark, cool place.
If your pet is not ready for winter, continue caring for him as usual. Despite the winter, you will have magnificent lilac-white flowers on your stand. If the flower continues to bloom in late autumn or even winter, do not worry - it means that your flower needs it. Peace will be ensured only in the spring, but this will not affect his future life in any way.
Basic methods
Having acquired this beautiful plant, you soon wonder how to propagate it? This will not present much difficulty if you know a few rules for breeding this flower.
There are several ways to propagate gloxinia: by seeds, rooting leaf cuttings, tubers, sprouting peduncles and apical cuttings. Moreover, the most painstaking and difficult thing is the propagation of gloxinia by seeds .
What to do after?
We move on to further actions when the roots entwining the earthen ball are visible through the walls of the cups, and the plant itself begins to grow. This will happen in about 3 weeks. Then, in order not to damage the root, the cutting can be transferred along with a lump of soil into a permanent pot with soil mixture (we talked about how to choose a container for gloxinia here, and in this article you will find tips on preparing soil for an indoor flower). Then all that remains is to take good care of the plant as if it were an adult.
Is it possible to plant a flowering plant?
Is it possible to replant a flowering plant? It is not recommended to replant gloxinia during flowering. It will lose all its flowers and buds, and due to untimely intervention in the process of development and nutrition of the entire plant, the tubers may die. However, in cases where the plant can be saved only by urgently replacing the soil, transplanting flowering gloxinia is allowed. To do this, you need to trim all existing flowers and buds, as well as stems with foliage located above the first pair of leaves.
Transplantation is a huge stress for the plant . Transplanting a flowering gloxinia can lead not only to the loss of flowers, but also to the death of the entire plant. Therefore, it is not worth the risk.
Why might a cutting disappear?
Sometimes after a rooted leaf is planted in the ground, it begins to rot and disappears. This can happen for several reasons:
- the leaves were cut with an unsterile blade or roughly broken off from an adult plant;
- old leaves were taken for rooting (for rooting, young and healthy leaves with long cuttings should be taken);
- when planting a plant in the ground, there was excessive pressure on it, the cutting should be carefully lowered into the hole made in the soil and sprinkled with earth without compacting it;
- the greenhouse was not ventilated enough or was exposed to direct sunlight;
- the rooted plant lacked lighting (the pot should be placed closer to the window or artificial lighting should be added);
- in the room where the seedling stood, it was too cold or too hot, and there were also sudden temperature changes and drafts;
- the soil did not have time to dry out between waterings;
- the plant was planted in autumn or winter and did not have time to take root.
Our specialists have prepared for you information about the rules and subtleties of the gloxinia propagation process, as well as information about the features of caring for the plant. In particular, read about how to:
- propagate gloxinia by apical shoots;
- grow gloxinia from seeds;
- plant gloxinia with seeds and tubers.
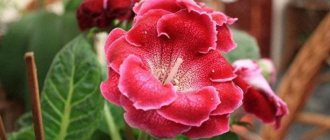
Gloxinia is a plant with very beautiful, original and spectacular flowers. She is able to decorate any room, turning it into a blooming flowerbed. By following the tips for propagating and rooting the leaves of this indoor plant, even a novice amateur gardener will be able to grow many magnificent and colorful gloxinias that will delight others with their large and bright flowers.
When is the best time to root?
The most suitable time for rooting gloxinia leaf cuttings is spring and early summer. Then the plant will have enough time to form a new tuber and prepare for winter dormancy.
Young leaves of gloxinia are best cut off during the budding period of the plant. At this time, the leaves have great vitality and quickly produce roots. If a leaf is slightly withered, you can revive it by placing it in water for a while - it will become elastic again.
Important! A correctly cut leaf should have a cutting, the length of which is no shorter than 2-4 cm.