When and how to plant geraniums in open ground in a flower bed
As for the timing of planting geraniums in open ground, first of all you should monitor the weather - it should already be quite warm during the day, naturally, the return of spring frosts should pass, which means that pelargoniums should be transplanted into the garden from the second half of May.
Planting pelargonium in open ground is more than simple:
- chose and prepared a place;
- dug a planting hole slightly larger than the size of the pot;
- they pulled the seedling out of the pot (and didn’t forget to spill it first) and put it in a new place of residence;
- sprinkled with fertile soil on the sides, compacted around the seedling;
- spilled plenty of water.
As for the planting location, the plant should not be planted in an area that is too open, otherwise the sun will burn the leaves and the plant will have an unsightly appearance and poor health.
For geraniums, it is optimal to find a place in light partial shade.
Video: planting pelargonium in open ground - when, where and how to plant
When should you sow pelargonium seeds for seedlings?
Many people know that pelargonium is propagated by cuttings, but now the seeds of the plant are on sale. Therefore, propagating geraniums at home has become even easier.
The advantages of the seeds are that they germinate quickly and well, the plant has a compact shape and blooms constantly. Young shoots of the plant bloom by 5 months.
What do pelargonium seeds look like and what should you do with them before planting them in the ground?
The seeds of the plant are hard, large and oblong in shape and brown in color. To plant seeds, you need to prepare the soil; it must be loose.
The composition of the soil should be approximately this: 2 parts turf soil and one part sand and peat. To prevent the plant from fattening, the substrate should not be rich in nutrients.
Before planting, it is necessary to disinfect the soil (steam, calcine or water with a solution).
To sow seeds, you need to prepare a shallow container. Distribute the seeds over the surface at a distance of two centimeters from each other. Cover the seed with soil, about 1 centimeter. Be sure to keep the container with the seeds warm. The soil should not dry out, so moisten it with warm, settled water.
Also, in order for pelargonium seedlings to germinate faster, you can cover it with film, but be sure to make holes in it for ventilation. As soon as the shoots appear, remove the film immediately. Seedlings should be kept in a well-lit place. The soil should be moderately moist, not allowed to dry out and not flooded. Avoid exposure to direct sunlight.
Caring for pelargonium seedlings
Growing pelargonium seedlings is a pleasure. This process is very interesting and exciting not only for an adult, but also for a child. Shoots will appear in about a week. It’s so nice to watch how velvet leaves emerge from each seed. Everything is fine, of course, but you need to transplant the pelargonium seedlings into separate pots. Therefore, we do the following procedures:
- As soon as four leaves appear on the plant, it is time to transplant them into a pot. You will need a container with a diameter of about 8 centimeters.
- The plant must be pruned. This means that each plant must be transplanted from common soil (container) into a pot.
- Using a small spatula, remove each plant with a small lump of earth so as not to damage or disturb the roots.
- Plant pelargonium in your pot.
- The soil in the pot should not be rich in nutrients. Therefore, if you use a purchased mixture, and it is mainly peat, it must be diluted with garden soil and compost.
- After planting, you can now observe the growth rate of the plant. If you follow all the rules, then geranium grows by leaps and bounds.
Now all that remains is to wait for flowering.
Of course, many people believe that a young plant blooms after a year, do not believe the rumors. You will have to wait about five months for flowers. You may also encounter problems such as yellowing of leaves and the appearance of brown and yellow spots. This may be due to the heat. Therefore, many gardeners and flower growers plant geraniums in the garden. The result surprises many. Since the plant becomes even more beautiful, it blooms constantly, there are no yellow leaves. This method can be used to save your favorite flower during the hot season.
With proper care, the plant does not get sick and is not damaged by pests. Therefore, let this amazing and unpretentious flower please you for many months.
Video: sowing and caring for pelargonium
Propagation of pelargonium by seeds is interesting because it makes it possible to grow your own specimen, which is not similar to the parent plant. This is a rather labor-intensive process that has a number of nuances that you need to know.
In this article we will talk in detail about how to prepare pelargonium seeds for sowing, what kind of soil to plant them in and how to further care for the young seedlings of the plant. You can also watch a useful video on the topic.
Sowing pelargonium seeds for seedlings in 2022
Despite the rather complex name of the flower, pelargonium is very famous and popular among experienced gardeners. It is suitable for those who want to have flowering plants in their room. This culture has another name - geranium. Although not everyone likes the aroma of this flower, its appearance can attract any admirer of indoor plants.
Pelargonium (lat. Pelargonium) is a flowering plant from the genus Geranium. Essential oil from Geranium is used to create perfumes and soaps, as well as to purify the air from pathogenic bacteria.
Pros and cons of propagating geraniums by seed
This method of reproduction has one significant disadvantage. Planting by seed does not guarantee the preservation of the parental qualities of geranium, which makes it almost impossible to achieve the transfer of varietal characteristics.
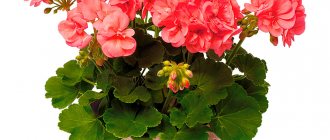
Blooming geranium
But there are also advantages to propagating geraniums by seeds:
- simplicity and ease;
- seed material has a long shelf life;
- self-collected seeds will not be infected with diseases;
- sowing is carried out at the end of winter or beginning of spring (by mid-summer the plant will begin to bloom).
When do they ripen?
Lovers of indoor plants are aware that geraniums do not always produce seeds. If they do appear, take into account the following nuances:
- An unhealthy plant will not produce quality seeds.
- A hybrid is always capricious.
- It is often affected by blackleg.
- Hybrid properties are not preserved with this type of propagation.
Geranium produces seeds when properly sown. It is important to take good care of it, providing timely but light watering. After collection, the seeds of ivy-leaved or zonal pelargonium are stored dry in a warm room until planted in a container.
What do geranium seeds look like?
Hydrangea seeds - what they look like and whether it is possible to grow seedlings from them at home
Before sowing geraniums, careful selection of seed material is carried out. What do geranium seeds look like? They should be painted brown and have an elongated oval shape with internal side depressions. The matte-colored shell is dense and looks like leather. The size of the seeds depends on the variety, but they are all large.
Geranium seeds
It is important to carefully select pelargonium seeds. Deformed and small elements are removed immediately; they are unsuitable for planting.
How to obtain and collect seed material
Lavender seeds - what the seedlings look like
To independently collect planting material, preliminary pollination of the flower is carried out. A brush is used to move pollen from one flower to another. After flowering, a seed box will form on the plant. When it is completely dry, they immediately begin to remove the planting material.
Seed pod
On a note! Propagation by seeds is used for simple species. Ampelous, royal, double and tulip-shaped varieties cannot be grown this way.
What to do with them after and how long can you store them?
As soon as the seeds are collected, transfer them to paper sheets, saucers or small bowls. After this, place the bowl under a canopy, out of direct sunlight. This place should be well ventilated. If they are not ripe, then the temperature in the room should not be higher than +24⁰С; and when they are completely dried, then t=+30+35⁰C.
When the seeds ripen and dry, put them in a linen bag. It is advisable to knead it in your hands and then pour it onto a saucer. This is how they fight chaff.
They simply shake it out of the bag and blow it off the saucer. Only after this the seeds are transferred to a paper bag or linen bag. Storage temperature – +15+20⁰С.
The year of collection and the name of the variety are signed so as not to later be confused with some other plant.
Rules for choosing purchased seeds
Rose seeds - what they look like, can you germinate them at home?
Geranium seeds are purchased only from trusted manufacturers. After opening, carefully inspect the planting material. It must be dry and uniformly colored. The seeds should not show any damage or signs of disease.
Well-known seed producers
It is important to know! Before purchasing, please read the instructions on the back of the package and the expiration date.
Soil preparation
The substrate can be purchased at a flower center or prepared yourself. When purchasing ready-made soil, there is a high probability of non-compliance with the proportions of nutrients. In this case, the first shoots will appear later and will not grow large. It will be bad for geraniums to bloom on such soil.
Flower growers advise preparing the soil mixture yourself (in a ratio of 1:1:2) from:
- peat soil;
- sifted river sand;
- turf.
Note! To protect against infections, the prepared mixture is calcined in the oven or poured with boiling water. Houseplants are often disinfected with fungicidal agents.
What should the soil be like?
Pelargonium loves slightly acidic soil that allows air and moisture to pass through well. It has no special requirements for fertility and composition, so the main concern of the grower when composing the substrate is looseness and high-quality drainage.
You can make such a mixture yourself from 2 parts turf soil, 1 part peat and 1 part coarse sand. To make the substrate more loose, add a little perlite to it. A layer of expanded clay drainage must be placed at the bottom of the pot.
Before planting seeds, it is recommended to disinfect the soil. This can be done using a solution of potassium permanganate or boiling water, with which the ground is thoroughly watered.
This option is suitable for store-bought substrate that has already undergone certain processing. It is better to ignite the self-prepared soil in a well-heated oven for 3–5 minutes.
This gentle treatment will kill all germs and larvae without destroying the nutrients.
Scarification, disinfection and soaking of pelargonium seeds
Before growing geranium from seeds at home, planting material is first prepared. Partial removal of the shell helps speed up the germination process. To avoid damaging the seed, the procedure is performed using sandpaper. It only removes the top layer.
For disinfection, use a weak solution of manganese or hydrogen peroxide. After disinfection, soak in water at room temperature. Two hours is enough for the planting material to swell.
Preparation for the procedure
In order for pelargonium from seeds to delight you with beautiful flowering for a long time, you need to carry out the preparatory work correctly.
Selection of containers
Geranium seeds can be planted in boxes or individual containers. For group planting, shallow wooden or plastic containers are used.
Peat pots are very popular among gardeners. In this case, the grown bushes can be planted in new containers along with a shell of peat.
Geranium seeds are planted in light, fertile soil.
How to sow pelargonium seeds at home for seedlings
Pelargonium from seeds can be grown in any shallow container. Suitable for this:
- plastic containers;
- peat cups or tablets;
- toilet paper.
Planting seeds and caring for pelargonium at home is carried out in strict accordance with step-by-step instructions.
In containers
You can sow geraniums at home in special trays. The depth of the container should not exceed 3-4 cm. Pre-prepared trays are filled with soil and watered with warm water. The ground temperature must be at least +20 ℃. Seeds are sown at a distance of 2 cm from each other.
Additional Information! It is not recommended to deepen the planting material too much.
Sowing in plastic containers
Plant the seeds in shallow holes and sprinkle a little of the same substrate on top. Watering after planting is a mandatory procedure. It is recommended to create conditions close to greenhouse conditions, that is, cover with film or transparent glass.
In peat tablets
Growing pelargonium from seeds can be done in a peat soil mixture. Peat tablets are perfect for this. They are watered in advance. Sowing is carried out in shallow holes, the plantings are covered with polyethylene or glass. For this method, it is important to carry out daily ventilation and spraying.
Using peat tablets
It is important to know! Peat tablets should be selected according to their acidity level.
Using toilet paper
Germinating seed on toilet paper is considered one of the simplest and most effective methods. Pre-treated seeds are placed on moistened paper in a container and covered with a lid. When the first sprouts appear, the seedlings are transplanted into the ground as carefully as possible.
Germination on toilet paper
How to grow a crop from seeds: step-by-step instructions
Planting pelargonium with seeds is considered the best method. The grown seedlings are unpretentious, resistant to diseases and are characterized by abundant flowering.
Not all types of pelargonium reproduce well by seeds. In this way you can grow zonal geranium.
Ampelous pelargonium is very beautiful, but capricious when propagated from seeds. Even experienced gardeners prefer to propagate it by cuttings.
When to sow?
Some gardeners advise growing pelargonium from seeds from November to April, others in December-January, and still others only in spring. Everyone is right, since it can be planted at any time. In central Russia, February-March is considered the best time. By the time of germination and the beginning of growth, the length of daylight hours increases. When sowing earlier, additional lighting is required.
Information: 5-6 months pass from sowing seeds to flowering.
Preparing soil and material for sowing
Before sowing, it is necessary to prepare the seeds. For faster germination, a scarification procedure is carried out, that is, using fine sandpaper or a nail file, the hard shell is slightly destroyed
You need to do this carefully, remove only the top layer and try not to damage the seed itself. If this procedure is neglected, seedlings may appear only after 2-3 months. After scarification, the seeds are soaked for 10 minutes in a solution with zircon or epin
To prevent various diseases, you need to keep the seeds in a weak solution of potassium permanganate or ordinary hydrogen peroxide for 20 minutes.
After scarification, the seeds are soaked for 10 minutes in a solution with zircon or epin. To prevent various diseases, it is necessary to keep the seeds in a weak solution of potassium permanganate or ordinary hydrogen peroxide for 20 minutes.
Disinfected seeds are poured with water at room temperature for three hours to swell. It is recommended to disinfect the soil before planting. You can place it in a preheated oven for five minutes or pour hot water with potassium permanganate. You can also use commercial biofungicides.
How to plant?
Dishes for sowing can be plastic containers or individual cups. They are also disinfected with a solution of potassium permanganate. Holes are made at the bottom, drainage is poured and prepared soil is poured on top. Water with water or root solution.
In a large container, the seeds are planted at a distance of 5 cm from each other, 6-7 cm are left between the rows so as not to damage the roots when diving. One seed is planted in cups. The seeds are deepened by about 50 mm and sprinkled with a thin layer of earth or sand. You can simply deepen the seed a little with a match.
It is convenient to grow seedlings using small volume peat tablets. In this case, the root system is not injured when transplanting into a pot. The tablets are placed in a container and filled with warm water, and they increase in size by about 6 times. The seeds are placed in special recesses and lightly sprinkled with peat from the tablet.
Before germination, the crops are covered with film or glass and placed in a bright, warm place. Most varieties of pelargonium germinate 7 days after sowing.
Seeds of ivy-leaved pelargonium do not sprout for 2-3 months. It is necessary to remember this and continue to care for the crops.
Detailed instructions for sowing pelargonium can be seen in this video:
Choosing a pot for planting
After the first two leaves appear, the seedlings are picked. To do this, you need to select narrow and tall pots. It is recommended to use pots with a diameter of about 10 cm. It is advisable to use clay pots that allow air to pass through well.
Indoor pelargoniums do not like large pots. They will not begin to bloom until their roots fill the entire earthen ball.
Choosing soil for growing plants
Pelargonium is planted in loose, medium-density soil. You can buy a special mixture for geraniums in the store, or you can prepare it yourself. The following options are recommended:
- Peat, sand and turf in proportions 1:1:2.
- Peat, perlite in a 1:1 ratio.
- Peat, sand in a 1:1 ratio.
Step-by-step instructions on how to plant seeds
After filling the pots with soil, lightly sprinkle the surface of the soil with warm water and leave for one day to warm the soil to the required temperature (21−22 °C).
- Then use your finger or a suitable tool to make small holes at a distance of two cm from each other. Sprinkle the seeds with a layer of soil one cm thick.
- The soil must be slightly moistened again and the containers covered with film , in which small holes have been previously made to provide air access.
- At home, geraniums must be provided with optimal temperature conditions and lighting, but under no circumstances place pots with planted seeds on the windowsill.
When the first soft green sprouts appear, remove the cover so as not to create conditions of high humidity for the plant. Now is the time to place the trays with pelargonium on the windowsill to provide the plant with sunlight, otherwise growing the flower will take two to three times longer.
In order to obtain a healthy bush with strong stems, as well as to strengthen the root system, the soil must be loosened periodically. After two true leaves appear, the pelargonium should be plucked and the bush should be transplanted into a narrow and tall container.
After waiting for the fifth leaf to appear on the pelargonium, the seedlings should be pinched. This will ensure that the bush grows as branched as possible, otherwise you will end up with a plant with a long, thin stem.
When to transplant to a permanent place
Transplantation of strengthened sprouts is carried out at the end of spring. 1-2 days before transplantation, the substrate is moistened so as not to damage the root system and the healthiest plant can be planted in a permanent place. In open ground, the distance between plantings is at least 20-25 cm.
At home, you can grow almost any flower, even an exotic one, from seeds. For some species, the seed planting procedure involves a series of complex activities. Geranium, in turn, is easy enough to sow and achieve a positive result.
It is important not only to choose high-quality planting material, but also to follow all the rules for caring for a young plant
In China, for example, this species has been recognized for many decades as a symbol of wealth and prosperity. To propagate a flower, the seed method is most often used. Pelargonium can become a real decoration not only for the home, but also for the garden plot.
https://pocvetam.ru/komnatnye-rasteniya/tsvetushchie/semena-gerani.html
Proper care of seedlings
A well-executed planting procedure is part of successful care of pelargonium seedlings. It is better to grow seedlings in favorable conditions.
Seedlings need:
- timely watering;
- correct temperature setting;
- good feeding.
Watering the seeds
The amount and frequency of watering seeds depends greatly on the time of year. In hot summers, it is better to water every 3 days, and in winter they moisten once a week. Before watering, it is necessary to place a thick layer of drainage under the bottom of the container, since pelargonium does not tolerate strong excess moisture. The moistening itself is carried out as soon as the top layer of soil dries out.
Geranium grows well only with sufficient light, but direct sunlight should be avoided. For good development of pelargonium, daylight hours should be at least 15-16 hours.
Picking sprouts
As soon as the first sprouts of pelargonium appear, it is necessary to transplant and pick the seedlings into individual containers. The sprouts are buried at a distance of 2-3 centimeters. Transplanted into containers that are shallow in depth.
Pinching pelargonium
The sprouts should be pinched at about 6-8 leaves. But pinching should not be carried out during flowering and the formation of buds. Mature species of pelargonium are pruned in spring and autumn. Timely pruning of weak and damaged shoots allows you to obtain pelargonium of extraordinary beauty that can bloom longer.
Pinching pelargonium seedlings promotes better formation of lateral shoots and significantly more luxuriant flowering
External factors
Before growing pelargonium, it is necessary to create the right conditions. This culture grows well only in bright rooms, but the plant should not be kept in direct sunlight. The daylight hours of pelargonium should be at least 15-16 hours. In summer, it is recommended to take the plant out into the fresh air.
Temperature changes are unacceptable for young shoots, otherwise they will be severely damaged. On average, the required air temperature for pelargonium should be no lower than 7 degrees, but not higher than 22.
Plant nutrition
The mixture for fertilizing pelargonium is selected taking into account its needs. The best options for feeding are those that contain the following substances:
- copper and zinc;
- manganese and phosphorus;
- boron, iron;
- calcium, nitrogen.
They use complexes of mineral substances, but before purchasing you need to read the composition.
At the initial stage of growth of the stem, leaves and roots, it is necessary to add nitrogen to the fertilizer so that pelargonium grows faster and there is no fading in the flowers.
It is recommended to feed in this way at the beginning of spring, but you need to take precautions and dosages recommended by the instructions. As soon as the first buds begin to bloom, it’s potassium’s turn
Since it is the main component for the appearance of flowers in pelargonium, and phosphorus will stimulate the strength of its leaves and stems
As soon as the first buds begin to bloom, it’s potassium’s turn. Since it is the main component for the appearance of flowers in pelargonium, phosphorus will stimulate the strength of its leaves and stems.
Iodine serves as a stimulant for the formation of a large number of buds. Therefore, in addition to peroxide, iodine is added to the soil. Preparing the fertilizer is simple, and after 2-3 procedures the effect will be noticeable.
Step by step action:
- Before planting, the soil must be moistened.
- Prepare a solution consisting of 1 drop of iodine, 1 liter of water and 1 ml of peroxide.
- Pour along the walls of the container, avoiding contact with the trunk and leaves.
For one watering it is necessary to use no more than 50 grams of fertilizer, and repeat the procedure at intervals of 3-4 weeks. The work is carried out long before the abundant flowering of pelargonium. You should not use this fertilizer too often, so as not to burn the flower.
Briefly about landing
- Experienced breeders plant pelargonium seeds year-round, but in the autumn-winter period they organize natural lighting for the boxes with them. The best time to plant them is November-April (with lighting in winter). In March-April, the length of daylight hours increases, and at the same time the seeds hatch faster.
- Before planting the plant in a special container or box, prepare the ground. A suitable substrate consisting of peat, sand and turf (1:1:2); perlite and peat (1:1) or peat and sand (1:1).
- The grains are placed in a box at a distance of 50 mm from each other. Do not plant them deep (5 mm): the layer of mail on top should be thin.
- Immediately after planting, water the plant with water at room temperature. Subsequently, watering should be regular and timely so that the soil is always slightly moist.
- After this, cover the container with glass or film.
- Place it on a well-lit windowsill, but make sure that direct sunlight does not fall on it.
- The plant will develop a strong stem and a strong root system. After 2-3 weeks at t=+18+23⁰С, the first shoots will appear.
- Garden pelargonium seedlings are transplanted into a nursery, and after the bush has formed, they are planted in a flower garden.
- The optimal distance between plants in this case is 40 cm.
You can find out more about how to grow geranium from seeds at home and care for it afterwards.
Caring for polyanthus rose
After planting, new shoots will appear on the rose bushes in about half a month. At this time, the culture needs especially careful care.
Trimming
This procedure is carried out for the first time before and after planting polyanthus roses. First, all damaged shoots on the roots are removed from the seedling, and the shoots are cut to a length equal to the root.
Important! After planting, all shoots of the rose bush are shortened by a third. In autumn, the shoots are shortened again, leaving no more than 8 buds on each
During the flowering period, it is important to cut off dry buds, this will stimulate the appearance of new ones. Broken, dried shoots are also regularly removed.
In autumn, the shoots are shortened again, leaving no more than 8 buds on each
During the flowering period, it is important to cut off dry buds, this will stimulate the appearance of new ones. Broken, dried shoots are also regularly removed.
The next year in the spring, after removing the protective insulation, sanitary pruning of polyanthus roses is carried out: dry and old stems are removed, and young ones are shortened by a third.
When to pluck geraniums after germination + video
Geranium or pelargonium will delight the eye in the cold season on the windowsill, and in the summer - in the flowerbed. This flower is distinguished by bright flower caps that cover almost the entire bush. Therefore, most housewives love geranium very much and are glad to have it in their home. To do this, you need not only to be able to care for it, but also to know the secrets of geranium propagation, so that if the plant dies, the window sills will not be left empty. You can grow geranium using cuttings and seeds. Recently, more and more flower lovers are choosing the second method, since such a plant takes on the appearance of a neat small bush with a large number of flowers. Therefore, we will discuss how to grow geranium yourself using seeds.
How to care for geranium seedlings
Correctly carried out planting procedure is part of a good result. Seedlings need to be grown in favorable conditions. Geraniums require timely watering, correct temperature conditions and good feeding.
First shoots
Watering
The amount and frequency of watering directly depend on the time of year. In hot summers, moisturizing is carried out every 3 days. In winter - once a week. The bottom of the container is laid with a thick layer of drainage. The plant categorically does not tolerate excess moisture. Watering is carried out only when the top layer of soil dries.
Feeding
The first feeding is carried out only 14 days after picking. At this stage, the plant requires potassium and phosphorus. Agricola and Effecton are well suited for these purposes. Fertilizers are applied to the soil from March to October. Frequency – once every 20 days.
On a note! In winter, any feeding is suspended.
External factors
Before growing geranium from seeds, it is important to create the right climatic conditions for it. The flower grows only in well-lit places
But, as with other indoor species, direct sunlight should be avoided. Daylight hours for pelargonium should be at least 15-16 hours. In summer, the plant is taken out into the fresh air.
Due to the fact that geranium leaves are covered with a special protective layer, it is strictly not recommended to spray the species. Any moisture on the stem and leaves can lead to rot on the flower.
The flower painfully tolerates temperature changes. For young shoots this is unacceptable. The optimal air temperature is 20-22 degrees above zero, the minimum is +7 ℃.
Picking
After the first sprouts appear, the seedlings are picked and transplanted into individual containers. The depth should be 2-3 cm. Young flowers are transplanted into small and shallow containers.
Picking a view
Pinching
It is recommended to pinch geraniums at the level of 6-8 leaves. Adult species must be pruned in spring and autumn. Timely pruning of weak and damaged shoots will allow you to get an unusually beautiful plant that will delight you with lush flowering for a long time.
On a note! Pinching should not be carried out during the formation of buds and during the flowering period.
How to plant geranium seeds?
When to sow geranium seeds to wait for flowering this year? Usually, geranium seedlings from the moment of germination with proper care (as described below) begin to bloom in the 3rd month. Consequently, geranium seeds planted in mid-February will bloom in mid-late May.
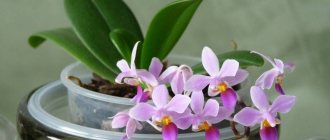
What do geranium seeds look like? Geranium seeds are similar in shape and structure to coffee beans. One side of the seeds has a convex shape, the other is flat with a pronounced dividing line of the cotyledons. Typically, geranium seeds have a distinct brown color. Today on sale you can find geranium seeds of various colors and double varieties. There are flowers with different smells, for example, with the smell of apple.
If the seed is collected at home, it is located on the plant in a seed pod. The ripe seed pod is brown in color. The seeds themselves are surrounded by a dense shell with a small umbrella of fluff. This covering shell must be removed before sowing grains in the ground.
How to sow geranium seeds? To plant seeds and successfully grow seedlings you will need:
- Greenhouse. This can be a regular seedling box covered with a plastic bag, a food tray with a transparent lid, or a regular plastic bottle cut in the middle.
- Priming. Be sure to be light and loose, without humus. A regular soil mixture for seedlings will do. You can make the mixture yourself. To do this, take turf soil, sand and peat, mix everything in a 1:1:1 ratio.
Sowing geranium seeds in most cases is carried out superficially, that is, the seed material is not covered with soil, sand or vermiculite. Some experts still sprinkle the grains with a layer of soil, the thickness of which does not exceed 0.5 cm. The explanation is simple - future seedlings need air, and it simply will not penetrate into a thick layer of soil.
So, planting geranium seeds at home is carried out from early to mid-February in the presence of sunlight during the day and additional lighting in the evening. Sowing is carried out according to the following scheme:
1 step. Previously prepared soil at room temperature is poured into the greenhouse in a layer of 5-7 cm. The soil should not contain lumps or debris. It compacts slightly. The soil is wetted and left for 5 minutes. This time is enough for the soil to be completely wetted. Watering is carried out only with warm water.
Step 2. Seeds of geranium flowers are laid out on the surface of the soil with the rounded side up. The flat side of the seeds should be in close contact with the soil. The grains are lightly buried in the soil.
Step 3. The seeds are watered again using a spray bottle.
Step 4 The greenhouse is being covered.
Favorable conditions for growing geranium from seeds:
1. Temperature. It should lie within +18...+24 degrees. Moreover, temperature fluctuations have a beneficial effect on germination. So, during the day it should stay within +23…+24 degrees. At night it should not fall below +18 degrees. At a temperature of +27 degrees, geranium does not germinate.
2. Humidity. A high level of humidity accelerates the process of seed germination, and therefore the grains and seedlings themselves are kept in a greenhouse until the first pair of true leaves appear. It is ventilated 2 times a day.
3. Backlight. It is important for seedlings. Grains can be germinated in the dark, but when sprouts appear, the greenhouse is exposed to bright, diffused light. The length of daylight hours is at least 12 hours. You can use a fluorescent lamp for artificial lighting.
When do geranium seeds germinate? Geranium seeds germinate within 2-14 days from planting. Regular varieties (ampeled, garden geraniums) germinate the fastest; terry varieties may take up to 1 month to germinate.
Geranium seedlings definitely need sunlight. This can be either natural or artificial lighting. Without sunlight, geranium seedlings stretch out.
>What do geranium seeds look like in the photo and how to collect them at home?
Scheme for growing at home
In order to successfully germinate orchid seeds at home, you must follow all the rules for planting and caring for seedlings.
Sowing seeds
The procedure must be carried out very quickly, over boiling water, since there is a high risk of infection. A grate or tripod is installed above the steaming container, where the vessels with seeds are placed.
Pre-planting material is sterilized again. It is placed in a clean test tube, a few drops of hydrogen peroxide (2%) are added and kept under a closed stopper for 5-10 minutes. Then, using a pipette, the seeds are transferred to the prepared substrate. In this case, the flask can be slightly tilted in different directions for better distribution over the surface.
The containers with the nutrient medium are observed for 1 week. If pathogenic microorganisms do not appear on the surface, the seeds have taken root successfully.
Approximate time frame for orchid seeds to be ready for sowing
Seedling care
It is better to grow seedlings in small greenhouses or florariums. The first shoots appear 6–9 months after planting. All this time, the flasks with seeds should be kept under certain conditions:
- diffused light for 12–14 hours a day (additional lighting should not be closer than 30 cm);
- stable temperature 25–28 °C above zero;
- air humidity 70%.
Phalaenopsis seedlings look like small green peas. Over time, hair-like threads (rhizoids) sprout from them, with the help of which the young plant feeds. After 2–3 leaves appear, the orchid’s root system begins to form.
It is better to grow seedlings in small greenhouses or florariums
Planting sprouts in a pot
Young seedlings can be planted in the ground no earlier than a year after sowing the seeds. It is better to use a soil mixture consisting of pine bark, fern roots and sphagnum moss in equal proportions. Before planting the seedlings, all components are filled with water for half an hour to get rid of parasites. Then the liquid is filtered, and a homogeneous substrate is prepared from the crushed components.
The bottom of the pot is laid with a drainage layer of fine crushed stone, broken brick, or river sand. The soil mixture is poured on top and a small hole is made. The young plant is carefully placed in the recess, straightening the roots.
Geranium vs pelargonium
Over time, geraniums and pelargoniums were divided into two different genera of the geranium family due to their complete dissimilarity. However, flower growers around the world stubbornly continue to call them garden geraniums and house geraniums. Breeders are forced to follow this trend - after all, we do not live in a botany textbook.
Garden geraniums are frost-resistant perennials with pinnately dissected leaves and single cute flowers. Pelargoniums are also perennials, but they do not overwinter in the ground, but they form large caps of brightly colored inflorescences; they can be ampelous (ivy-leaved), zonal (with a round border or spot on the leaves), royal (large-flowered) and many others. By the way, blue and blue varieties predominate among geraniums, but pelargoniums do not have the delphinidin gene responsible for blue color at all.
Pelargoniums can be planted in the garden throughout the summer season - they will bloom profusely until the cold weather arrives. The main condition for the continuous formation of buds is sunlight. While there is a lot of it, pelargoniums increase their vegetative mass and bloom like crazy; when daylight hours shorten with the arrival of winter, pelargoniums go into retirement, lose ⅔ of the vegetative mass and do not look very presentable. With the arrival of spring, the cycle repeats.
How to sow pelargonium (geranium) for fast maximum germination.
January is the best time to sow pelargonium or geranium.
, as this flower is called in the old fashioned way. Sowing is carried out so early in order to obtain flowering plants by summer for planting in open ground.
You can sow geraniums all year round, but if sown in summer, the plants will bloom only next year, and if sown in February or March, the beginning of flowering will be delayed by a month, respectively, it will begin in June and July.
Growing pelargonium from seeds is one of the ways to propagate this flower.
. Many people prefer to propagate geraniums by rooting cuttings, but by buying seeds you can get new varieties of flowers. Also, pelargonium is grown from seeds as an annual garden flower by those who do not have the opportunity to preserve flowers in winter until spring, so they are grown from seeds when sowing seedlings every year.
New plants obtained from seeds or through rooting cuttings always bloom more abundantly and longer than biennial plants
, so it is recommended to renew geraniums every year. From new varieties of geranium grown from seeds, you can collect seeds for sowing next year.
Despite the fact that pelargonium is an unpretentious plant and requires simple care, difficulties often arise when sowing seeds - seedlings appear for a long time, there are few or no seedlings
. The fact is that pelargonium seeds are enclosed in a dense hard shell; it must collapse in the soil so that the embryo begins to receive moisture to start the germination process.
Even if you buy high-quality seeds treated with special compounds, this is indicated by the color of the seeds, there is no guarantee that you will get quick and friendly shoots. Since there are very few seeds in a pack of rare varieties (3 to 5), we want to get maximum germination in a short time. Typically, manufacturers indicate on geranium seeds that the emergence of seedlings should be expected in 2-3 weeks.
How to sow pelargonium?
Pelargonium seeds are not too small, approximately 2-3 mm long with a dense brown shell.
In order for geranium seeds to germinate quickly, you need to scarify or carefully damage the outer shell of the seeds so that moisture and a solution can get inside, which will stimulate their germination
To carry out scarification you will need fine sandpaper. Place the seeds on the sandpaper, pressing lightly with your finger, drag each seed along the relief surface for 2-3 cm. After scarification, you can see lightened areas on the seeds; there is no need to do more damage or damage, so as not to damage the insides of the seeds.
After scarification of the seeds, we stimulate their germination by soaking
. To do this, simply immerse the seeds in warm water for 5-6 hours. You can use the stimulating drug “Zircon” to soak the seeds, 1 drop per half glass of water is enough and keep the seeds in this solution for 1-2 hours before sowing.
After two stages of preparing seeds for sowing - scarification and soaking, sow
. You can sow geranium seeds in a bowl or individually in small cups filled with loose, damp soil for seedlings. Pelargonium seeds should be buried no more than 5 mm into the soil when sowing. Crops need to be covered with film to retain moisture and placed in a warm place.
After complete preparation of the seeds, the first shoots of pelargonium began to appear within 2 days, 2 weeks earlier than stated.
Geranium seedlings need to be protected from “black leg”,
Sprinkling the surface of the earth with a thin layer of wood ash or crushed tablets of activated carbon.
Caring for geranium seedlings is as usual as for any flower seedlings.
The seedlings need maximum sunny lighting, moderate watering, and the soil in the pots should not be allowed to dry out or become waterlogged. Fertilize the seedlings after 2 weeks, using complex mineral fertilizer dissolved in water for irrigation according to the instructions. Replant growing bushes as they grow; a month to a month and a half after germination, the size of the cups should be doubled. The formation of pelargonium is done by pinching the tips of the shoots above the fourth or sixth leaf.
The article was useful - like it and subscribe to the channel!
Source
How to grow geranium from seeds at home step by step with photos
Growing indoor plants from seeds. Step-by-step master class on growing pelargonium from seeds
Master class “Growing pelargonium from seeds” with step-by-step photos
***
This master class is addressed to children of middle and high school age, educators, additional education teachers, all lovers of indoor floriculture, and parents for organizing joint activities with children. Completed by: Lapteva Svetlana Khristyanovna, teacher of the state budgetary institution of the Novosibirsk region “Social Rehabilitation Center for Minors”, Tatarsk Purpose: decorating the interior of an apartment, balcony, garden plot Purpose. Growing pelargonium from seeds. Objectives: - teach basic techniques for growing pelargonium from seeds; — introduce the conditions of keeping pelargonium; — cultivate a caring attitude towards indoor plants, a desire to care for them.
A simple geranium blossomed on the window, And the house was painted with a bright inflorescence, As if a girl in a polka dot dress was running barefoot after the warm sun.
She will seem unsightly to some, And they will say that there is a philistine touch in her, But how modest, among others, is the beauty, And she blooms generously for the joy of people. Author Lilia Rimm Geranium, craneweed or pelargonium is the name given to a fragrant plant from the geranium family in different parts of the world.
The scientific name of geranium is pelargonium, from the Greek pelagros, which means “stork” and hints at the similarity of geranium fruits with the long beak of a stork or crane. For a long time, pelargonium was considered an aristocratic plant. It was bred in the greenhouses of wealthy owners of mansions and villas. In the USA and Western European countries, this plant has been popular for hundreds of years. Unfortunately, in our country there was a period of not only the heyday of the popularity of this flower, but also an incomprehensible oblivion. Many still remember the years when pelargonium received the terrible nickname “bourgeois flower” and for some time became unfashionable. Now we have learned to appreciate pelargonium, as in Europe, they widely use it for landscaping. Pelargonium is grown at home in pots, in gardens, and in flower beds. It comes in different types and colors. And how amazingly and tirelessly pelargonium blooms! We rejoice in the beauty of abundantly blooming, unpretentious pelargoniums. The advantages of pelargonium have become obvious to many gardeners in recent years. Healing properties of pelargonium Pelargonium has antiseptic, analgesic, diuretic, bactericidal, antiviral effects, normalizes heart rate, and has a calming effect on the human nervous system. Pelargonium is an excellent antidepressant; it improves mood and relieves tension. In addition, it perfectly activates the mental and physical potential of older people. The leaves exude a pleasant spicy aroma, from which geranium essential oil is industrially extracted. Propagation of pelargonium Growing pelargonium is not particularly difficult. By following simple rules and creating favorable conditions, you can achieve lush and bright flowering. One plant can have up to 20 or even more inflorescences per season. These can be buds, fully opened inflorescences and already losing their decorative effect. In general, pelargonium can be characterized as an unpretentious plant that grows quickly and reproduces easily. There are practically no problems when growing it. With proper care, pelargonium does not suffer from anything and is not affected by insect pests. Anyone, even a novice flower lover, can easily grow pelargonium to decorate their home, balcony and garden. Some people prefer to propagate pelargonium by seeds, and some by cuttings. Both methods of propagating this plant do not cause problems. By growing pelargonium from seeds, we can only get plants with a simple flower. Pelargoniums with double and rosebud flowers are propagated only by cuttings. Personally, I love growing pelargonium from seeds. Growing pelargonium from seeds is a sheer pleasure! Firstly, pelargonium seeds are quite large. Secondly, it grows very quickly. This fascinating process, when shoots very quickly emerge from a grain, grow, and velvety delicate leaves appear - is simply mesmerizing. Later, a zonal border appears on the leaves. And after a while a flower stalk appears! And you are waiting for the moment, well, when your pelargonium, grown by you personally from seeds, will finally bloom. And then one sunny morning it blooms, and you rejoice and admire its beauty. Geranium Exposing her round palms to the sun, Closing her eyes with happiness and warmth, The geranium stands on my window, White as a gentle Snow Maiden.
Grandma loved geranium flowers: both scarlet and white, like snow. She watered them early in the morning and said: “Every person is born to admire beauty and bring love and beauty to the world.” Her face shone with kindness, And on the window stood, all in bloom, Multi-colored geraniums in pots. And the house smelled of bread and cleanliness. I will grow my own geranium for my daughter. I want to share the beauty with her. Author Lyubov Panasyuk When propagated by seeds, the flowering period begins after about 4-5 months.
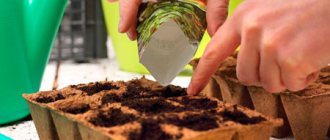
The recommended time for planting seeds is January-February. Necessary tools and materials: - pelargonium seeds; - peat tablets; — disposable cups 100ml; - awl; - expanded clay.
Let's take disposable cups and, using an awl, make 3-4 holes in them to drain excess water when watering.
Place a layer of expanded clay on the bottom of each cup. Expanded clay will further protect the roots from stagnation of moisture, absorb excess and slowly release it into the external environment. We fill the prepared cups with soil from peat tablets. You can see how to prepare it in detail in this master class: /blogs/lapteva-svetlana/master-klas-s-poshagovymi-foto-vyraschivanie-gloksini-iz-semjan.html
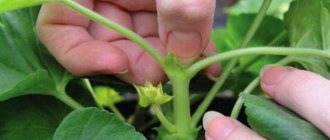
Place one pelargonium seed in the center of each glass.
We bury the seeds 0.5 cm into the soil and lightly moisten the soil. Place the cups in a disposable container.
Cover the container with a plastic bag. We put it in a warm, bright place. The optimal temperature for seedlings is 20-22 degrees. We monitor the soil moisture and do not allow it to dry out.
Shoots will begin to appear in 3-5 days. After the seedlings appear, the greenhouse must be removed. The temperature of the plants can be reduced to 18-20 degrees.
Water the seedlings carefully so that water does not get on the leaves. Watering should be moderate and with warm, settled water.
To prevent the seedlings from stretching, it is better to provide additional lighting, which will result in strong, strong seedlings.
As soon as the seedlings have 6-8 true leaves and all the soil in the cup is covered with roots, it is necessary to take care of replanting the plants.
Replant into pots with a capacity of 0.8-1 liter. This size of pots will be sufficient. The root system of pelargonium is not very large. In large pots, pelargoniums will grow lush, but flowering will be weak.
After 4-4.5 months, pelargonium will begin to produce the first buds. Pelargonium loves light very much, but this plant is not recommended to be placed on a south-facing window, where the scorching rays of the sun will burn its leaves throughout the day. East windows are ideal for pelargonium. And here is the first flower. For uniform growth, pelargonium must be periodically rotated around its axis relative to the light source. Mass flowering has begun.
During the flowering period, pelargoniums need regular feeding with complex fertilizers. Use any fertilizer for flowering plants for this.
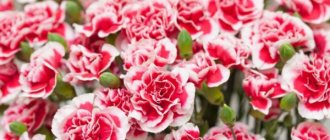
Let's take a closer look at the beauty of these amazing flowers! White, red, pink! The delicate colors of this flower fascinate with their beauty! Here they are bathing in the rays of the morning sun! Dressed up like a bride!
You can admire their beauty endlessly!
Girlfriends in a bright round dance!
Mini pelargoniums. Also grown from seeds.
They bloom profusely and for a long time. Elegant simpleton!
Abundant flowering of pelargonium in a summer cottage.
On the balcony.
Star pelargonium Quantum from seeds. Beautiful flowering. I will be glad if you liked my master class and you have a desire to grow pelargonium from seeds! Good luck!
We recommend watching:
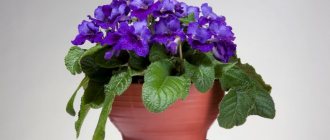
Violets - and that says it all! Geranium. Interesting facts Summary of GCD for children of the older group. Plant as a gift for Astilbe's mother. Interesting Facts
Similar articles:
Geranium. Care
Schefflera flower. Home care
Aechmea striped. Home care
Seed requirements
In order for pelargonium seedlings to sprout and develop successfully, it is necessary to select high-quality planting material. The seeds should be brown, oblong in shape and always hard. Other options for seeding material can either produce low-quality seedlings, or even leave the grower without a “harvest.” To avoid such troubles, you should not buy seeds at the market or in supermarkets. For this purpose, it is better to visit a specialized store, the quality of the goods in which will be guaranteed to be high. Good seeds are sold ready for sowing, so you don’t have to do any complicated manipulations to get them to germinate.
What geranium seeds look like - photo
Large size garden geranium seeds. They are hard, oblong in shape and brown in color. Next you can see in the photo what geranium seeds look like:
The seeds of indoor pelargonium are small, slightly elongated, shiny.
How to collect geranium seeds
If the plant is indoors, it is possible to obtain seeds only by pollinating the pelargonium yourself. To do this, pollen from the stamen of one flower is very carefully and carefully transferred to the pistil of another using tweezers, a toothpick or a cotton swab.
Soon a box will appear in the middle of the flower, which will gradually ripen, dry out and fall off. Next, how to collect pelargonium seeds is very simple and clear, but you should be warned that from such seed material plants will grow that will be inferior in color saturation to the mother’s.
Selection of pelargonium seeds
To avoid possible mistakes, you need to carefully select and prepare planting material
When choosing seeds, you should pay special attention to the following points:
- Color. High-quality pelargonium seeds have a rich brown color. Slight dullness and light tint are allowed.
- Form. The developed seeds are oblong, with slight depressions visible on their sides.
- Size. The planting material is quite large.
- Shell. Pelargonium seeds are characterized by a dense, leathery shell.
Also, when choosing planting material, pay attention not only to the beauty, shape and richness of the shade of the buds, but also to the maintenance conditions that the flower will need to provide for healthy growth and full flowering. If creating the appropriate conditions necessary for growing the selected type of geranium from seeds at home seems too difficult to you, it is better to opt for another variety of pelargonium
Processing of seed material
As already mentioned, geranium seeds have a dense shell, which makes their germination difficult. Sometimes you have to wait quite a long time for germination, but the seeds still do not germinate. The reason for failure is improper seed treatment before planting or lack thereof.
Before planting, geranium seeds must undergo scarification - a procedure to remove the dense film. It is not difficult to carry out this procedure yourself. To do this you will need fine sandpaper. With its help, only the top dense layer is removed from the seeds, and no deep tears remain.
After this, they are treated with phytohormones (“Epin”, “Zircon”) and soaked in warm water for several hours.
If you purchased high-quality seeds from a well-known company, or, for example, bought seeds from China, then you will not need to carry out complex preparatory procedures. All you need in this case is to store the planting material in a dry, dark place, protected from insects and sunlight.
If the packaging with seeds indicates that the material is not prepared for planting, or you have some doubts about the quality of preparation, additional processing will be required. To do this, use phytohormones (“Epinom”, “Zirconom”), after which the seedlings are soaked in warm water for several hours. Carrying out such procedures helps accelerate seed germination and improves the quality of seedlings.
Pelargonium seeds (how to choose, preparation, planting dates)
You can buy pelargonium seeds at any flower shop. When choosing, pay attention to the expiration date of the seeds: the fresher they are, the better, the greater the chance of germination. The color of pelargonium seeds is rich brown, similar in shape to coffee beans, only smaller.
IMPORTANT: Large shifts are preferable for planting, as this guarantees germination.
It is worth refusing to purchase seeds that are small, deformed or unevenly colored and have light spots.
Many people ask the question: – When to plant seeds so that pelargonium blooms in summer? – You need to plant the seeds in early March! If you shift the planting date by 2-3 weeks, then flowering will only occur next year.
Quite often, pelargonium seeds take a long time to germinate or do not germinate at all. The reason is improper processing of planting material. Pelargonium seeds are covered with a dense leathery shell. It must be removed before planting. This can be done by lightly rubbing each seed with fine-grained sandpaper without touching the inner layer. Next, to increase germination, the seeds need to be treated with phytohormones according to the instructions and soaked in water for several hours. These are important secrets to successful germination.