Rules for transplanting aloe
You need to know how to properly transplant aloe so that the plant feels comfortable. To do this, take into account the size of the plant, its age and other nuances.
How to transplant an adult plant into another pot?
A novice owner should familiarize himself with the rules on how to transplant aloe into another pot so that it quickly takes root. To begin, select a suitable pot and prepare the substrate. If the rhizome grows to the sides, you will need a wider container; if it grows downwards, a deeper one. Next you need to follow a few simple steps:
- pour a small earthen pillow into the new pot;
- carefully remove the plant from the old container, being careful not to damage the roots;
- place it in a new pot and add soil to the sides.
You may need to add some soil after a few days as it compacts. In a new container, the plant is left in the shade for a week, watered only after 5 days. Then it is transferred to a well-lit windowsill or balcony.
How to separate and plant a shoot?
The most common way of propagating aloe is by shoots, or babies. They appear every year under the mother bush and already have their own roots. You need to know a few nuances on how to transplant an aloe shoot so as not to harm the adult plant:
- a small bush is carefully dug out of the ground so as not to damage the roots;
- immediately transplant it into a separate pot;
- Water the plant moderately every few days.
This is the easiest way to transplant aloe. In this way, the plant can reproduce all year round, but it is better to wait until the warm season. This plant can produce a large number of babies per season. Many owners complain that their flowers multiply too intensively, and their pots take up all the free surfaces.
Transplantation by cuttings
Aloe can propagate by cuttings. They are shoots that extend from the main stem. The procedure is simple and can be carried out at any time of the year:
- the process is cut with a knife as close to its base as possible;
- the cut needs to be dried before planting, so the sprout is left in the shade for 5 days;
- without waiting for the roots to appear, the cuttings must be planted in the ground to a depth of several centimeters;
- The plant is watered immediately after planting, and then after it has taken root.
We recommend: Aloe Vera and Agave - beneficial properties and differences
You can plant several cuttings at the same time in one large container. In this case, the distance between flowers should be at least 5 cm.
Transplantation without roots
If the flower grows too tall, you can separate the top and form a separate plant. The lower leaves are immediately used to obtain juice or gel, which are then added to cosmetics and medicines. The transplant procedure is very simple:
- the top with 6-7 leaves is cut off with a knife;
- the shoot is placed in a jar of water and waited until it takes root;
- the plant is planted in a pot with a suitable substrate.
The method of replanting aloe without roots is suitable for large adult plants. The leaves become suitable for medicinal purposes at 3-4 years of age, then they are cut off. As a result, the flower turns out to be tall, and the leaves are located only at its top.
Why replant aloe
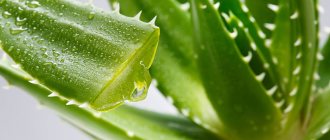
The homeland of plants belonging to the botanical genus Aloe is located in southern Africa, about. Madagascar and the Arabian Peninsula. Aloe is an amazingly hardy plant. The peoples of the Arabian Peninsula and the Middle East used to nail a bush with succulent leaves above the entrance to their homes to attract positive energy. Aloe without soil stays juicy for months!
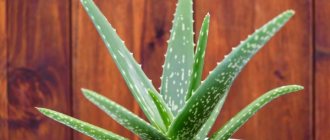
The leaves of about 30 species of aloe are used in alternative and official medicine. The most popular species in indoor floriculture: aloe vera (agave), vera. Plants are often cut for medicinal purposes, as a result of which the stem becomes bare and loses its decorative effect. It is recommended to cut it off and replant the top.
Usually, “babies”—layers—appear in the lower part of an adult plant. After cutting the main stem, you can divide the “kindergarten” and transplant it into other containers. Damaged, old areas of the plant are pre-cut.
Common reasons for planned and reasons for emergency transplantation:
- grown seedlings or rooted cuttings require larger diameter pots;
- the soil is contaminated with pathogens and pests (nematodes, pomurs, etc.);
- the old container is small for the root system;
- signs of root rot appeared;
- the bush has lost its decorative appearance;
- The soil in the pot has become sour.
Aloe rarely suffers from diseases and pests. Signs of trouble are dark spots at the bottom of the stem, yellowing, curling and wilting of the leaves. The cause is often root rot. Remove the plant from the pot to inspect the roots. Then the diseased parts are removed and the aloe is replanted in fresh, healthy soil.
Transplant methods
Aloe propagates easily:
- By transplanting part of the adult color;
- Jigging of the shoot;
- Parts of green leaves;
- Seeds.
Each method has its own little tricks.
Transplanting an adult plant
You need to replant an old aloe in the following cases: Buying a flower in a store. If the flower has “outgrown” the size of the pot. Diseases have appeared in the soil or pests have infested. Stages of transplanting a whole plant:
- Water a day or two before transplanting.
- Free from the old container. The earth is slightly shaken off, old rotten roots are removed. If the transplant is caused by the presence of pests or diseases, the roots are completely washed off the ground.
- 2-3 cm of finished soil is poured onto the drainage layer.
- The plant is placed in the center of the pot. The roots should not bend. The stem is placed 2-3 cm below the edge of the planting container.
- The roots are evenly covered with earth, lightly compacted.
- Watering is carried out strictly at the root. Moisture should not get on the rosettes of leaves and cause rotting of the weak plant after replanting.
- Protect from direct sunlight for 3-5 days.
Separation and transplantation of the shoot
The shoots grown from the root are suitable for jigging. You can plant an aloe baby when the small plant has reached 5-10 cm in height and has produced 3-4 leaves. Two ways to take a shoot from aloe:
The plant is removed from the pot and the soil is shaken off. In this case, with a sharp knife it is easy to separate all the shoots along with the roots and the adult plant
Small plants are transplanted into separate pots or into a “school” for growing. Using a narrow spatula, carefully separate the shoots, trying not to damage the roots. The adult flower is not removed, leaving it to grow in its original place.
Without root
Aloe successfully reproduces from parts of the plant without roots:
- Cuttings;
- Leaves;
- The tops of woody stems
Aloe cuttings are young shoots that grow from the base, side stem or top of the plant.
Cuttings or parts of leaves are cut with a sharp knife closer to the mother plant. After treating the cut site with activated carbon, the planting material is removed to a dark, cool place to allow the wound to heal. A leaf or cutting is planted in damp, washed sand. In two weeks the roots will appear.
After the plant has come to life and started to grow, it is transplanted to a permanent place. A new plant is obtained using the “rootless” method from the tops of “wooden” stems. To do this, cut off the “top” 2-3 cm below the leaves. The cut part is placed in a container with water. After the roots appear, the top is transplanted into a pot with soil.
Aloe vera - transplantation and propagation. Step-by-step master class
Indoor plants are a decorative element of many houses and apartments. Somewhere there are more of them, somewhere less, and some gardeners grow entire collections of flowers.
This widespread hobby also affected me. Although I don't have many indoor plants in my home, each one is treasured and loved. Some of them delight the eye with their bright buds, some with patterned leaves, and some, despite their visual appeal, have practical applications. One such medicinal plant that grows in my home is aloe vera - or more accurately, aloe vera.
The healing properties of this flower have long been proven by science. It has been scientifically proven to treat many different conditions, both topically and internally. I usually use aloe vera for beauty treatments. Aloe vera extracts are used in creams, and natural, unprocessed aloe vera juice is even healthier.
It is believed that homemade aloe vera does not require special care - it does not need frequent watering or fertilization and is not afraid of open sun. Indeed, this is true. The homeland of this flower is hot Africa, where plants have adapted to survive in the most extreme conditions. However, a minimum of caution is definitely necessary.
One of the problems faced by those who grow aloe vera at home is its uncontrolled growth and, as a result, unattractive appearance. Aloe vera grows quite quickly, its strong trunk bends, and adventitious shoots appear. The roots also develop lushly, wrapping around the soil in the pot.
My aloe was planted as a small shoot, but over several years it grew into a tall plant, which was not very beautiful: the main shoot did not bend well and always wanted to fall. Even several wooden supports that I drove into the ground did not help. And at the bottom of the stem intertwined young shoots appeared.
I decided to replant and at the same time improve the appearance of the aloe, creating a compact and neat composition in a pot. Looking ahead, I can say that everything turned out perfect, and I am very pleased with the result. So that you can repeat my experience, I will describe the process step by step, illustrating it with photographs.
It is believed that transplanting and propagating aloe vera is best done in the spring, when the plant is actively growing. I replanted it in the summer because I couldn't wait any longer. I think that if necessary, it can be replanted in autumn and winter, but it is better to wait until March-April, if time is of the essence.
First of all, I separated the sucker from the bottom of the main aloe shoot. There are five of them: two large shoots and three slightly smaller ones. I cut them by hand, without using a knife, carefully separating the stems one by one.
[!] When working with aloe vera, it is best to wear gloves, since it is not at all poisonous, but it has prickly growths along the edges of the leaves that can scratch the skin of your hands.
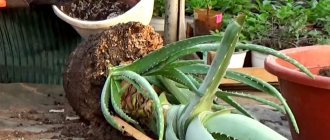
All that remained was the central trunk, bare at the bottom, which was removed from the pot. Notice how tightly the roots wrap around the soil, forming a kind of wire skeleton that follows the shape of the container. Responsible gardeners do not allow this to happen, and I, of course, should have replanted the aloe a long time ago.
After thinking for a while, I decided not to record the main photo session. I could have cut off the top and rooted it, but the trunk was too crooked. So I tore off all the leaves and threw away the rest of the plant.
[Aloe leaves are stored for a very long time, remaining juicy and without losing their properties. You can not use them immediately, but after some time.
I placed suitable young shoots in jars filled with warm water at room temperature. All that remained was to be patient and wait for the first roots to appear.
After some time, the shoots began to develop thin roots in the water. However, there is one problem - the aloe leaves have begun to rot. Not on the lower leaves, but on the upper young leaves: Putrid spots appear at the base of the leaf in the middle of the rosette. Until the disease spread to all the seedlings, I decided not to do anything. Perhaps this is how the aloe reacted to the water, and the rot will disappear on its own after replanting.
[To prevent rotting, you can root aloe not in water, but in a damp mixture of peat and sand.
After a few more weeks, the roots of the aloe stems finally grew, and the flower had to be transplanted into the ground.
For planting, I bought a new ceramic pot covered with white glaze, special soil for cacti and succulents with neutral acidity and drainage. Young plants are best planted in small containers, but I bought a medium sized pot. Firstly, I decided to plant several offspring in one pot, and secondly, from my own experience I know that aloe vera very quickly grows its root system and develops the soil.
The following process is probably known to all owners of indoor plants:
- I filled the bottom of the pot with drainage. The height of the drainage layer is approximately 2-3 cm. Aloe vera, which is native to African deserts, does not tolerate stagnation of moisture in the roots and reacts to this by rotting, so it is important to provide abundant drainage.
- I then poured about ⅔ of the potting medium into the pots and misted them with water using a fine spray bottle. A little advice: if you have regular all-purpose soil, add a little clean and preferably coarse sand. This will make the soil lighter and looser, which will have a positive effect on the health of the flowers.
- Using your hands, place the cuttings into the pot, carefully spreading out the roots. To create a more elegant arrangement, I planted two large stems in the back and three smaller stems in the front. So I created a sort of foreground and background.
- It is easy to calculate that five stems were planted in one container. I did this on purpose because I want the aloe vera to be more compact and bushy rather than tall. If the seedlings grow too large, I will transplant them into a separate container.
- I filled the empty spaces between the seedlings with substrate, lightly compacting it as I went.
At this point most of the transplanting was done. All that remained was to remove excess dirt from the plant and container. I took the aloe to the shower and rinsed it thoroughly with lukewarm water. I had to compact the substrate a little more with my hands and remove the leaves from the soil. Damaged leaves also need to be trimmed to keep them looking nice and preventing rot from spreading.
I could have stopped there, but I wanted to add some rocks to the surface of the soil, so that's what I did. Light-colored stones create a beautiful contrast and support plants that are not yet well established in the soil.
That's all. After some time, my aloe will get stronger, begin to grow further, and I will admire its incredible beauty and, of course, use it for cosmetic procedures.
I hope you found the tutorial helpful and wish you good luck growing aloe at home.
For your convenience, here are step-by-step instructions:
Aloe vera transplantation at home can be done in several ways:
- By seeds;
- By transplanting cuttings;
- By transplanting an adult flower;
- Replanting a plant that has no roots.
Let's look at each method in more detail.
Planting seeds
Gardeners recommend planting seeds under a source of daylight in a moist, warm greenhouse.
How to prepare a suitable planting mixture?
Basically, take granulated sand and mix it with leaf soil. The ratio is ½ part sand to 1 part soil. Before mixing, the sand should be sterilized in a water bath for 1-2 weeks before planting.
It is recommended to soak the container for planting seeds the day before, and then pour the previously obtained mixture into it. You can then gently press the seeds in and cover the top with a thin layer of sand.
Once the seeds are placed in the growing container, lightly moisten the top layer and place the pot in the greenhouse you prepared earlier.
Transplanting seedlings
For this type of transplantation, shoots that grow at the base with several leaves and are 5-10 cm long are suitable.
There are two ways to separate shoots from aloe:
- Remove the plant from the pot, shake off any remaining soil and use a sharp knife to carefully separate the shoots and roots from the base of the flower, then place the small flowers in separate containers.
- Carefully separate the scion from the main plant without damaging the roots. The adult flower, on the other hand, remains in the same container.
Transplanting an adult plant
The entire process of transplanting an adult plant can be divided into several stages.
For convenience, here are step-by-step instructions:
- Two days or a day before transplanting, the flower should be watered.
- When removing from the previous pot, remove some of the soil or wash the root system if the reason for replanting is diseases or pests. Old roots will be removed.
- Fill the bottom of the container with drainage and add a 2-3 cm layer of soil on top.
- Place the plant in the center of the pot, making sure the roots are not bent. The ideal position of the flower shoot is 2-3 cm below the edge of the pot.
- Cover the roots with soil, making sure the mound is level. Do not forget to lightly compact the resulting layer of mixture at this stage.
- Provide watering at the roots. At this stage, it is important to make sure that the water only gets under the root and does not cause rotting.
- From the third to the fifth day, gardeners are advised to protect plants from direct sunlight.
Useful video on how to properly replant aloe vera:
Transplanting plants without roots
To propagate flowers without roots, you can take leaves, cuttings (young shoots grown from the side stem, top or base of the plant) and the tips of bark-like shoots.
- The part of the plant required for the selected type of transplantation is cut off with a well-sharpened knife close to the base of the plant;
- Treat the cut area with activated carbon;
- Place the treated part of the flower in a dark place with low temperature;
- After the cut site has healed, the plant is transplanted into a new container with sand moistened with water. The most important thing at this time is to only moisten the sand to prevent rotting.
Within two weeks, the seedling will take root on its own and can be transplanted to a permanent location in a pot.
After transplanting, aloe vera should be watered very carefully, as excess moisture will lead to rotting much faster. In this case, it is necessary to repeat the transplantation procedure, clearing the roots of the damaged parts.
Preparation
Rooting a plant at home will require preliminary preparation of containers for planting. Its size should be selected depending on the age of the crop: for a young flower you will need a large pot; for aloe with sprouts, you can only replace the soil, and also plant the “babies” in separate pots.
To cultivate succulents, it is recommended to use plastic or ceramic containers. In polymer pots, the plant will develop evenly, but in such a container it is necessary to ensure that the moisture does not stagnate. As for pots made of ceramics, this material is capable of allowing air to pass through, which will facilitate the natural evaporation of excess moisture, as well as normalization of temperature. This will make it easier for the grower to care for his plant in the future.
Before rooting the culture into the purchased container, it must be thoroughly washed and dried.
Proper preparation of the soil for the crop will help reduce stress for the plant; it is worth rooting aloe in a substrate that is as identical in composition as the old soil. The soil can be purchased at the store or prepared with your own hands. In the first case, the substrate must be intended for growing succulents and cacti. If you plan to prepare the soil yourself, then certain recommendations should be followed in this matter. The ground should be:
- nutritious and light;
- with neutral acidity.
There are several options for preparing the substrate at home:
- the soil may consist of sand, leaf and clay turf soil, taken in equal proportions, with the addition of half of the peat;
- sheet soil, coarse sand and charcoal.
In addition to the pot and soil mixture, it is also necessary to prepare the crop itself for replanting. In this case, a few days before the planned rooting of the plant in a new place, it needs to be well moistened. This will make it easier and with minimal damage to later remove the aloe from the old pot.
Required materials and tools
You will need ceramic or plastic pots, substrate, and drainage material. The size of the new container should not be much larger than the diameter and height of the old one. A pot for transplanting a large specimen of aloe is taken in diameter by 3 cm, for medium-sized specimens - by 2–2.5 cm, for young specimens – by 1.5–2 cm. At the same time, drainage material is prepared.
You will need water to remove the plants from the pot. To remove old, diseased, damaged roots and leaves, use a sharp knife. The instrument used for transplantation is first wiped with alcohol. You will need a solution of potassium permanganate and charcoal.
About the need for a transplant or who needs it
Aloe roots develop slowly, but replanting cannot be delayed. There is such a thing as the removal of nutrients from the soil by a plant. The coefficient of mineral removal from aloe is high, which cannot be said about nitrogen, which desert dwellers have little need for. Applying fertilizers will not correct the situation: the humic and enzymatic components of the soil are lost, which cannot be replenished. The soil becomes as light as dust and crusts over after watering. And the tap-shaped root grows, and the lobe-shaped ones begin to protrude from the pot. It is urgently time to correct the situation: replant the aloe, change the soil mixture.
Transplant time is spring or summer. If the roots have grown slightly or a voluminous plant is difficult to replant, simply replace part of the soil.
Why is a transplant needed?
Aloe is a succulent plant that needs space. Its powerful root system grows quite quickly, therefore, in the process of growing a beautiful and useful crop at home, the grower is recommended to create comfortable conditions for its growth and development. Replanting is a prerequisite that will ensure the presence of a healthy plant in the room.
There are a number of reasons why a perennial may need to be replanted.
- The main reason why aloe is actively grown by humans is the external attractiveness of the crop. In order to maintain the beauty of a succulent, it will need to be replanted from time to time, especially for an adult plant.
- As the crop grows, young shoots will appear around it in the pot and on itself. If there are a large number of them, the gardener is recommended to transplant the children into separate containers. The sprouts will take a lot of nutrients from the mother crop, slowing down its development and depleting the soil in the pot. In addition, the plants will crowd each other and prevent them from developing properly; as a result, the flower may become one-sided or curved, which will negatively affect its appearance.
- In addition to the increase in the size of the above-ground part, the aloe root system is also growing, so the container for the plant will need to be replaced with a larger one. Neglecting this rule may result in some roots growing through the drainage holes in the pot, complicating subsequent rooting in another pot. A clear sign that the aloe rhizome has become too large for the pot will be poor penetration of moisture into the soil.
- The crop will need to be replanted due to the gradual depletion of the soil in the pot. Succulents have a high coefficient of mineral removal from the soil, while the nitrogen in it is consumed very slowly. This situation leads to the fact that the soil simply turns into dust from a large amount of nitrogen, and the top layer becomes rocky, which blocks the flow of moisture to the roots. A flowering plant must grow in nutritious soil, otherwise its lower row of leaves will die, and the plant itself will become pale, as a result the flower will wither.
- Aloe will require urgent replanting if its root system begins to rot. Such situations can arise due to excessive moisture in the crop, as well as due to damage to the perennial by some kind of disease. Signs of rotting will be souring soil in the pot and blackening of the crop. Often such problems arise in winter.
- You will need to transplant the plant into another container after purchase. This is necessary because the crops are sold in stores in a substrate not intended for indoor cultivation.
Experienced gardeners do not recommend replanting a crop without good reason, since these manipulations are a serious stress for the plant, after which it takes a long time to adapt to new conditions.
Requirements for soil mixture
The soil should be light and loose, allowing the roots to access air. The composition is a mixture of clay-turf soil and forest deciduous soil with sand in equal proportions. The addition of charcoal or peat mixture should not exceed a fifth of the soil.
Small stones are placed at the bottom of the pot for a drainage layer, which helps remove excess moisture from the pot. These are fine gravel, sea pebbles, expanded clay, and sawdust.
Step by step transplant instructions:
- on the eve of replanting, the flower is watered abundantly for easy release from a cramped pot and separation of salt-depleted soil from the root system;
- the agave is carefully removed from the flowerpot, tilted over the prepared place on the table to spread the soil and further divide the bush into individual plants;
- fragile fleshy leaves require careful handling when planting in a new place for further growth;
- the soil around the root system should be held in a lump, facilitating faster rooting in a new location;
- the roots are inspected, rotten ones are removed and the plants are sorted according to the size of suitable flowerpots for each succulent;
- prepare a drainage layer along the bottom with a thickness of 5 to 10 cm, depending on the size of the new pot, consisting of fine gravel and sawdust.
- The separated aloe is placed on a small layer of soil mixture and covered with prepared soil to the edges of the flowerpot, slightly compacting the moistened soil;
- to retain moisture before aloe takes root, the top layer of soil is laid out with a layer of expanded clay stones;
- After transplantation, the succulent is removed to a shaded place for several days without watering.
Diseases and pests
Like any other plant, aloe is also susceptible to diseases and suffers from pests. The most common diseases are associated with damage to the root system by rot. This can be either root rot or dry rot.
The first is caused by frequent watering and/or using cold water for this. The first signs are a complete cessation or slowdown in plant growth, and the stem begins to dry out. In order to cure a plant, you need to remove it from the pot, completely remove all rotten roots, and then plant it in soil with plenty of sand. In the next 3 weeks, you should stop watering. If the entire root system turns out to be unusable and has completely rotted, then it is still possible to propagate the plant using the tops, the main thing is that the stems are healthy.
Dry rot is much more dangerous. The causes are usually associated with inconsistent watering, frequent changes in temperature and air humidity. It is very difficult to recognize the disease, because its symptoms are similar to root rot - the plant also begins to dry out. It is impossible to cure aloe from dry rot, unless it is periodically treated with special preparations (fungicides) to prevent the disease.
Often the plant suffers from improper care of the owners themselves. Contrary to all advice, some begin to water the plant too often, do not observe the temperature regime, and put aloe in dark places. All this leads either to withering and incorrect development or to the death of the plant. You can understand that you are caring incorrectly based on several signs:
- Pale and limp leaves - excessive watering;
- A tall stem and small curled leaves mean the plant does not have enough light;
- Reddening of leaves - exposure to direct sunlight;
- Drying ends - lack of potassium. It is worth replanting and feeding with appropriate fertilizer;
- Weak and slow growth - improperly selected soil;
- If aloe leaves fall off, watering is done with too cold water.
The plant may suffer from insects. This happens rarely, but a thorough inspection should be carried out periodically. The most common pests of aloe are scale insects, spider mites, mealybugs and thrips.
If brown growths begin to appear on the plant, this is a scale insect. It's quite easy to fight her. It is necessary to moisten a cloth in alcohol (vodka) or vinegar, and then wipe all the leaves and stem. Afterwards, do not forget to treat with a special preparation (insecticide).
Spider mites are more difficult to see, but possible. If a cobweb appears on the aloe, take a closer look; there should be a small spider nearby - this is our pest. Fighting him won't be a problem. You can use either a special preparation or a regular remedy, in the form of soapy water or garlic tincture.
The largest and most visible pest is the mealybug. If there are not too many of these “guests”, then you can remove them manually, and then wipe the damaged area with garlic tincture with alcohol. In a more complex situation, the plant should be treated with a special agent.
Aloe can be protected from thrips by treating with insecticides in 2 stages. The first will kill adult insects, the second - larvae. The interval between treatments is a week.
Further flower care
The plant moves to partial shade for a week or two. In a shaded position, the flower heals injuries and gets used to new conditions. Injuries during transplantation are always inevitable, even if the plant was transplanted very carefully.
Location and lighting
The plant needs a significant amount of sunlight. In spring, it is necessary for aloe to get used to intense sunlight. At lunchtime, it is enough to hang a small screen on the window. This technique avoids burns.
Aloe on a sunny windowsill
Important! In summer, during very intense heat, the plant must be hidden from the sun. It’s good if aloe grows on a balcony or terrace in summer
In these conditions, it must be hidden from the rain. Excess moisture causes the flower to rot.
It’s good if aloe grows on a balcony or terrace in summer. In these conditions, it must be hidden from the rain. Excess moisture causes the flower to rot.
In autumn, when daylight hours decrease, aloe needs additional lighting. A fluorescent lamp is suitable for this. It needs to be turned on as soon as the sun disappears below the horizon.
Temperature
The optimal temperature should not be higher than 30 degrees. In winter, you need to ensure that it does not fall below 12 degrees. Aloe does not withstand frost, so a sharp drop in temperature in winter rooms should not be allowed.
Humidity
The plant tolerates dry indoor air well. However, if dryness is combined with elevated temperatures, it needs to be watered more often and sprayed periodically. In winter, when the central heating is on, you should use humidifiers or place small containers of water near the pot.
The plant should not be allowed to develop in damp rooms. The root system and stems will suffer from this.
Watering
Watering is highly dependent on the ambient temperature. If in summer the temperature reaches 30 degrees, then the plant needs to be watered every other day, sometimes daily. In the cold season, the temperature can drop to 12 degrees, in which case aloe is watered once a week.
When growing, the soil is watered at the root, and not from above. Water that gets on the leaf rosette causes the stem to rot. The main criterion for the need for watering is complete drying of the soil.
An adult plant is fed no more than once every 3 weeks. The best would be a special fertilizer for cactus.
The soil
It is necessary to monitor the condition of the soil. If it turns sour, the bush urgently needs to be replanted. You need to purchase the substrate at flower shops - there are kits specially designed for succulent plants.
Important! Aloe needs the soil to always be loosened
Loosening should be done carefully so as not to damage the roots.
If the plant does not take root
There are several reasons why the plant does not take root:
- Inappropriate soil composition. You urgently need to replace it or prepare a mixture with the correct ratio of components. The best option is to purchase a ready-made mixture for succulent species.
- Poor quality planting material when transplanting cuttings. This happens if the cutting is taken from a large plant. In this case, the agave needs to be replanted again.
- Incorrect care. It is necessary to carefully follow the recommendations of gardeners and promptly eliminate even the smallest signs of the disease.
Diseases, pests
Agave can be affected by dry or gray rot. Diseases manifest themselves as drying or deformation of the leaves and rotting of the roots. If these signs are detected, the agave needs to be urgently transplanted.
Aloe can be affected by the following pests:
- Spider mite. It is difficult to notice due to its small size. The main sign is that the finest cobwebs appear on the leaves. The leaves turn pale and dry. At a late stage of the disease they become scarlet.
- Scale insects inhibit the process of photosynthesis. Red spots appear on the leaves.
- A sign of a mealybug is a coating of leaves.
Pests can be controlled using special antiparasitic drugs.
Aloe is an unpretentious, beautiful and useful plant. If you take good care of it, there will never be any problems with it. Its longevity will depend on proper transplantation.
How to plant aloe correctly
Those who want to grow an unpretentious plant at home must first figure out when and how to plant aloe so that it takes root well and quickly.
The first thing you should pay attention to is the landing time. It is important to remember here that the active development of the flower occurs from mid-spring to the end of summer; in autumn and winter it is dormant.
Therefore, it is better to replant or plant a plant in early spring, when it emerges from the dormant state and enters the growth stage.
Having prepared the planting material and soil, you can begin a simple procedure, the correctness of which determines the growth and development of the flower.
Preparing the soil and pot
Since the plant is adapted to life in the desert, the soil for tree aloe must be appropriate. If the soil is not chosen correctly for aloe, the flower may get sick and die.
As a rule, very little soil is needed for planting agave, so it is better to purchase special balanced soil at a flower shop.
A special earthen mixture for succulents and cacti is rich in nutrients that are necessary for the normal growth and development of not only young but also adult plants.
When mixing aloe soil at home, it is important to consider the following points:
- the earth should be slightly acidic or neutral;
- the soil should easily allow air to pass through and not retain water;
- For agave, clay-sandy soil with a high iron content is more suitable.
This succulent will feel very uncomfortable in liquid black soil. Do not mix peat with the soil, as it increases its acidity level.
Most often, turf, leaf soil, humus and sand are mixed. Moreover, turf soil is taken 2 times more than other components.
You can mix a little charcoal with the soil to disinfect it and some small stones to make it looser.
Before filling the pot, it is advisable to treat the soil with high temperatures to reduce the likelihood of diseases and pests.
Choose a medium-sized container for agave: a small container will not allow the flower to grow, but a large container, on the contrary, will suppress its development.
When choosing a container for planting, you need to focus on the root of the flower - it should fit completely into the container at a distance of about 3 cm from the walls.
It is better to give preference to earthenware, where it will be easier for the roots to breathe and excess water will not stagnate. Preparing a container for planting involves filling it first with drainage and then with soil substrate.
Planting aloe
There is more than one correct answer to the question of how to plant aloe. There are several ways to plant agave, each of which has its own advantages and disadvantages.
Growing from seeds
If you want to get a large number of plants, preference is given to growing from seeds. For a successful procedure, all necessary conditions must be taken into account:
- 1 Sowing time: last week of February – first week of March.
- 2 Temperature conditions: the room temperature should be from +21°C.
- 3Container: small, flat.
The container is filled with soil that meets the requirements of the given plant variety. The soil is moistened, seeds are laid out on its surface, and then sprinkled with sand. It is important that the seed material is no deeper than 1 cm from the surface. After this, the seeded container is placed in a warm and humid greenhouse, where additional lighting is installed.
Watering should be done in moderation, but the soil should not be allowed to dry out. The emerging sprouts are sprayed with a sprayer. And when they have 3-4 true leaves, they are transplanted into small pots, the height of which does not exceed 5 cm. The next transplant is made after 1 year into a larger container for further development.
The seed method of growing aloe is considered the most difficult, so it is used quite rarely. However, in this case, the probability of plant survival is much higher than when cuttings or growing from shoots.
Planting the “babies”
This is the name given to young shoots growing from the roots. This method allows you to grow several bushes from the children surrounding the mother plant. In order for the agave to take root faster, you need to know how to grow aloe from a shoot. When growing, you must follow the basic rules, which are as follows:
- replant shoots that have at least 3 young leaves;
- children are removed during replanting of an adult plant for better survival;
- for planting, the children are cut off from the root using a sharp knife, leaving a few roots on the shoot.
Whole children can be immediately planted in prepared soil, but damaged ones are better left to dry for several days.
Preparing the container for planting consists of the following steps:
- 1Laying drainage.
- 2Filling with special soil.
- 3Good soil moisture.
After the excess water has drained into the tray (about half an hour after watering), you can begin planting the bush. To do this, it is deepened into the soil by about 1 cm. For the first 10 days, the shoot is watered daily. It is important not to allow the soil to dry out in order to prevent the root system of the shoot from drying out. Within a month, rooting should occur and new leaves should appear.
Planting a Broken Plant
An adult plant must be moved very carefully. After all, the large fleshy stems are very tender, and if tilted incorrectly they can easily break. In this case, the roots remain in the ground, and the upper part is no longer connected to them. Even in this case, you can save the flower if you know how to plant aloe without roots.
For this purpose, the main part of the plant is left in the refrigerator for several hours. During this time, you need to have time to prepare the soil and container for the flower. After moistening the soil, place the stem 1-2 cm deep into it, and then place the container in a warm, sunny place. Care is carried out in the same way as usual: water as the soil dries.
With proper care, the succulent leaves of the plant are directed upward. If they don't have enough water, they sink and begin to curl. When exposed to excess sunlight, they change color from green to brown. Compliance with all the rules of planting and care will allow you to grow a beautiful plant that will delight not only with its appearance, but also with its high-quality medicinal characteristics.
Plant care
Agave is a succulent, so its leaves have a specific structure that allows them to retain moisture for a long time. That is why it does not need frequent watering. It is enough to water no more than once a week, and in late autumn and winter – once a month.
You should be wary of excessive soil moisture, because this can lead to rotting of the roots and death of the plant. Overmoistening can be detected by the appearance of the flower: it begins to wither, the leaves become pale. You can save it by replanting it in new soil. Before planting, it is necessary to examine the root system and remove rotten parts.
When growing aloe, do not forget that the plant will feel best in a well-lit place.
You should not replace direct sunlight with artificial lighting: in this case, the flower may stretch out and lose its decorative effect. In summer it can be taken outside.
The plant tolerates temperature changes quite well: it will be comfortable at both +10°C and +22°C. Therefore, you can place the pot in a cool place.
Feed the agave once a month with liquid combined fertilizer during the period of growth and development. But you should not apply too much fertilizer - this can stop the development of the plant. When replanting in a timely manner, it is better to avoid fertilizers altogether, since a large volume of nutrients in fresh soil can negatively affect the flower.
Source: https://moimirdizaina.ru/kak-posadit-aloe.html
When is the best time to do this?
The best period for rooting aloe in a new container will be spring; it is important to choose the right time so that the plant is just emerging from the dormant phase and has not yet begun to actively develop. If you have time to replant a succulent during this period, the active metabolism that accompanies the growing season will help the crop quickly adapt to new conditions and maintain its health.
This is especially true for the root system, which in any case will be disturbed and injured during the process of removing the plant from the old soil and rooting in a new container. Some gardeners transplant aloe in the summer, while simultaneously propagating the crop.
It would be better to refrain from such work in the autumn and winter, since at this time the succulent will already suffer from a lack of sunlight, which will weaken its immunity. In addition, the autumn-winter period is the resting phase for aloe. As a result, the flower will need much more time to adapt to new conditions.
How often to do it, when is it better?
Until the flower reaches the age of 5 years, it is necessary to replant annually , since the plant is fast growing, therefore its root system requires more and more space over time.
Adult specimens grow much slower; it is enough to replant them once every three years. It is better to replant aloe in the spring-summer period, since at this time the plant is in the process of active vegetation, thanks to which it can more easily withstand stress.
Growing aloe at home
Thanks to the unpretentiousness of agave, it can be easily grown at home in any quantity. It reproduces with the help of:
- children (young bushes that grow next to an adult);
- parts of the stem;
- pieces of leaf;
- seeds
Reproduction using shoots (children) is perhaps the easiest and fastest way. As an adult aloe bush develops, it produces a large number of young shoots that grow near it and represent a fully formed plant, with a root system and leaves. A significant number of children in a pot with a mother flower dulls its growth.
Therefore, they simply need to be removed periodically. Therefore, the use of this method of reproduction is also indicated for the favorable growth of adult agave. Once harvested, the babies are immediately ready to be planted in an individual pot. It should be noted that before removing the shoot, the soil must be watered abundantly so as not to damage the young roots during replanting. A drainage layer and soil are placed in the pot. The shoot should be buried in the soil up to the lower leaves. The soil is lightly pressed down and watered. In the future, caring for a young agave is the same as for an adult. The plant takes root quite quickly and well in its new location.
It is also easy to grow agave without roots, using the upper part of the stem
In this case, it is important to properly prepare the cuttings. For these purposes, use the upper part of the stem with at least two leaves. After the cutting is cut from the main bush, it needs to be given time to rest.
Within a week, the cut areas should dry out a little. During this time, the cutting can be stored in a paper towel at room temperature or on the bottom shelf of the refrigerator. Afterwards, the cuttings need to be planted in the ground, adhering to the planting principles outlined when children examined aloe. Since cuttings are a way of growing agave without roots, to improve the survival rate of part of the stem, it is covered with a glass jar. Under conditions of constant temperature and humidity, the cuttings quickly form a root system and take root. Just remember that this method of growing requires daily care: ventilation, watering. When young leaves appear on the surface of the soil, the jar can be completely removed; the agave has taken root well and started growing.
Regarding whether cut stems can take root in a glass of water, the opinions of flower growers are diametrically opposed. Some strongly recommend that before planting the cutting, keep it in water until it takes root. Others insist that the stems rot when left in water for a long time and it is best to plant them in the ground immediately.
Therefore, the right to choose how to root the cutting remains with the grower; in any case, if one of the chosen methods turns out to be less effective, then the rapid reproduction of the agave will allow the reproduction to be repeated without damage to the population.
The next way to propagate aloe is using a leaf. Of course, this will take a little more time, but this is an ideal opportunity to get an adult plant when there are no shoots or cuttings.
First of all, a leaf 3-5 centimeters long is cut off. It is dried for a week, that is, placed on a paper napkin so that the cut area is slightly covered with a protective film. Then the leaf needs to be planted in soil made of soil - 1 part and sand - 2 parts, watered and covered with glass or a jar. Greenhouse conditions help the leaf form roots faster. As soon as young shoots appear, the plant can be planted in an individual pot with soil.
Growing aloe from seeds at home is extremely rare. This is a rather labor-intensive process and is resorted to when they decide to grow decorative variegated species of this plant on their own. Seeds for planting are purchased in the store, where you can also get detailed instructions on how to grow them correctly. In general terms, we mean that before sowing, the planting material is well cleaned of the protective film using fine sandpaper and pre-soaked in water for a day. Seeds are planted immediately in individual pots and germinated under film at constant humidity and air temperature + 23 degrees. The first shoots appear in a month. The seeds are planted in soil made from soil, turf, coarse river sand and charcoal. It will take at least two years for a plant grown from seeds to reach its mature decorative form.
How to plant aloe without roots - step-by-step instructions
Aloe rarely pleases with flowering at home, but at the same time it is a favorite of many gardeners.
This plant is known for its extraordinary form, medicinal properties, and the benefits of its juice for the skin.
It has the characteristic feature of always growing back the lost part, which is very remarkable for the propagation of a flower. You can learn how to plant aloe without roots from this article.
Growing aloe at home
In order for aloe to develop normally in indoor conditions, it must be pampered with nutritious soil. Immediately after transplanting into a new pot, you should feed the plant with fertilizers for succulents:
- complexes containing minerals must be added directly to the soil, and not to the flower itself;
- in spring and summer, the frequency of fertilizing should be at least once every two weeks;
- Fertilizers can only be added to a moistened substrate.
Aloe propagates easily at home. You can use seeds for this, but planting and growing them is a very long and labor-intensive process. It is better to resort to vegetative propagation - cuttings or shoots.
Why do you need a shoot?
Planting aloe without roots is an absolutely real task, for which you will need a plant shoot.
How to take a shoot from aloe? It is carefully cut at a minimum distance from the stem, and the cut site is immediately treated with activated carbon. The cut part is stored for a day or two in a dry and preferably dark place.
During this time, a kind of film is formed on the sprout, which performs a protective function and serves as a conductor of nutrients.
How to properly plant aloe in a pot with a shoot? You need to immerse it in the soil 2-3 cm with the cut down, so that it takes a vertical position and is stable.
It is also recommended to cover all sides with small pebbles or sawdust so that the green mass located on top of the soil does not touch the ground. The planting material is covered with a glass jar or an ordinary plastic bag.
The pot with the plant is placed in a well-lit place. In order for some of the aloe to form roots more quickly, it can be pre-treated with a growth stimulator.
Caring for a planted flower is quite simple:
- systematic soil moistening, spraying the plant and ventilation;
- to prevent rotting, it is better to water using a tray placed under the pot;
- use only slightly warm water;
- keep the pot in a bright place, but protect the planted sprout from direct sunlight.
Planting dates and correct soil selection
Loading …
The most optimal period for planting aloe is spring. From mid-March to the end of May, the flower intensifies its growth, develops rapidly and takes root in a new place. If there is a need, the plant can be planted in autumn or even winter, but in this case there is a high probability of its death.
Before transplanting an aloe shoot, you need to choose the right soil, which will facilitate rapid rooting of the sprout. It does best in balanced cactus soil. The main thing is that the substrate contains a lot of nutrients and iron.
Basic soil requirements:
- it should be well loosened and have excellent breathability;
- neutral or slightly acidic soil is most acceptable;
- You can use charcoal or sand as additives.
It is not recommended to add peat, otherwise the substrate will become too acidic. Before using soil for growing aloe, it is advisable to expose it to high temperatures.
Cuttings
There are really many options for growing aloe from a shoot without roots. One of the effective ways is cuttings. It is best to resort to it in late spring - early summer. For propagation, lateral shoots that grow along the stem are required. They are cut with a disinfected knife and kept in a dry room for several days.
After drying, the cuttings are immersed in previously prepared sand-based soil. The distance between seedlings should be at least 4 centimeters. They need to be deepened a little - about 1-1.5 cm. The soil should be watered regularly, kept moist, and after the first roots appear, watering should be made even more intense.
After a few weeks, the cuttings, which have already acquired their own root system, can be transplanted into separate, larger containers.
Source: https://sadim.guru/kak-posadit-aloje-bez-kornej/
Caring for aloe at home after planting
A planted plant needs quality care. Any mistake by the grower at this stage of growing aloe can be disastrous, since the plant has not yet had time to get stronger
Therefore, you should pay attention to the basic requirements of culture that cannot be ignored
Rules of care:
- lighting. Aloe is considered a light-loving plant, so it is necessary to select a southern or eastern window sill for it. But it is necessary to avoid direct sunlight, as it can cause burns on the leaves. In winter, this indoor plant needs additional artificial lighting. The lamps should be placed at a height of 35 cm above the plant;
- content temperature. This succulent feels good at high temperatures. In summer, a flowerpot with a flower can be placed outside. In winter, when aloe is at rest, the favorable temperature is 16 ° C;
- humidity. Aloe is a drought-resistant plant, so the leaves should not be sprayed. The optimal humidity level is 60-65%. Sometimes you can simply wipe the leaves to remove dust;
- transfer. This procedure should be carried out when the succulent pot becomes crowded. In this case, the plant stops actively growing, and the young leaves become significantly smaller. It is recommended to carry out replanting using the transshipment method, without destroying the earthen ball at the roots.
How to feed aloe
This plant does not require high levels of nutrients. For feeding, you should use mineral fertilizers, which can be purchased at the store labeled “for succulents.”
Aloe rarely needs to be fertilized.
Features of fertilizing:
- when planting in a purchased substrate, you need to apply fertilizer for the first time only after six months, and in other cases - after 3 months;
- The dosage indicated in the instructions cannot be exceeded;
- It is necessary to use fertilizers from March to the end of September once a month, and take a break in late autumn and winter;
- Only healthy seedlings can be fed.
Important! You cannot use aloe for medicinal purposes after feeding; in this case, you need to wait 2 months.
How to water correctly so as not to destroy young plants
Aloe does not tolerate waterlogging of the soil. Therefore, you need to water the plant only when necessary when the top layer of soil dries out, avoiding stagnation of moisture.
It is also important to periodically loosen the soil in the pot to improve its breathability.
For humidification, it is recommended to use settled water at room temperature. Watering should be carried out at the root so that water does not fall on the leaves. But it is also permissible to sometimes pour water into the pan to saturate the substrate with moisture.
When choosing aloe as a houseplant, planting and caring for it at home will not cause any serious difficulties. Therefore, any gardener can cope with this task, regardless of his experience.
Care after transplant
Caring for aloe is easy. Under natural conditions, it feels comfortable in sandy soils with rare precipitation. In the places where it grows, it receives a large amount of direct sunlight all year round.
Watering procedure
The main rule in caring for agave is that it tolerates drought better than too much watering. It is able to accumulate moisture in the leaves, so it can survive without precipitation for a long time. If it grows in a wetland, its green mass will begin to rot. Young plants are watered once a week, then the frequency is gradually reduced. An adult flower needs water no more than once a week in summer, and in winter - once every 30-40 days.
Lighting
Agave, like other succulents, thrive in intense light. They are recommended to be placed on window sills on the south side. If the plant does not receive enough sunlight, the leaves will grow uneven and become distorted. Lamps are not required. If the flower has been in the shade for a long time for any reason, it should not be suddenly placed in the sun.
Temperature
The flower grows quickly at room temperature and can withstand temperatures ranging from 12 to 30 degrees. In summer, pots can be placed outside or on an open balcony. In winter they must be moved indoors. The frequency of watering also depends on the air temperature. The warmer the room, the more water the plant needs and vice versa.
We recommend: Aloe spinosa - care and beneficial properties
The process of transplanting aloe into a new pot
There are several ways to transplant aloe. All the methods are quite easy, so even a novice gardener can handle them by following the instructions.
Transplantation with roots
The most common way to replant a plant is to replant with roots.
Instructions:
- Carefully remove the plant from the old pot. You can turn the pot over slightly, or try pushing the old potting soil with a stick through the hole in the bottom of the pot.
- Free the plant's roots from old soil. If the soil is very dry, it is recommended to immerse the root system in warm water for a short time.
- If there are damaged roots, they must be removed. Be sure to treat the cut areas.
- Take a new pot, add drainage and some soil.
- Now you can plant the aloe in a new pot; the top layer of soil needs to be lightly compacted.
- After transplanting, aloe does not need to be watered for a week, and it is also not recommended to place it in highly lit places.
- In addition, you should not apply any fertilizing or fertilizer in the next six months after transplantation.
Transplanting aloe without roots
This method will be relevant if the plant is very stretched upward, the stem is completely bare, and the leaves remain only on the top of the head.
So, to replant, you need to carefully cut off the top of the plant with a sharp knife. The cut area must be treated
It is important to let the plant dry for several days, preferably in a dark place.
After these procedures, we place the plant in water or moistened sand so that roots appear. As soon as the roots appear, the plant can be planted in the soil.
Scion transplantation
This method of plant transplantation is also the most common propagation method for aloe.
With this method, the most important procedure will be the correct processing of the cut site on the mother plant and on the shoot.
After you have cut off the side shoot and treated all the cut points, the shoot should be sent to a dark place for several days, and then placed in water. When the roots appear, it’s time to plant the shoot in a separate pot.
Aloe: propagation by seeds
This method of propagation of aloe is considered quite rare. Growing a crop from seeds is a complex process and takes a lot of time. Because aloe, which is planted using this method, acquires its own decorative, beautiful appearance only after 2 years.
But, if you decide to propagate aloe at home, be sure to choose this method. He already has his own fans. And this is not strange, since observing all stages of cultural growth is a fascinating activity.
Perform the propagation process using seeds as follows:
- Plant in March . Purchase seeds in advance.
- For planting, use shallow containers. The plant requires special soil. Make it yourself, just mix turf soil, leaf soil, and river sand in equal portions.
- Maintain the desired temperature in the room. It should be a minimum of +20°C and a maximum of +22°C. In addition, provide the plant with normal light. For this, gardeners often use a special lamp. Remember also that aloe is considered a light-loving crop. Also don't forget about regular watering. Do this with a spray bottle.
- Having noticed the first shoots, pick the flower. Plant your aloe by choosing a small container for the plant.
- The small container must be stored in a greenhouse for 12 months. When spring comes, you can transplant the plant into a large pot. Care for this flower as usual.
Seeds
Now let's look at the process of sowing seeds:
- Prepare soil that is suitable for this particular plant.
- Pour the soil into a small bowl.
- Moisten the soil
- Place the seeds on top of the soil, sprinkle with sand so that its layer is no more than 1 cm.
- When you notice 4 leaves, transplant the seedlings into containers so that their height is no more than 5 cm.
How to plant and propagate succulents
Often, replanting agave is caused by the sprouting of shoots that deplete the soil and the mother plant. In nature, aloe reproduces through young shoots, forming impenetrable African thickets. The call of nature also affects the indoor cultivation of aloe.
The shoots can be removed from the pot without replanting the main specimen. The preparation process includes abundant watering, preparation of flowerpots and soil for aloe seedlings. The sprouts are planted in separate containers, similar to transplanting an adult specimen. It is noteworthy that this procedure can be carried out at any time of the year. Young shoots take root well even in winter, since they have their own root system. Planting “babies” is the most common way of propagating aloe.
Popular beliefs say that a succulent not only lives for a hundred years, but also blooms once every hundred years.
Aloe is also propagated by cuttings. In this case, the generally accepted rules for cutting succulent plants are followed. The cut or plucked leaf is left in the open air for several days so that the cut surface is completely dry. Then the cuttings are planted in wet sand to a depth of no more than one centimeter. There is no need to set up a mini-greenhouse. Succulents have a sufficient supply of moisture in their tissues and rot in greenhouse conditions. Soon enough, the first bud will hatch and the leaf of a new seedling will sprout. The cuttings need to be planted in individual containers after the third leaf appears.
In addition, you can transplant aloe without roots. Flower growers use this method when rejuvenating an old plant. The scarlet sheds its lower leaves, the trunk becomes bare and eventually lies down because it cannot support the weight of the thick leaves. Knowing how to replant an aged aloe without a long stem and root, you can get a new mature plant.
In this case, the stem is cut below the leafy part. The cut part of the aloe is dried in the open air and placed in water. The first roots will soon sprout. After this, the seedling is planted in another pot with a complete substrate for succulent plants.
When and why is a transplant needed?
Aloe is a succulent plant that develops an extensive root system over time that cannot tolerate small, cramped pots. Also, the transplant procedure must be carried out in the following cases :
- When the roots rot, replanting is the only way to save a dying plant.
- With an old, depleted substrate, since in poor soil the plant slows down its growth, loses leaves, and eventually dies altogether.
- When many shoots form around the central aloe.
- To renew the plant and give it a decorative appearance.
- With an unsuitable substrate for aloe.
Rules for caring for a plant at home
Caring for Aloe is quite simple, here are the basic recommendations:
- It is not necessary to water often, since the plant can easily survive on water for a long time. During the warm period, water once every seven days. With the onset of cold weather, watering is limited to twice a month.
- Excessive watering is not recommended. Stagnant water will cause the root to rot. To avoid this, use a drainage system. Be sure to leave holes at the bottom to allow water to drain.
- The temperature of the water used for irrigation should be from 25 to 35 degrees above zero.
- It is useful to place the pot in a pan of water so that the roots of the plant are saturated with moisture.
- Growing a flower requires regular feeding. Aloe should be fed in spring, summer and autumn. They do this once a month. Use a special mixture for cacti or succulents as fertilizer. Mineral compositions in liquid form are well suited.
- There should be plenty of light, but avoid direct open sun.
- Dry air is worse for Aloe than dry soil. Spray the leaves and air around the plant regularly. Such care is extremely important for the flower.
- The plant needs winter rest; there is no need to disturb it at this time, water less, no fertilizing, no replanting.
- Provide access to fresh air. Ventilate the room, but avoid drafts.
You have learned the basics of growing Aloe at home. This beautiful, useful plant in its own way will take its rightful place in the collection of your indoor flowers. If you are a beginner, start gaining experience in plant growing with this flower. Planting Aloe and caring for it will not burden you.
If you are an experienced amateur or professional, then the abundance of species of this flower will delight you with its diversity; here everyone will find a plant to their liking. By combining these flowers with other indoor flora, you can create beautiful compositions to decorate your home with.
Suitable soil composition
Before replanting aloe, you need to understand which substances will benefit it and which will be harmful. The main nutrients for aloe are phosphorus, potassium and calcium. If there is a shortage of them, the leaves of the plant change color, fall off or dry out. To provide these substances, humus or wood ash is added to the soil during replanting; you can also buy special fertilizer for cacti and succulents. A sufficient amount of nutrients will increase the plant's endurance and ensure normal development of the root system and leaves.
Household succulents do not tolerate excess nitrogen well. A high content of this element in the soil leads to aloe leaves cracking and the plant losing its moisture-holding properties. Therefore, the soil should not contain peat, the main source of nitrogen for plants. A succulent still needs a minimum amount of the substance. The amount of nitrogen in humus and wood ash is quite enough to satisfy this need. The acidity of the soil for aloe should be neutral or weak, the recommended pH is 6-7. The plant tolerates a lack of nutrients and moisture more easily than their excess. Therefore, fertilizing during dormancy is not required.
Caring for aloe at home
Aloe illumination
Aloe is a light-loving plant, so it is best to grow it at home on the south side of the house, while it is not afraid of direct rays of the sun hitting the plant. A bush that has stood in the shade for a long time is gradually accustomed to the bright rays of the sun. In the winter season, the bush sometimes needs additional lighting; for this, you can use fluorescent lamps.
Temperature conditions for aloe
In the summer, aloe develops and grows within its normal limits at normal room temperature. During the warm season, it can be moved to fresh air on a balcony, loggia or veranda, and a place protected from precipitation is selected for it. If in the summer you do not move the plant outside, then it is recommended to ventilate the room in which the aloe is located from time to time. In winter, aloe has a dormant period; therefore, it is recommended to move it to a cool place (no warmer than 14 degrees). If the room is warmer, the bush may begin to actively stretch, since in winter the sun cannot give it the necessary amount of light.
Watering aloe
During the growing season, aloe is watered immediately after the surface of the soil mixture in the pot dries. In winter, watering should be less frequent, however, the earthen clod should not be allowed to dry out. When moistening the substrate, make sure that the liquid does not get inside the leaf rosette, because this can lead to rotting of the trunk, and this in turn can consequently destroy the bush.
Aloe blossom
In order for aloe to bloom, it needs to arrange a period of rest, which is only possible with long daylight hours and coolness. It is quite difficult to provide a plant with such conditions when growing in an apartment; therefore, its flowering can be seen very rarely.
Aloe fertilizer
Aloe feeding is carried out from the second half of spring to the beginning of autumn at intervals of 1 time every 4 weeks. When the bush is dormant, there is no need to add fertilizer to the soil mixture.
Aloe transplant
A substrate suitable for growing aloe must consist of turf and deciduous soil, as well as sand in the proportion (2:1:1). To make the soil mixture more loose, it is mixed with a small amount of charcoal and small pieces of brick or crushed stone. Transplantation is carried out only if necessary; as a rule, young bushes undergo this procedure once every couple of years, and older ones - once every 4 years.
Transfer at the right time
Young aloe should be replanted every year - in its “young” years it will grow noticeably and noticeably. Once the aloe vera reaches five years of age, it should be replanted every 2-3 years, as this process is very labor-intensive and risky, and the plant does not tolerate it well.
The best time to transplant is spring or summer. Before the active growing season begins, the plant gains strength, so it has a better chance of surviving a traumatic procedure and recovering quickly.
Aloe should not be replanted in winter and autumn. The fact is that during this period the plant is in a kind of suspended animation, hibernation, so it cannot quickly and fully recover after transplantation. Plants that are too young, old or weak may not survive this procedure at all.
If the roots haven't grown much, or if you're concerned the aloe won't survive replanting, you may not want to remove it entirely from the old soil, but simply replace most of the old soil with fresh soil.
Although agave can be exposed to direct sunlight, do not overdo it: Prolonged exposure to direct sunlight, especially in dry conditions, will cause the branches to lose their lushness and turn purple or brown.
How to transplant an adult plant into another pot
It is easier to divide the work associated with transplanting aloe into several stages. For example:
- Stop watering the flower a day before the event.
- If aloe has diseases, it is better to completely free the flower from the old soil. Rinse the root system, cut off old roots.
- Laying drainage at the bottom of the container is a must. Add soil on top.
- Place the plant in the center of the pot, monitoring the condition of the roots. The stem of the flower should be located just below the edge of the pot.
- Cover the roots with soil, ensuring evenness. Compact each next layer a little.
Watering after transplantation should be root watering.
Important! Water should not cause the plant to rot. Aloe should be protected from direct sunlight
What kind of pot do you need?
Pots for house plants surprise with their variety. There are a wide variety of shapes, textures and colors; it can be unclear what kind of pot is needed for aloe. The container affects the external characteristics of the plant, so this stage is one of the most important.
Variety of pots for indoor plants
Aloe is hardy, but a lot depends on the right pot. For example, a flowerpot is a decorative vessel without a tray. The accessory is elegant in itself, therefore it hides the unattractiveness of the succulent.
It is important to allow enough space for aloe roots. However, you should not initially choose a large pot, because in the future you will need an even larger container
You should not consider dark pots, as they get hot in the sun. Rectangular containers are not considered very useful. Water accumulates in the corners, mold appears, and ventilation deteriorates.
Important! The optimal container size for one flower is 10-14 cm. If the plant is large or there are several aloe plants in the pot, the diameter of the pot should be 20-25 cm
When choosing containers, you need to take into account the root structure of the plant.
When choosing an alternative container, it is necessary to take into account the material of the pot. Most houseplants do well in ceramic containers. Pots of this type are not only beautiful, but also environmentally friendly. Ceramics are characterized by the presence of pores through which oxygen penetrates. Thanks to this uniqueness of the material, a high-quality climate is maintained inside. A ceramic pot is indispensable for plants that do not tolerate waterlogging. Aloe is one of these.
Land requirements
Aloe grows naturally in places where it is very hot and there is minimal rain. In the room, the cactus species prefers loose soil substance
It is important that there is breathability. The soil must have good drainage
Loose soil for planting
If the plant does not like the selected soil, the flower will react accordingly. For example, yellowing and rapid death of aloe will begin. To prevent this, it is better to choose soil with a slightly acidic pH, up to 7 units.
Soil loosening agents required:
- gravel chips;
- perlite mixture;
- vermiculite mixture;
- brick crumbs;
- small coals.
Basic components of the mixture:
- turf;
- ordinary land;
- sandy soil;
- fresh humus.
Preparing the plant for transplantation
Preliminary preparation of aloe for transplantation will be the key to the success of the stressful procedure. The plant should be watered abundantly one or two days before the important event, so that when it is removed from the pot, all the soil is moist and easily separated from the roots.
Although this plant has long won the popular name “agave” due to its extreme survival ability, the procedure should be approached with love and care. A careless attitude towards transplantation can destroy even aloe.
Rules and process of aloe transplantation:
- The main rule of transplanting aloe is in tune with the famous Hippocratic oath “do no harm!” Aloe has rather fragile leaves. Possible loss of the green part of the plant should be minimized. The succulent moisture of the succulent leaves will nourish the plant during the rooting adaptation period.
- The plant should be held with one hand at the base of the stem, supporting the pot with your free hand. Carefully turn the pot upside down and remove the aloe root system along with a lump of substrate. Place the plant on a horizontal surface, loosen the earthen ball, freeing the roots.
- The aloe root system requires careful examination and recovery. It is necessary to remove old dry roots, rotten roots affected by putrefactive bacteria and pests. Agave may not tolerate radical cutting of the roots; diligence is only necessary when replanting due to soil rot or the dominance of soil pests.
- The roots of aloe replanted due to pests and acidified soil should be completely freed from the soil. A short disinfectant bath may be used. A small amount of soil may remain on the roots if seasonal replanting or planting of young shoots is carried out.
- A drainage layer of gravel is placed in the new pot, which is covered with a layer of coarse sand. Next, pour a layer of earthen substrate onto which the aloe roots are placed. The plant must be oriented in the center of the flowerpot, carefully holding the leafy part. The short stem of the succulent creates considerable inconvenience when adding soil. A narrow spatula can make the task much easier. It is extremely undesirable for the substrate to get into the rosettes of leaves. A slight deepening of the stem is allowed, which will allow the plant to form additional roots. The soil is slightly compacted and the leaves of the plant are wiped with a damp sponge. The first watering is carried out no earlier than the next day.
Features of transplanting an old flower
Some gardeners have a question: when to replant aloe at home? On average, a flower is replanted every two years after its roots completely fill the pot. Transplantation should be carried out in spring or summer. If there are few plant roots in the pot, then the soil is partially replaced. When replanting aloe, you should not change the soil to a substrate that differs in quality. Otherwise, this may lead to flower diseases.
The day before transplanting, it is recommended to water the plant abundantly. After the flower has completely absorbed the water, it is necessary to loosen the soil as carefully as possible so as not to damage its roots. Drainage must be placed at the bottom of the pot. It is made from:
- Expanded clay;
- Small pebbles;
- Pieces of brick.
It is necessary to pour a layer of soil mixture on top of the drainage. The pot in which the plant is located must be turned over as carefully as possible. A flower with an earthen lump emerges from it. Old soil that has not been entwined by the roots of the plant must be carefully removed so as not to damage them. Next, the flower is placed in a new pot. In this case, the root collar of the aloe is placed a few centimeters below the top of the pot. The flower must be covered with new soil. Next, the soil is compacted a little and watered.
After the flower has been cut, it must be placed in a place protected from bright light. During the first few days, the plant is not watered. If there is too much moisture, the flower may rot.
Transplanting and caring for aloe at home is quite simple. Anyone can do this, even a child.
Aloe transplant methods
Many aloe flowers are characterized by the presence of a bushy form. This is why shoots are formed from the root of the plant. These types of aloe can be propagated using root shoots. To do this, it is necessary to remove it from the pot during the transplantation of an adult aloe. Pre-prepare two pots of the same size as the previous pot. After the aloe is removed from the pot as carefully as possible, you must try to remove absolutely all the soil from its roots. Next, the plant is divided into several parts, depending on the number of shoots. This must be done by hand. When cutting a flower with a knife, its roots are severely damaged, which can lead to its death.
Very often, transplantation of aloe cuttings is required. This action is carried out in the warm season. After cutting an adult plant, it is strictly forbidden to immediately plant the cuttings in the ground. They must be placed in the air so that the cut area is completely dry. After this, you need to plant the cuttings in the ground. For this, it is best to choose nutritious soils. It is recommended to buy soil in a specialized store.
As you know, aloe can reproduce by seeds that form on its leaves. After they fall into a large pot, you should not touch them. Aloe seeds are small flowers that sprout when dropped into the ground. They should be transplanted after they reach a height of five centimeters.
Aloe is a fairly valuable medicinal flower. In order to limit the possibility of plant disease, as well as ensure its full growth and development, it is necessary to replant it in a timely manner.
Share your results of replanting aloe, and watch a video in which an experienced gardener tells you when to replant aloe at home.