Do you have an orchid growing, but you don’t know how to replant it at home? Read the article, it contains a lot of useful tips and instructions.
The orchid, just like the rose, can be called the queen of flowers. Graceful flowers, decorative leaves, intertwining roots and stems create a plant of incredible beauty. But this flower, like all the others, needs good care, an important component of which is replanting. It needs to be done correctly and on time - the further development of the plant and the abundance of flowering, as well as the duration of the adaptation process, depend on this.
Read another article on our website that tells how to propagate an orchid at home with children, cuttings, roots, and seeds. All methods are described in detail.
This article describes the timing, as well as the rules for transplanting a home orchid. You will learn how to replant a flower after the store and why to do it at all. Read on.
Why replant an orchid when grown at home: is it replanted at all, is it possible?
Orchid transplantation at home
Various circumstances may arise under which a transplant is performed. Why replant an orchid when growing it at home? Is it possible to replant at all? Yes, this can and should be done. Here are the circumstances under which flower breeding experts advise doing this:
- Replanting is required once every 3-4 years after purchasing or replanting the plant.
- If it is noticed that the roots have begun to appear from the pot, i.e. it has become too small for the plant.
- If the orchid is very sick, all its leaves begin to turn yellow.
- Unsightly appearance and condition of the substrate in which the flower grows. Mold or severe dryness of the upper fragments has appeared on the surface, which indicates a loss of the filler’s ability to pass water and air.
- The plant does not bloom for several years, and then it needs a good shake-up in the form of a transplant.
- If necessary, divide the orchid.
If these signs are not observed, it is better not to touch the orchid - it does not really like to be disturbed. It is also not recommended to do this during the flowering process; it is better to wait until it is over, unless an urgent transplant is needed.
How to determine that a transplant is necessary?
You can determine whether a plant needs replanting by looking at the state of the root system, especially since the pots for them are often transparent. If the roots of the flower have white, light gray, or rich green shades, the plant is healthy and does not need to be replanted.
Signs that an orchid needs to be replanted:
- the soil in the pot was compacted in clumps and sank greatly;
- the roots of the plant have grown very large and do not fit well in the pot;
- an unpleasant odor characteristic of mold or rot appears;
- the appearance of the flower has deteriorated, looks depressed, lethargic;
- the color of the roots in the pot changed and became grayish-brown;
- 1-1.5 years have passed since purchasing the plant, or 2-3 years have passed since the last transplant.
Important. Orchids should only be replanted in a completely healthy and non-flowering state. To avoid the death of the flower, you should try to cure it or let it bloom before replanting.
Standard terms
A healthy flower must be replanted every two to three years due to compaction and oxidation of the substrate. In such cases, it is better to replant the orchid after it blooms, during the new growing season, when young shoots begin to appear.
After the purchase
After purchasing an orchid in a store, it is recommended to replant it, because the substrate very often contains mold and spores of fungal diseases due to improper care of the plant in store conditions. It is better to temporarily isolate a new flower from other indoor plants for a period of up to one month.
If you are confident in the good condition of the soil and the plant itself, replanting can be done 1-1.5 years after purchase.
Depending on the time of year
- It is usually recommended to replant an orchid in the spring, when it begins its period of active growth, because... at this time, it quickly adapts to the new substrate.
- In summer it is also possible to replant the flower in new soil.
- But in autumn and winter it is not recommended to replant phalaenopsis, since during these periods the biological metabolic processes of the plant slow down greatly.
Timing: when can an orchid be replanted?
Replanting an orchid at home
This operation should be carried out when the dormant period of the inflorescences and the entire plant has ended. But there are types of orchids in which the dormant period is weakly expressed, for example, phalaenopsis, which blooms almost all year round with short breaks. Therefore, if new shoots of a plant do not develop in the absence of signs of disease, it means that it is entering a dormant period. This is the best time to replant. This time usually occurs in the spring - late February and March. This is the best time to replant an orchid.
When is the time to transplant?
Many gardeners, especially beginners, are interested in when to replant an orchid. There are several recommendations on this matter. Typically, such a procedure is carried out once every 2 years. But there are a number of factors that influence choosing the right time for this. The time for transplantation comes when the orchid acquires certain external characteristics. Of course, you should not allow a significant deterioration in the health of the plant. Otherwise, it will not be able to undergo the procedure.
Every gardener should know how to replant an orchid and how to care for this plant. If the root mass does not fit in the pot, it is time to purchase a new container. The plant will be more comfortable in it. You may also notice that the plant begins to develop multiple aerial roots.
During this period, the orchid begins to lack nutrients. Because of this, its leaves become pale. Yellowish spots may appear on them. Flowering also stops. It has been missing for more than 3 months. This is a clear sign that the time has come for a transplant.
Another way to determine that it is time to replant is to increase the volume of foliage mass. It is 2 times the size of the pot.
It is best to choose the time to transplant immediately after flowering has completed. Most often this procedure is carried out in spring or autumn. It is worth noting that it is quite possible to perform a transplant in summer or winter. It is important to assess the condition of the flower. It is also worth noting that the orchid is not sensitive to root pruning.
Frequency of orchid transplantation at home: how often?
Replanting an orchid at home
Many novice flower lovers ask the question: “How often to replant an orchid?” . What determines the frequency of transplanting inflorescences at home?
- The answer to this question depends on what composition of the substrate is in the container.
- It may consist of moss, and then it needs to be replanted more often - once every two years .
- If the main part of the substrate is bark, which decomposes more slowly, then you can replant it once every three years.
Of course, these dates are indicated for planned replantings, when the inflorescence looks completely healthy and has no signs of damage by insects.
How to make the right choice when shopping in a store?
The orchid substrate market is overflowing with various offers.
Stores sell both ready-made mixtures and individual components . But even well-known manufacturers do not always please with the quality of the product. Often the soil contains a large amount of peat, which is useful for terrestrial orchids and is contraindicated for epiphytes. Therefore, before purchasing, it is important to pay attention to:
- The purpose of the substrate, what varieties of orchids it is suitable for. Soil for epiphytic exotics is sold under the name “Mixture for Phalaenopsis”, and for terrestrial orchids “Mixture for Cymbidium”.
- Supply of components and soil pH.
- Nutritional value of soil.
- Recommendations for use.
Experienced flower growers recommend sifting the finished mixture , thus getting rid of excess peat and earth dust. And then add the required amount of disinfected tree bark.
We invite you to watch a video on how to choose the right substrate for orchids:
Substrate for orchid transplantation at home: what is it made of?
Substrate for transplanting orchids at home
To transplant orchids at home, you need to choose a high-quality substrate. The health and further flowering process of the plant largely depends on this. What is it made of? You can buy a specialized one at retail outlets, but it comes in two types:
- For epiphytic (i.e. with aerial roots). It's called Phalaenopsis Mixture.
- For terrestrials - “Mixture for Cymbidium”.
The first mixture is used for flowers growing on trees with long aerial roots. Therefore, the substrate for them must be breathable, because the roots of these flowers take part in photosynthesis and they do not need soil, only moisture, to grow. The composition of such mixtures usually includes:
- Pine bark
- Ground fern root
- Activated carbon
- Cut cork
- Sphagnum in small quantities
The second type of mixture is denser, because it is intended for orchids living on the ground. It contains more of these ingredients:
- Sphagnum moss
- Lowland peat
- Leaf ground
- Coal
Sometimes various synthetic materials, such as perlite or foam, are used as a substrate. You can also use:
- Expanded clay
- Shell rock
- Pumice
The substrate can be made at home. Pine bark is used for this:
- First disinfect it - hold it over steam for half an hour or boil it in water.
- After this, dry and boil again. This treatment kills all pathogenic organisms.
- Place to dry again and then cut into pieces up to 2 cm .
To the bark prepared in this way, add dry and finely chopped sphagnum moss and just a little peat coal. You can now fill the pots with this mixture.
What substrate is suitable for orchids?
Almost all decorative orchids need access to air and light to the root system. Industrial substrates are well suited for the successful cultivation of epiphytes and lithophytes:
- Durpeta is a fortified soil containing bark, agroperlite, peat moss and charcoal.
- Compo Sana is a substrate based on pine bark and peat.
- Orchid - soil containing steam-treated pine bark, sphagnum moss and vitamin supplements.
You can prepare the substrate yourself. To do this, pine bark is boiled and dried. The procedure is repeated for complete disinfection. Next, the bark is cut into 2x2 cm pieces and mixed with dried crushed peat moss.
Is it possible to plant a flower in the ground?
Ordinary soil, even the lightest and most granular, is not suitable for epiphytic and lithophytic varieties. These orchids receive nutrients through the roots, which are covered with a special sponge-like hygroscopic layer - velamen. By accumulating moisture inside the root, velamen must remain dry. In ordinary soil there is no air for the necessary aeration of the root, then it rots and the flower dies.
Terrestrial orchids are equipped with underground roots and tubers. These include:
- Anectochilus;
- Makodes;
- Gemaria;
- Goodyer;
- Ludisia.
Ready-made mixtures for terrestrial orchids are almost never produced, so they are prepared independently from:
- leaf, turf or coniferous soil;
- leavening agents in the form of rotted leaves, moss, coal or bark;
- organics in the form of dry mullein with clay.
Earth is sometimes found in industrial soils. It can be added to substrates for varieties that prefer high humidity. It should not be black soil, but leaf soil, and no more than 40% of the composition.
Interesting! Representatives of wild terrestrial orchids growing in the temperate climate of Russia, Belarus and Ukraine are Anakamptis, Limodorum, Ophrys, Lady's slipper and several other species.
Which pot is best to replant a home orchid?
It is better to replant the orchid in a transparent pot.
Most orchids have large roots that like to entwine the pot from the inside and even look out. Therefore, when choosing a new container for a flower, you need to focus primarily on the size of the root system. But, given that the base of the flower will grow further, you need to add a few centimeters to the diameter. Which pot is best to replant a home orchid?
Worth knowing: For a large orchid with intensive growth, you can buy a pot, as they say, “for growth,” so as not to replant it often.
Orchid lovers most often grow their “beauties” in plastic transparent pots or containers. What are the advantages of such containers? Here is the answer:
- The roots are clearly visible and you can constantly monitor their condition. With normal soil moisture, the roots are usually green, but as the substrate dries, they gradually turn gray, which indicates the need for watering.
- In plastic containers, unlike clay ones, the roots do not grow to the walls of the container and therefore are not injured during replanting.
Although clay containers have their advantages:
- In them, the base-root does not overheat, which is very important for orchids.
- Do not overwater the plant because the moisture will last longer.
- In addition, a clay pot is much heavier than a plastic one and therefore will not tip over. Orchids are planted in such pots, some of the roots of which completely dry out and die during the dormant period.
Be sure to make drainage holes in the containers. This will provide the roots with faster drying and ventilation, which will protect them from rotting. Flower lovers with no experience often overwater the plant for fear of drying it out. Drainage holes will help in this case too.
Worth knowing: Plastic containers have one drawback - they have a rather simple, not very sophisticated appearance, compared to the flower itself. To correct this shortcoming, you can buy a beautiful flowerpot that will completely hide the plastic.
There is another way out - you can put a plastic pot in a low glass vase. The space between the walls of the vase and the pot is filled with some kind of jewelry or tinsel, balls or floral fillers. This needs to be done carefully so that the multi-colored filler does not distract from the beauty of the orchid flowers.
Remember: Do not buy large containers for orchids. In small ones - up to 15 cm in diameter, it feels much better and blooms longer.
What to do with the baby?
Before separating the baby from the mother plant, you should make sure that it is old enough. The length should be at least 5 cm, and the number of leaves should be 3-4. Make a cut with a sharp knife, powder it with charcoal and place it in a regular plastic cup. After about a year, you can transplant it into a larger pot.
Read here how to properly separate and transplant a young shoot.
How to transplant children, one child, a shoot of a home orchid: step-by-step instructions
Replanting a baby home orchid
An orchid growing in normal, ideal conditions can produce young shoots, or babies. This is a great opportunity to propagate the plant. What should be done? How to transplant children, one child, a shoot of a home orchid? Here are the instructions step by step:
- The baby should have fairly long roots - more than 5 cm and 3-4 leaves - these are the most suitable parameters for transplantation.
- Children usually appear on the stem or near the root collar. Using a sharp knife, you need to cut off part of the stem with the baby, stepping back to the sides at a distance of about 1 cm . Sprinkle the cut area with coal.
- Prepare a small glass in advance, preferably a plastic one, and add a small layer of drainage.
- Place the baby in a glass and carefully cover it with substrate. for the first 3-4 days .
- Place the glass with the baby in a place where the air humidity is high. You can simply spray the surface of the window sill where the glass is located more often. Try not to get it on the leaves.
The baby will grow in such a container for about a year, after which it can be transplanted into a larger container. An orchid grown from a child will bloom in three years .
Step by step instructions with photos
Procedure for replanting an orchid:
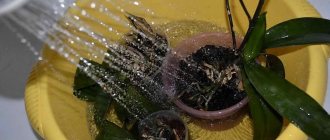
- Carefully remove the flower from the old container, carefully separating the roots from the walls of the pot.
- Rinse the root system with warm water and inspect it.
- Remove rotten, dried areas with a sharp instrument.
- Treat areas of fresh cuts with charcoal. This will prevent infections and fungal diseases.
- Dry the plant, it is especially important to pay attention to the sinuses. Drying usually takes 4-6 hours.
- Place a layer of drainage at the bottom of the pot, then add fresh substrate.
- Place the orchid in the center, gradually filling in the soil, leaving no voids between the roots.
- The upper part of the orchid should not be deeply buried in the substrate; the roots need access to air; it is better to put a layer of sphagnum moss.
Some gardeners advise leaving a small amount of old substrate so as not to disturb the microflora. For the phalaenopsis orchid, the question often arises: where to put the aerial roots? Some should be left on the surface of the pot, and the rest should be placed in a container.
Further proper care of the phalaenopsis orchid plant after transplantation, growing conditions
After replanting, you need to provide proper and timely further care for the orchid. Here are the conditions for growing a phalaenopsis orchid plant:
Proper care of an orchid is to shade the window so that the sun does not burn the leaves of the flower.
- As mentioned above, immediately after the transplantation is made, the container is placed on a sunny windowsill for a week, but shaded from direct sunlight. Otherwise, if this is not done, the orchid leaves will lose their decorative appearance, wrinkle and become wilted.
You can water the flower after transplanting only after a couple of weeks.
- water the plant after replanting only after 2 weeks . The fact is that orchid roots are susceptible to various fungal diseases. Therefore, the root system needs to be slightly dried to avoid this. Find out how to properly water an orchid here .
Spraying the plant so as not to dry it out
- But, in order not to dry out the plant, spray the leaves, or, even better, wipe them with a wet sponge. In this case, under no circumstances should water get into the depths of the rosette of leaves. This can lead to their rotting.
Orchid grows at optimal temperature
- It is important to maintain optimal temperature. The orchid does not like heat, it needs a temperature no higher than +21-22°C , but it should not fall below 18°C . Otherwise, the inflorescences get stressed, which is very undesirable for these sissies.
Feed the orchid
- A blooming orchid needs feeding. Use only mineral mixtures. Organic ones are not suitable for feeding flowers, since they can introduce diseases into the soil.
Excessive nitrogen nutrition can cause leaf growth to the detriment of flowering. Nowadays you can find special fertilizer compounds for orchids in stores. In any case, it will be good to use an all-purpose fertilizer for flowering plants. They must be diluted strictly according to the instructions so as not to harm the flower. They need to be added along with water for irrigation.
Features of transplantation
After the purchase
A plant should be replanted after purchase only if it dies . Otherwise, if the substrate is good, then there is no need to replant.
If the bark has collapsed, it is replanted under the following conditions :
- after flowering;
- after the plants have acclimatized in your apartment (about 2 weeks).
Read more interesting things about transplanting after purchase in this article.
in spring
The best period for transplantation is spring, when daylight hours increase (late February-early March). The transplant technology is standard.
In a glass vase
Quite an unusual way of planting and cultivating orchids. The positive side of this is that the plant hardly needs to be watered . In the sense that with the correct selection and placement of substrate components, moisture from the bottom of the vase gradually rises up and reaches the roots. Under such conditions, the root system can reach relatively large sizes and resemble a beard.
Orchids in glass vases.
It should be understood that this method requires some experience and knowledge , the volume of which is worthy of a separate article and will not fit into a small paragraph.
Old orchid
Old plants are replanted in the same way as young or mature ones . The only caveat is that with a particularly large plant you need to be more careful than with small, young ones.
Old, well-cared for orchids usually have a bushy root beard that is easily damaged. You need to be careful with them. Otherwise, the transplantation technology is identical to specimens of other ages.
Read more about replanting an old orchid in this article.
If there is no flowering after transplantation: what to do?
Lack of flowering after transplantation
After transplantation, the orchid should increase its green mass and bloom after a certain time. This usually happens after 3-4 months . But what if the inflorescences do not appear for much longer? What to do if there is no flowering after transplantation? This problem can occur for several reasons:
- The plant is overfed with nitrogen fertilizers , active leaf growth is observed, they become larger than they should be during normal development. In this case, feeding should be stopped for a month.
- The transplant was not carried out in a timely manner . For example, if for some reason an orchid was transplanted at the time when it bloomed last year, then it most likely will not bloom this year. The plant will direct all its energy to restoring its root system, and not to flowering.
- Perhaps you made mistakes during transplantation . If the plant is not firmly fixed in the substrate, then when you move the pot, it begins to dangle in it, and the roots and stems will receive microtrauma. The plant does not have the opportunity to direct its energy to flowering, experiencing constant stress.
- Insufficient lighting and low humidity . You need to move the pot to a lighter windowsill and spray its surface to increase the humidity of the surrounding air.
Follow these tips, and your flower will soon delight you with its unique blooms. It's worse when the plant begins to wilt. What to do? Read on.
Possible problems
Transplantation sometimes has negative consequences, the plant begins to hurt. In addition, problems arise such as:
- death of the central part of the root system;
- development of rot;
- leaves become limp and yellow;
- drying out roots;
- the appearance of pests.
Leaves wither and turn yellow
Often after the transplantation process, the orchid loses turgor and its leaves turn yellow. There can be a huge number of reasons why this occurs, but most often it lies in large-scale damage to the root system, as well as in the plant’s prolonged exposure to the sun.
In the first case, the flower can easily die, but in the second case it can still be saved. The flower should be removed to a cool, shaded place and the leaves should be wiped with succinic acid to reduce moisture evaporation.
What to do if your home orchid withers after transplantation?
A home orchid withers after transplantation.
Most likely the plant is sick. If planting rules are violated, when mechanical damage to the roots occurs, the leaves do not receive full nutrition. What to do if your home orchid withers after transplantation? Here are the tips:
If you watered a lot, replant the plant:
- With good watering and stagnation of liquid at the bottom of the container, especially if there is no drainage, the roots may begin to rot.
- Then the wilting will soon be replaced by yellowing of the leaves and the plant may die.
- Here an emergency orchid transplant will be needed to save it.
Control pests:
- Another reason could be a pest attack.
- Spider mites, the worst pests of indoor plants, thrive in dry air.
- It can be difficult to notice them right away - they are very small and the bad effects begin to appear when there are a lot of them.
- Whiteflies and scale insects also harm orchids. Providing optimal air humidity will help to significantly reduce the number of these insects.
Protect from the sun:
- If the orchid is not protected from direct sunlight, its leaves will begin to wilt.
- This indoor flower feels best on windows that face east, where the sun appears only in the morning and for a short time.
Containers must be provided with drainage holes, and they need to be made not only at the very bottom of the container, but also on the sides to ensure good air exchange for the roots.
Step-by-step instructions for replanting an orchid
Step-by-step instructions for replanting an orchid are easy to follow. Compliance with it is mandatory (especially for beginners) if you want the orchid to continue to delight you with its beauty and abundant flowering. So, follow these steps:
- Prepare a container for transplanting. The best choice is a transparent (can be replaced with a matte) plastic pot. It must have drainage holes through which the orchid will receive water. They are usually located on the bottom or at the bottom of the side walls. If the container you purchased does not have such holes, do not be discouraged; they can be easily made with your own hands using a sharp device (a knife or a hot nail).
- Next, prepare all the other items that will help with the transplant. These are two containers in which we will soak the roots of the plant to make them more elastic. You will also need scissors (can be replaced with a knife or garden pruners) to trim affected, diseased, dry, rotten areas of the root system. A means for disinfecting sharp devices (alcohol and cotton swabs or a piece of rag for applying antiseptic, or you can simply boil the tool). You also cannot do without crushed activated carbon, ground cinnamon, iodine or brilliant green to treat the cut areas (if any). You may need some string to tie the plant up.
- Now take the old plant pot and carefully remove the flower. If necessary, you can first soak the orchid (directly in the pot) in a basin of warm, settled water. In this case, the roots will be more elastic and the plant will be easier to remove. Next, carefully shake out the contents of the pot (it will not be needed, since the substrate has already served its purpose).
- Now rinse the roots of the plant under running warm water or soak in a container with settled liquid for twenty minutes. After this, you can carefully remove the substrate particles stuck to the roots. Leave the plant for about ten to twenty minutes to dry the roots. After this, lower the orchid into the pot (empty) to make sure that the size is correct.
- Next, you need to carefully examine the root system of the orchid. If there are dry, rotten or dead areas of roots, they need to be trimmed with a sharp, disinfected device, capturing about one centimeter of healthy tissue. After this, the cut sites are treated with the selected product (brilliant green, iodine, ground cinnamon, crushed activated carbon). Leave the orchid for about twenty minutes to dry the cut areas.
- Now you can start planting the plant in a new pot. Place a drainage layer up to two centimeters thick in the container. Then lower the orchid vertically into the prepared container. Holding with one hand, begin pouring the prepared substrate. The lower leaves of the plant should be above the top border of the pot. You can gently tap the sides of the container to help the substrate fit better. But remember that you don’t need to pack the soil mixture too tightly, as this will make it difficult for the roots to aerate. As a result, the orchid should stand tightly in the pot and not wobble.
Advice! In some cases, it is also possible to use an old substrate (only pine bark or coconut fiber), if it is suitable. To do this, these elements of the composition need to be boiled and then dried thoroughly. The fact that the substrate is no longer suitable for use will be indicated by the presence of a white salt coating, a specific putrid odor, mold or fungal spores, and dust. If there is any doubt, it is better to use a new soil mixture.
After the plant is transplanted, it should not be watered for at least two to three days. At first it is better to place the flower in partial shade, and after three or four days return it to its original place with an abundance of soft, diffused light. Remember that if the roots were pruned, the plant will need time (up to six months) to adapt and grow new roots. Only after this will it be possible to wait for the appearance of new buds and flowers.
How to properly water a home orchid flower?
Well-groomed orchid flowers
Watering a home orchid flower is carried out by immersion in water, the temperature of which is not lower than +20°C , so as not to cause stress to the plant. How to do this correctly? Here is the answer:
- To do this, take a cup with warm liquid and place the container with the plant in it for 20 minutes .
- Then take it out and place it on a wire rack to drain off excess water.
- Then place the flower in its usual place.
In winter, the number of waterings should be reduced, but in summer, on the contrary, this should be done more often, at least twice a week. It is necessary to monitor the pseudobulb - if it has lost turgor, then watering is necessary.
Important: It is forbidden to take long breaks between waterings. The orchid is a tropical plant that naturally lives in times of frequent rain and high humidity. Therefore, drought is detrimental to it.
Features for adult and old flower
Old specimens are replanted in the same way as young ones. The only key point is to be extremely careful during transplantation. An old plant has a large number of roots that can be easily damaged, so it is important to handle the flower carefully during the procedure.
During transplantation, an adult plant can be divided into several and planted in different containers. The main condition: each individual shoot must have the required number of roots (or pseudobulb).
How to replant an orchid flower if the root is rotten: tips
Replanting an orchid flower if the root has rotted
Infrequently, but there are cases when novice gardeners, as a result of improper care, have the roots of an orchid rot. This can happen to all the roots or to a large part of them at once. Is it possible to save the plant then? How to replant an orchid flower if the root is rotten? Here are the tips:
- To revive orchids whose roots have completely died, you need a small window greenhouse.
- In the container where the leaf rosette will be located, you need to pour a small layer of drainage - this can be expanded clay or pebbles.
- Place sphagnum moss on top, which is previously kept over steam and dried.
- Now moisten the substrate and place the leaf rosette in it.
- Transfer to a greenhouse, where a constant temperature should be maintained within +21 - +27°C and high humidity of about 100% . The light should be bright, but diffused - direct sunlight is detrimental to leaves during this period.
After 3-4 weeks of this regime, root rudiments will begin to appear at the base of the leaf rosette and then they will begin to grow. Epin , to the water for irrigation .
If a diseased orchid has several living roots left, or even just one, the chances of saving it increase:
- After trimming the rotten roots, you need to rinse the remaining living roots under warm water and sprinkle the cut areas with charcoal.
- A pre-prepared pot up to 8 cm in diameter is filled with ordinary substrate and a leaf rosette with roots is planted in it.
- Next, the plant is treated as in the first case, placing it in a greenhouse.
If everything went well, new roots will begin to grow in 2-4 weeks .
General tips for plant care
General tips for caring for a plant are a must-have. The following rules must be followed for the speedy appearance of flowers after transplanting an orchid:
- Maintain a temperature of 22-26 degrees in the room where the orchid grows.
- Ensure the difference between day and night temperatures is up to 6-8 degrees.
- Make sure that the temperature does not fall below 16 degrees and does not rise above 30 degrees, as this is detrimental to the orchid.
- Provide soft, diffuse lighting for 8-12 hours a day.
- Maintain humidity at 50%-60% by regularly misting (or better yet, pollinating with water) the plant, using a humidifier, or placing containers of liquid around the room.
- Avoid drafts, proximity to heating devices or direct sunlight on the plant, as this leads to flower wilting and an increased likelihood of developing diseases (swelling, sunburn, rust and much more).
- Do not place indoor plants that require different maintenance conditions next to the orchid.
That's all. These are all the requirements that must be observed after replanting the plant, so that it quickly adapts to new conditions and begins to bloom. An orchid, in principle, cannot be called a very whimsical plant. In practice, maintaining comfortable temperature, humidity and light levels is very simple. In addition, many hybrids have now been bred that are easier to adapt to apartment conditions, and they bloom for up to six months.
Is it possible to replant a flowering orchid while it is blooming?
You can replant orchids during flowering, but in the most urgent cases.
There is only one situation in which you can replant a blooming orchid - if it is in danger of dying for any reason and you need to choose one of two:
- The orchid will fade, but then die, having spent its last energy on flowering.
- The peduncle is cut short, but later with good care, the plant is completely restored and after a while it will bloom again.
What to do in the second case? Adviсe:
- Prepare fresh substrate and pot. How to do this has already been said above in the text.
- Cut the flower stalks of the orchid to about 2/3 of the length. By the way, the flowers can be placed in water - they will last for almost a week.
- Carefully remove the plant from the pot and inspect the roots, cutting out any rotten ones.
- If the substrate is in normal condition, i.e. there is no mold or its smell, it is not overdried or, on the contrary, very waterlogged, then in this case you need to try to preserve it as much as possible without shaking off the roots. Otherwise, proceed as with a regular transplant, the procedure of which has already been described.
- Now you need to place the plant in the pot and secure it well there.
All that remains is to put the orchid, transplanted during flowering, into the greenhouse and observe how it will feel further. Do not forget to follow all the rules for caring for this flower, which are no more complicated than the rules for caring for other indoor flowers.
Replanting after purchase
In stores, orchids are most often sold in a special transport soil, but it is not suitable for permanent use. Therefore, the flower will definitely need to be replanted, and the sooner the better. But first, keep it in quarantine for at least 5-7 days without watering or fertilizing in order to identify possible diseases and pests.
Photo: vseolady.ru
How to replant an orchid step by step photos
There are several ways to replant an orchid at home. Let's look at the most popular of them and the features of each planting.
Landing in an open system
This is the classic method of growing this flower crop. In this case, a regular pot is used with drainage holes designed to evaporate excess moisture and circulate air. A detailed description of how to transplant orchids into a new pot will be given below.
Planting in crown pots
Crown pots differ from ordinary ones in their design, which allows them to hold the substrate, but almost not cover the roots. The transplantation technology does not differ from the classic method into another pot.
Planting an orchid on a block
The technology is like this:
carefully remove the orchid from the previous container without damaging the roots, get rid of the remaining substrate around the root system, get rid of rotten and old roots;
prepare the future block: it can be tree bark, dried and scalded with boiling water. The length and width of the block should be slightly larger than the root system (it is necessary to leave room for root growth);
use sphagnum moss as a cushion for the roots: wrap them around the moss, secure the orchid on a block: with fishing line, wire, rope, tie the “pad” of moss to the block, do not forget to attach the neck of the flower;
the block can be placed in any flowerpot or on a vertical surface.
Planting an orchid in a water system
It is necessary to transplant according to the following method:
carefully remove the plant from the previous container without damaging the roots, get rid of any remaining substrate around the root system, clean the root system of rotten and old roots, wash the roots in running water;
pour clean water (so that most of the root system is immersed in it) at room temperature into the future growing container; you can add special anti-stress components for habituation after transplantation;
if necessary, fix the peduncle; in the future, it is necessary to monitor the condition of the flower and, as necessary, increase/lower the water level in the system.
Next, we will consider a step-by-step algorithm for planting an orchid in a new pot at home.
What to do if a lot of roots have dried out?
If the air shoots begin to dry out, then you just need to cut them down to living tissue (treat the sections with cinnamon or charcoal).
If, after transplanting at home, the roots in the substrate begin to dry, then the plant will have to leave the pot: cut off the peduncle, get rid of all dried roots and treat the damaged areas with phytosporin and then with charcoal.
Afterwards, you need to start the process of growing the root system. If it was possible to rehabilitate the orchid, new roots (5-6 cm long) began to form, then it can be replanted in fresh soil mixture.