Dividing a large anthurium bush
This method of propagation is suitable for an adult, well-grown bush. It is usually carried out during a planned transplant in the spring. By the way, this is a good way to rejuvenate a plant, since from one large bush you can get about a dozen new ones.
The separated bushes are completely independent and easily take root in separate pots. If you are still worried about their condition and survival rate, then you can spray the seedlings once a week with any biostimulant (Kornevin, Zircon, etc.)
Before the procedure, water the mother plant thoroughly and allow the moisture to be absorbed. Then carefully remove it from the pot and shake off the soil from the roots. We begin to divide the bush and at the same time make sure that each small bush has its own growing point, several leaves and several developed roots.
When dividing the bush, be very careful, try to untangle the roots and not tear or cut with a knife, since the root system of anthurium is very fragile. If “wounds” could not be avoided, be sure to sprinkle them with cinnamon or activated carbon.
Inspect the resulting bushes: remove dry and wilted leaves, cut off rotten roots. And then plant them in small pots with the soil that you usually use when replanting an anthurium (for more information on how to do this, read the article How to replant an anthurium). Just make sure that the roots of the new specimens are buried in the same way as in the mother plant.
It happens that a young plant is quite tall, and the roots cannot yet hold it - then use supports to tie up the stem. But foresee such a scenario in advance, since the support is installed before planting in the ground, and not after.
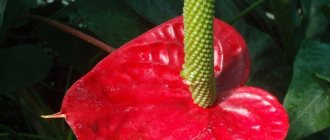
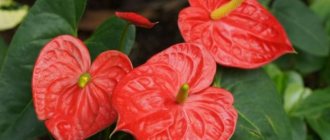
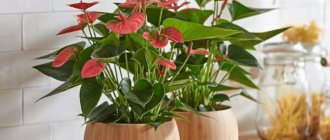
What does anthurium look like?
Anthurium is one of the most popular tropical plants grown at home. The genus belongs to the Aroid family (Araceae) and has more than five hundred “natural” representatives, excluding selectively bred hybrids. Most anthuriums can be found in the forests of South and Central America, as well as on the islands of the Caribbean.
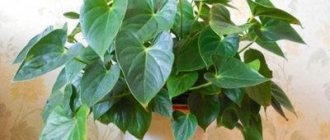
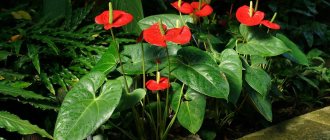
In nature, anthurium leaves grow up to 1 m in length; at home, the dimensions of the plant are much more modest.
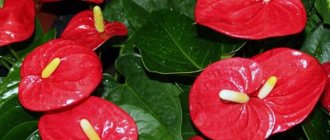
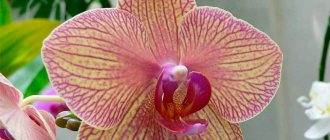
Anthurium owes its enduring success among indoor plant lovers to its abundant, bright and almost continuous flowering. Experienced flower growers believe that only some types of orchids can compare with this “living bouquet” in effectiveness.
Anthurium is highly valued by indoor plant lovers for the duration, abundance and brightness of flowering
With rare exceptions, anthuriums are epiphytic or semi-epiphytic plants (sometimes there are vines with a long stem and herbaceous perennials that form a continuous carpet of leaves). “ traditional” roots mainly to cling to branches and tree trunks. At the same time, anthurium is not a parasite - it uses the “host” only as a support. The plant absorbs the moisture and nutrients necessary for existence from the atmosphere with the help of a developed system of aerial roots.
Rooting side shoots
This method of reproduction is natural, and is laid down by nature itself. Children are formed as shoots from the parent plant. They are separated during planned transplantation. You cannot pull out shoots from an anthurium standing in a pot, as the roots will be damaged.
It happens that a shoot is needed urgently, but the plant is still far from being transplanted. Then you can, after thoroughly watering the plant, carefully remove it from the pot, preserving the soil as much as possible, and separate the “baby”. And then return the anthurium back to the pot.
Since the “baby” is less developed than the separated plant, it is necessary to create certain conditions for it to survive better. Fill the seedling pots with sphagnum and moisten it well. Next, we put the children in it and cover them with plastic bags or plastic bottles. We also observe other greenhouse conditions: temperature not lower than 27 degrees, humidity - 80% and above, maximum illumination, but not direct sunlight.
Remove the cover from the plantings every day for 15-20 minutes to ventilate them. Spray with any biostimulant every 3-4 days. After about a month, the young shoot will be sufficiently strengthened and strong enough to be transplanted into ordinary soil.
Caring for a young plant
Standard care for a young, recently planted plant is very simple, but requires compliance with the following rules:
- along with other tropical inhabitants, anthuriums need fairly bright but diffuse lighting;
- Direct sunlight should not be allowed to hit the above-ground part of the plant, so it is best to place the decorative crop indoors on windows facing west or east;
- when placing a flower pot with a plant on the southern windows, artificial shading is used with light curtains or a self-made gauze screen;
- Anthuriums grow and develop very well when placed on flower stands located at a distance of a meter from the southern windows, covered with tulle curtains;
- anthuriums with decorative foliage have sufficient shade tolerance, so even when located on northern windows they develop quite well;
- in winter, when there is insufficient natural light, anthuriums may require additional lighting using a phytolamp with a power of 25-35 W;
- in spring and summer it is recommended to provide ornamental crops with a temperature regime within 20-25°C, and in the autumn-winter period the temperature should not fall below 18°C;
- anthuriums do not tolerate even a slight draft, so when choosing a location, you must take this fact into account;
- when growing anthurium, the plant needs to create an optimal level of humidity and strict adherence to the irrigation scheme;
- watering should be plentiful, but not too frequent, and on hot days the plant needs to be watered about three times a week with warm and settled water;
- all excess water accumulated in the pan after watering must be drained, since stagnation of moisture in the soil of the flower pot can cause rotting of the root system;
- for irrigation activities, soft and warm water is used, and tap water must be left to stand for a couple of days and softened with a few drops of citric acid;
Anthurium propagation from root
This type of reproduction is the initial stage of the previous one. Only when propagating by shoots do we take a ready-made plant, but here we have to grow it from the root ourselves, so the method is more time-consuming.
For the operation you need good roots - strong and healthy. They are separated from the mother plant when transplanted. Next, the separated piece of root is placed in sand or perlite and covered with polyethylene. Make sure the substrate is always slightly damp.
The process is slow and takes about two months. Usually 1-2 leaves appear by the specified date, and then you can remove the polyethylene from the planting. And only after another month the young anthurium is ready for transplanting into ordinary soil.
Cuttings
This is also one of the simplest and most frequently used methods. Cuttings are best done in the spring. For the operation, you need stems 15 cm or more long, which have at least 2-3 leaves. The cutting itself is a part of a stem with a leaf on it. By the way, the sheet itself can be deleted.
The cut site on the mother plant must be disinfected with ash or iodine. Leave the finished cuttings in the air for 15-20 minutes to dry. Next, we plant them in plastic cups with sphagnum moss. Don't forget to make holes in the bottom of the cups to allow water to drain.
Another option is to grow cuttings in water. But remember that the water must be warm, purified, and it must be changed every day. You can add a few drops of biostimulant to the water. Make sure that no more than 4-5 cm of the lower part of the cutting is in water or moss.
To create greenhouse conditions, cover the cups with polyethylene. We constantly check the moisture content of the sphagnum moss.
The roots usually appear after a week, and when they reach 2-3 cm in length, young anthuriums can be planted in ordinary soil. In this case, the pots must be small, otherwise the soil will turn sour and the plant will become rotten.
For more information on how to propagate anthurium by cuttings, watch the video:
Breeding anthurium from cuttings
Cuttings are an excellent way to propagate anthurium. Cuttings are the apical parts of stems. In indoor conditions they take root quickly and easily. Just follow these rules:
- Take cuttings only from healthy bushes.
- Pay attention to the presence of growth points on each cutting.
- Cut branches with a maximum length of 2-3 internodes.
- After making the cut, let the planting material dry a little, about 15 minutes.
During drying, the lower cut will be covered with a film that will protect the sprouts from rotting. Next, each gardener chooses the method of rooting the cuttings. Here are some tips:
- Place them in water. Take cooled boiled water, pour it into a small container and place the cuttings there. Place a piece of charcoal on the bottom. As the water evaporates, replenish its volume. As soon as new roots appear, plant the sprouts in the ground.
- Root in the substrate. To do this, use a mixture of sand, peat and perlite. Take all ingredients in equal proportions. Deepen the cuttings into the soil by 5 cm. Cover the planting material with a glass jar or a transparent bag. Rooting will take from 2 to 4 weeks.
- Use moss. It is an excellent device for rooting. Take plastic cups, fill them with damp moss and dip the cuttings into it. You can do the same in plastic bags. Be sure to moisten the moss regularly. Place the planting material in a warm and bright place.
These are the simple ways to propagate decorative anthurium.
Germination of seeds
The method is very labor-intensive and unpopular among gardeners. There is a great risk that nothing will work out at all or that the grown offspring will not inherit its properties from the parent plant, since many domestic varieties are hybrids.
But if you still decide to breed anthurium in this way, be prepared for the fact that you will see the first flowering no earlier than in 3 years.
Where can I get the seeds? They are sold at any flower shop. When choosing, look at suitability: if the seeds are more than six months old, then the chance of germination is minimal. Optimally – 3 months between collection and planting.
You can get seeds yourself, provided that you have 2 anthuriums in your house. When the first one blooms, carefully collect the pollen from the cob onto a piece of paper and place it in the refrigerator. We wait for the second one to bloom, and then use a cotton swab to distribute the pollen over its cobs, moving in different directions.
The procedure must be repeated at least 4-5 times. If you succeed, then in a month the cob will begin to swell. The fruit will ripen for about a year. The ripe inflorescence will be greenish-brown and the berries will be very dark. Then we cut off the inflorescence, remove the seeds and dry them for 3-4 days. The sooner you sow the resulting seeds, the better.
For better germination, sow the seeds in peat, after soaking them in a pale pink solution of potassium permanganate for 15-20 minutes. We cover the planting with polyethylene, arrange bright light and 25-degree air temperature. It will be ideal if you can provide light bottom heating of the pot.
Shoots should appear in a week. They need to be ventilated daily for 10-15 minutes and sprayed periodically. The film can be removed only when real leaves begin to appear. Young plants can be planted in cups no earlier than they have formed 3-4 leaves.
Sowing seedlings
The most difficult way to propagate anthurium is to sow seeds. If you decide to do it, then get ready for a complex and lengthy process. Lovers of indoor plants will find it interesting and educational. Anthurium seeds are sold by collectors and distributed by specialized shops for flower growers. When you buy planting material, pay attention to the packaging date. The fact is that after 3-4 months the seeds may lose their viability.
If you cannot get quality material, you can try pollinating your own plant. When the anthurium begins to bloom, collect pollen from the cob. Wrap it in a paper bag and place it in the refrigerator. After another flower blooms, use a brush to carefully transfer the pollen to its ear. Repeat this procedure for 5 days.
You can also take advantage of self-pollinating flowers. After a week or two of bud blooming, run your hand down and then up along the cob. When the seeds are ripe, collect them and dry them. It is better to sow them immediately after harvest. They will rise quite quickly. Within a week, the first sprouts may appear on the soil surface. Do not forget to water young shoots on time. With the appearance of the third true leaf, pick the seedlings and transplant each rosette into a separate cup. Plant the seedlings in the same substrate as for an adult anthurium. If you follow all the recommendations for propagating anthurium by seeds, you will achieve a positive result.
Leaf propagation
This type of propagation is only suitable for some varieties of anthurium that have thick veins on the leaves. For example, Scherzer's anthurium, Andre, leathery.
For the operation, we cut off the leaf with part of the cutting. Next, roll it up into a tube and lightly tie it with an elastic band. We plant this tube 2/3 of the way into a mixture of peat and sand and cover it with a plastic bag.
We provide greenhouse conditions for planting, ventilate daily and spray with a root formation stimulator. After about 3 weeks, a sprout should appear from the funnel, and after another month the young anthurium can be planted in regular soil.