Planting a calla tuber in open ground in spring, which is carried out according to all the rules, allows you to grow a beautiful exotic flower on your site.
Calla or zantedeschia with massive leaves and showy flowers comes in several varieties. The most common is the classic one with a white flower, but there are varieties with buds of other shades.
Nowadays, many gardeners have begun to grow calla lilies in flower beds in the garden, so this article will describe in detail how to plant calla lilies in open ground and properly care for them so that they will delight you with beautiful flowering.
Important! Tubers can be planted in open ground, sprouted or not.
Characteristics of garden callas
Callas can be grown in open ground, so they cannot be called indoor plants. Zantedeschia is native to South Africa, however, this plant can also be grown in Russia. The plant has an unusual property - it develops during warm winters, so it can bloom not only in summer, but also in winter.
Bushes, depending on the variety, can grow from 30 to 150 cm. Therefore, callas can be planted in the center or along the edges of the flowerbed. But she also looks very beautiful alone.
Interesting! Gardeners who know the rules for planting and caring for dahlias will not have problems growing calla lilies. This is described in detail in the article: Dahlias - planting and care in open ground in spring after winter .
Diseases of calla lilies
Garden callas most often suffer from such common diseases as wet rot and yellow spot.
Wet rot is a bacterial infection. Its signs:
- Rot of peduncles and leaves;
- Sluggish rotten roots;
- The presence of rotten brown spots on tubers.
The plant can be saved only at the onset of the disease during wintering or before planting in the ground. All diseased parts of the tuber are removed, and the sections are covered with a solution of brilliant green. If the disease appears in the summer, the diseased plant must be removed from the planting and destroyed.
Yellow spot is a viral disease . Its main manifestations:
- Leaf curl;
- Deformation of flowers;
- Light spots on the leaves.
Treatment methods for this disease have not been developed. For preventive purposes, thrips, the pests that carry it, are destroyed. Insecticidal preparations are used to combat thrips.
The most common pests that attack garden callas are aphids and spider mites. Timely treatment of plantings with Actellik or Fitoverm will help completely get rid of harmful insects.
Popular types
There are two types of callas - tuberous and rhizomatous. Most often you can find the latter type of this plant on sale.
Rhizomatous - this is Ethiopian calla with white flowers. This type of calla grows near country lakes and under trees in soil with high humidity. Under such conditions, the shrub grows quickly all summer, growing up to 100 cm in height, regularly releasing new inflorescences.
Tuberous callas produce colorful buds:
- Remani;
- Elliot.
These flowers love sunny areas, but sometimes they need to be shaded.
Types and varieties of calla lilies for growing in the garden
There are the following types of these plants that grow well in garden culture:
- Ethiopian calla;
- Calla Elliott;
- Kalla Rehmanni.
Each of these species has many varieties.
There are also hybrid intervarietal forms. Ethiopian calla is a tall plant, reaching a height of 1-1.5 m. Its underground part looks like a rhizome.
The flowers are large, their covers are white. The most popular garden varieties of Ethiopian calla lilies:
- “Childsiana” is a variety with snow-white flowers and a bright orange, almost red center;
- "Green Goddess" is a two-color white and green variety.
Calla Elliott is a tuberous plant reaching a height of 50-70 cm.
Its leaves are dark green, and the flower covers have bright yellow or golden shades.
Calla lily varieties:
- 'Black Magic' has a yellow flower spathe with a wavy edge;
- “Captain Chelse” is a variety that has a purple flower cover with a yellow edging;
- "Mango" is a hybrid form characterized by flowers of an intense yellow-red hue.
Calla Rehmanni is a small tuberous plant whose flowers are pale pink.
There are many varieties of this species, distinguished by a variety of pink, lilac and even almost black flowers.
- "Bolero" - a variety with a crimson flower cover, dark at the base;
- "Captain Rosette" - a variety with flowers of a delicate pink shade;
- “Black Beauty” - the variety has flowers with a dark burgundy, almost black, veil and a light stripe along the edge;
- "Magestic Red" - distinguished by monochromatic bright red flowers.
When to plant callas in open ground: planting dates, in what month
You can plant tubers or calla lilies germinated in a pot in a permanent place when the soil warms up to 15 degrees Celsius (insert a thermometer into a hole 15 cm deep and measure the temperature). In this case, the risk of night frosts should be avoided.
The timing varies in different regions:
- In the south of the country - from April 15.
- In the central zone and Moscow region - from May 15.
- In Siberia, Leningrad region and the Urals from the beginning of June.
Important! For germination, tubers are planted in a pot in March.
You can also refer to the lunar calendar 2022. Favorable days:
- March - 12-17, 22-25;
- April - 6-8, 20-26, 29, 30;
- May - 6-8, 14-17, 21-23, 31;
- June - 1, 2, 9, 10, 11.
Unfavorable days:
- March - 6, 7, 21;
- April - 5, 1;
- May - 5, 19;
- June - 3, 4, 17.
Is it possible to grow callas in an apartment?
Callas can be grown at home, but specifically white callas (Ethiopian, which have rhizomes, not tubers)
, because they are less demanding on lighting. However, for normal development they need high air humidity. If it is dry, they will bloom sparingly or not at all.
By the way! White calla will bloom in winter or closer to spring (from November to March) .
In this case, you need a wide pot with a volume of at least 3, and preferably 5 liters, with a diameter of at least 25-30 cm, and a depth of 10-15 cm.
But colored callas are exclusively garden flowers . In room conditions, they will not have enough light, and they will begin to stretch out greatly.
Another thing is that it is better to grow colored tuberous callas in flowerpots, displaying them in the garden , for example, on the veranda.
Actually, you can do the same with whites.
Selection of planting material (tubers)
Depending on the type, calla lilies can be planted with tubers or rhizomes. Callas Elliot and Remani are propagated by tubers, and white Ethiopian by dividing the rhizome of the mother bush.
Interesting! All types of calla lilies can also be grown from seeds, but this process is very labor-intensive. It does not preserve varietal characteristics.
Recommendations for choosing tubers:
- Calla lily tubers appear on sale in February. It is better to buy them at garden centers and stores .
- The tubers should be firm, like new potatoes. Sluggish and wrinkled specimens should be immediately discarded.
- The tubers should be free of rot, mold and signs of damage.
- The diameter of 1 tuber should reach 4 cm or more.
Description:Advice! After purchasing, keep the tubers on a tray in a dry place with an air temperature of 5-7 degrees. In this case, it is necessary to regularly ventilate the room, and also constantly turn the tubers, then they will not germinate until planted in open ground.
there are 8-9 species in the genus, native to tropical Africa. The most common type in culture is the following.
Tsantedeschia ethiopica
— Z. aethiopica
(L.) Spreng.
On heavy clay and silty soils on damp, periodically drying meadows, along river banks in South Africa (Cape region).
Photo of Svetlana Polonskaya
Perennials with thick rhizomes, annually forming a large number of leaves and several flowering stems. Leaves with petioles 0.5-1 (1.5) m long. The leaf blade is light green, heart-shaped-arrow-shaped with a blunt or slightly pointed apex, 15-45 cm long and 10-13 cm wide; the length of the anterior lobe is more than 1.5 times the width; The lateral lobes are rounded, 3-4 times shorter than the anterior one. Flowering stem about 1 m tall. The spathe is 10-25 cm long, funnel-shaped, with a short tube at the base and a pointed, somewhat elongated apex, white. The cob is cylindrical, yellow. The flowers are unisexual, without a perianth. In the lower part of the spadix there are pistillate flowers, above there is a zone of anther flowers, which is 4 times longer than the pistillate part of the spadix. The berry is ovoid, yellowish in color. 2n=24. In culture since 1687. Widely known as “calla” or “cantedeshia”. On an industrial scale, it is grown for winter cutting in greenhouses with planting in ridges or hotbeds for the summer.
For abundant flowering, plants need a period of rest (from mid-May to the end of July), so watering is greatly reduced; in July-August they are transplanted into large pots or greenhouse soil in a nutritious mixture of clay turf soil with humus, after which the watering is increased and the plants are regularly fertilized alternately with mineral and organic fertilizers. The air temperature in greenhouses in the fall should be 8-10°, with the beginning of flowering it is recommended to increase it to 12-15°. Numerous hybrid forms and varieties are usually cultivated; the most common variety is Perle von Stuttgart (Pearl von Stuttgart) with large inflorescences.
In addition to Z. aethiopica, Z. elliottiana
(Knight) Engl. is sometimes grown.
with yellow inflorescence spathe and
Z. rehmannii Engl
. with a pink blanket.
Further from the article by Tatyana Smirnova “Feel free to release calla lilies into the garden” // “Flower Club”.
It is not surprising that amateur flower growers still cannot tame the capricious calla lily. Collecting information about the culture of these plants, we discover contradictions even in the most authoritative publications on floriculture. What kind of riddles are these?
Over the two hundred years that calla lilies have been grown in Europe, many stereotypes have developed around the plant. Firstly, many people believe that calla lilies are a winter flower. Secondly, that she will feel really good either in a greenhouse or, with special care, in an apartment. Thirdly, fourthly, fifthly... There are so many things that it seems easier to give up trying to make friends with this plant. But in fact, calla lilies are generous, responsive and unpretentious. You just need to hear her natural ri flower.
Photo of Natalia Kozlova
While rummaging through magazines trying to figure out what I was doing wrong (the calla lilies didn’t bloom and that’s it!), I came across photographs of an amazing garden published in Flower Club magazine No. 12 for last year. Calla lilies were blooming there; white “wings” hovered over a huge bush, about ten of them, no less. They obviously felt good in a corner near the water, protected from direct sunlight. Larisa Zorina, who created a magnificent garden on seven acres near Moscow, has been growing callas for five years. She agreed to talk about how she managed to lure the plant out of the greenhouse.
When will calla lilies bloom?
The first thing I had to figure out was the plant's life cycle. About calla lilies they usually write: “blooms from October to April.” This simply cannot be! December, January and February in the homeland of calla lilies - South Africa - is summer, hot and sometimes dry. It is during this period that calla lilies go into a dormant state. It awakens to life in the fall, when the air temperature does not exceed +20 +22 o C and rain falls.
Therefore, the peak of calla flowering occurs in our summer (June-July-August) - accordingly, during the mild South African winter. Why torment a living being by imitating “our” winter as “their” winter, disrupting the natural life schedule of a flower for six months? Moreover, returning to the usual cycle for calla lilies opens up a completely new opportunity for us - to decorate the garden with these wonderful plants. Not winter, but real. Feel free to release calla lilies into the wild!
Calla belongs to the family Araceae. The plant was renamed several times, alternately receiving the names Calla, Richardia, Zantedeschia. As a result, the plant is called differently - calla lily and zantedeschia. Callas are divided into two groups. Larger plants reaching a height of 150 cm. and having a mostly white "flower", descended from the Ethiopian calla lily
(Calla aethiopica).
Another group includes varieties with a colored blanket, descended from the golden-yellow Calla Elliott
(C. Elliottiana) and the pink-red
Calla Remani
(C. rehmanii). “Colored” callas do not exceed 50 cm in height.
The “flower” of a calla lily is the covering leaf (veil) in which the yellow “candle” of the inflorescence-cob is wrapped. Real calla flowers are small and inconspicuous, but extremely fragrant. Their aroma is reminiscent of vanilla.
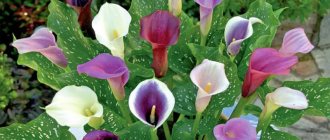
| Zantedeschia 'Pink Persuasion' | Zantedeschia 'No.14A' | Zantedeschia 'No.11' |
| Zantedeschia 'No.9' | Zantedeschia 'Mango' | Zantedeschia 'Yellow Hybrid' |
| Photo of Vasiliev Oleg | ||
Do not overwater the tubers, do not dry out the rhizomes!
The underground part of the calla lily is either not described at all in the literature, or it is spoken about in a vague way. Either calla lilies have tubers, or rhizomes, or “tuberous rhizomes.” It turned out to be very simple. In some plants, those descended from Ethiopian calla lilies, the underground part is a rhizome. Others, whose ancestors are Calla Eliotta and Calla Rehmann, have tubers. Both of them feel great in the garden.
Two groups of calla lilies - “white” and “colored” - require a different approach. “White” are moisture-loving, bloom longer, and do not shed their leaves during the dormant period. “Colored” are less demanding on soil and air moisture, love bright, diffused light and completely shed their leaves during the dormant period. Many people, when purchasing blooming calla lilies, do not know which group this plant belongs to. Guided by general recommendations for flower care, lovers often fill tuberous calla lilies. And when the plant sheds its leaves, they think that the Calla has died and throw away the tuber along with the earthen lump. Other troubles happen with Ethiopian calla lilies. When a plant gets from the greenhouse into a dry, warm apartment, it “thinks” that summer has come and gradually prepares for it - it stops blooming, droops and sheds its leaves. We rush to save our treasure - we begin to water and spray abundantly. The result is sad: the confused calla does not rest and does not grow.
And yet - how to grow calla lilies in the garden? I decided to ask Larisa Zorina all the secrets.
Tuberous callas: colorful dreams.
— In February–March, tubers of hybrid calla lilies Eliott and Rehmann go on sale. Can we really create in our garden the same beauty that is shown in the photographs attached to bags of tubers? — If you choose the right tuber and “wake up” it in time, then everything will work out.
'Mozart'
Photo by Andrey Ganov
- What should the “correct” tuber be like and when should it be “awakened”? — The tuber should not be limp or wrinkled. The larger the tuber, the more likely it is that the calla will bloom this year. Don't rush to plant the tuber. If you purchased it in February - March, wrap it in a napkin and put it in the vegetable compartment of the refrigerator. In April, when the night frosts weaken, it is time to wake up the tuber. Please note that before planting in open ground, the plant must be provided with sufficient lighting and a difference between day and night temperatures. Then the above-ground part will be formed correctly - the leaf petioles will be short, elastic and thick. It is very good to place a pot with a tuber on a closed balcony or, if you go to the country in the spring, in a greenhouse. When the threat of frost passes, it will be possible to plant the calla lilies in open ground.
— Okay, around mid-April we took the tuber out of the refrigerator. How to plant it correctly? — The volume of the pot should be minimal. It is not worth planting callas deeply. It is enough to sprinkle them with soil about two centimeters. When planting in open ground, they can be deepened a little more. Callas love slightly acidic soil, so a mixture of peat, humus, leaf soil and sand (1:1:1:0.5) is suitable for them. As soon as the soil has dried, it’s time to water. You should not plant tuberous callas in a swamp. Although they are moisture-loving, they prefer to grow near water rather than in water.
— Do calla lilies need to be fed, and if so, with what? — You can dilute mullein 1:10, but you can use any liquid fertilizer once a week. I have one secret; plants respond well to soil acidification. Even battery acid is suitable for preparing a watering solution. I dilute a spoonful of acid in a bucket of water and sing calla lilies with this “cocktail” three times a summer.
— How long do tuberous callas bloom? — Until the beginning of October. Each flower remains decorative for about a month and a half. It could stand longer, but I cut it off after the covering leaf turns green, so that seeds do not begin to form. In this way I stimulate the growth of the tuber.
— How do you know when it’s time for calla lilies to retire? — Look at the weather. Before frost, you need to dig up the plant, wash the tubers and put it in a dry, dark pantry. Do not cut off the leaves; let the tubers take the last nutrients from them. After a week and a half, the leaves will be easy to separate. After this, cut off the roots completely. Do not separate the baby nodules from the mother tuber; let the babies grow up a little. Before transporting to the apartment, sprinkle the calla tubers with crushed charcoal. It will dry and disinfect them at the same time. The tubers should be stored in the refrigerator, in the vegetable compartment. Calla lilies will rest well in a cellar or closed balcony, with a temperature of +3+5°C. At higher temperatures the tubers will germinate. (EDSR note: without a dormant period, calla lilies do not bloom).
— I read that callas cannot tolerate midday sun and dry air. — I place callas near the water. The sun illuminates them until noon and then goes away. The cold spray of a miniature waterfall creates the necessary humidity.
— It is often written that to stimulate flowering it is necessary to remove young shoots along the periphery of the bush. Is this true? - I do not do that . My callas grow in a lush bush and at the same time bloom wonderfully.
Preparing calla tubers for planting
Before any planting (in pots for germination or directly in open ground), the tubers must be prepared.
The seed material is carefully inspected. Tubers with rotting, mold or dried out are removed - they can no longer be used for planting.
Important! If the damage and rotten areas are small, these specimens can be saved! Using a disinfected knife, cut the damage down to healthy tissue and treat these areas with brilliant green.
Before planting, the tubers are treated with a fungicide to destroy pathogens of fungal diseases . For this, use Fundazol or Fitosporin-M.
Advice! If the tubers are slightly wilted, they should be kept wrapped in a damp cloth for 2-3 days. After this, they must dry out, then they can be planted in the ground.
Planting tubers for germination in a pot at home
Experienced gardeners recommend that you first germinate the tubers at home, and then transfer the seedlings to open ground.
In this way, you can check the viability of the tubers and achieve earlier flowering.
For germination, soil intended for growing calla lilies is used. You can buy it at a garden store. You can also use slightly acidic soil for Saintpaulia.
If you wish, you can make your own soil mixture:
- 1 part each of peat, river sand and leaf soil.
- 2 parts turf soil.
Advice! The soil must be disinfected before planting tubers.
You also need to prepare a spacious 3.5 liter pot, with drainage holes at the bottom.
To properly plant calla tubers in a pot for germination, you must follow these steps:
- A layer of expanded clay or other drainage is placed on the bottom of the pot.
- Next, pour the prepared soil. Leave 3-4 cm of empty container to the edges.
- A small hole is made in the middle, into which with the tubercle upward (the tubercle is the upper part of the tuber) .
- The hole is filled with soil to cover the tuber with a small layer of soil. There should be no more than 1.5-2 cm of soil above it, since the roots grow along the entire height of the tuber.
- Water carefully without eroding the soil, and add more soil if necessary.
Advice! At the end, you can also pour in a solution of Fitosporin-M to prevent diseases.
Watch the video!
How to grow callas Caring for tuberous callas during germination at home before planting in open ground:
- Pots with plantings are left in a bright room with an air temperature of 18-20 degrees.
- Regular watering is carried out so that the soil is always moderately moist.
Important! The water that remains in the pan after watering must be drained.
- After the sprout appears, the pot is placed in a bright place without direct sunlight.
- When the sprouts reach 5-7 cm in height, add 2-3 cm of soil.
- Every 14 days, the planting is fertilized with complex mineral or humic fertilizers for seedlings (Potassium humate, Agricola).
Advice! 1-2 weeks before transplanting seedlings into open ground, they are hardened. To do this, open the window, then place the sprouts on the balcony or outside for 1 hour, increasing this time every day.
After flowering
It should be noted that the care of rhizomatous callas and tuberous callas has some differences. For example, in the Ethiopian calla lily, which belongs to the first type, the dormant period begins in the hottest time of the year. At this time, its growth slows down, after which it stops altogether, and the plants begin to turn yellow. The crop is taken out onto the balcony or into the garden and placed in a well-lit place. But it is worth paying attention to the fact that the plants should not reach raindrops.
At the beginning of July, the calla lily should be removed from the container, all shoots and old leaves should be removed, and transplanted into a pot where a new nutrient mixture is poured. After this, the container with the plant is placed in a bright place, watering and fertilizing begin. In this way, the crop is prepared for the next flowering. This is exactly what the cycle looks like in rhizomatous varieties of callas.
Garden varieties remain on the site until autumn, and in September the rhizome must be dug up and stored together with a lump of earth in some cool and dry room. Watering should be infrequent and moderate.
In tuberous varieties, after flowering, the bedspreads turn green and droop over time, the leaf blades turn yellow and dry out. Garden varieties should be carefully dug up in the third decade of the first autumn month, taking care not to harm the tubers. They are freed from the soil, washed and kept for two weeks at an air temperature of 5 to 10 degrees. Under such conditions, all beneficial nutrients must move from the leaf blades to the tubers. Next, dead leaves can be easily removed.
Rules and stages of planting calla lilies in open ground in spring
It is necessary to prepare for planting tubers and seedlings in open ground according to all the rules. The future flowering of plants depends on this.
Selecting a location
Callas need to choose the right place.
Important! Tuberous callas (Remani and Elliott) do not like excess moisture. But the Ethiopian calla, on the contrary, loves swampy areas and tolerates moisture well.
The area should be bright and warm, while protected from direct sunlight . Lightly shaded and semi-shaded areas are best.
Important! In the shade, callas may not bloom at all!
Calla loves moist air, so it can be planted near a pond, the main thing is that the soil in this place is not waterlogged.
Advice! The ideal place for calla lilies is slightly shaded with fertile soil.
Soil selection and preparation
Callas grow well in fertile, loose, slightly acidic or acidic soil. Therefore, it is important to prepare the land for planting in advance:
- Remove all stones, debris and weeds from the site.
- Then dig a trench 30-40 cm deep and an arbitrary width depending on the number of tubers.
- Next, the trench is filled with soil:
- For calla lilies, which are sold at the garden store.
- Prepared independently (according to the recipe described for the germination of calla lilies, consisting of equal parts of leaf soil, peat, river sand and two parts of turf soil).
- Mixed from humus, peat and garden soil, taken in equal proportions.
- It is also recommended to add mineral complex fertilizers, for example, Nitroammofoska (according to the instructions, 2 tablespoons per 1 square meter of area or dissolve the same amount in 10 liters of water). Then it will be possible to no longer apply fertilizing (except for potash for lush flowering).
Important! Preparing the site and soil are important steps in growing calla lilies in the garden.
Scheme of planting germinated seedlings
- The holes make a little more than the volume of a clod of earth in the pot. Interval - 20 cm (for low-growing varieties), 30-40 cm (for medium-growing varieties), 50-60 cm (for tall ones).
- Carefully remove the germinated seedlings with a lump of earth.
- Transfer them into holes, deepening them by 1.5-2 cm to preserve the surface roots.
- Cover with soil and lightly compact.
- Watered.
- When the water is absorbed, the plantings are mulched with 3-5 cm of peat.
Important! Calla lilies have a very sensitive root system, so replanting must be done carefully.
Planting tubers (without prior germination)
Tubers can be planted in open ground without germination:
- The holes are made 5-7 cm deep. The interval is the same as for germinated seedlings: 20-60 cm.
- Place the tuber with the tubercle facing up at the bottom of the hole.
- Cover with a 4-5 cm layer of soil for better germination.
- Lightly compact.
- Watered.
- When the water is absorbed, the plantings are mulched.
Watch the video! Calla lilies. How to plant tubers
Choosing a landing site
In order for calla lilies to consistently delight you with dark green luxurious foliage and abundant flowering, it is extremely important to choose the right site for planting it; let’s look at how to do this correctly:
- This plant develops better and blooms longer, and the inflorescence covers have a brighter color when grown in open areas , being shaded from direct sunlight during the hottest hours.
Advice . It is worth planting callas in the rare shade of a dwarf rowan or willow, in a ridge on the east side of a building or near a pergola. - Calla is one of the most moisture-loving flower garden plants ; the ideal place for it is an area near a pond, where the leaves will receive additional moisture from the air.
- Please note that this flower requires slightly acidic or neutral soil . Under no circumstances should the plant be planted on calcareous soils containing construction waste, which usually has an alkaline reaction.
- Callas are an excellent material for landscape design .
If you have enough space, you can create an original flowerbed or garden bed by planting one of your favorite varieties. Such a uniform planting looks purely decorative. Advice . Plant a dense group of calla lilies of at least 10 plants on your lawn or around your home. Such a flowerbed bouquet looks charming, including 2 or more harmoniously combined flowers, for example, white, pink and dark purple.
Features of planting calla rhizomes
Calla lilies are best planted with rhizomes in the fall. Planting material can be purchased at garden centers or stores. You can also divide the rhizomatous bush.
To do this, carefully dig out the bush.
- Carefully break off the root collar from the main root. Soil should remain on the roots.
- Plant the shoot for germination in a large pot.
- Leave in winter in a humid room with an air temperature of 13-15 degrees.
- In the spring they are planted in open ground at the same time as the tubers, using the same technology!
Growing calla lilies with seeds
The most difficult method of growing calla lilies is from seeds, which is why it is not so popular among gardeners.
Calla lily seeds have poor germination, and the growing process itself is long and complex.
First, seeds are sown for seedlings:
- The seeds are soaked in a solution of growth stimulator Zircon, Epin-Extra, Potassium Humate.
- Next, they are germinated - laid out between layers of cotton pads or fabric, moistened, wrapped in a bag and kept in a warm place for about 7 days, periodically moisturizing.
- After germination, the seeds are planted as seedlings. To do this, use the same soil as for germinating tubers.
- When the seedlings grow up, they are planted in open ground.
What care does calla need?
Ideal conditions for this African woman: light, moisture, warmth and fertile soil. Frequent fertilizing, which is carried out once every 2-3 weeks, using fertilizers for corm flowers, also has a beneficial effect on its development, and during flowering the ground under the bushes is sprinkled with potassium (15-20 g each). You need to be careful with nitrogen-containing fertilizers: their excess will lead to accelerated growth of foliage and a decrease in the number of flower stalks. With proper care there can be up to 10 of them on each plant.
Although calla lilies love water, overwatering is detrimental to it. The soil should not be wet, but slightly moist. Unlike flower stalks, young shoots can be left to grow, since they have almost no effect on the formation of flower stalks, and a lush bush will look very attractive. So calla lilies can rightfully be called an unpretentious flower and can be grown in the country without any problems, admiring the exotic beauty until the fall.
Caring for callas in the open ground after planting
Rules for caring for calla lilies:
- Calla loves moisture very much, especially Ethiopian, but cannot tolerate its excess in the ground (this is detrimental to the Remani and Elliot varieties). Watering should be moderate but frequent. The main thing is that the soil does not dry out and is not too wet.
- Callas are responsive to fertilizers. If no fertilizer was added during planting, it is necessary to apply fertilizer for corm flowers every 3 weeks.
- During flowering, potassium sulfate is added (1 tablespoon per plant, lightly embedded in the soil. It is needed for abundant flowering.
Advice! You should not use nitrogen fertilizers, so as not to cause the growth of green mass.
- Loosening around the plant is carried out regularly after watering or rain for good access to oxygen to the roots. The main thing is that an earthen crust does not form.
Advice! It is advisable to populate the soil where callas grow with earthworms. They will loosen the soil and enrich it with humic compounds.
- After flowering, faded flower stalks are cut off to ensure the growth of new ones.
At the end of September, callas are prepared for wintering. The above-ground part is cut off, leaving an area with two or three leaves, and the tubers are dug up.
Features of care
Callas are demanding on growing conditions. Ethiopian species require regular watering. Other types cannot be filled in. How to water callas at the beginning of growing? Typically, young plants are watered only after they have taken root in the garden bed and begin to sprout new leaves. Until this moment, no watering is carried out, although if the soil dries out too much, it won’t hurt to water the flowers a little. In the future, they are watered 1-2 times a week or more often (the degree of watering and regularity depends on weather conditions, soil type and plant type). Ideally, you should not allow the soil to become waterlogged or dry out.
After watering, the soil is loosened, preventing the appearance of a hard crust on the surface. Be sure to remove weeds. To reduce the amount of loosening and simplify the task of growing, some gardeners deliberately release earthworms into the bed with calla lilies. They enrich the soil with humic compounds and loosen under the roots in a natural way.
How to separate babies from calla tubers
If babies appear on the tuber, they must be separated after a bridge appears between the tuber and the baby (within 12 months). When the jumper is 5 mm or more, the baby is carefully broken off and planted in the ground.
If you break off the baby early, you will create a large wound on the tuber, which can result in infection, which will lead to the death of the tuber. and death of planting material.
Nowadays, calla lilies can be grown in Russia even in open ground, the main thing is to plant and care for the plant correctly. By following all the technology, a beautiful exotic flower will always bloom in your garden.
Watch the video! Secrets of caring for calla lilies in the garden and at home
How to properly dig and store callas in winter
In the fall, callas are dug up and transferred to a cool place for storage. They are removed from the soil with leaves and roots no later than mid-October, since it is undesirable to keep them in the garden with the onset of frost.
The dug up tubers and rhizomes are stored in a cool, dry and closed room for about 2 weeks. During this time, the leaves of the plants will wither and the roots will dry out. After this, the wilted leaves are carefully separated, the roots are cut off, and the rhizomes and tubers are washed and carefully examined.
If there is damage or decay, it is necessary to remove the diseased parts by covering the sections with brilliant green or covering them with activated carbon.
It is useful to soak the tubers for 1 hour in a weak solution of potassium permanganate.
The planting material prepared in this way is dried in a dry and ventilated room.
After this, it is packed for storage. Calla lilies are best stored in perforated paper bags at a temperature of about 10ºC .
The room in which plants are stored must be dry and well ventilated. During storage, planting material is periodically opened and inspected to prevent waterlogging and rotting. At the end of March or beginning of April, calla lilies are transferred to a living room and kept at room temperature for 2 weeks before planting in the ground. During this time, the buds on the tubers wake up, and the plants prepare for the beginning of the growing season.