When should a plant be replanted?
You can determine that a flower needs replanting based on several signs.:
- multiple roots displace soil from the pot;
- in the aboveground part of the plant and on the rhizomes, signs of decay or damage by pests are visible;
- the soil has lost its nutritional properties and signs of decomposition are visible (pieces of bark are crumbling, and after watering the soil does not dry out);
- a large number of babies with buds and sprouts, ready for separation.
When can it be harmful?
Replanting is stressful for the orchid, so it is carried out at home only after flowering , during the period of active flower growth (everything about the flowering of the dendrobium nobile orchid is described here). Usually it's spring. Do not disturb Dendrobium during its dormant period. Transplantation is carried out no more than once every 2-3 years.
Replacing the soil should be combined with propagation so as not to disturb the plant again.
Which pot to choose?
Clay pots are perfect for dendrobium , providing the necessary stability for the flower.
Plastic containers and special orchid baskets are also suitable. The size of the pot should accommodate the root system of the plant and there should be no more than 1-2 cm of free space at the edges. If you choose a small pot, the roots will not have enough space, they will begin to climb out of the container and may be injured.
Step-by-step instructions: how to plant an adult plant and children?
Before you start planting children and an adult plant, prepare in advance everything that may be useful in the process:
- scissors or knife;
- charcoal;
- new pot;
- warm water in a basin;
- orchid substrate.
We have other information about dendrobium on our website. Read about flowering, yellowing of leaves and home care.
Removal from pot
To painlessly remove an orchid from an old pot, you need to:
- Knead it with your hands or fill the pot with water to the top for 10-30 minutes if the previous steps did not help.
- Then the Dendrobium is picked up under the leaves and removed. The action should happen without much effort.
Reference . A healthy plant is firmly attached by its roots to each other and to the pot. A weak plant can be removed immediately and without effort, due to its weak root system.
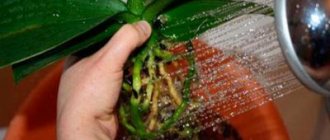
Washing the roots and getting rid of excess substrate
- It is better to carry out the washing stage by immersing the orchid in a basin of warm water. Once the roots and soil are wet, it will be easier to separate them by moving the root plexus with your fingers. Dirty water must be drained.
- You can use a shower jet under low water pressure.
Heavily ingrown particles of old substrate should not be forcibly separated from the plant, so as not to damage it.
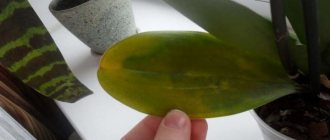
Inspection and removal of diseased shoots
Then you should inspect the roots for the presence of:
- pests;
- rot;
- dead areas.
Healthy roots are always elastic and dense. Patients are dryish or hollow, sometimes with liquid, foul-smelling contents inside.
Before transplanting, all instruments must be disinfected with alcohol or held over a fire to avoid infection of the plant. If this is not done, an infection can occur and the plant will begin to hurt.
After removing the damaged parts of the roots, fresh sections are treated with activated carbon, garlic solution or cinnamon powder for disinfection.
Drying
Do not ignore the drying stage . This helps heal wounds caused by root pruning. In room conditions, it is enough to allocate only 2 hours for this.
Planting flowers and babies in new containers
Please note that after pruning the root system, you may find that for planting you will need a pot of the same size or even smaller if there are a lot of damaged roots.
Important ! It is advisable to disinfect the new substrate by boiling before use. Then let it dry naturally without using a stove or battery, so as not to lose its necessary qualities. The pot is also washed with hot water and detergent, followed by rinsing.
- A small drainage layer of expanded clay is laid on the bottom of the pot.
- Then some mixture.
- The plant is placed in the center and the empty space around is filled with the rest of the mixture.
- When sprinkling with substrate, you need to ensure that the roots do not move to one place if the old soil has been completely removed.
- The soil is slightly compacted.
Compound
You can buy the substrate ready-made in a specialized store or make it yourself. Its main part is wood bark. It is advisable to take pine bark.
Do it yourself
The composition of the homemade substrate includes: wood bark, pumice for looseness, expanded clay, charcoal for souring, perlite, river sand or broken brick for drainage.
Cooking instructions:
- bark is collected from dry trees without signs of rot and disease or bought in a store;
- disinfected from infections and pests;
- dried;
- expanded clay, sand, pumice are boiled and dried;
- drainage is poured onto the bottom of the pot;
- large pieces of bark are laid out on the drainage;
- Small pieces of the substrate are placed on top.
When planting, the substrate is compacted to remove air gaps.
Treatment of bark against infections and pests
Before planting, the orchid bark is disinfected in one of the following ways:
- Pour boiling water over, then cool. The water is changed. The procedure is repeated three times.
- Pieces 2–3 cm in size are boiled for half an hour, larger pieces for about an hour.
- Heat in the oven at +70 °C for more than an hour.
Read about how to prepare bark for the substrate yourself and which one to choose in the store here.
The video shows how to prepare the bark for planting yourself:
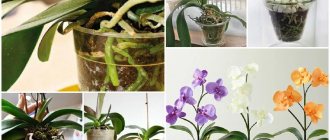
Ready-made substrate from the store
What kind of soil is needed for dendrobium and what is better to choose? The most popular compositions for epiphytes:
- "Gardens of Aurica". It has optimal airflow and moisture permeability, unlimited shelf life.
- "Bio Effect". Made from environmentally friendly material. Has a constant acid-base balance.
- "Bio Master". Made from the bark of pine trees growing in the same area as the manufacturer (Nizhny Novgorod). Convenient packaging in transparent bags of light weight.
The photo shows popular brands of purchased soil:
Aurica Gardens
Bio effect
Bio Master
Read the general article for basic rules for plant care.
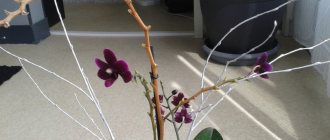
Photo
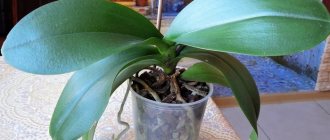
Next in the photo you can see the transplanted flower and the babies.
Rooting cuttings
- The cuttings are pre-treated with charcoal.
- Then 2 cuttings are placed in a plastic bag with moistened sphagnum moss.
- The resulting greenhouse is ventilated every day, moistening the moss if necessary.
- After 2 weeks, fresh roots should appear. Then it’s time to plant the cuttings in pots.
Reference . Relocating a flower to a larger pot if the soil is still suitable should be done by transshipment. In this case, the earthen lump is soaked and not completely removed; in a larger pot, the voids are filled with fresh soil. The substrate remaining on the roots allows the orchid to more easily tolerate replanting.
Basic methods
The peculiarity of the denrobium nobile orchid is that its roots grow very quickly. Sometimes you have to move the flower to a larger pot. If the orchid is healthy, the roots are not damaged, and the substrate is still suitable, then the “transfer” method is most often used:
- The earthen lump is soaked, disassembled, but not completely removed.
- We clean the roots from damaged dead roots.
- We carefully loosen the old substrate and renew it.
- We place small pieces of charcoal in it for disinfection.
This method allows you to preserve the earthen ball as the orchid’s already familiar habitat. Adaptation with this method will be less painful and easier. We simply move the flower to a larger pot.
Dividing the bush
We'll tell you step by step how to plant a bush at home:
- After flowering, remove the adult orchid from the pot.
- We clear the old substrate and damaged roots.
- Using a sharp knife, cut into pieces.
- Each part should have 3 mature healthy pseudobulbs and young shoots, at least 3 cm.
- Place the pieces in water to moisten.
- We treat the cuts with charcoal.
- Plant in small pots.
Planting cuttings
- Cuttings 10 cm long are treated with charcoal.
- We put wet moss - sphagnum - into plastic bags.
- We place 2 cuttings in each such “greenhouse”.
- Store at a temperature of 22 - 24 ºC, ventilating and moistening the moss - the base - daily.
- The light is bright and diffused.
- After 2 weeks, when the roots appear, we transplant them into pots.
- Presumably young orchids will bloom in 2 years.
Watering
You cannot water the plant right away . It is necessary that the cut roots dry well. If before planting in the ground the roots of the plant were dried in the open air for up to 2 hours, then watering should be done no earlier than 2-3 days after transplantation.
In case of extreme heat, the orchid should be watered within 24 hours. If the roots were air-dried for 8-10 hours, then the transplanted flower should be watered immediately after being placed in the substrate. This will allow the roots to take root faster.
What should not be done during the procedure?
Some actions of inexperienced gardeners can greatly harm the plant:
- Strong deepening of the orchid during planting. It is necessary that after transplantation all pseudobulbs and buds remain on the surface.
- It is necessary to distribute the roots evenly in the pot, otherwise the plant may never recover from a difficult transplant.
- You cannot cut off pseudobulbs and peduncles; you must wait until they die naturally.
- You should not use untreated pots and soil from infected plants.
Planting children
Children are formed at the nodes of the stem. How to plant them? They are separated from the mother plant when the roots grow to 6 cm. They are cut with a sharp knife and kept in water for 10 minutes to absorb moisture.
Planted in a fine-grained substrate without deepening the growing point and compacted the surface. Until the leaves appear, maintain constant light soil moisture.
Read about how dendrobium reproduces with the help of children and more here.
Find out interesting information about other types of orchids: Odontoglossum, Cymbidium, Vanda, Oncidium, Cambria, Coelogina, Cattleya, Ludisia precious, Miltonia, mini orchids, Brassia, Phalaenopsis
Possible problems
- It is important not to look for the presence of diseases and pests during transplantation. A plant that is stressed during transplantation and weakened by infections can take a very long time to adapt to new conditions.
- Dendrobium roots are fragile and brittle; be sure to soak the soil before removing the plant from the pot. It is also better to get rid of the old substrate in water, so as not to harm the roots. Otherwise, recovery may take a long time.
- Stagnation of water in a pot or tray contributes to the death of the flower.
Remember that in nature, orchids grow attached to tree trunks or steep surfaces of rocky soils, where there is no excess moisture. - Do not overuse fertilizing or apply it in excess of the norm.
- Treating the pot and substrate before planting will help avoid infection of a plant weakened by transplantation.
Dendrobium: orchid care at home
In order for the plant to bloom profusely and grow, producing new pseudobulbs, it must feel the constant care and support of the grower. Dendrobium orchid care includes:
- regular watering;
- feeding;
- irrigation and shower on especially hot days.
The plant receives especially frequent watering throughout the entire period of flowering and growth. But here you need to take into account that constant exposure to a humid environment is unacceptable for orchid roots. The substrate should dry out between waterings.
The best way to water is to immerse in filtered water that is a couple of degrees warmer than the surrounding air. Moistening the soil can be combined with fertilizing by adding liquid orchid fertilizer to the water.
You can stimulate flowering by regulating watering and the supply of nutrients to the roots. With the end of the growing season, watering is reduced and fertilizing is completely canceled until flower buds appear on the plant again. Early resumption of usual summer care for the dendrobium orchid activates not the development of buds, but the growth of daughter rosettes.
Further care
- After transplantation, the orchid should be protected from direct sunlight to avoid burns. For the period of adaptation from stress, shaded areas with windows facing south or north and east windows are suitable.
- It is advisable to place the flower in a place with high humidity.
- After transplantation, the introduction of fertilizing should be systematized. It is worth adding them every second watering with a concentration of 25% of the norm recommended for orchids. The last feeding is carried out towards the end of August.
- Once a month you can treat the Dendrobium with a warm shower (avoid during the dormant and flowering periods). After the procedure, the leaves are dried with a napkin.
The Dendrobium orchid is loved by both experienced gardeners and beginners. It requires special attention and knowledge at certain stages of life. If you do everything correctly at such moments, she will definitely thank you with delicate flowers that will delight their owners for a long time with their fragrance and pleasant aroma.
Read more about caring for dendrobium at home in this material.
How to properly care
In order for a culture to develop normally, it should be provided with complete and high-quality care.
Temperature
In summer, the optimal daytime temperature is considered to be +20-25 degrees. At night the indicator should be +16-21 degrees. In winter, it is not recommended to exceed the daily mark of +20 degrees. At night the maximum temperature should be +18 degrees. This mode is optimal for heat-loving orchid species.
Illumination
Light requirements depend on the type of orchid. Moreover, all varieties love bright, diffused light. The flower needs protection from direct sunlight. It is worth considering that all types react negatively to the effects of drafts.
Watering mode
In spring and summer, orchids require abundant watering. It is recommended to avoid stagnation of liquid in the substrate. This will cause root rot. For irrigation, you should use settled or filtered water.
Air humidity
The culture requires high air humidity, which should be 50-80%. In summer, it is recommended to keep the plant outside and spray its leaves as often as possible. In winter, the container with the culture should be placed on a tray, which is recommended to be filled with wet gravel.
Transfer
Dendrobium does not tolerate transplantation. Therefore, this procedure should be performed as rarely as possible – once every 3-4 years. Species that bloom in spring should be replanted immediately after this process is completed. Plants that produce flowers in the fall are moved to a new location when young shoots begin to develop.
A pot that is not too large is suitable for the plant. It can be made from any material. It is worth placing several heavy stones at the bottom. Place a drainage layer on top. To do this, it is recommended to use expanded clay or polystyrene foam.
Then you should pour coarse bark and carefully transfer the flower into a new pot. The voids are filled with new substrate. To plant a plant, you should use ready-made soil for orchids.
To plant the plant, you should use ready-made soil for orchids.
Fertilizer and feeding
It is recommended to apply fertilizers exclusively during the period of active growth - from April to September. This procedure is performed every 15 days. To do this, you can use liquid fertilizer for orchids. All types of heat-loving dendrobiums require the systematic use of fertilizers based on potassium and phosphorus. This composition is applied once a month. It is recommended to feed cool-season orchids with nitrogen 2-3 times a month.
During flowering
Orchids bloom at different times. The duration of this process is 2-3 months. To achieve a timely start to flowering, a difference between night and day temperatures of 5-7 degrees is required. This is easiest to achieve in the summer.
After flowering
When flowering ends, watering should be gradually reduced. In this case, the peduncle is cut off and the crop is moved to a cool place. In this case, the culture will be able to fully relax and gain strength. In winter, the bush requires mandatory additional lighting. For this, it is definitely recommended to use a phytolamp.
Requirements for pot and soil
Dendrobium requires a spacious pot. It should be quite wide. The roots of the plant do not participate in photosynthesis, so it does not require a transparent container. Some epiphytes with cascading flowers are recommended to be planted in hanging baskets.
For the plant, you should use a standard substrate, which includes a mixture of sphagnum, peat, pine bark, and charcoal. Before planting, a drainage layer is placed on the bottom of the container, which will help avoid stagnation of moisture.