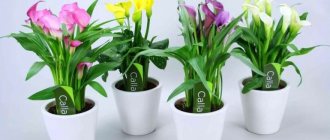
Calla is an amazingly elegant flower that is happily grown in garden plots, at home in a pot, and used to create beautiful bouquets. Today in the gardening and flower trade, “calla lilies” is the name given to many members of the genus Zantedeschia of the Araceae family growing in South Africa, in particular Zantedeschia ethiopica, Elliott and Rehmann. This name also has the Whitewing - a marsh calla that grows in the temperate zone of the Northern Hemisphere. It is believed that growing calla lilies at home brings happiness and cohesion to its owner's family. In addition, care will not be a hassle, and beautiful ornamental plants with a light pleasant aroma will decorate any interior.
Whitewing is not grown at home, as this species requires a deep period of rest in low temperatures.
Description of calla lilies
Calla lilies grow naturally in South America and Africa. Their size and appearance are somewhat different from indoor varieties.
For your information! Another name for the flower is zantedeschia.
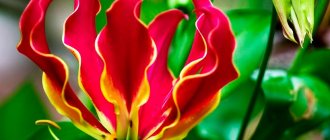
Calla lily is a compact plant with wide, glossy leaves, the color of which can range from light to dark green. The inflorescences are a cylindrical ear, as if wrapped in a leaf-shaped blanket. Flowering is long lasting, more than a month.
The color of the bract varies depending on the type of plant. The shape of the root system also differs, for example, white callas have powerful roots, while colored callas are bulbous plants.
Calla
Possible difficulties in growing
If not properly cared for, Calla may refuse to bloom, and most often this is due to one of the following reasons:
- cramped potty. Transplanting the plant into a larger container will help.
- Lack of light . The culture must be moved to a more illuminated place or a phytolamp installed near it.
- Lack of nutrients . It is necessary to regularly feed the flower, and also replant it in new soil annually.
- No rest period . In order for the plant to gain strength before flowering, you should move it to a cooler room and gradually reduce the amount of watering and fertilizing.
Popular types
Calla flowers - growing and care at home
There are a huge number of varieties of this flower, but in floriculture the four most popular species are most often used.
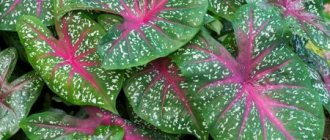
Calla Eliot
The main difference between this species and others is the color of the leaves; they are covered with small white spots. The color of the leaf itself is dark green.
The bracts have a yellow inner surface and a paler, greenish outer surface. In this regard, the plant is called yellow calla lily.
Illuminated window sills are suitable for growing this species. It is also necessary to maintain high soil moisture.
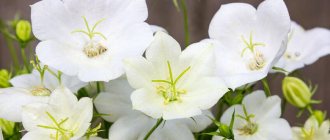
Ethiopian calla
The most popular classic look. It has powerful leaves, which can reach 60-70 cm in length. The rhizome of the flower is powerful and well developed.
The flowering leaf is white. The inflorescences are often used for cutting into bouquets and to create various flower arrangements.
Ethiopian calla
Calla Remanna
This species can be called miniature; the height of the bush is usually no more than 40-50 cm. The leaves are elongated, oblong, dark green.
A distinctive feature of the species is the shade of the inflorescences, the color of the bedspread is pink-red.
For your information! This variety is the predecessor of other species with brighter inflorescences of red and purple flowers.
Calla Remanna
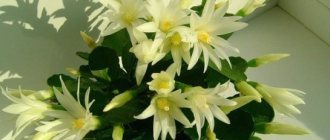
Calla Amethyst
The plant is distinguished by a powerful and tall bush. It can reach 1-1.2 m. The spectacular bush amazes with its stateliness and size.
The inflorescences are very original. What is special is not only their color, soft violet, but also their delicate aroma. Since ancient times, this type of calla lilies has aroused the admiration of even high-ranking ladies.
Calla Amethyst
Plant propagation instructions
The Calla flower can be propagated at home by dividing the bulb or with the help of children. But in order for new plants to take root and bloom soon, you will need to provide them with proper care.
Dividing the bulb
This propagation method is suitable for Ethiopian (white) varieties of the crop. And it should be carried out at the beginning of autumn. First you need to prepare spacious new pots with drainage holes and fill them with soil with the same composition as for adult specimens. A layer of expanded clay, small pebbles or crushed bricks, 4-5 cm thick, should be poured onto the bottom of the containers.
The flower must be carefully removed from the old pot. The rhizome must be carefully washed under a weak stream of warm water and cut into several pieces with a sharp and disinfected knife. Each of them should have a sufficient number of roots. Having moistened the soil, you should plant the cuttings in it, deepening them to 6-8 cm.
Calla flower, propagated by dividing the bulb.
For the first 7 days, watering the plants is strictly prohibited. During the second week you need to moisten the soil 1-2 times. Then the amount of irrigation should be gradually increased, and foliar spraying and fertilizing should be added to it.
Reproduction by children
This method is only suitable for adult plants of colored varieties and hybrids. And it needs to be carried out in early to mid-March. First, you should prepare several containers and fill them with a suitable substrate, not forgetting to make a drainage layer. Then you need to dig up the flower tuber and carefully clean it of the old soil.
It is necessary to separate the children - small bulbs - from the main plant. But only those that easily lag behind the mother tuber are suitable for reproduction. So it is absolutely forbidden to tear children away by force. The mother tuber must be planted in an old flowerpot, and the bulbs must be buried 3 cm into the new substrate. It is advisable to cover future plants with film or glass. After planting, young plants should be watered no more than 2-3 times a week. When the sprouts appear, you should remove their coverings and sprinkle the tubers with a layer of soil.
Growing indoor calla lilies
The first step to successfully growing this exotic flower is to properly plant the plant in the ground.
Callas - planting and care in open ground
Before you start planting, you should pay attention to some important requirements.
- Boarding time. It is better to plant callas before the active phase of development of this plant begins. This period occurs at the beginning - mid-April.
- Pot size. The root system of calla lilies develops quite quickly, so it is better to choose a larger pot. Given the tendency of roots to grow wider than deep, it is better to choose a container with a large diameter.
- Drainage. Creating good drainage in the growing container is a must. Expanded clay or broken brick should be poured onto the bottom of the pot; the layer thickness should be at least 5 cm.
- Soil composition. Calla is a flower that needs nutritious and breathable soil. It should consist of two parts peat, the same amount of sand and one part garden soil.
Important! At the beginning of July, it is recommended to transplant the flower into a larger diameter pot. At the same time, dead leaves and root shoots are removed.
Transplantation without the risk of injury. Step-by-step instruction
When replanting a flower, you should follow these instructions:
- A drainage layer up to 5 cm thick should be poured onto the bottom of the new container. To do this, you can use broken brick, pebbles or expanded clay. The drainage will need to be covered with a layer of fertile soil.
- The calla needs to be carefully removed from the old pot. The roots of the flower must be washed and inspected for damage and rot. It is better to remove the affected shoots and sprinkle the wounds with crushed charcoal.
- The flower should be placed in a new container. Ethiopian Callas must be installed so that their root collar is below ground level. Tubers of colored varieties, on the contrary, should protrude ¼ of their height from the soil.
- The voids must be filled with prepared soil and compacted lightly. To do this, just knock on the walls of the pot.
After transplantation, flowers should not be watered for 16-20 days. Otherwise, the roots may rot and the plant will die. Adaptation of a culture to new conditions is difficult, and the whole process takes about a month, but stimulating its growth during this period is strictly prohibited. So you should not feed the tropical beauty or add growth stimulants to the soil.
Zantedeschia: care at home
Decembrist flower - how to plant and care
Considering the fact that calla lilies are native to Africa and South America, we can draw a conclusion about the conditions that they need for full growth. A warm, humid climate is key to successful planting.
To maintain favorable conditions, you need to know how to care for calla lilies and choose a suitable place for growing them. Homemade flowers in a pot of this kind require compliance with a list of certain parameters. Everything you need to consider when caring for callas at home is described below.
Lighting
Callas are very demanding when it comes to lighting. These homemade flowers in a pot are best placed on a bright windowsill. Sunlight should be diffused during the day and direct in the evening. Morning scorching rays can be detrimental to the plant. For full development, they need to receive the required amount of light for 12 hours.
Callas need a lot of light
Note! If it is not possible to find a sufficiently illuminated place in the apartment, you can add additional light to the plant using a phytolamp.
It is necessary to light the plant even during the dormant period. After the leaves begin to yellow, place it in a sunny place and gradually reduce watering. Due to sufficient illumination during this period, many root shoots are formed that must be removed.
Temperature
Like many other plants native to southern countries, callas require a warm climate.
The optimal temperature in summer is 20-22 °C during the daytime and 16-18 °C at night. In winter, it is better to reduce the indicators to 3-4 °C.
Important! White callas prefer a cooler climate, unlike colored ones. In summer it is better not to increase the temperature, keeping it at 20 °C, and in winter - 15 °C.
Maintaining the temperature regime is very important, especially in order to obtain inflorescences. It is also worth considering that these flowers do not tolerate drafts and sudden temperature changes. The transition to cooler winter conditions should be carried out gradually.
Humidity
It is this indicator that often causes problems when growing callas. These plants require very high humidity levels, 70-80% at a minimum.
To maintain such high performance, you can resort to the following:
- The pot with the plant is placed on a tray with pebbles or expanded clay. By constantly moistening this pan, you can achieve a slight increase in humidity;
- A more effective way is to use a humidifier. By placing it in close proximity to the flower, you can increase the humidity to the required level.
Watering
Callas require regular watering. The soil moisture requirements for white callas are different from those required for colored ones.
The most frequent and abundant watering is needed during the flowering period. After its completion, the degree of moisture is gradually reduced. White callas are watered during the dormant period, but colored ones are not.
Important! Water for irrigation should be settled and moist. Watering with cold water is bad for the health of the plant.
Feeding
All types of this flower require regular feeding. They should be applied during the period of active growth and flowering once every two weeks.
Indoor calla is very responsive to fertilizing with complex mineral fertilizers. Specialized stores have ready-made mixtures specifically for this type of plant.
Care must be taken when applying fertilizers. Excess minerals can lead to flower disease. Particular attention should be paid to fertilizers containing nitrogen; an excess of this substance can cause a lack of flowering.
Pot size
During the period of active growth, callas quickly expand their root system and consume nutrients from the soil in large quantities. In this regard, it is necessary to periodically change the pot and soil.
Replacing the soil is also necessary when signs of disease are detected. In this case, you should resort to emergency transplantation, regardless of the phase of flower development.
Rest period
Most colored varieties, in particular those grown on the basis of such breeding material as Elliott and Rehmann calla lilies, have tubers and need to go into a dormant state. If the plant does not rest, this may cause a lack of flowering and even death. After planting, after 3 months the first flowers with bracts appear. Flowering lasts about 3-4 months. Afterwards the peduncle is cut off and the leaves gradually dry out. The plant is watered rarely at first, and then they stop moistening the soil until it dries completely. The tubers are carefully removed from the pot and until planting (about 2-6 months) stored in a cool, dry place at 3-10°C in bags filled with sawdust or sphagnum and with holes for ventilation.
White indoor calla lilies with rhizomes do not require a period of rest. The flower with the peduncle is simply cut off, and caring for the greenery continues. With proper care and favorable conditions, white callas can bloom at home even 2 times a year - in spring and autumn.
In gardens and summer cottages, plants are used to decorate the banks of reservoirs, although potted crops can be kept at home only in cold weather, and taken outside or transplanted into open ground for the entire spring-summer period.
Flowering in the apartment
The flowering period of different types of callas differs. White varieties bloom in winter, while colored varieties bloom in summer. The flowering of this indoor flower can be achieved by observing certain conditions for its maintenance:
- suitable temperature conditions;
- timely application of fertilizing in the required quantity;
- ensuring conditions during the rest period;
- timely increase and decrease of watering.
Note! White varieties bloom more often and have a shorter dormant period. With proper care, they bloom annually for 4 months.
The process of growing colored varieties is more like forcing. To achieve flowering, the tuber should be stored in sand during the dormant period, and planted in the ground in March.
Fertilizers for plants
For full flowering, it is necessary to regularly feed Calla lilies. Moreover, it is advisable to apply medications every 10-14 days. You can also alternate organic and mineral fertilizing, which will have a beneficial effect on the decorativeness of the crop.
Mineral mixtures
To feed Calla lilies, you can use any complex mineral fertilizers with a minimum amount of nitrogen. The culture responds well to the preparations “Kemira-Lux”, “Pokon”, “Biomaster”. Fertilizers should be applied only in the morning or evening, and after abundant watering. And the preparations themselves should be diluted with water in the proportion specified by the manufacturer.
Organic fertilizers
From organic fertilizers, you can feed the flower with a solution of wood ash. To do this, the substance must be poured with water at the rate of 1 liter per 100 g, and left to infuse for 3 hours. Then the mass will need to be mixed and used for its intended purpose.
Reproduction at home
There are three ways to propagate domestic calla lilies. Each of them has its own advantages and is determined by the type of flower.
Propagation by seeds
This method is difficult to apply at home and takes a lot of time. In addition, it is not advisable to wait for the seeds to ripen, since this process requires a lot of strength from the plant.
Calla lily seeds
To obtain seeds, the peduncle is left on the plant until they form. After ripening, the seed capsule is cut off and set aside to dry. Before planting, the seeds are germinated on damp gauze and only then planted in the ground.
Note! Calla lily seeds lose their viability very quickly. You can only use those received in the current year.
As a rule, this propagation method is used only if there is a need to grow a plant of a rare variety.
Propagation by tubers
For those types of callas that have a tuberous root system, the tuber propagation method is used.
During the growth process, shoots form on the main tuber. When they reach maturity, they can be easily separated and planted in a separate container. This procedure can be carried out when storing or planting tubers in March.
The soil for new plantings should be nutritious and light, with a high content of peat and sand. You should also constantly monitor the maintenance of soil moisture.
This propagation method is quite simple and allows you to obtain a lot of planting material. Under favorable conditions, calla lily tubers form many shoots.
Reproduction by dividing the bush
Most often, gardeners grow white callas, which have a powerful rhizome. It is best to start propagation after flowering has finished.
To obtain new flower specimens using this method, shoots are separated from the main root during autumn transplantation. Next, they need to be planted in a spacious pot with nutritious soil.
Important! During the rooting period, young plants need high air humidity and regular watering.
It is necessary to separate young shoots so that as much soil as possible remains on the roots. This will improve their survival rate and further accelerate growth.
Reproduction methods
There are two ways in which calla lilies can reproduce:
- seeds;
- dividing the tuber.
Propagation of calla lilies by seeds is a rather long process; from sowing to the moment when the plant blooms, at least two years will pass. However, this method makes it possible to obtain not only plants that repeat the mother’s color, but also specimens of completely new colors.
For planting, it is preferable to use freshly collected seeds - over time, germination capacity is quickly lost. The seeds are treated with a growth stimulant and then germinated, wrapped in a damp cloth, preventing them from drying out. After a week, the hatched seeds are placed in a container with soil. Over time, calla lily sprouts are planted in separate pots.
It is much easier to propagate calla lilies using tubers. The nodule grows quickly and the babies are easily separated when transplanted. They can be cut off with a sharp knife or carefully broken by hand. The cut area is treated with crushed coal.
Small nodules need to be planted in separate pots. They are well watered and sprayed frequently. After final rooting, care for it in the same way as for an adult plant.
Possible problems and difficulties
Considering the demanding nature of calla lilies in terms of growing conditions, beginning gardeners may encounter a number of difficulties. As a rule, they are associated with errors in care.
Failure to comply with temperature conditions
To achieve not only intensive growth, but also flowering, it is necessary to strictly observe the temperature regime. This is due to such a feature of this flower as the need for a period of rest.
It is at this time that the necessary temperature must be provided so that the plant enters this state gradually. Only in this case will further development result in abundant and prolonged flowering.
Short daylight hours
During flowering, the duration of daylight should be 12 hours. Considering that white callas bloom in winter, it is impossible to meet this condition without additional lighting of the plants. It is the lack of light that can be the reason why callas do not bloom.
Note! You need to choose the most illuminated window sill to place the flower, you need to install a phytolamp. It is also worth considering that you should not expose the flower to direct sunlight. It is better for the light to be diffused.
Insufficient or excessive watering
Depending on the type, callas require a certain watering regime. White ones are watered all year round with varying intensity, while colored ones do not need watering during the dormant period.
If there is a lack of moisture, the plants will develop poorly and may not bloom. Overwatering can lead to rotting of the roots or tuber, and subsequently to the death of the plant.
Low humidity
The humidity requirements of these southern plants are quite high. In an apartment, especially in winter, it is very difficult to maintain it at the proper level.
If you have a strong desire to grow callas and make them bloom, it is better to purchase an air humidifier. This is the only way to achieve the required level of humidity in winter.
Incorrect soil composition
Callas need light soil, as well as a large amount of nutrients. If there is a lack of nutrition, plants will not have enough strength for full growth and flowering.
Planting in soil with an unsuitable composition can lead to depletion and disease of the flower. Also, do not neglect periodic replanting as the plant grows.
How to store tuberous calla lilies?
First, the tubers are cleared of soil, after which they are dipped into a fungicide solution for 20-30 minutes. After this time, they are dried in the sun for 2-3 days.
Then the wilted leaves are cut off and the tubers are stored in a container with sawdust, peat or vermiculite. The container is placed in a dry room with an air temperature of 10-12°C. In winter, make sure that the tubers do not rot or dry out.
The calla tuber must have a diameter of at least 7 cm. Otherwise, flowers are unlikely to appear from it in the first year
Diseases and pests
Callas are susceptible to fungal diseases. At the first signs of disease, changes in the appearance of leaves and flowers, immediate action should be taken. This may be changing the watering regime or replacing the soil. It is also necessary to carry out treatment with appropriate preparations.
Another problem may be an attack by aphids and thrips. If these pests are found on flowers, they must be immediately treated with special means.
Important! It doesn't hurt to inspect other indoor plants; they may also be affected.
Callas are spectacular exotic flowers. They can be successfully grown at home and enjoy the amazing flowering of these plants even in winter. Among the variety of species, you can find inflorescences that have both snowy white and black colors. Growing calla lilies seems problematic to many, but this is not entirely true. By providing the plants with proper care and appropriate conditions, you can not only grow them at home, but also propagate them. So don’t think twice about choosing a zantedeschia flower; caring for it at home won’t be too difficult.
Watering and air humidity
Calla is a moisture-loving plant. You shouldn't forget about this. This is especially important when growing Ethiopian calla lilies. After all, this plant grows practically in a swamp, where there is very high humidity not only in the air, but also in the soil.
Calla lilies in pots can have covers of different colors. This is what makes them popular among gardeners. Plants with colored spathes are not so demanding of moisture. However, do not forget about regular watering. The amount of water depends on the period. For example, during flowering, watering should be more abundant, and during dormancy - moderate. It is not recommended to overdry the soil in the pot.
There should be high air humidity in the room. Of course, this is very difficult to achieve. To make the plant feel comfortable, you can spray it more often.
Bulbs
Let's figure out how to plant calla lilies in a pot and grow them from a bulb. First of all, using such material is the easiest method for growing such plants. Callas are very easily propagated by roots and bulbs. The main thing is to create optimal conditions for their growth.
For those who don't know what a bulb is, it's where a new plant begins to grow. It's not really a root. But in its structure, the calla bulb is very similar to it. To be more precise, it is a thick and fairly large shoot of the main root, from which young shoots subsequently appear.
As soon as the calla bulb accumulates a sufficient amount of moisture and beneficial components, it begins to produce new shoots. During the process of photosynthesis, the bulb will supply the plant with all the necessary substances.
Planting calla lilies in a pot is a simple process. To prevent the bulb from deteriorating in the pot, it is recommended to make holes for drainage. After this, a hole is made in the container with a depth of at least 10 centimeters. You can plant an onion in the resulting hole. It needs to be placed so that the sprouted tips look up and are placed strictly horizontally. After this, the roots can be sprinkled with earth and the calla lilies can be watered.
The soil
The soil for callas needs to be very fertile and acidified. They will not grow in alkaline soil.
Peat must be present in the substrate for calla lilies.
The best soil mixture for growing them is the following: turf soil, peat, humus and coarse sand in a ratio of 1:1:2:1.
For white varieties, you can use a purchased substrate for flowering aroid plants. Another option is to prepare the soil mixture yourself by mixing one part each of humus, sand and leaf soil, adding ¼ part clay and 2 parts turf soil.
For colored varieties, the recommended soil composition is as follows : one part each of humus and leaf soil, 2 parts turf soil and 0.5 parts sand.
For all types of calla lilies, add 1 tbsp per 3 liters of substrate. spoon of superphosphate.
Transfer
Planting calla lilies in a pot is another important moment. Do not replant a weak plant or damaged sprouts. In order for the calla to quickly get used to its new place, you should use not ordinary soil, but soil that is as close in composition as possible to natural soil.
Before replanting the plant, it is necessary to wash the roots. This must be done extremely carefully. Otherwise, you can infect the flower with a new disease or introduce bacteria into the wounds. As a result, in a new place the calla lily will suffer from a new ailment.
After this, you should pour a little soil into the pot and place the plant. The transplant doesn't end there yet. The roots should be carefully sprinkled with soil and then watered. Calla is a plant that requires a lot of water. Therefore, the transplanted sprouts should be watered abundantly. Of course, you shouldn’t be too zealous in this regard.
Requirements for growing conditions
Like many indoor crops, calla lilies love warmth, moderate watering, normal humidity and good lighting. The pot should be placed in a ventilated place, but not in a draft. This plant does not like cool weather, so you need to choose a place where the air temperature is higher than the average for the apartment. Already at +8°C the flower begins to hurt, and if the air remains cold for several days, the leaves and flower stalks will gradually die.
Some gardeners keep containers with green plants in their yard all summer. There is nothing wrong with this, but with the onset of cold weather you need to remember to move the callas into the house. The most suitable temperature for this species is from +21 to +24°C.
In addition to warmth, callas have high requirements for lighting. In order for flower stalks to form, the length of daylight should not be less than 12 hours. After flowering ends, the duration of exposure to light is reduced to 8 hours. If the natural day is longer at this time, the plant is protected from light, but this is usually not necessary because flowering stops in the fall.
Water your indoor plant not too often, but regularly. During flowering, soil moisture should be more intense than before and after. It is advisable to maintain air humidity within normal limits or slightly higher.
Room temperature
Growing calla lilies in a pot is a simple process. Of course, if you follow certain rules. Do not forget that callas usually grow in southern latitudes, where temperatures are constantly high. These plants are very difficult to tolerate when this indicator drops to 8 °C. Therefore, it is worth keeping calla lilies on the balcony only in warm weather. In winter, the plant should be moved to a room where heating devices are installed. The most favorable temperature for the growth of calla lilies is from 20 to 25 °C.