Ensuring proper fit and care
Flower growers who already have their own planting material and dig it up for the winter, take out the tubers after winter storage and carefully examine whether they are healthy.
A disinfection procedure is required - soaking the tubers in a manganese solution for several hours. Next, they are planted in containers slightly larger than the tuber size. It is not recommended to place them immediately in pots that are too large; in this case, all their growth energy will be directed to the development of the root system.
Calla lilies like soil that is sour or slightly acidic; the following composition would be best suited for them:
- sand – 1 part;
- peat – 1 part;
- leaf soil - 1 part;
- turf soil - 2 parts.
It wouldn’t hurt to add a little superphosphate and complex microfertilizers to the soil you prepare yourself.
Having placed the treated tubers in the prepared soil, place the containers in a bright place, start watering after a week, make sure that the soil is always moistened, but you should not get carried away with excessive watering. In 15–20 days the buds will wake up and begin to grow. With the appearance of leaves, you need to water abundantly (taking into account good drainage).
You should try to ensure the daytime temperature is within 20–23°C, and the night temperature is 15–18°C.
If the flowers have been stored and transplanted into new flowerpots, they should be brought into a warm, bright room in early or mid-March and started to be watered, thus interrupting the dormant period. Flowers need to be accustomed to sunlight gradually.
During the growing season, callas require a lot of diffused sunlight. It is better to protect the plant from direct rays. The ideal place for it would be a windowsill, where the sun hits only in the afternoon.
Watering for growth and flowering requires moderate but regular watering. In hot, dry summers, the volume of watering will need to be increased. The large leaves of the flower evaporate a lot of moisture, and daily spraying will only benefit them
It is important to prevent water from getting on the bedspread
Considering the origin of white callas, they are provided with abundant watering. And yet, water stagnation should not be allowed.
If fertilizer was not added to the hole before planting, during the growing season the flower can be fertilized 1 or 2 times a week with complex fertilizers for flowers.
The fertilization period should be stopped after flowering, at which time watering is significantly reduced.
Peculiarities
For long and abundant flowering, calla should rest for 2 months a year. The rest of the time is spent growing and flowering. The dormant period for plants occurs at different times, especially when kept in an apartment.
To organize a dormant period for the plant, it needs to be watered less often after flowering, and then almost stop watering . The leaves of the plant turn yellow and dry out, and it goes into a dormant state. Some gardeners do not stop watering and fertilizing after flowering has ended. This way it is possible to achieve a second flowering in the season, but after this a period of rest is already necessary for the plant.
Typically, calla lilies have dormant periods in July and August or January and February.
Their dry leaves are cut off and the pot is removed to a cooler and darker place. After the rest is over, they are transplanted to new land. Now it is important to properly awaken the plant so that it begins to grow intensively and blooms soon.
Experienced gardeners recommend waiting until the plant wakes up on its own , and immediately after transplanting, water it well with water acidified with lemon juice. For 0.5 liters of warm water you need a few drops of lemon juice. As a rule, new leaves appear within 1-2 weeks.
Selection of planting material (tubers)
As noted above, plants can be of different types. Therefore, calla lilies can be planted with tubers or rhizomes. For example, calla lilies Remani and Elliot are propagated by tubers, but the white Ethiopian variety has a branched rhizome, so it is propagated by dividing the mother bush.
Growing calla lilies of all types is also possible from seeds, but the method is very labor-intensive and unpromising. In addition, with this method it is impossible to preserve varietal characteristics, so it is used very rarely.
Tips for choosing quality planting material:
- You can see the tubers of this flower crop as early as February. It is recommended to buy planting material in reliable and trusted garden centers and specialized stores. Read reviews from real customers, ask your friends what they think about certain points of sale.
- The tubers should be firm (the texture should resemble new potatoes). Only such material can please you with flowering in the first year after planting.
- But if you come across limp, shriveled tubers in the store, then it is better to discard such a specimen once and for all. Nothing good will come out of it, it's just a waste of money.
- And of course, the planting material should not show signs of mold, rot, or damage.
- The optimal tuber diameter should be at least 4 centimeters.
Types and varieties
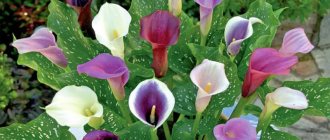
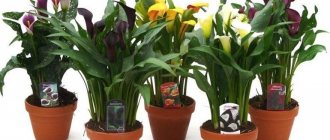
Three types of calla lilies and many decorative varieties are used in the culture. Let's consider the most popular of them, which make it possible to fully appreciate the palette of colors and the elegance of the plant:
Ethiopian. The dark leaves of the Ethiopian calla lily or marsh calla lily are located on vertical petioles and have a uniform color. The foliage remains all year round, without drying out completely even during the dormant period. This species is demanding on air humidity; ideally, the humidity in the room should be at least 80%.- Remanna. This variety is more compact. The leaves are elongated, the underground part of the plant is represented by a flattened rhizome of irregular shape. Calla Rehmann has a pronounced dormant period when the plant sheds all its leaves. Breeders have developed many varieties of different colors.
- Elliot. The plant is distinguished by spectacular leaves with light spots on a bright green background and colorful bright covers of inflorescences.
Planting calla lilies in open ground
There are various ways to plant a plant. Planting garden calla lilies in open ground is possible with tubers or seeds; planting by dividing the bush is also a common method.
Planting by dividing a bush
Planting with tubers
To grow a viable plant, you need to select and prepare the tubers correctly. They are usually purchased in specialized flower shops some time before planting.
It is important to pay attention to the appearance of the bulb. It should have a uniform shape, light brown tint
Important! If there are cracks, dents, or rotten areas on its surface, such a tuber is not suitable for planting. After purchasing, the bulbs are laid out in a thin layer on a wide tray, stored in a cool and dry place until planting, turning them regularly to prevent rotting.
After purchasing, the bulbs are laid out in a thin layer on a wide tray and stored in a cool and dry place until planting, turning them regularly to prevent rotting.
Before planting, the soil must be thoroughly loosened. After this, make small indentations (up to 10 cm) at a distance of about 40 cm from each other. Place one plant bulb into the resulting holes, sprinkle with soil, and then water thoroughly.
It is important to remember here that you do not need to press the bulb into the soil, this can damage the tuber, as a result of which the calla lily will not grow
Planting by dividing the bush
This method involves separating the root collar from the root of the mother plant. The daughter crop must be planted in a large container, where it remains until the start of the planting season. These containers must be stored in a cool room with high humidity and moderate lighting.
Note! The division of plants is carried out in the fall - before the beginning of summer, the new shoot becomes quite strong and viable. This means that it can be safely planted in open ground.
Calla sprout
Planting seeds
This method is also considered quite popular. The method includes several stages:
- The seeds must be placed in a solution of potassium humate for several hours.
- Place them on a wide surface with sides, having previously lined it with a dampened cloth.
- Spread the seeds evenly in a thin layer.
- Cover with another damp cloth.
- Leave for several weeks, maintaining the required level of humidity.
- When the seeds germinate, they must be planted in a shallow container with loose soil.
- Wait until strong shoots appear, and then plant them in open ground.
It is important to water the sprouts regularly, otherwise they will die. Also, you should not immediately plant sprouted seeds outside; you need to wait until the sprouts get stronger
Propagation by seeds
Calla lily seeds have poor germination, they take a long time to germinate and often die in the first days. But if you have patience and a desire to feel like a real breeder, you can use the seed propagation method. First, the planting material is placed between cotton pads, moistened generously with water and left for 3 days. When the seeds hatch, they are very carefully laid out in the soil.
The mistake that beginners make is that they immediately plant the sprouted seeds in damp soil, where they rot. Instead, it is better to place them in a shallow container, three-quarters filled with a mixture of sand, peat, humus and turf soil. It is advisable to take all components in equal parts.
After waiting for friendly shoots, the young flowers can be picked into separate pots. The optimal period for picking is from the beginning of mid-May. It is better to remove weak specimens immediately, since in the future they are unlikely to become full-fledged plants. Calla lilies can be grown in long boxes, provided that the distance between neighboring bushes is at least 40 cm.
Scary flower?
Europeans will tell you why callas are flowers of death. Traditionally in Europe it is customary to bring white flowers to funerals. In a cemetery, calla lilies feel great, grow and bloom well.
Giving white flowers to an elderly woman is considered bad manners and a hint of imminent departure. This applies not only to calligraphy, but also to chrysanthemums, carnations and even roses.
Another reason why calla lilies are flowers of death is their appearance. The flower does not look alive, but as if sculpted from wax. To some people, the yellow center resembles a candle in its appearance, and the white petal resembles a funeral shroud.
To answer the question why calla lilies are flowers of death, it is worth analyzing the properties of the plant. All types of flower are poisonous. The juice of the plant, if it gets on mucous membranes or wounds, causes irritation, and in some cases, swelling of the throat and vomiting.
There is a superstition about why calla lilies are the flowers of death. The flower reacts sharply to changes in the surrounding energy. Sensitive people are able to predict future troubles based on the state of the flower and change the course of events. Although calla lilies indeed predict imminent death, they are not capable of attracting death. You shouldn’t throw away this living barometer of your family’s condition. A flower can become an excellent talisman for its owner, or a curse, depending on the person’s attitude towards his plant.
Despite ominous superstitions, in many countries calla lilies are a popular decoration for gardens and are loved by florists. Flower growers value the plant for its unpretentiousness and ability to grow in shaded areas. Beauty and minimal care make the flower ideal for beginners in growing flowers.
Description of the plant and species
Calla is a beautifully flowering representative of the Araceae family, whose homeland is considered to be South Africa. The plant delights with its austere, amazing beauty and many colors.
The calla lily houseplant has bare stems with large leaves shaped like a heart or an arrowhead. Tall peduncles at the top turn into a single-petal flower, which consists of a spadix and a funnel-shaped bract.
Many varieties of calla lilies of various colors have been bred, including even black. Popular types:
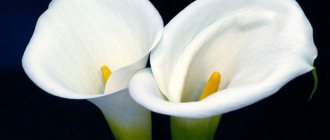
- Ethiopian calla is the most common species. The flower has a yellow spadix and a white spathe. The stem is up to 1 meter high, fleshy green leaves are up to 45 cm in length.
- CallaRemani is a miniature species, the height of which does not exceed 50 cm. The bracts are red or bright pink.
- CallaElliota - has heart-shaped leaves with white spots. Blooms profusely. The bract is yellow.
- Calla amethyst - from 60 to 120 cm in height. It has a violet hue and a subtle, refined aroma.
House conditions
In order for caring for calla lilies to bring results, immediately after purchasing the plant, it is necessary to create the proper conditions for it in terms of soil composition, watering and lighting.
Lighting
Calla needs good lighting throughout the year. It is best to grow it in indirect sunlight. The plant feels its shortage especially in winter - there may be no flowering, only the development of stems is noted.
Watering
The most important condition for the growth and development of a flower is to ensure constant moisture in the soil in which the calla lilies are located. Even the top layer of soil should not dry out!
Still, we should not forget about the natural conditions in which the plant develops - swamps and coastal zones.
It is necessary to water every day using soft water with a small amount of salts. In addition, to create an additional source of moisture, you can place a container with a flower on a pallet filled with pebbles, expanded clay or broken bricks. They need to be moistened as they dry.
If water gets on the flowers when watering, they will become covered with unattractive, non-decorative spots. To prevent this from happening, there is no need to spray the plant; instead, wipe the leaf blades with a moistened sponge or napkin.
Spraying
To maintain the air humidity necessary for the plant, it must be sprayed frequently. In summer, in hot weather, you can spray twice a day - early in the morning and after sunset.
Calla responds well to moistening the leaves with a wet sponge or cloth. During the dormant period, the plant is not sprayed, since it lives mainly off the tuber and is not affected by air humidity.
Necessary feeding
As plants are planted in a pot, their roots grow and fill the pot, absorbing all the useful elements from the soil. Calla spruce is constantly kept indoors; it needs timely feeding and complex fertilizer. This will allow the flower to develop properly.
For this purpose, universal complex fertilizers are used at intervals of 1 time in 2 weeks. The use of nitrogen fertilizers is unacceptable until the flower begins to bloom. Urea or infused eggshells are added to the soil as a top dressing.
Such procedures must be carried out carefully. When there is an excess of fertilizers, the edges of the leaves turn yellow and dry out, or even die.
Caring for calla lilies during the rest period
The rest period for some varieties varies in duration and usually occurs after flowering has ended. The plant may completely lose its leaves, which is more typical for garden crops. On the windowsill, calla lilies slow down their growth and therefore need to change their maintenance conditions:
- air temperature drops to 15–18 degrees;
- watering is reduced to 2–3 times a month;
- fertilizing is excluded during the winter months; from spring, it is introduced gradually 2 times a month (organic compounds are preferred - infusion of nettle or manure).
This video shows how you can store calla tubers in winter.
The rhizomatous Ethiopian calla variety has a dormant period in the summer, so it needs to be provided with a cool place with preserved lighting.
Flower transplant
As soon as the plant begins to emerge from the resting phase, it should be transplanted into fresh substrate. Callas are replanted every two years, subject to regular pinching and replacement of the top layer of soil.
The pot must be at least 15 cm in diameter and not deep. The thickness of the drainage must be at least 5 cm. To calculate the depth of the pot, you must multiply the diameter of the rhizome by 3. As soon as the flower is transplanted, the air temperature should be increased slightly. After a couple of weeks, they begin to fertilize and water the flower abundantly.
Protection from diseases and pests
Of all the diseases, the most common are those caused by fungal infections and bacteria. These are mainly gray and root rot, anthracnose, and bacterial rot. Indoor calla lilies are a flower that, at home, caring for in order to protect against such diseases is almost no different from caring for garden varieties. Fungal infection can be caused by waterlogging of the soil, the presence of a diseased plant in the neighborhood, or excess nitrogen fertilizers.
At the first signs of root rot, stop watering or replace the soil with a less moist one. To get rid of gray rot, as well as anthracnose, which is characterized by the appearance of brown spots on the leaves, the plant must be treated with fungicides.
Bacterial rot, which affects the calla flower, cannot be treated. Home care must necessarily include preventive measures to prevent the occurrence of this serious disease. They consist of treating tubers for the purpose of disinfection. If the plant has already shown signs of bacterial rot (darkening of peduncles, leaves and roots), all affected parts must be removed immediately. If the damage is significant, the flower must be disposed of completely.
Among the insect pests, the greatest danger to calla lilies are aphids and spider mites, the sign of which is small inclusions on the leaves of a yellowish color. To combat ticks, preparations such as “Fitoverm”, “Vertimek”, etc. are suitable. Which products are best to use must be clarified when purchasing a calla flower (mix), caring for which at home will necessarily require protecting this plant from insects - pests Against aphids, it is enough to spray the flower with a solution of laundry soap.
Diseases
Callas are susceptible to some infectious and fungal diseases. Of these, the most common are gray rot, root rot, wet rot and anthracnose.
With gray rot, a dirty gray coating appears on the affected areas of the plant. All parts of the plant are sick. This disease can only be combated by using special antifungal drugs (Vitaros).
The development of root rot is promoted by stagnation of water in the soil and poor drainage . The tubers of the plant rot, and the above-ground part withers. The plant should be transplanted into another soil, drainage in the pot should be improved, and treated with fungicidal preparations.
Planting calla tubers
At the end of February - beginning of March, before planting in the ground, calla tubers are planted for germination. If the tubers have wilted a little, before planting, keep them in a damp cloth for 2-3 days until they become elastic again and the buds are clearly visible on the surface of the tubers.
Carefully inspect the tubers.
If you notice damage on them or signs of dry rot, which often appears due to improper storage, strip the tuber with a sharp knife to healthy tissue.
Lubricate the wound surface with brilliant green and let it dry.
To prevent fungal infections, before planting, treat calla tubers with any fungicide intended for treating tubers and bulbs. The drugs Fundazol and Vitaros, which have a systemic effect, are well suited for this purpose. They not only destroy fungi on the surface of the tuber, but are also absorbed by the plant, providing it with long-term protection. Dry the tubers a little before planting.
In the photo: 1. cleaning the wound surface of calla tubers 2 and 3. Treating the wound surface with brilliant green 4. treating calla tubers in the foundation
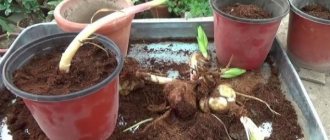
Fill a small pot with nutritious earthen mixture to about 2/3 full. The mixture should have a slightly acidic reaction. Soil composition for planting calla lilies: peat, humus or compost, leaf or garden soil, washed sand (2:1:1:0.5). Compact the soil in the pot and place the tuber on top.
Cover the tuber with the prepared soil mixture. The planting depth for calla tubers is 1.5–2 cm from the top of the tuber to the soil surface.
Water carefully, being careful not to wash away the soil. Place the pot in a bright place
Calla develops well at daytime temperatures of about +15. +20 °C. It doesn’t matter if at night the temperature of the calla lilies drops to +13. +15 °C, the difference between night and day temperatures is beneficial for the plant.
in the photo: 1 and 2. planting a tuber in a pot, 3. watering a newly planted calla tuber
Calla lily roots grow in all directions. To prevent them from coming to the surface of the soil, as soon as the sprouts reach a height of 5–7 cm, add another 2–3 cm layer of soil to the pot. Keep the soil moderately moist. Tubers do not tolerate excessive watering and stagnant water, so drain the water from the pan immediately after watering. Once every 2 weeks, feed with a solution of complete mineral fertilizer for seedlings. Fertilizing with liquid gumized fertilizer brings good results.
The photo shows sprouted calla lily tubers in pots
When the soil in the garden warms up to +15°C and the threat of frost has passed, calla lilies can be planted in open ground. Calla does not like direct sunlight, so choose a place for it that receives full sun until noon. Prepare a hole measuring 30x30 cm for planting, add half a bucket of humus and peat into it and mix well.
Carefully remove the plant from the pot. Despite the fact that calla lilies have powerful roots, they are very fragile and cannot be restored if damaged.
Place a ball of earth in the hole.
in the photo: preparing the planting hole and planting calla lilies
Gently fill the area around the roots with soil. When planting, it can be deepened again by 1.5–2 cm, so that during care you do not accidentally damage the surface roots.
Water and wait until the water is completely absorbed into the soil. After watering, mulch the plantings with peat to prevent the formation of a soil crust.
in the photo: planting calla lilies in the ground in May
Transfer
Calla lilies are transplanted into new soil after the end of the dormant period. This may be in early spring or early autumn.
The plant tuber is removed from the pot and the soil is removed along with the old roots . If children have formed on it, they can be separated and planted in separate pots. Then the tuber is planted in the same pot in a new earthen mixture.
It is necessary to pour a drainage layer of fine expanded clay. The plant tuber is buried approximately 2/3 into the soil so that all growth points remain on the surface. After transplantation, water the plant rarely - once a week until new shoots appear. After this, abundant watering is resumed.
Houseplant diseases
The main causative agents of diseases in domestic calla lilies are fungi and bacteria. However, you will never encounter them if you know how to care for calla lilies at home. The best option to combat diseases is prevention.
It is necessary to very carefully monitor the condition of the soil in the pot, excluding its drying out or waterlogging. You also need to protect the flower from direct sunlight and drafts.
The key to successfully combating emerging diseases is knowledge of their characteristics and symptoms. The most common diseases of this indoor flower include:
- anthracnose, accompanied by the appearance of brown spots on the leaves. Over time, they crack and dry out;
- gray rot, which forms on all parts of the plant due to improper care, high air or soil humidity;
- bacterial rot, which is very difficult to treat and quite often requires immediate destruction of the infected flower to prevent spread to other plants;
- root rot, which contributes to the gradual withering of the plant and appears as a result of abundant watering and waterlogging of the soil;
- lack of flowering as a result of frequent rearrangements or transplants of calla lilies, poor lighting or insufficient amounts of fertilizer, and so on.
How to care for calla lilies at home is not a very complicated process. But we must not forget that the varieties of these plants require different care. For example, white callas at home require more moisture. But at the same time, they do not stop growing during dormancy or absence of flowering.
Calla lilies “mix” at home are unpretentious to air and soil humidity. But at the same time, for their good development, good lighting is required. In addition, during the dormant period, such a flower sheds its foliage. Therefore, you should not panic - the plant is simply sleeping. And with the onset of summer, its leaves will grow again.
Reproduction
At home, growing calla lilies from seeds takes a long time, so most people prefer to purchase planting material, then propagate the adult plant. If you have grown root calla lilies, then they propagate it by dividing the root; tuberous callas are propagated with young nodules.
Reproduction methods:
- Dividing the bush. At the end of the flowering period, the bush is dug up, part of the rhizome is separated and planted in a mixture of peat and sand, a mixture of humus and sand, or in soil for seedlings of flower crops. After rooting, transplant it into a pot, water it, then leave it alone for a week. The pot is kept in a cool room away from bright sun.
- Nodules. Young tubers can be separated when they have isthmuses. If they are tightly pressed to the mother tuber, then they cannot be forcibly torn off. The procedure is performed after flowering. The young tuber is planted in a small container in soil for flower seedlings, in a mixture of humus and garden soil, grown, and then transplanted into a pot.
Planting calla lilies in a pot and replanting
Different varieties of calla lilies have individual requirements for planting and replanting. This is due to differences in the root system of plants, different conditions of the dormant period, and the individual composition of the soil.
White callas
Planting Ethiopian callas occurs as follows:
- A good drainage layer must be laid out at the bottom of the pot. This need is due to the prevention of stagnation of moisture in the soil. Expanded clay, fine crushed stone, and coarse sand are suitable for drainage.
- An equal layer of soil is applied to the drainage layer. The soil should be loose, without lumps.
- Only 1 calla lily is placed on top of the soil. The roots of the flower must be carefully straightened. Roots that are too long are left as is; pruning is not necessary.
- The flower is covered with soil. The height of the embankment should correspond to the space occupied by the roots of the flower, multiplied by 2.
- The soil is pressed down a little from above and watered generously.
This variety is replanted in the first half of July.
During transplantation, old leaves and all shoots must be removed. If left, they will interfere with the growth of the flower.
When transplanting into a new pot, you need to pay attention to the location of the root system. The roots of the plant should be located at the same level as they were in the old pot
Otherwise, the calla lily will spend extra energy adapting to the new situation. Transplantation is carried out annually.
Tuberous callas
Planting tuberous calla lilies involves the following actions:
- A drainage layer of expanded clay, small crushed stone, gravel, and ceramic shards is laid on the bottom of the pot. Polystyrene foam can be used as drainage.
- A layer of soil is applied to the drainage layer up to the middle of the pot. The soil should be loose, without lumps, and not contain lime or clay.
- Tubers are placed on top of the soil. Several representatives of this variety get along well in one pot.
- Flowers are covered with a 1 cm layer of soil.
- The soil is not compacted. The flower is watered only after 3 weeks.
Flowers are replanted annually.
The optimal time for transplantation is March. Usually at this time the flowers wake up from hibernation. Before planting, the tubers are taken out of the cool place where they spent the whole winter and laid out on the surface in a warm, sunny place. The tubers “breathe” fresh air for several days, and then they are planted.
It will also be interesting: Dendrobium Orchid - home care and flower transplantation?
Air temperature and humidity
When growing calla lilies at home, you need to pay attention to some characteristic features of this process. This flower is a light-loving plant, so it is necessary to provide the place where it grows with good lighting both in summer and in winter. In addition, in spring it is necessary to gradually accustom the plant to the fact that the length of daylight hours increases.
These flowers are heat lovers. Therefore, they develop very poorly in cold conditions. The temperature in the room where they grow should be between 18-23 degrees Celsius. Ventilation of the room must be done very carefully, avoiding the formation of drafts.
The air in the room should be humid. To do this, you can plant plants in pots with trays, which will ultimately serve as water reservoirs. As moisture evaporates, it will saturate the air, simultaneously increasing the humidity in the room.
Possible problems and difficulties
- If not cared for properly, novice gardeners may encounter some difficulties in growing this flower. Insufficient lighting and dry air in the room lead to stretching of the stems. When certain rules and recommendations are followed, caring for a flower is very simple.
- When there is a lack of nutrients in the soil, the plant's leaf petioles become brittle.
- Improper care of the plant in winter and the absence of a rest period inhibits the flowering of calla lilies.
Diseases characteristic of indoor calla lilies
Indoor calla lilies are affected by quite serious diseases that can lead to the death of the plant in a short time.
Anthracosis
Anthracosis is a common cause of brown spots on leaves. At first they are small and slightly concave, and later they become large with red sides and a light center. Subsequently, the entire leaf blade dries out and dies. The reason lies in a fungal infection. Treatment is treatment of unaffected parts with a fungicidal preparation. Leaves with spots are removed immediately.
Gray rot
Gray rot appears from waterlogged calla lilies and rarely ventilated rooms. The leaves soften and gray mold appears. The fungus spreads very quickly, including to other plants.
You can fight for the flower by removing damaged leaves and treating the remaining leaves with a fungicidal agent (for example, “Fundazol”). Of course, along with treatment, the causes of the disease must be eliminated. Since the pathogen remains in the ground and can live there for up to 2 years, complete removal of the old substrate is required.
Bacterial rot
Calla lily tubers, if damaged during transplantation, can become infected with bacterial rot. Excessive watering and excess nitrogen contribute to this. During the disease, leaves quickly darken and die. Unfortunately, it is almost impossible to stop the death of the plant. You need to completely remove the leaves, treat the bulb with potassium permanganate and let it dry. When you replant the calla lilies in the pot, do not allow the soil to become waterlogged.
Root rot
With root rot, there is a sharp drying out of all leaves due to the death of the roots. The process is triggered by constant stagnation of water in the pot. It is possible to try to save the flower by treating it with Ridomil or Previkur and changing the surface layer of soil.
No flowering
If the calla lily does not please its owner with elegant flowering, then the most likely reasons lie in improper care of the plant:
- Lack of space in the pot, which is not always reflected in the growth rate of foliage, but may be the reason why calla lilies do not bloom at home.
- Insufficient lighting and frequent moving of the pot from place to place. The flower is forced to constantly be under stress and adapt to new conditions, which leaves no energy for the formation of buds.
- Lack or lack of fertilizing, especially before the start of the active period. The cause may also be the alkaline reaction of the soil, which does not allow food to be absorbed by the root system.
- A short duration of the resting phase in a cool place, during which flower buds do not have time to develop.
- Overgrown tubers requiring replanting.
- A large amount of soil in the pot, promoting the development of putrefactive processes.
Pests
- Thrips. They cause small yellow spots to appear on the leaves. Pest control - treatment with an insecticidal solution, for example "Aktara" or "Fitoverm".
- Spider mite. The leaves become dry, and thin threads of cobwebs are visible on their surface. In addition to treating insects with insect repellents in the room, it is necessary to increase the air humidity or spray the flower more often.
- If the leaves curl and fall off, aphids may be a possible cause. Small colonies of insects can be easily removed with cotton wool and soap or alcohol. If the prevalence is high, the entire plant is sprayed with a solution of “Aktara” or “Iskra”.
Important! Any treatment is carried out 2-3 times to destroy all stages of insect development. Interval between spraying – 5 or 7 days
Problems
Sometimes it takes a long time for a plant to bloom. There may be several reasons for this. The most common is the absence of a rest period. It should be remembered that before flowering begins, the plant must rest for at least 2 months.
Calla may not bloom due to lack of feeding . On the contrary, heavy fertilizing with nitrogen fertilizers leads to blackening of the edges of the leaf blades.
Another common reason for the lack of flowers is low lighting. A plant that begins to bloom may stop blooming if the air humidity is very low.
But even with high humidity, if the air temperature is above 27ºC, the leaves and flower stalks of the plant may begin to dry out and wither.