Orris root - this exquisite name is given to some types of iris, or, as it is also called, iris - German, Florentine or pale, the rhizomes of which emit a surprisingly delicate violet smell.
These plants, natives of the Mediterranean, their types, characteristics and preferences will be discussed in this publication.
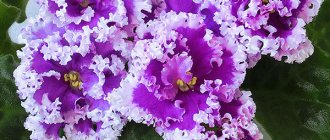
Types of violets
Several types of violets grow in the natural environment: fragrant, marsh, Vittroka (Pansy), field, dog and others. Decorative violets growing in pots vary in variety.
There are a very large number of different varieties of indoor violets.
- Variety Frosty cherry. A plant with double flowers. Interestingly, the older the violet, the darker its flowers become.
- Variety Wedding bouquet. Graceful delicate lush violet flowers, white as a bride's dress. The foliage is light green. They look like a bouquet because the plant produces many stalks of flowers at the same time. This is how the flower earned its name.
- Variety Sea Wolf. Indoor violet with blue star buds.
- Variety Bullfight. A spectacular scarlet or red violet with semi-double, ruffled flowers and green leaves.
- Variety Magic of love. It has some of the largest bright flowers of a star-shaped or wavy shape on low peduncles, blooms very actively. Despite its external beauty and splendor, this violet is also undemanding in care.
- Variety Pauline Viardot. This variety has a variegated rosette, which visually distinguishes this species from other flowers on the windowsill.
- Variety Artik Frost. One of the most unpretentious varieties. It has long flowering. Ideal for beginners. The flower is soft white, variegated with blue splashes.
Successfully used in the interior are ampelous varieties of violets with a border on the petals, a flower in the shape of bells, with light and dark green foliage. Uzambara violet, popular among flower growers, comes in pink, purple, blue and white colors.
A little history
Africa is considered the birthplace of violets. But it got its name in honor of its discoverer, Baron Saint-Paul. He brought this wonderful flower to Europe and contributed to its spread. Initially, violet was considered a very capricious plant. But when they studied it and understood the rules of care and reproduction, the popularity of the flower increased significantly. Today, domestic violet is found in many parts of the world. There are many varieties of this plant that have been bred, it is simply impossible to list them.
Growing violets at home from leaves
Indoor violets cannot be called difficult to care for plants, but you need to know some of the nuances of growing depending on the type of flower. If you take into account the preferences and characteristics of the plant, it will delight you with beautiful flowers and a healthy appearance for a long time.
Petiole trimming
Often at home, violets are grown from leaves. A baby will be produced from it. The first step is to carefully trim the petiole to propagate the flower. For these purposes, use sharp, disinfected scissors.
Where to get a leaf
A leaf is selected from an adult plant in the second or third row of the rosette. Violet or Saintpaulia pruning is carried out in the spring at the beginning of the growing season.
Preparing the container and soil
The soil for violets should not be too nutritious, loose with good air permeability. For loosening, you can use vermiculite, dry sphagnum and even crushed foam.
Violets need a low but wide pot, since the root system grows mainly in width. Plastic containers work well; the plant’s roots will not catch on this material.
Rooting in water
To root violets in water, select a small container and sterilize it. Take filtered water and dissolve an activated carbon tablet. Coal will become an adsorbent for mucus and sediment.
It is important that the flower stalk in the water does not touch the walls of the container. To do this, long violet cuttings are secured using cardboard or thick paper with a slot placed on the edges of the container. A violet stalk is placed in a slot that is sufficient for the thickness of the stem of the flower leaf, but prevents the entire leaf from falling into the water.
During the entire period of violet germination, they monitor the cleanliness and transparency of the water and the condition of the leaf - it should not rot or become stained.
After the roots appear, you need to wait until the bud begins to grow, then you can transfer the leaf.
Rooting in soil
When propagating violets, each leaf is planted in a separate plastic cup. A hole is made at the bottom of the cup to drain excess moisture, drainage is poured, and soil is placed on top of it just below the edge of the container. The leaf stalk is deepened by 1-2 cm. It is important that the violet leaf does not touch the ground; to do this, it can be supported with a match. The glass with flower seedlings is covered with a bag or a larger plastic glass to maintain the desired temperature until roots appear.
Important. You can replant violet or Saintpaulia when the new grown leaves of the plant have reached a diameter of 2-3 centimeters.
LiveInternetLiveInternet
Quote from Nina_Andreevna's message
Read in full In your quotation book or community!
Secrets of Uzambara violets.
A short course on growing, propagation and care. SOURCE
Author Valery, collector of Saintpaulias from Seversk.
As amended by violet collector Petrovich, St. Petersburg.
And comments on the St. Petersburg product range
Every violet lover wants his plants to grow well and bloom beautifully. To do this, you need at least minimal knowledge about the Uzambara violet (Saintpaulia) in order to avoid gross mistakes during cultivation and the inevitable subsequent disappointments.
A healthy and properly grown Saintpaulia usually sends out flower stalks sequentially as it grows in the upper three or four tiers of the rosette. You need to know that the peduncle grows from the leaf axil only once; there will be no more peduncles in this place. Therefore, one should not expect violets to continuously bloom in lush bouquets. So the violet blooms only in spring, after the winter period of growth and rest from flowering. It follows from this that the beauty of Saintpaulia flowering depends on the condition of the rosette. If you have grown a multi-tiered symmetrical rosette in good soil and in a container of normal size, your violet will definitely delight you with luxurious blooms. Conversely, there is nothing to expect from a dusty, stunted rosette, consisting of three tiers of withered leaves and growing in a two-liter pot filled with compacted soil from the native garden.
Soil and dishes for violets. Transfer. Fertilizers.
So, you purchased a “baby” or a leaf of the variety you liked at an exhibition or from friends. Take your time to transplant the young rosette into a more beautiful and spacious container. Remember that it is necessary to replant a growing Saintpaulia when the diameter of the rosette is three times the diameter of the pot. It is advisable to replant an adult Uzambara violet into fresh soil twice a year, after spring and autumn flowering, during which the plant intensively “eats” nutrients from the soil. Young “babies”, separated from the leaf, are planted in plastic containers of minimum volume with a diameter of no more than 4 cm, filled with soil to a height of no more than 4 - 5 cm. Transparent disposable plastic stacks and cups with a volume of up to 0.1 liter are best suited for this. A larger volume of soil and dishes for a young “baby” is not only unnecessary, but also harmful. Then the grown “baby” is transplanted into a container with a diameter of about 7 cm and a volume of up to 0.2 liters; plastic coffee cups with a capacity of 0.18 liters are suitable for this. In this container, the violet will grow normally until the first flowering. The optimal volume of dishes for an adult Uzambara violet is 0.3 - 0.35 liters, while the height of the dishes should not exceed its diameter, i.e. dishes for violets should not be deep. Practice has shown that Saintpaulias develop better in low, wide bowls that provide good air permeability of the soil. The maximum diameter of the pot should be 9 centimeters. And no more!!!
When replanting, do not pour soil to the very top of the pot, leave 1 - 2 cm from the top free, you will fill them with fresh soil as the rosette grows and the lower leaves die. The height of the soil should reach the cuttings of the lower tier of leaves. If planted too deep, the growing point may rot; if planted too high, the rosette will be unstable, with a weak root system. In the period between transplants, as the lower leaves die off, add fresh soil to the level of the lower cuttings, carefully removing the upper salty layer of soil. This is very important, since in this place of the trunk the violet will grow new roots. A properly grown Saintpaulia should not have any trunk above ground level; the entire space up to the lower cuttings should always be filled with soil.
When transplanting an adult violet, carefully loosen the earthen lump removed from the pot with a sharpened peg and remove as much of the old soil as possible, being careful not to damage the root system. Please note that a thorough shaking of the root system will only benefit the violet in the future. Don’t follow the example of those who simply dump the old lump into a larger container and add new soil around the edge. Such a “transplant” will bring nothing but harm. This way you can only transplant a young “baby” with a weak root system for the first time. When replanting a violet that is more than two years old, use a sharp knife to remove the lower part of the root system along with the trunk, leaving the upper part of the roots, which will be enough for the rosette until new roots grow on the upper part of the trunk. This is how the root system of an adult Uzambara violet is formed correctly as it grows. The size of the dishes should not increase when transplanting adult violets. I repeat, the maximum diameter of the pot should be 9 centimeters. And no more!!!
If after transplanting the violet's leaves droop, place it for a day in an “aquarium” made of two transparent cake lids and create high humidity inside the “aquarium” by spraying it under the lid with a spray bottle and pouring a little water into the bottom lid. In this case, the violet pot should stand on a tray and not absorb this water. This “reanimation” is also used when the earthen clod is drying out, if you forgot to water Saintpaulia on time and its leaves have lost turgor (elasticity).
Pay special attention to the soil for your Uzambara violet. It is poor soil that is the main reason for failures among violet lovers. Experienced violet growers prepare soil from a mixture of turf, coniferous, and deciduous soils with the addition of sand, peat, moss, perlite, vermiculite, etc., mixing these components in different proportions and combinations. Everyone here has their own secrets, but you don’t have to know them. It is important to understand several requirements that the soil for Saintpaulia must meet.
The soil should be loose, breathable, contain enough nutrients, and be close to slightly acidic in terms of pH (acidity). The soil should not become compacted over time, losing air permeability, since the root system needs air no less than moisture.
In dense, overly nutritious soil, the violet roots will first rot, and then the trunk. The larger the container used, the faster you will flood the violet in such soil and destroy it.
The best and easiest way to ensure a loose soil structure is to use cut sphagnum moss. Its share in the soil for adult Saintpaulia is about 30%. Along with moss, you need to use other cultivators such as perlite and vermiculite, about 30%. The remaining 30% of the mixture should be soil containing mainly peat, 10% can be nutritious turf and deciduous soil.
There are so many soil compositions that it makes no sense to list them all. Each collector comes to his own composition.
You can only take as a basis the percentage ratio of 1. Rippers, 2. Moss-Sphagnum 3. Soil containing mainly peat. Each of the components can be taken in approximately equal shares, 30%. 4. Nutrient soil - approximately 10% Moss-Sphagnum can be replaced with Coconut fiber, sold in briquettes. Coconut fiber has optimal acidity for violets and does not acidify the soil.
Sphagnum moss will increase the acidity of the soil and it is advisable to reduce it by adding dolomite flour. Perlite and Vermiculite are ideal as rippers for violet soil. Using sand as a loosening agent will do more harm than good - the sand settles in the lower part of the earthen clod, compacts it and prevents the flow of air to the roots. I do not recommend using sand.
The structure of the soil will remain loose and porous for a long time; if the main part of the soil is peat soil, the best properties are found in coarsely fibrous brown peat. However, peat, as a product of the decomposition of sphagnum moss, is characterized by the same high acidity and low nutrient content. In addition, peat is poorly wetted by water, so peat-based soil is very difficult to wet if the earthen clod is very dry.
It is not recommended to take soil from flower beds, garden beds, greenhouses and greenhouses for planting Saintpaulias. Such “land” is usually infected with many pathogenic bacteria, fungi and viruses, as well as pests such as nematodes. Soil for violets must be prepared in the forest, away from the city. The best time for this is late autumn, before snow, when there are no mosquitoes or ticks. And even such soil is recommended to be steamed or calcined before use. This is the only protection against the most dangerous pest - nematodes. The easiest way to carry out heat treatment is in a microwave oven. It is enough to heat for 5-10 minutes in a lidded container (the time depends on the amount of soil being heated) at maximum mode until a characteristic unpleasant odor appears. In the same container, without opening it, let the soil cool to room temperature, after which it is ready for use. The same sterilization of soil can be carried out in an electric oven. Don’t listen to all-knowing grandmothers - specialists who giggle at such advice on heat treatment. Spend 5 - 10 minutes on this, otherwise there is a high probability that one fine day you will not even understand why your violet died.
To prevent toxicosis and root fungal rot after steaming, it is useful to add some effective biofungicide to the prepared soil - for example, trichodermin or phytosporin. Before pouring any fertilizer into a pot with an expensive violet, understand its composition and decide whether your Saintpaulia needs it at all. If you are not confident in your knowledge, it is better to put the “elixir” aside. There are no miracle fertilizers that will instantly make violets smell fragrant and bloom in huge bouquets. Basically, it all depends on your daily violet care and your knowledge about this plant. If you grow Saintpaulia in poor-quality soil, ignoring the simple tips outlined above, no fertilizer will help you. With good soil composition, regular replanting and careful care, your violet will only benefit from careful fertilizing with phosphorus fertilizer during the flowering period. For this purpose, liquid mineral fertilizer “ETISSO” with a red cap, for flowering plants, is best suited. When watering, its concentration should be reduced by 2 times from that recommended according to the instructions.
You cannot use commercially available soil “Garden of Miracles” for growing violets. Saintpaulia" in a beautiful package with the inscription "Completely ready to eat." It can only be used as a fertilizer, and it is better not to do that either. Other store-bought soils, although not as destructive as Saintpaulia, also do not meet the requirements for soil for violets in terms of looseness and breathability, and without sphagnum moss or coconut briquettes, their use will only bring grief and disappointment.
Soils that deserve attention are GREENWORLD and PLANTAFLOR, produced in the Baltics.
An example of the composition of soil for violets:
Soil GREENWORLD or PLANTAFLOR – 30% Perlite and Vermiculite – 30% Moss-Sphagnum or Coconut Fiber – 30% Nutrient soil – 10%
Watering violets.
You need to water violets carefully, without flooding the leaves and growing point. If you decide to do this simply from a bottle, it is better to grow Tradescantia. A violet will not live long from such “watering”. For watering, a small syringe with a long, thin tip is best. Pour water in a thin stream into the edge of the pot, without eroding the soil. You can use bottom watering by immersing the pot about a third in a container of water. This impregnation is best used when the earthen coma is too dry or the soil has poor wettability. Each of these irrigation methods has its own advantages and disadvantages. When watering from above, there is a danger that part of the earthen lump remains dry, although water comes out of the pot into the pan. In addition, when watering from above, you gradually wash away nutrients from the soil.
Watering from below, from a pan, until moisture appears on the surface due to the capillary effect guarantees good saturation of the soil with moisture, but constant such watering leads to the accumulation of harmful salts in the soil and undesirable alkalization of the soil. Therefore, it is wise to alternate watering from above and below. You can use tap water for irrigation that has been left standing for a couple of days. When watering, the water should be slightly warmer than room temperature. After watering, do not place the violet in a cool place. How often to water Saintpaulia? There is no “schedule” to follow. The frequency of watering depends on many factors: air humidity, soil composition, size of the pot, etc. It is necessary to water only after the surface of the soil has dried. Too frequent and diligent watering will lead to acidification of the soil, to rotting first of the roots and then of the Saintpaulia trunk. The root system needs air no less than moisture. For fear of flooding the violet, there is no need to go to the other extreme; do not keep Saintpaulia on a water “diet”, slightly moistening the soil surface. The entire lump should be spilled until water appears in the pan. Half an hour after watering, the water from the pan should be drained.
If for some reason you did not water the violet on time, and its leaves drooped and lost their elasticity, begin “reanimation”. First, soak the earthen ball with water using the immersion method, and then place the plant for a day in an “aquarium” of two cake lids, as described above. Such “reanimation” will restore the elasticity of the leaves and save the plant from death. In the same “aquarium” with high air humidity, you can root in sphagnum moss or in ready-made soil stepsons, “babies” without roots, separated from the leaf, the tops of aged violets cut off to “rejuvenate” them.
Conditions of detention. Temperature.
The favorable temperature for Uzambara violet is about 20*C. Acceptable temperatures range from +17*C to +24*C. At this temperature, Saintpaulia grows and blooms normally. At temperatures below 13*C, the violet will die; it will not be able to withstand temperatures above 30*C for long. Cool conditions at 15*C - 17*C will slow down the growth of rosettes, but will form them more compact, the flowers will have richer tones, and the varietal characteristics of the colors will be better revealed: edgings, strokes and “fantasy” spots. At a temperature of about 24*C, Saintpaulia rosettes will grow faster, become spreading, and bloom faster, but the edges and edges of the flowers may disappear. For example, Saintpaulia Emergency at 17*C will bloom with dark red flowers with a spectacular wide white fringe, and at 25*C the white border will be barely noticeable or disappear completely. Therefore, higher temperatures are favorable for young growing “babies”, while cooler conditions are preferable for mature mature Saintpaulias.
Air humidity. Lighting.
The air humidity favorable for violets is about 60% - 70%. In winter, with central heating running, dry air becomes a problem, so keep violets away from radiators and humidify the air around the plants, but do not spray water on the crowns of violets.
Almost the only effective way to really increase the humidity under violets. This means placing trays filled with small expanded clay under the pots. Only fill half of the tray with water. In this case, the area of moisture evaporation from the surface of wet expanded clay increases several times compared to just the surface of the water under the violets.
Do not place Saintpaulias on cold window sills and under open windows in winter, and in direct sun in summer. Violets benefit from not too bright diffused light from eastern and western windows in summer and bright light from southern windows in winter. To bloom, violets need 12 hours of good light and 6 hours of complete darkness, when the hormones necessary for flowers are produced.
Saintpaulias with dark and variegated leaves require more intense lighting than plants with light leaves. In addition, there are features of the perception of light by violets of different varieties. If you are growing Saintpaulias on a windowsill, the intensity of the light depends on the orientation of your windows. In summer, violets prefer western or eastern windows; on northern window sills, variegated varieties and violets with dark green leaves will experience a lack of light. From March to September, southern windows should be shaded from sunlight, but in winter, it is southern windows, illuminated by the winter sun, that are most suitable for violets. In summer, Saintpaulias should be protected from the sun in any window orientation. That is, growing Saintpaulias on a windowsill creates many problems - they must be constantly rotated, eliminating the tilt of the rosette; In winter, a violet on a windowsill can instantly die in a draft or under an open window. In addition, in winter the duration of daylight is significantly less than the 12 hours required for Saintpaulia. Therefore, violets grown on a windowsill will bloom well twice a year - from March to May and from September to October; in the summer heat, violets bloom reluctantly, despite sufficient lighting.
Many problems disappear when growing Saintpaulia under artificial lighting with special fluorescent phyto-lamps; it is permissible to use ordinary fluorescent lamps such as LB-40. But the best lamps are OSRAM FLUORA and lamps with three and five-band phosphors. Three-band phosphor are lamps with indexes from 827 to 865. Five-band phosphor are lamps with indexes from 927 to 965. The distance from the lamp to the leaves of the socket should be about 15 cm. What will correspond to the distance between the shelves: For children and cuttings - 28-30 cm For small starters – 32-35 cm For starters – 38 cm. For adult violets – 40-42 cm.
Practice has shown that the 25–30 cm recommended in authoritative “violet” literature leads to under-lighting and, as a consequence, to poor growth and flowering. One LB-40 lamp is enough to illuminate a shelf up to 30-40 cm wide.
If there is not enough light for the violet, large leaves raised up on long cuttings will grow near the rosette. In case of excessive illumination, the rosette will form flat, with leaves on short stalks. Young leaves at the top will rest against each other and warp, and the flower stalks will be short. When flower stalks appear, it is better to move violets with bright pink and red flowers to a window; in natural light, these color tones will be much brighter than in artificial light.
Propagation of Saintpaulias.
Usually the violet remains decorative and blooms well for about two years. Later, if grown incorrectly, it turns into a poorly flowering “palm tree” with a bare trunk. Therefore, in order not to lose the variety, the violet must be “rejuvenated” in time or grown again from a leaf cutting or stepson. If during the next transplant it turns out that the roots of the violet are rotten and blackened, or the exposed trunk is too large, it would be most reasonable to “rejuvenate” your Saintpaulia. To do this, cut off the leaves near the trunk, starting from the lower ones, so that there are no remnants of cuttings. Leave only the top three tiers of the outlet. Then cut off this remaining top from the trunk so that 1 - 2 cm of the trunk remains under the lower cuttings. Your task is to grow new roots on this part of the trunk.
To do this, prepare not too wet loose soil, into which the rooted rosette is buried to the level of the cuttings of the lower leaves. The container for rooting should not be too large; the optimal volume is about 0.2 liters. The rooted rosette is placed for 3-4 weeks in greenhouse conditions of high humidity or under a plastic bag.
Particularly valuable varieties can be rooted in a small container with finely chopped sphagnum moss, saturated with settled water. Place the container with the rooted rosette in a greenhouse with high humidity or under a bag. After about a month, the violet can be planted in regular loose soil.
Stepchildren emerging from the leaf axil in place of flower stalks should be removed, preventing the rosette from becoming overgrown. The violet should grow into one trunk, with one growing point. As an exception, you can let the stepson grow, then separate it, grow roots in sphagnum moss and get a new young plant. Violets are usually propagated by leaf cuttings. Leaves from the lower tier are not suitable for propagation. Select a leaf that is not very large, with a shape and color characteristic of this variety. If you are propagating variegated Saintpaulia, choose a leaf with the maximum chlorophyll content, i.e. most green. Using a sharp blade, make an oblique cut from the cutting, holding it face up. The length of the remaining cutting should be about 2 cm. This leaf is placed in a vessel with water so that the leaf does not rest on the cutting. The water must be well settled, boiled or distilled. As it evaporates, water must be added. Place the container with the leaf in a bright place. After about 3 weeks, the leaves will grow roots and can be planted in the ground. Planting depth is about 10 mm. To prevent the leaf from falling when watering, plant it at an angle, supported by the wall of the container, or secure it with rods stuck into the ground. Planting too deep and too dense, nutritious soil will make it difficult for the “babies” to germinate, and most likely they will rot before reaching the surface.
Practice has shown that the quality and quantity of leaf “offspring” largely depend on the quality of the soil. It should be loose, breathable, i.e. 3/4 consist of finely chopped sphagnum moss. Place the planted leaf under a fluorescent lamp so that there is about 10 cm from it to the leaf. In about a month or two (depending on the variety and strength of the leaf), “offspring” will appear. Take your time, wait until the “babies” have two or three pairs of leaves. This will take about 2 more months. “Children” of variegated varieties are not separated from the leaf until the number of green areas sufficient for photosynthesis appears on the young leaves, otherwise the baby will die. Remove the grown “offspring” from the soil along with the leaf and carefully separate the “babies” from the leaf, trying to preserve as many roots as possible. Place each “baby” with roots in a separate bowl and water. (For dishes and soil, see sheet No. 1). If the “baby” does not have roots, they can be grown in sphagnum moss or in loose soil in a greenhouse with high humidity.
To grow violets with a “fantasy” flower color, you need to save all the “babies” grown from the leaf, grow them to the first flowering and leave those that have repeated the varietal “fantasy” color. Some of the rosettes will bloom with monochromatic flowers; it is better to give them to friends or throw them away. If you have an adult “fantasy” violet or chimera violet, they can be propagated by pinching. To do this, carefully cut out the top with the top 2-3 rows of leaves and root it in sphagnum moss. Moss can be replaced with Perlite. In place of the cut top, several stepsons will grow, which will repeat the color of the mother violet. All that remains is to carefully separate them and grow roots in sphagnum moss.
In addition to the stepchildren, promptly remove flower stalks of faded flowers, yellowing and rotting lower leaves, while trying not to leave remnants of cuttings of removed leaves on the trunk.
Do not be upset if the first long-awaited flowers on your violet turn out to be small and inconspicuous, and the flower stalks are weak. Wait until the outlet has enough power. In order not to be upset in vain, it is better to remove the first flower stalks, preserving the strength for growth of the young Saintpaulia. The real flowering, corresponding to the variety, will be no earlier than the second one for a violet that is more than a year old.
Growing Saintpaulias is a rather labor-intensive task that requires constant attention and patience. To prevent your window sills from being filled with unsightly, rarely flowering plants that do not bring joy, take the simple practical tips outlined above seriously and additionally study the available literature.
And you will succeed.
Conditions for keeping violets
Indoor violets are heat-loving flowers; in order for them to bloom magnificently and delight with their beauty, certain conditions must be observed.
Location
Violets do not like drafts and direct sunlight. Flowers feel great on windows with diffused sunlight during the day, for example on the east side.
Temperature
For good growth of violets, a temperature of about 24°C in summer and slightly lower in winter is suitable. If the temperature is always below 16-18°C, the plants will not bloom.
Humidity
High air humidity is favorable for violets, but moisture on the leaves and flowers is harmful. Violets are not sprayed and Saintpaulias are watered very carefully.
The soil
Violets prefer loose, breathable soil with low acidity. It may include coniferous soil, leaf soil, a little peat and sand. The easiest option is to choose a ready-made mixture for violets. In this case, fertilizers will not be needed soon.
Pot
From the point of view of aesthetics and the shape of the root system, violets or Saintpaulias should choose low and wide containers. The plant looks harmonious in them, and care in such containers is not difficult.
Botanical description
Iris is a very beautiful flower, exquisitely elegant and at the same time quite bright. There are many varieties of it. But in medicine and cooking, the most widespread is the marsh iris, which is a herbaceous perennial. In the wild it can reach a height of 80 cm.
From a botanical point of view, iris is a relative of one of the most expensive spices - saffron.
The stems of this plant are flattened; from certain angles they may even appear flat. At the same time, they branch slightly, and many flowers with blue or purple petals appear on them (up to 15 pieces on one plant).
The rhizome is considered a raw material for cooking and traditional medicine. In the marsh iris, it is very powerful, branched, its diameter can be up to 2 cm. At the same time, when cut, the rhizome darkens very quickly, which is explained by its chemical composition. In the old days, this property was used by tanners - they used orris root to dye their materials. It is curious that from an evolutionary point of view, the rhizome is a modified stem - this is confirmed by the fact that it has an apical growth point.
Iris is a genus of plants that has more than 800 species. In Russia, the most common is the marsh iris. It is found almost throughout the entire territory of Russia, except perhaps the northernmost regions.
The leaves of the marsh iris are wide, large, and can reach 2 m in height. In appearance, they resemble the leaves of the marsh calamus. But their shade can be different, not only green, but also bluish.
In most regions, marsh iris blooms in early summer, but in some it blooms in July. Iris flowers with their purple veins and orange spot located in the middle are known to many. But not everyone saw the fruit. In fact, it is a triangular capsule containing large shiny seeds. These fruits appear in August.
How to care for violets at home
Caring for violets will not be a hassle; you just need to take into account the peculiarities of watering the plants.
Methods of watering violets
Violets are harmed by moisture on green leaves and flowers, so the methods of watering these plants differ from the usual methods.
Watering through a tray
Clean water is poured into the pan. Through the hole, moisture passes into the ground, and the violet receives the required volume of liquid. If desired, fertilizers are added to the water.
Drip irrigation
For compact indoor violets, drip watering can be used. To do this, use a syringe. The narrow nose of the syringe is brought directly to the soil with the plant, without touching the green leaves and flowers of Saintpaulia, and without eroding the roots of the violet.
Immersion method
For this method, take a container wider than the pot and fill it with water. The container with the plant is immersed in a container. After 15-20 minutes, the flower can be put back in place and the remaining water can be poured out.
Wick watering
Wick watering is convenient for violets when you need to go away and leave the plants alone for a while. Organizing this procedure is not at all difficult. A wick - natural or nylon rope - is placed in the drainage holes. The other part of the Saintpaulia remains outside and is immersed in a container of water, on which the container is placed above.
Top dressing
Throughout the season, violets are fertilized with nitrogen-containing fertilizers, 3-4 times is enough. To maintain and increase the number of flowers, phosphorus-potassium fertilizers in dry or liquid form are added to the fertilizing.
Trimming
Trim off wilted, yellow, diseased violet leaves with signs of rot. Pruning is also carried out in order to reduce the number of leaves and achieve flowering faster. For pruning, use a disinfected sharp knife. It is recommended to cut as close to the violet stem as possible, and treat the cut area with charcoal. Pruning in combination with fertilizers enhances flowering.
Important. If the Saintpaulia stem is too bare, you need to add soil.
Hygiene
The velvety leaves of violets do not react well to water, but they still need to be cleaned of dust and soil. To do this, use a soft brush, using it like a broom, the main thing is to carefully sweep away everything unnecessary from the plant’s rosette. After flowering, it is better to remove the flower stalks.
Wintering
Plants overwinter in the apartment, but not on the balcony. The favorable temperature range for violets is 18-24°C. If the flowers are on the windowsill, you need to make sure that the heat from the heating devices and the cold from the window do not mix next to the violets. It would be ideal to place the shelving close to the window, but not in a draft or at the temperature limit.
Florentine iris
Iris Florentine is a bearded hybrid, which received a telling name because of the brightly colored decorative hairs located at the base of the outer petals. These plants are characterized by very tall branched peduncles (up to 0.7 m), producing up to 5-7 flowers - white with sky-blue transitions or yellow, unusually elegant and decorative. It has Florentine iris and a pleasant aroma. The leaves of the crop are bluish, large, sword-shaped. The plant has been cultivated in Mediterranean countries since the 15th century. In temperate Russian latitudes, the Florentine iris requires shelter for the winter, since it is characterized by low frost resistance.
A feature of the culture is exclusively vegetative propagation, since it does not produce seeds. Flowering begins at the end of May and can continue throughout June.
A striking representative of this species is Elbrus diamond - a tall variety with a bright aroma of large white flowers with an orange core.
The listed irises (varieties with photos and names), although they belong to medicinal species, are still more often used for decorative purposes. Despite their short flowering, these plants are distinguished by their excellent decorative leaves and do not lose them until the cold weather.
Transplanting violets at home
For this, two methods are used: the transshipment method and soil replacement.
Transplantation by transshipment method
This method is used for specimens with an overgrown root system. The soil is well moistened. Prepare a larger container with drainage and a small amount of soil. The violet is removed from its previous place along with the earthen lump and the rosette is carefully placed in the new place, soil in the upper tier is added, and watered. Fertilizers can be used after a couple of weeks or at the beginning of flowering.
Replanting with soil replacement
The method is similar to the previous one, but the main difference is that the earthen ball is not stored on the roots of the plant. If possible, carefully untangle the soil and roots of the violet, shake off the remaining soil and transfer the plant as a whole rosette to a new place with new soil.
Replanting sockets
It is necessary to separate the sockets from each other very carefully so as not to damage the root system. Each specimen should still have good roots and several pairs of leaves. The top of the plant should match the bottom. These proportions must be observed. If there are too many leaves, they need to be removed. This will help the plant to better take root in new conditions and quickly adapt. It is better to replant young rosettes into small pots. They should not be too deep or high. Good drainage is very important. In the first days, you can make a small greenhouse from a bag or glass jar. Young violets should be regularly ventilated and watered. Other breeding methods, more complex, are available only to experienced gardeners. Therefore, you should choose propagation by leaf or division of the bush. This is the best option used by many gardeners.
Pests and diseases of violets
Violets are attacked by many pests: various mites, aphids, mealybugs, whiteflies, springtails and others. Delicate violets are also susceptible to many diseases. Some of them are: powdery mildew, rust, root and stem rot. Diseases that are fungal in nature are more difficult to defeat.
Prevention of violet diseases can include sterilization of the soil, compliance with maintenance conditions, not reusing soil from other plants, regular fertilization and flowering control. For any signs of disease on the leaves or petals, medications are selected. You can apply them under the roots or on the leaves of the violet.
The use of orris root in folk medicine and perfumery
The rhizome of the plant, due to its rich chemical composition, is widely used in both folk and official medicine. In particular, science has proven its anti-inflammatory properties - they are the result of a high content of flavonoids. Substances from this group are recommended to be taken in order to normalize the condition of blood vessels, strengthen capillaries and thereby stabilize blood pressure and the functioning of the heart muscle.
The spices included in the substance are also antispasmodics; they can have a beneficial effect on almost all internal organs - of course, if there is no overdose.
Orris root is also used in the production of perfume. But in the old days, a love potion was made with its addition. It was believed that it was enough to simply dip a finger in the powder from the root and then touch the object of passion with it in order to evoke a reciprocal feeling.
Although orris root does not contain harmful substances, it should be eaten with caution as it can cause a severe allergic reaction. In addition, it is contraindicated for those who have problems with blood clotting. Therefore, it is advisable to consult your doctor before using preparations from any part of the plant.