When an orchid shoot is discovered, it is real luck, since exotic plants are very demanding to care for and are not always ready for reproduction. To avoid making mistakes with transplantation, the florist will be helped by knowledge about the places of origin and the rules for separating buds. You have to act with scrupulous caution so as not to destroy the flower.
Where and when do shoots appear?
The appearance of shoots, with the help of which flowers reproduce, occurs in different areas. In this case, the formation of buds can be stimulated:
- partial removal of the faded peduncle, leaving a 2 cm stem;
- providing lighting for 14 hours;
- high temperature conditions (up to +25 degrees);
- reducing watering (once a week)
- use of hormonal drugs.
After flowering, children are able to independently form in the area:
- peduncle;
- stem;
- roots.
To separate the buds from the mother stem, their readiness for further growth and development is determined.
Long formation process
If a florist discovers that an orchid has sprouted a shoot on its stem, he can not touch it for six months, but only observe the changes. During this period, a couple of leaves and roots will grow. It is necessary to allow them to fully form; you should not interfere with biological processes again, since moderation is important in everything.
A shoot with small roots is not removed; they wait until it grows to 3 cm. Too long ones will also not bring any benefit. First of all, they are difficult to separate, and careless actions can harm the root system.
But the children should not be on the trunk for more than 6 months; they will begin to deplete the mother plant. With independent growth, the shoot will gain strength and will fully develop.
It can be difficult to decide what to do correctly if the green mass has become lush, up to 4 leaves have blossomed on the shoot, but no roots have appeared. This requires surgical intervention with cutting off the shoots and separate rooting. To do this, the removed part is placed in a bowl filled with water or covered with moistened moss.
It is not recommended to touch the basal processes, which do not have their own roots, and the nutrition comes from the mother’s body. In this case, two orchids are allowed to grow in one place; the young shoot should not be separated. Over time, the main orchid will dry out and a new flower will take its place.
Is it worth keeping it on the mother flower for a long time?
In most cases, the period for complete development of a shoot on an orchid takes about six months, and it can be either less or a little longer. During this time, leaves and roots appear on the baby, and it gains strength for independent life in a separate pot.
Namely, because for each child the timing is individual, then in order to know when it can be separated from the mother plant, you need to focus on its size: as soon as the roots in the amount of 2 - 3 pieces reach a length of 5 - 6 cm, or when they appear 4 – 5 leaves, can be transplanted into the substrate. Read about why baby orchids may lack roots and how to grow them here.
How to create greenhouse conditions
If the result is successful with the root and leaves, it is necessary to plant the orchid shoot in a pot, where it will survive a period of adaptation. At this time, greenhouse conditions are created for the flower. Activities consist of actions:
- choosing a small transparent pot;
- preparing a loose, light substrate;
- laying drainage on the bottom of the dishes;
- placement in a darkened room;
- compliance with the irrigation regime with nitrogen fertilizers.
The temperature in the room should be consistently warm (+25 degrees), without sudden changes, with humidity within 70%.
Orchid propagation methods
Is it possible to propagate an orchid at home? Certainly. In indoor potted and greenhouse culture, orchids, as a rule, reproduce:
- vegetative way;
- child shoots;
- by dividing the pseudobulbs.
Seed propagation is also possible , but it requires specific conditions, knowledge and precise actions and is more suitable for nurseries where professionals grow orchids on an industrial scale for sale.
How to disconnect baby
To separate the shoots you need to prepare:
- pruner;
- knife;
- scissors.
One of the sterile instruments will be enough. Disinfection should not be ignored, as infection will lead to rotting, bacterial damage to the sprout and death of the flower. If you wipe a knife with alcohol, it will not cause any harm. When the baby is ready, make a cut at the place where it is separated, and you also need to capture a small area of the mother plant. After drying for half an hour, the cut is processed. Why is activated carbon or cinnamon ground?
How to remove an orchid shoot from a stem
The baby feeds on the mother plant. Therefore, in order to relieve the load from it, a separation procedure is carried out. Sometimes the children are separated in order to propagate the entire plant , planting both in different pots. We will tell you how to place them correctly later in the article.
Determination of readiness
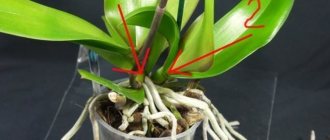
Before dropping off your baby, make sure she is ready for this. Such a shoot has 2 pairs of leaves and 2-3 roots with a length of 5 cm . As usual, the shoot on the peduncle develops to this state in 3-6 months, depending on the conditions of detention and the habit (species) of the mother plant.
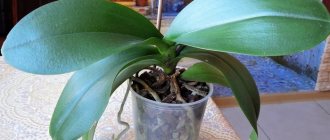
Baby orchid, ready to separate.
Separation and planting in a separate container is carried out when the young plant has acquired the appearance of a miniature orchid , it is healthy and ready for independent existence.
Technology
The procedure is simple. After it has become obvious that the baby is ready, it is carefully separated from the peduncle. The same is done with the shoot that formed below, next to the root system of the queen cell.
When examining the root system, you must remember that it is quite fragile in orchids. Be careful not to cause damage.
Usually, for these reasons, as well as for decorative reasons, such shoots are left on the mother plant. In the future, there is a high probability of getting two plants in one pot and thus doubling the flowering intensity.
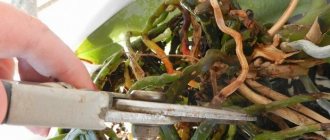
The separation is carried out with a sharp, disinfected instrument: a knife, scalpel or pruning shears. The cut is made in one precise movement. Sawing or working with a blunt instrument is not permitted. Sometimes the baby on the peduncle does not lend itself to careful manipulation; in this case, you can separate it along with a short fragment of the peduncle.
All sections are treated with crushed coal or cinnamon powder , then dried before planting. It is better to dry it in the shade outdoors or on a windowsill if it is summer outside.
Attention! There are times when a baby tries to bloom while still on the peduncle. This cannot be encouraged; the flower stalk on the baby must be removed without fail.
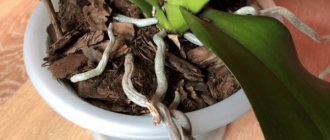
Sometimes the children on flower stalks refuse or are very reluctant to grow their own root system. In this case, you can wrap the base of the young plant with damp sphagnum , securing it with twine or soft wire. The moss should be constantly moist, but not wet, do not let it dry out.
You can stimulate the growth of the roots of children using wet moss.
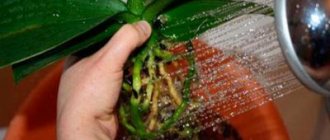
Good results in root growth can be achieved by frequent spraying and any increase in air humidity around the plant. It is best if the humidity is more than 70%.
If, due to carelessness, the baby was separated without roots, then it is necessary to grow them before the plant exhausts the water and energy stored in the leaves. In this case , the technology that is used to resuscitate orchids left without roots is applicable:
- The baby is treated with epin, heteroauxin and placed in a mini-greenhouse on a cushion of damp sphagnum in the top layer and expanded clay in the bottom;
- Bright diffused light is required, the temperature should be 22-26 ° C, humidity more than 70%;
- Feeding can begin when the first roots appear. Frequency: once every 2 weeks. Use a fertilizer with a focus on nitrogen, 1/6 of the concentration indicated on the package. Increase the dosage gradually.
Peculiarities
The separation procedure is essentially identical to pruning branches on other plants, but has its own nuances, depending on where the baby was formed:
- separation from the peduncle. The most common place for the baby to appear is the peduncle. Separating the stocky baby won't be difficult. It is enough to simply cut it along with a short fragment of the peduncle and plant it;
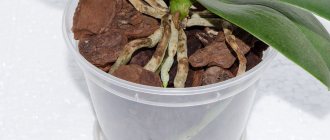
- from the root. The baby appears on the part of the stem where the roots grow and which is located in the substrate. It turns out that in order to separate it, you will have to remove the entire plant from the pot, clean it of the substrate, pick out the roots and separate the shoot. It is not a fact that at this moment the process will be ready for the procedure (it may not have its own roots);
- a shoot from a leaf axil. It is customary to leave the babies that are formed from the stem or leaf axil. The operation of pruning it can cause the death (in almost all cases) of the baby itself, and sometimes of the mother plant.
Transplant Basics
When it’s time to transplant the shoots, they also need to be prepared:
- pre-soak in water with added growth hormone, the wet root will not break and is more difficult to injure;
- prepare a pot with fine screenings at the bottom;
- place the sprout in the middle of the container;
- carefully cover with the substrate without compacting the earth.
The soil is sold in stores, and you can also prepare it yourself. You can collect soil from a flower bed and add humus from tree leaves.
Basic care rules
Simply planting an orchid shoot from the stem is not enough; to root the sprout, you need to provide it with good care, then in a few years it will begin to delight you with its flowering.
One rule applies here - moderation, you cannot be overzealous:
- Lighting is only diffused. In winter, artificial lighting is used because the days are short. In summer, the room is darkened with curtains and direct sunlight is excluded to avoid burns.
- The temperature in the room is kept at room temperature from +16 to + 25 degrees, do not forget about air ventilation.
- Flowers are placed on window sills on the south side, but away from radiators, if the house is heated using this method.
- After jigging, watering is organized after 3 days. At first, adding mineral fertilizers and growth stimulants will speed up rooting. Water only when the substrate is completely dry. You cannot create favorable soil for rotting by stagnating water in a pot.
You will have to carefully care for the young orchid for a whole year, after which they switch to the usual regime for maintaining adult flowers.
When is it better to choose this breeding method?
This propagation option is used if one or more children appear on the peduncle instead of a bud (they can be located either in the middle of the peduncle or at its base).
Before planting a shoot as an independent plant, you need to wait until it has at least three leaves no less than 5 cm long. This process can be accelerated by creating optimal growing conditions for the orchid.
Most often, the baby appears precisely at the base of the rhizome.
In this case, separating it from an adult plant will be more problematic, since there is a risk of damage to the root system. Therefore, it is important to carry out the procedure as carefully as possible. When the shoot is separated correctly, it quickly takes root and grows.