Step-by-step instructions: how to carry out the procedure correctly?
It is advisable to prune dead roots when your flower has already bloomed and is at rest.
But there are times when replanting a plant and pruning putrefactive formations is urgently necessary. Then you have to choose between blooming and saving the flower. So, you've decided to trim. If the orchid is in bloom, then first of all you need to remove the peduncle. Alas! Beautiful flowers will have to be sacrificed.
This must be done so that the flower’s forces are switched to the creation and growth of a new healthy root system.
Preparing tools
To remove infected and dry roots, you need to prepare the following tools and devices:
- Knife (scissors, pruning shears).
They must be well sharpened so that unnecessary roots are removed in one motion. It is not advisable to use nail scissors for this procedure. They are too small and can cause irreparable harm to the plant. - Antiseptic for disinfecting instruments. In the absence of such, burning the instrument with fire is allowed.
- Medical rubber gloves. They are necessary not only to protect your hands, but also to prevent substances on the skin of your hands that are unnecessary for the plant from getting onto the cut plant.
- Powdered activated carbon (if unavailable, can be replaced with charcoal). It will protect fresh cuts from drying out and infections.
- Oilcloth and a new pot (if the old pot is the right size for your orchid, you can use it after treating it with an antiseptic).
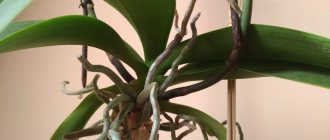
Search for roots
First you need to carefully remove the orchid from the pot, being careful not to damage the root system. This is easiest to do when the soil is dry. Then shake off the roots from the soil
If that doesn’t work, carefully untangle the roots with your hands and remove excess substrate. Let's move on to inspecting the root system. Rotten roots can be seen immediately, they acquire a peculiar brownish color and are distinguished by excessive moisture. We check dried roots with water to see if they are capable of further vital activity
If not, feel free to classify them as circumcised.
So, we have identified the roots that need to be removed.
Process
- Cover the table with oilcloth.
- Wear rubber gloves.
- Treat instruments with an antiseptic.
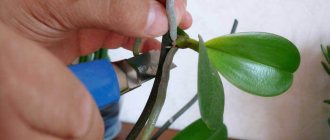
- Cut off damaged roots with a knife:
- If the rot is located only in the lower part of the root, only the affected area needs to be cut off.
- If the root has rotted at the base of the flower, it is cut off completely.
- Treat the sections with an antiseptic.
How to treat the damaged area?
A cut for a plant is like a wound for a person. Through it, the flower can become infected. Therefore, processing the cut is a mandatory procedure when cutting roots. There are several ways to process slices:
- Crush the activated carbon tablet into powder and sprinkle on the cut area.
- You can do the same with charcoal.
- A good anti-rot agent is sphagnum moss. It must be crushed and applied to the cut site.
- Manganese solution. Process the cut area.
- Zelenka. Process the cut area.
- Ground cinnamon is an excellent fungicidal agent for treating orchid cuttings.
Do not treat cut areas on orchid roots with vodka or alcohol. They can dry out healthy roots.
After the cut areas of the orchid have been treated, a vitamin compress can be applied to the exotic roots. To do this, dilute 1 ampoule of vitamins B12, B1, B6 in 1 liter of water. Place the roots of the flower in this solution and keep them there for 10-15 minutes.
Rules for pruning and processing orchid sections
In order for the pruning procedure to be successful and cause minimal harm to the orchid, you must adhere to a number of rules:
- do not trim the orchid unless clearly necessary;
- Pruning flower shoots should only be done when the flower stalks are dry;
- trim parts damaged by infections to healthy tissue;
- carry out pruning with a sharp sterile instrument in one movement;
- Process the cut immediately after trimming.
The whole procedure step by step is as follows:
| Stage | Performance |
| Tool preparation | Scissors, a garden knife or pruning shears are washed in soapy water, wiped with alcohol or a strong solution of potassium permanganate and dried. |
| Preparing the plant | If necessary, the orchid is removed from the pot and freed from the substrate, inspected, washed and dried so that there are no drops of water on it. |
| Trimming and processing | The targeted areas are cut off very quickly. Small sections are cauterized with brilliant green or another chosen product. Large sections are treated with brilliant green along the edges, the rest is wiped with a cotton swab dipped in any disinfectant solution. Next, a large cut is powdered with crushed activated carbon. |
After trimming and processing the cut, the orchid is left without watering for about 10-14 days. This drying helps to avoid rotting of the wound surface.
Pruning rotten parts of the plant to living tissue is necessary to completely remove all areas populated by microorganisms. Only in this case is there a chance that the infection will stop spreading.
Reason 2: inappropriate pot volume
If there is no replanting for a long time, another problem may arise - the orchid simply outgrows its pot. Moreover, the better conditions the plants are kept in, the faster this process occurs.
Determining that the roots have become too crowded in the pot is quite simple:
- through the walls of the container it is noticeable that the roots have completely mastered the volume and are interfering with each other;
- individual roots began to grow through the drainage holes;
- the plant appears “lifted” because the growing root system pushes it out of the pot.
An orchid that has outgrown its pot is easy to recognize - it falls on its side, and if the container is too light, it may even turn over.
Is it possible to trim the roots of an orchid - tips for novice florists
Features of the root system
Orchids belong to the group of epiphytes - plants attached to other plants. The orchid receives absolutely no nutrients from its “host” - the phorophyte. As a result, the flower cannot be considered a parasite, because it receives all useful elements through the roots.
The root system of epiphytes is located both in the soil and on its surface
Belonging to epiphytes also determines the unusualness of the root system, which is located both in the soil and on its surface. The number of roots depends on the nutritional value of the substrate. When the soil is poor in useful microelements, the amount of root fibers increases significantly.
Video “Transplanting and pruning orchid roots”
This video explains how to trim root shoots when replanting a tropical flower.
Orchid roots are covered with a thick layer of velamen
Underground
Taking into account the opinion of professional flower growers, orchid roots cannot be classified into underground and aerial, since they are all located on the surface of the ground. However, underground roots are conventionally called those roots that do not extend beyond the boundaries of the pot. Their main function is considered to be nutrition and fixation of the plant on the so-called host.
The main procedures for caring for underground roots are watering and fertilizing. After watering, it is recommended to dry the soil so that excess moisture does not stagnate in the soil. In addition, the old substrate must be replaced with a new one from time to time, and the grown plant should be transplanted into a more spacious pot.
By air
This type of root system does not penetrate into the soil. Its main function is considered to be the absorption of rain moisture and air. Beginning gardeners are often interested in whether it is possible to cut off those roots that have crawled outside the pot. The fact is that the formation of aerial roots is a completely normal phenomenon for many tropical plants, which include orchids. Considering this fact and the functions that above-ground roots perform, the logical answer suggests itself: no, there is no need to trim them.
But what to do if the roots grow rapidly upward and disrupt the aesthetic appearance of the plant? In this case, you should pay attention to the level of air humidity and watering. Active formation of aerial roots is often associated with moisture deficiency, so it makes sense to increase the amount of liquid consumed by the flower. In addition, the cause of excessive root formation may be waterlogging of the soil.
Be that as it may, before you start pruning the roots, you should understand the reasons for their active growth.
Aerial roots absorb moisture and air
Parched
The roots become dry due to the following actions:
- Insufficient and irregular watering. This most often happens in the summer, when there is dry air and rapid evaporation of moisture from the soil surface.
- Hard water. Heavy metals contained in ordinary tap water have a detrimental effect on the condition of the root system. As a result, the roots dry out and die.
- Chemical fertilizers. A high concentration of synthetic components in fertilizers often causes the death of roots.
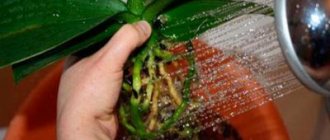
But you shouldn’t immediately cut off the dry roots, because they can still be restored. To do this, you need to give the orchid’s root system baths of soft and warm water. It is fundamentally important to follow the watering regime. As a rule, after such procedures the plant comes to its senses quite quickly.
How to distinguish dead roots from living ones
In order to determine which roots are alive and which have already died, you need to collect a small container of boiled water. The roots should be immersed in it for several hours. After this time, it is necessary to observe the color of the fibers. If the previous green tint returns, it means they are alive.
If the roots remain gray, it is recommended to cut them off, since they cannot be revived.
Rotten and insect-damaged roots must be removed
Step-by-step pruning instructions
Pruning is a responsible process for a gardener who wants to grow a healthy plant. In this case, it is important to know which flower fragments must be removed and which can still be restored.
Preparing tools
To perform pruning you will need the following tool:
- pruning shears or sharp garden shears;
- antiseptic;
- charcoal for disinfecting the cut area.
Before starting the procedure, it is necessary to treat the entire instrument with alcohol or any other antiseptic. This stage cannot be neglected, because after pruning the plant becomes especially susceptible to pathogenic bacteria and putrefactive processes.
Inspecting the flower and removing the damaged part
Now is the time to start examining the orchid. It should be remembered that the following fragments of spines must be removed:
- with gray or dark spots that indicate decay;
- dried out;
- soft roots that release a viscous liquid when gently squeezed.
The affected areas must be removed almost to the ground, leaving so-called stumps 1 cm in size. If you treat the procedure negligently and leave the diseased roots untouched, you can only aggravate the situation, because such areas will very quickly infect healthy roots. The first to remove are the accessible fragments of the root system located at the edge.
Post-procedure treatment
After the pruning procedure, it is necessary to treat the cut areas with activated charcoal or charcoal. However, any bactericidal drugs have a similar antiseptic effect. If you neglect this stage, you can start the processes of rotting of the orchid after the first watering.
The consequences of pruning for a plant
Pruning, like replanting, is a shock to the plant. After a correctly performed procedure, your indoor pet will recover quite quickly. A careless attitude to pruning will not only be ineffective, but also dangerous for the orchid. As a result of this, the flower may die.
Why did the orchid roots come out of the pot?
It is also worth taking into account the fact that the procedure for supplying nutrients and moisture to an orchid that is located at home differs from that in natural conditions. Under natural conditions, an orchid receives nutrients only through the root air system
Under natural conditions, an orchid receives nutrients only through the root air system.
It grows where there is practically no soil, and is attached by branches to trees and large plants.
This form of existence is called an epiphyte.
An orchid that is placed in soil mainly receives nutrients and moisture from it.
But still it releases some of the roots to the surface and this is normal.
You can determine how a plant feels by the condition of the roots, because any deviation from the norm is reflected in the roots.
They begin to rot, change color, or dry out.
If the roots are greyish-green in color and do not look healthy (when in good condition they are fleshy and elastic), this means that the plant is under stress.
Healthy shoots are light green.
Pay attention to the density of the roots; if they grow too densely, transplant the flower into a larger pot. Use a special soil substrate for orchids.
Use a special soil substrate for orchids.
The orchid will receive nutrients from this substrate and will not have much need to produce a lot of aerial roots.
What to do?
Look at the condition of the roots, if they are firm and white, it means they are healthy and you don't need to do anything.
What you definitely cannot do is remove aerial roots if they are healthy.
If the roots are dry and dead, they can be cut off, but this must be done very carefully, the tool must be disinfected.
You cannot cut off the healthy part of the root; some kind of virus can get into the open wound.
How to reduce aerial roots?
The appearance of a large number of roots can be influenced by the conditions in which the orchid is kept.
Lack of space
If an orchid becomes crowded in a pot, it will move its roots outward, in search of a new place.
In this case, you need to transplant the plant into a larger pot.
To allow the roots to receive more light, plant them in a transparent pot.
Overwatering
If a flower is flooded with water, its roots will begin to rot and aerial roots will begin to form, just to survive.
Lack of moisture
If the roots do not have enough water, they will begin to grow outward, because with the help of the roots the orchid receives moisture from the environment.
There may be a lack of moisture not only due to lack of watering, but also due to dry air.
Soil density
Dense soil is not suitable for orchids; it is difficult for roots to develop in it.
Substrate
If the soil is chosen incorrectly, the flower will try to escape from unfavorable conditions.
The substrate should be changed once every 3 years.
Insufficient lighting
Lack of light stops the process of photosynthesis and the roots begin to rot, so the plant is forced to send out the roots to get light.
Planting an orchid
Place a drainage layer at the bottom of the pot - it will prevent the roots from rotting due to stagnant water. Sprinkle a little dried substrate on top and place the orchid on it. Carefully place the aerial roots inside the pot. If there are particularly long ones that do not fit into the flowerpot, there is no need to forcibly bend or break them. Let them remain on the surface. Cover the roots placed in the pot with substrate.
To speed up the process of formation of new roots, place the pot with the plant under a cover to avoid rapid evaporation of moisture and to maintain the same air temperature throughout the day. During the first days, it is enough to wipe the leaves with a damp sponge; there is no need to water yet. In the future, watering should be carried out as usual.
The orchid has yellow roots, what to do? So, orchids with light roots:
White on the outside, hollow on the inside.
A common mistake made by inexperienced flower growers: they think that if the root is light, then it is alive, but if you cut the root, it turns out that it is dry and empty inside.
Is yellow bad?
Sometimes the roots, deeply immersed in the substrate, acquire a yellow or even brown tint. The reasons for this are that the roots are in the dark, in addition, the color of the roots can be affected by substances that the orchid absorbs from the soil. In this case, the dark color of the roots in no way indicates a deterioration in the health of the flower.
How to determine whether orchid roots are dead or alive?
If the root is hard and elastic, this is a sign of its viability.
And vice versa: even if the root looks quite healthy, but when pressed with a finger or nail it is easily pressed, then most likely this root is already dead.
It happens that a generally healthy root has a necrotic area somewhere in one place. Such a root is no longer useful to the plant, since it is not able to fully nourish it, and can even cause harm: the dead area can become a source of infection for the plant stems. Therefore, when examining the roots, be very careful.
It is a mistake to assume that if the upper, green part of the orchid is normal, then everything is fine with the roots. The pathogenic process in the roots does not occur at lightning speed, and if you identify diseased roots in time, you will have time to save the orchid.
Causes of root death in orchids:
- excessive moisture, poor lighting, too dry soil in the heat - that is, a violation of the agrotechnical conditions for growing orchids;
- fungal or bacterial infection of the plant;
- advanced age of the plant.
What to do if you find dead roots on your orchid?
First of all, correct mistakes in caring for the plant. An orchid can only be revived in conditions that are optimally favorable for it. A new root system can only appear from new shoots, in turn, new shoots can only come from green living buds. Our first task is to find these same kidneys.
Choosing the right time
At home, different types of orchids bloom at different times, while there are varieties that bloom several times a year - lasting 2-6 months. The main sign that the orchid has faded is that all the petals have flown off, the peduncle begins to dry out and changes color. You need to watch the plant - sometimes the orchid may bloom again on the same arrow.
Experienced flower growers advise not to remove the peduncle immediately after the last bud has dried up and fallen off, but to wait a little until the arrow is completely dry. It is also worth understanding that if you remove a peduncle that has not completely dried, the orchid will take longer to recover, and accordingly the time of the next flowering will be postponed for an indefinite period.
There is a common belief that the peduncle should be removed only in the fall, since it is at this time that the plant enters a dormant period. But this fact should not be taken as truth - each species has its own characteristics: in one species the peduncle must dry out and fall off on its own, in another it must be pruned as soon as the last flower has faded. Therefore, when purchasing a plant, you need to check with the seller when and how to carry out this procedure.
Is it possible to trim aerial or underground roots and is it necessary?
The first thing that orchid breeders need to know is that most species of this plant are epiphytes. Therefore, the plant has two types of roots:
- air;
- underground.
If with the underground everything is more or less clear, then with the air everything is not so simple. An aerial root system is simply necessary for epiphytes. With its help, the orchid is saturated with sunlight and moisture accumulated by these roots.
New roots may appear due to a dry climate. This way the plant increases the surface area through which it intends to absorb moisture.
In this case, you simply need to create comfortable conditions for a representative of the orchid family, that is, increase the air humidity around the plant, for example, by using trays of water.
That is why, if you doubt whether it is possible to cut off both aerial and underground roots, then you just need to remember that this cannot be done unless absolutely necessary. This should only be done if the flower root begins to dry out, die, or rot.
Alive
It is not difficult to distinguish a living and healthy root from a dead one:
- A healthy root is elastic and hard to the touch. With light pressure it does not break or sag. Dead, on the contrary, is dry and shriveled.
- It differs in color from dying roots by a lighter shade. Darkened roots are a sign of beginning death.
- There are no damages, stains or various types of necrosis on the root.
- Tears in the top layer of the root also indicate that such a root will not survive for long. Soon it will die off.
If it was not possible to determine a living root or a dead one by appearance, then you can immerse the root system of the flower in a container of water.
Living roots will immediately take on a rich green color. If this does not happen, the roots are dead. You will most likely have to get rid of them.
Dry dead
You can deal with dead roots in different ways:
- If rotting occurs, such roots absolutely need to be removed.
Rotting is the destruction of healthy roots by putrefactive bacteria. It will no longer be possible to save such a root. In addition, if one of the roots of a flower is rotten, the remaining roots will soon become infected. If infected roots are not trimmed in time, the plant may soon die. - But dried roots, although they will not be able to provide the plant with the necessary nutrition, will not cause any harm to the orchid. Some gardeners leave them to give them greater stability in the pot.
How to revive an orchid if the roots have rotted?
If not properly cared for, the orchid may begin to rot, which, of course, upsets the grower. But you can still help the plant if you get your bearings in time and organize the formation of new roots.
What do healthy roots look like?
Roots are the basis of any plant, since through them it absorbs water and nutrients, without which the orchid cannot grow and bloom.
Roots, when healthy and adequately hydrated, have an attractive green color.
Dry roots usually have a silver or white tint.
Rotten roots lose their density, become soft, and their color turns brown. At a certain point, a stage of decay occurs, when an unpleasant odor and mucus appear. After purchase, it is imperative to inspect the root system and remove damaged ones with a disinfected tool. The cut areas are treated with a charcoal solution or sprinkled with crushed activated carbon powder.
Root rot can lead to further mold, which easily spreads to nearby roots and slowly kills the plant.
Signs of decay
When the roots of an orchid rot, they not only change color, but also acquire an unpleasant odor. There are other signs by which one can understand that the system hidden in the substrate is gradually becoming unusable.
All the signs can be identified as follows:
- change of shade;
- the appearance of oozing fluid when pressed;
- wet areas appeared;
- thin roots, which when healthy should be dense and thick.
If you suspect that the roots are rotting, you need to check the center of the plant. If it is discolored or brown, and the base of the leaves are also discolored, then there is reason to worry about root rot . In nature, orchids are well blown by air masses, and since they are placed in pots at home, they become more susceptible to diseases.
As soon as the process of damage begins, the plant stops producing buds and buds for flower stalks. If a grower notices signs of rot—unhealthy-looking leaves, buds or stem—and is unable to control or eliminate the infection, removal of the plant should be considered. But it’s better, of course, to understand the reasons and try to save the orchid. Often, even with a completely rotten root system, this can be done, although it will be necessary to temporarily move the flower to quarantine.
Causes
Damage to the root system often occurs because it was simply flooded with water before. This is a common mistake of novice gardeners who think that excess moisture will only benefit a tropical flower. Wet and swampy substrate are two different things . Root rot causes the roots to turn brown and soft, and nutrients are no longer delivered to the plant through its nutritional system, which is almost certainly a death sentence for the orchid.
To avoid this problem, you need to choose the right pot with good drainage.
With such a system, the roots will remain moisturized, but excess moisture will be drained away. When the first signs of decay appear, the roots must be removed immediately, since the rate of spread is very high.
Too much water prevents oxygen from penetrating to the roots, hence the unfavorable processes. Leaf growth will begin to slow, new leaves will appear pleated and existing leaves will turn yellow.
Resuscitation methods
If trouble happens, you can always revive the orchid. Replanting and treatment against rotting, pruning damaged parts leads to positive results.
And then you need to take a number of measures to prevent further blackening of the roots.
- Make sure the orchid is in a pot with good drainage.
- Organize a clear watering regime.
- The leaves of some types of orchids act like a water siphon, which can cause water to collect at the base. You need to make sure that after watering the flower, all excess moisture is absorbed into the paper towel.
- There should always be air movement around the flower. Airflow can be done with a fan, air conditioner, or you simply need to constantly ventilate the room through a window.
Rot can be treated with hydrogen peroxide, which is poured onto the orchid crown . The procedure is repeated every 2-3 days until the product stops fizzing. Then sprinkle with cinnamon, which is a natural fungicide for fungus.
By maintaining viable roots, the orchid can be completely restored. To do this, remove the roots from the pot and clean them with a brush. The blades of the scissors are dipped in alcohol to sterilize, and then they are used to cut off the roots infected with rot. Drain the standing water in the drainage tray and thoroughly wash the container and tray in soapy water.
Change the substrate to a new one, lightly moisten it with clean water without bleach . Allow excess liquid to drain. Place the orchid roots in the pot and add extra bark around to anchor the plant. Place the container on the drainage tray.
The next watering is carried out only when the top few centimeters of the soil are completely dry. Do not allow standing water to remain at the bottom.
Most of it rotted
You can save a flower even if most of the root system is damaged. Cutting off rotting roots will restore the plant's health.
The step-by-step process is as follows.
- Pour 9 parts warm water and 1 part bleach into a container. Stir the solution with a spoon and lower the cutting tool into the liquid for 20–30 seconds. Pull out the blades, allowing the solution to drain, and then dry the equipment on paper towels.
- Wear rubber gloves to protect your hands from possible irritation when working with orchid roots. Cover the work surface with newspapers. Carefully remove the flower from the pot.
- Free the roots from the old substrate.
- Rinse the roots in warm water to thoroughly clean them. Place the plant on a surface covered with newspapers.
- Examine each root, noting areas with dark brown or black rotted tissue. You can tug on the discolored root to see if it slips, leaving a thin, string-like tendril behind. This is a sign that the root is dead.
- Take the end of the rotten root and cut it off at the point where living tissue is still present. Cut off at the base if it rots along its entire length.
- Each time you make a cut, dip the scissor blades into the bleach solution and hold it there for 20-30 seconds to kill the pathogen. Allow the tool to dry before making the next cut. This is how the entire root system is treated.
- Wash the pot and drainage tray with soap and hot water.
- Fill the container one quarter with sterile substrate.
- Spray fungicide onto the root system. Place the plant in the center of the container, spreading the roots over the potting mixture. Fill the pot with the rest of the substrate, without compacting it.
After this treatment, the plants are given high-quality watering and the excess liquid is allowed to drain.
A small part has rotted
It also happens that only a few orchid roots have rotted. In this case, reviving the plant at home is even easier.
The step-by-step process is as follows.
- Mix water and bleach in a 4/1 ratio. All instruments that will be used are sterilized, but the liquid is not poured out, since after each cut the pruning shears will need to be processed again.
- To cure a flower, you will need to transplant it into another substrate, since the old one is already affected by the fungus. Take out the orchid and clean the roots well; you can rinse them under warm water.
- Cut off infected roots with a sharp knife, pruning shears or scissors.
- Cover the rest of the root system with a fungicide. You can mix 500 ml of isopropyl alcohol and 2 tablespoons of cinnamon powder. Leave the mixture overnight, strain it through a coffee filter and pour into a spray bottle.
- Wash the old pot thoroughly and sterilize it in a 10% bleach solution (keep in the solution for several hours).
- It may be necessary to treat other flowers with a fungicide to prevent rotting. This precaution helps protect other plants from infection with rot.
The affected plant should always be isolated immediately as soon as root rot is suspected. Some fungal diseases, such as black rot, spread very quickly from one orchid to another.
Infected plants can be left in quarantine until it is clear that the infection has been completely eliminated.
Sometimes the roots of an orchid can become soft and die from overwork. Other times, they simply outgrow their pot and need to be repotted. Once every 2–3 years, it is necessary to change not only the size of the container, but also the substrate.
All the roots have rotted
It also happens that all the roots of an orchid die. Not every novice flower lover knows that even in this case it is possible to bring the plant back to life. To do this, you will need to cut all the roots down to the root collar , after which a special nutrient solution for germination is prepared. Take about 1 tablespoon of stimulant per 4.5 liters of water with a temperature of 37-40 degrees.
Do not add fertilizers to the soaking solution, as they will draw water out of the plant. Keep the orchid in the prepared liquid for about an hour or more.
Then they take sphagnum moss, moisten it, place it with the plant in a bag and seal it with a paper clip. If you can't get moss, you can replace it with a piece of folded paper towel. The plant should be placed in a warm and shady place. These conditions are extremely important as warmth will induce growth and a small amount of light will allow moderate vegetative development of new roots.
In a few weeks, the plant will have a new root system, after which it can be transplanted into the ground.
Leaves are damaged
If an orchid has suffered not only its roots, but also its leaves (they have become limp and yellow), then it is not easy to preserve it. This part of the plant is the best barometer for it. One look at the foliage can accurately determine the health of an orchid.
You can revive a flower in water if you cut off the rot and install the plant so that its upper part does not touch the moisture.
The best place is where there is enough light. It will be necessary to use nutrient solutions that promote growth activation and provide greenhouse conditions.
Vitamin B is perfect for resuscitation , since it is what helps the orchid live while there is no high-quality root system. A solution with this component can be used not only for soaking, but also for wiping leaves.
Natural phytohormones are found in growth regulators; they help quickly develop roots. Phosphorus or potassium additives in the form of fertilizers can also speed up the process. Some professionals advise using glucose as it is involved in the formation of new cells.
Don’t despair if the orchid’s roots are rotten; with experience, flower growers have learned to fix the problem even in the most hopeless cases. Even a beginner needs to learn this. With a new root system, after a while the flowers will feel great again.
What to do with it?
Excessive growth of aerial roots is not dangerous if the orchid visually looks good - the leaves are elastic, the color is rich green, the peduncle appears on schedule, the roots are smooth, without signs of disease or drying out.
It is worth taking measures if the plant is not feeling well, including due to a large number of aerial roots. The way out of the situation is to transplant the orchid into a larger container.
The substrate for the flower must be changed once every three years. A good substrate option is moss, charcoal, pine chips in a ratio of 2:1:5. When replanting, it is not recommended to completely replace the soil; you should leave some of the old one. So that the plant survives the move less painfully.
Types of orchids
Epiphytic
Epiphytes find places for themselves on other plants . But they do not feed on their juices. They are not parasitic. It’s not for nothing that their roots are called aerial. The thickened processes are covered with velamen.
Such roots are capable of collecting moisture from rainwater, dew and fog and from tree crevices. They store these reserves during further dry weather:
- Wanda;
- Lelia;
- Phalaenopsis;
- Dendrobium;
- Epidendrum;
- Tselogina.
Lithophytic
They grow in soil and on rocks. Their roots are not very different from epiphytic ones. Appearance, structure and functions:
- Masdevallia;
- Brassia;
- Komperia: grows only in Crimea on limestone.
Terrestrial (herbaceous)
The root system of these orchids is similar to many indoor plants:
- Paphiopedilum (Lady's slipper);
- Some (Habenaria, Orchis) have roots consisting of tubers.
Lady's slipper.
Phalaenopsis. Transfer
See also: Phalaenopsis babies: how to separate, plant and grow
Phalaenopsis has outgrown its pot
Like other orchids, phalaenopsis is repotted when the pot becomes too small for the plant.
An indicator that the pot is too small is not the phalaenopsis roots growing above the pot (this is exactly the sign of a healthy orchid ), but the fact that the entire pot inside is filled with roots that have actually displaced the substrate . In such cases, it is better to transplant the phalaenopsis after flowering into a pot slightly larger in size than the previous one.
Phalaenopsis root system is damaged
This is a dangerous situation for any indoor plant; repotting is required immediately. Damage to the root system is most often caused by improper care of orchids .
With insufficient watering of the phalaenopsis, the roots can dry out and die, and if there is excess moisture and stagnation of water in the pot (for example, due to incorrectly selected soil for the orchid or lack of good drainage), the roots rot and then die (photo below).
Unlike the terrestrial cymbidium orchid,
phalaenopsis is an aerial orchid, an epiphyte , so it is easier for it to survive the lack of watering than excess or stagnant water. The latter leads to root rot and phalaenopsis disease .
See also: Dendrobium: care at home, Orchids. Home care
Pot and soil for phalaenopsis
To monitor the condition of the roots, phalaenopsis and other orchids in transparent plastic pots. It is also believed that phalaenopsis roots develop better in the light.
The soil for the phalaenopsis orchid is made from crushed tree bark, to which charcoal, perlite and sphagnum moss are added. The proportions of these materials depend on the conditions in which the phalaenopsis is grown .
If phalaenopsis is kept in a dry atmosphere (most apartments with central heating in winter), then add up to 1/3 of moss to the substrate: it absorbs water during watering and then gives it to the roots.
If the air humidity around the phalaenopsis is high (in a greenhouse, for example), then the amount of moss can be minimized.
If you are not sure that you can properly make a soil mixture for phalaenopsis (this requires some experience in growing orchids ), use a ready-made substrate from the store. The package should indicate that the mixture is intended for phalaenopsis and other epiphytes (aerial orchids) . See our special article: Orchids. How to start a collection.
Treatment of phalaenopsis roots before transplantation
Remove the orchid from the pot , shake off the old soil from the roots, rinse the phalaenopsis roots with warm water and carefully inspect the root system.
Using clean scissors, trim all dried and rotten phalaenopsis roots to a healthy location. See photo below.
Some recommend treating orchid roots after pruning with crushed charcoal or an antiseptic. I really never do this.
Treatment of phalaenopsis roots when replanting an orchid. Using clean scissors, trim all dried and rotten roots to a healthy location.
If the phalaenopsis is sick and its roots are in poor condition, you have to cut off most of the roots. After such resuscitation, the orchid will have a hard time and good care of the phalaenopsis becomes extremely important.
Phalaenopsis transplant
Partially fill a new orchid pot the phalaenopsis roots and pour fresh soil on top.
those roots that grew above the surface of the pot ( phalaenopsis aerial roots ) open after replanting.
Make sure that the leaves and growing point of the orchid are not buried under the soil mixture, as they may rot.
Orchids , most of whose roots have been removed, may fall out of the pot because they have nothing to physically cling to in the soil. This phalaenopsis can be carefully secured using wooden sticks and should be handled with extreme caution.
Phalaenopsis: care after transplantation
After replanting the phalaenopsis, observe the plant. Healthy and strong orchids easily tolerate transplantation and happily begin to grow in improved conditions. Water the phalaenopsis as usual and when new growth begins, begin fertilizing the phalaenopsis during every second watering.
Unhealthy phalaenopsis after resuscitation and orchids that have undergone massive pruning of the root system need special attention.
To create the required level of humidity in the air, such a phalaenopsis should be placed in a transparent plastic bag along with the pot and ventilated periodically.
A plastic bag serves as a greenhouse for phalaenopsis, but it should be remembered that phalaenopsis in a greenhouse cannot be placed in direct sun in the summer so that the plant does not burn. more about caring for orchids in our special article: Orchids. Home care
Article and photo: Oksana Jeter, COUNTRY LIFE
Source: https://countrysideliving.net/Plants/Phalaenopsis_repotting.html
Manifestations of the disease
Proper cultivation of Phalaenopis involves the use of transparent containers, which allow you to timely determine the onset of putrefactive processes and revive or reanimate the culture.
In a healthy state, the roots have an elastic and hard surface, and their color remains grayish-greenish.
Timely diagnosis will allow you to quickly process the flower, perform a transplant, or begin a comprehensive restoration.
Among the main manifestations confirming that the orchid has begun to rot are the following:
- The surface of the sheet becomes soft and loses its elasticity. Even abundant watering does not eliminate the problem.
- A whitish coating of algae or spores forms inside the pot.
- The appearance of aerial roots differs from healthy ones. They begin to darken or dry out.
- The crop wobbles in the pot because the roots may rot and no longer attach to the soil.
If one of the listed symptoms is present, you should quickly remove the plant from the ground and perform an external inspection. If you let it remain without roots for a long time, this will lead to irreversible processes and death.
There are also more dangerous signs of cultural decay. Among them:
- The appearance of dark areas on the roots.
- Formation of mucus and phlegm on the surface of the roots.
- Release of fluids when pressing on the root.
- Decomposition of fabrics into individual threads.
If the grower notices signs of rotting, the condition of the center of the plant should be assessed. If the shade loses or brown spots appear, the likelihood of rotting will be as high as possible.
When growing in a living environment, the orchid is carefully blown with air, and at home it is kept in pots, which increases the tendency to putrefactive processes.
Having determined that the orchid has begun to disappear, it is important to take the following actions as quickly as possible:
- Remove the crop from the container, clean the roots from any remaining soil and rinse thoroughly.
- Get rid of any elements with rot with special scissors or a knife, leaving healthy tissue.
- Treat cut areas with crushed coal and fungicidal preparations.
- Soak the culture in a manganese solution for a couple of minutes.
What is the best way to water?
The nuances of watering depend on 2 main reasons for replanting:
- The density of the soil poured into the pot. Usually the soil is not compacted tightly, which is why moisture feeds the roots for a short time. Then, within 30 days, the soil shrinks and watering can be done less frequently.
- Soil moisture. In dry soil, water is poured immediately, especially in the summer, in wet soil - after 5 days.
If transshipment has taken place, it must be moistened immediately after the process.
Reference. Moisturizing immediately after replanting promotes faster compaction by weighing the soil down with an additional volume of water.
The features of watering also depend on the type of pot:
- Plastic transparent.
- It is installed in an additional glass container.
- Watering is carried out using the overhead method until it is ⅓ full.
- After 30 minutes, drain off the remains.
- Expanded clay drainage is placed at the bottom of the glass vessel so that the absorbed moisture nourishes the plant longer.
- Ceramic. It is recommended to use option 1 instead of glass, plus increase the drying time.
- Glass. Requires filling with water to the base of the root system for 20–30 minutes (with little presence/absence of soil). After draining the water and drying, the procedure is repeated after 3 days, less often at a cool temperature. If there are many drainage holes, use the immersion method.
Also, when using different drainages, watering is reduced by 2–3 times.
During growth
The active growth of an orchid requires intensive watering. The process helps the fast-growing leaves not wither due to lack of moisture.
Important! You need to water at least 2 times a week. On hot days - 3 times. When budding and flowering occur, the intensity of watering is reduced by 1.5 times.
In winter time
In winter and autumn, when plants go into partial hibernation, they are watered once every 10 days. Before this, after the transplant, they are allowed to rest for 3–4 days.
If the substrate is dry, during adaptation the solution is spraying with warm water.
The need for watering is determined by the silvery tint of the roots. In dry air, it is recommended to spray the leaves with heated water twice a week.
The rules for watering in the cold season are as follows:
- The water for spraying should be warm; it does not need to cover the buds and flowers.
- When watering in the shower, the temperature should not exceed 60 degrees.
- When flowering, it is better to leave the watered plant in one place so that the flowers do not stop opening prematurely.
- The pot must not be turned, moved or touched with flowers and leaves.
- It is forbidden to experiment with new methods of fertilizing and watering, because... in cold weather, the orchid’s metabolism is reduced, it may not be able to cope with the “innovation”.
It is also not recommended to get water on the outlet. If moisture gets in, dry it with a napkin.
Attention! In cold weather, top watering is undesirable for the plant.
You can learn how to water plants during the cold season from the video below:
kids
After transplanting baby orchids, water them less often than adult plants. The fact is that their root system is weaker and cannot withstand frequent watering.
They need to be saturated with moisture when the soil is dry, in small quantities. Once they begin to actively grow, they can be cared for like mature orchids. It is recommended to add a root formation stimulator to the water for irrigation.
Watering an orchid after transplantation is a process that does not require special skills or knowledge. It is enough to follow certain rules and nuances so that your exotic home flower quickly adapts and will soon delight those around you with beautiful flowers.
Appearance of healthy and rotten roots
Since roots are a key part of any plant, if they are damaged, it will slowly wither or die. However, if you take the necessary measures in time and provide the culture with proper care, it will begin to renew itself and create new roots.
A healthy root system is characterized by a green tint, which is due to the receipt of a sufficient amount of nutrient moisture. Dry shoots become silver or white.
As the roots rot, they lose their normal density , break and turn brown. Over time, they begin to disintegrate, which leads to the appearance of an unpleasant odor and mucus. In order not to lose an exotic plant, you should quickly begin resuscitation.
After purchasing a flower in a store, it is important to carefully inspect its roots and get rid of damaged elements using a cleaned gardening tool. Further sections of the cuts should be treated with charcoal or powder based on activated carbon. Rotting of the root system increases the likelihood of mold, which is quickly transmitted to other crops and causes the death of the orchid.
To obtain accurate information about the condition of the roots, you need to get rid of the substrate and wash the underground part of the crop.
Among the key signs of putrefactive or infectious processes are:
- The appearance of a dark shade on the root system.
- Formation of areas with mucus and wet surface.
- Liquid leakage when pressing on the root.
- The appearance of thread-like deformed roots.
If an orchid's roots have rotted, how to save them will depend on several factors. If there is a large dark area, it will need to be cut back to the healthy part.
Do the same with dried rhizomes. If the crop loses 2-3 roots, it will require enhanced care to restore its viability. However, if an orchid of the Phalaenopsis or Pachyphytum variety has lost most of its full tissues, the likelihood of its death will become extremely high.