Propagation of orchids by vegetative method is in the simplest and most accessible way for the average gardener. Sprouts are formed on adult plants naturally under normal conditions.
Even a beginner who has never done this can grow, separate and plant it. You just need to know how to do it correctly, otherwise the process can be lost and all your efforts will be wasted.
Growing an orchid shoot on a peduncle
The shoots (children) of orchids directly depend on the mother plant. Therefore, they need to be provided with the highest quality care and the most favorable growth conditions:
- First of all, ensure sufficient lighting. The light should be bright, but diffused for 12-14 hours a day. Direct sunlight on a western or eastern window is acceptable. If it is impossible to provide the plant with natural light, the plant is illuminated with phytolamps;
- daytime temperatures should be between 22-28 °C, night temperatures should be approximately 5-6 °C lower. Temperature differences are necessary for more confident photosynthesis. Recommended temperatures should not be exceeded or decreased. This can cause stress in the mother plant and inhibition of development;
The difference between day and night temperatures should be about 5-6 degrees.
- air humidity should be as high as possible. It must be increased by all available means. High air humidity is also important for the rapid development of the plant, as the stomata open and the orchid captures more carbon dioxide molecules per unit time. Carbon is essential for building cells. It is optimal to keep humidity at 70%, but not lower than 50%.
Important! A factor in the health of an orchid is access to fresh air, as well as its circulation.
Watering and fertilizing as usual. In nature, orchids produce shoots and gain vegetative mass during the rainy season, when elevated temperatures are combined with an abundance of sun and moisture.
Plant stimulation with hormonal agents is only permissible for adult, large and healthy plants. Otherwise, there is a risk of depleting a young or weakened plant.
Next, we will take a closer look at the orchid shoot: how to separate it and plant it?
How to determine that a shoot is ready for “independent life”?
Keiki are real treasures for orchid lovers. They can help produce another flower identical to the mother plant. It’s great luck to find such a process on your pet. Many flowers may not produce children at all during the entire period of their life. Therefore, the task of orchid lovers is to replant the baby correctly and not destroy the young plant. To do this, it is important to know how to correctly take a shoot from an orchid, root it and plant it.
Attention! The main thing is not to rush. The key to successfully separating the cake from the mother orchid is timeliness. It is necessary to allow the young flower to gain strength and send out roots.
Many flower lovers advise thinking about replanting, no earlier than the baby gives the first 3-4 leaves. And its roots will grow at least 5 millimeters. However, you shouldn’t delay the transfer either. It can also be difficult with overgrown roots. They are difficult to place in a pot without damaging them.
Separation from the mother plant
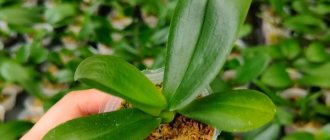
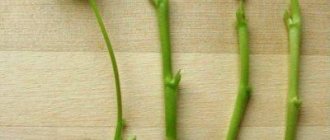
The shoot is removed from the peduncle after it has grown at least 2-3 leaves and at least two pairs of roots more than 5 cm .
The same must be done with the shoot that formed below, near the roots of the mother plant. When inspecting the root system, be careful - try to cause as little harm and damage as possible.
In general, it is not necessary to separate this process. You can leave it and in the future get two plants in one pot, which will bloom twice as luxuriantly.
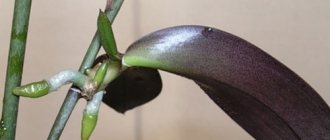
If the shoot appears on the orchid stem itself, it is not touched and left on the mother plant.
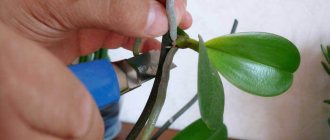
The procedure for planting a shoot is carried out with a sharp, disinfected knife, scalpel or other cutting instrument. If it is not possible to carefully separate the shoot, it can be cut off along with a short fragment of the peduncle. The cuts must be treated with crushed charcoal or cinnamon.
Attention! It often happens that the baby, while still on the peduncle, tries to bloom. This should not be encouraged under any circumstances - the flower stalks of children must be removed without fail.
What it is?
A baby, or pseudobulb, is a shoot on a peduncle or on the root of an orchid , which, during the ripening process, forms into an independent flower. Propagation of varieties such as phalaenopsis by pseudobulbs is the best option. It does not require much time and skill, and also does not harm the adult plant.
On a note. Many breeders and flower lovers prefer this type of breeding. The appearance of a baby is a real event for the gardener. After all, on their own, without additional stimulation, they appear extremely rarely.
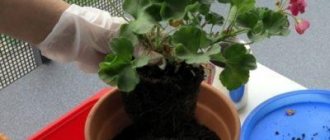
How to plant an orchid shoot at home?
So, the separation is done, how to plant the sprout? It is planted in a perforated pot of suitable size as an adult plant. A fine bark substrate is required . A few days before separating the shoot, it is strongly recommended to treat it and the adult orchid with epin. This is done to more confidently adapt the plant to new conditions, as well as to minimize stress.
It is better to separate the shoot with a small fragment of the peduncle . It is highly advisable to treat the sections with charcoal or cinnamon and dry them in the shade for 1.5-2 hours. The substrate is poured into a suitable pot to fill 1/3 of the volume, the young plant is placed inside, and the empty space is filled with the substrate. Before planting the shoot, the substrate can be moistened with a sprayer , but it should not be wet.
Planting baby orchids.
Before rooting the shoot, you need to make sure that the plant is secured so that it does not wobble in the pot when accidentally moved. There is no need to press the substrate. If the plant sways, it can be secured by tying it to the pot with women's tights. When the shoot is sufficiently rooted, the garter can be removed. Rooting lasts on average 2-4 weeks , depending on the conditions of detention.
Orchid propagation by separation of children
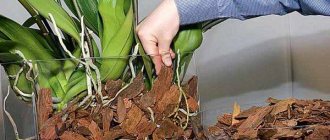
The baby orchid cannot be separated immediately after emergence, otherwise it will die. The shoot can remain on the mother plant for up to six months, managing to grow about 5 leaves and long roots during this time. Some gardeners try to speed up the growth of the root system by spraying it with stimulants, wrapping sphagnum moss around the root collar and attaching polystyrene foam underneath.
Advice
The worst idea is to place a baby orchid in a glass of water. This is a sure way to cause it to rot and die.
Such options do not guarantee the success of the operation for vegetative propagation of an orchid. On the contrary, the more of this kind of “help” a flower receives, the worse the result. But you also shouldn’t wait until the roots become too long - they will start to break during planting, and it will be difficult for such a baby to come out.
If plants at home begin to develop naturally, surviving and struggling for existence as in the natural environment, they will better adapt and grow at home. The roots may not grow much longer than after 6 months, so you should be patient and wait without trying to somehow speed up their growth in order to quickly plant the baby in another pot. When they grow to 5 cm, the young plant can be separated and replanted in the ground. Until this moment, the queen cell is cared for as usual - watered and fertilized. You can bathe orchids in a hot shower, sprinkling water on the leaves and baby from all sides.
Before planting an orchid shoot at home, you need to prepare the necessary tools and ingredients:
- sharp pruning shears;
- correct substrate;
- pot;
- activated carbon or cinnamon;
- gloves;
- disinfectant to wipe down instruments.
22
Further care
Watering is not carried out for the first few days. This is done so that the microtraumas of the roots are healed. Then water it using the dipping or soaking method. The second method is more preferable, since fresh pine bark does not absorb moisture well.
The frequency of watering depends on the conditions of detention , the condition and type of the shoot itself. In summer it can be daily. Keep an eye on the substrate and plant roots.
Care for the shoot as if it were an adult, recently transplanted plant. You can, for example, treat the roots with a root solution for better rooting.
For the first 10-14 days, you need to choose a shaded place for the shoot , excluding direct sunlight.
After this period, the orchid is placed in its permanent place of growth and care is provided aimed at gaining green mass and expanding the root system.
Advice! To achieve better results and rapid development of young orchids, they can be grouped in a florarium/orchidarium - a place where high humidity and bright lighting are maintained.
Step-by-step instructions on how to get offspring
An orchid will begin to form “offspring” only if it is provided with proper care and optimal conditions for reproduction are created.
- Prepare a peduncle that has faded but is still green: it must be trimmed, 2 cm away from the second “dormant” bud from the bottom.
- Treat the cut area with crushed activated carbon tablets or cinnamon.
- Provide the plant with differences in night and day temperatures (+15C-+30C). To do this, you can place the orchid on the windowsill or on the veranda of your house.
- Watering should be scanty: the stressful state that the epiphyte will experience will make it possible to awaken the “sleeping” buds.
- Spray the epiphyte daily with a spray bottle, thereby ensuring a high level of humidity in the room.
- Promote air access to the orchid roots: make additional holes in the walls of the pot.
- Provide access to a large amount of intense diffused light to the epiphyte (south and southeast windows).
- The orchid should be systematically fed with fertilizers high in nitrogen.
Reference. You can often find information about stimulating “dormant” buds with hormonal drugs so that the flower stalk throws out the baby. One of the most famous such drugs is cytokinin paste. Having opened the bud, it should be smeared with this paste on top.
This procedure can be repeated 3 – 5 times. Babies may appear within 2-3 months, but a lateral arrow may also appear from a “dormant” kidney. But it should be remembered that this method of raising children greatly depletes the mother plant.
Possible risks
The shoot of an orchid from an adult plant, in fact, differs only in size. Therefore, the risks and rules for transplanting it are the same as for an adult . The best prevention is to keep the plant in favorable conditions. When planting, try to be careful with the roots of orchids - they are quite fragile and can be easily broken.
Pest damage is possible if the plant is weakened and neighboring ones are already infected. It is necessary to maintain plant hygiene and not place them too close to each other. In case of an attack of paranoia, orchids can be sprayed with actara.
Orchid pests.
How do you know when to do this?
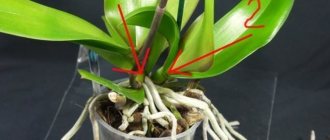
The readiness to separate the daughter orchid from the parent is checked by the following signs:
- the appearance of five leaves on the sprout, with the help of which the young flower will breathe and feed;
- the child grows at least three healthy and strong roots, each at least 5 cm long.
A shoot with weak roots cannot be separated, as it risks dying. Strong roots are ready to take root in a new place.
Detachment of shoots is a serious stress for a blooming orchid.
It is not recommended to replant a hatched shoot while the adult plant is blooming. The roots of the daughter shoot have not yet formed, so the new shoot cannot survive on its own.
How to care after transplant?
After separating the baby from the main plant and transplanting it into a new substrate, you will need to provide the shoot with proper care. If initially the sprout is quite strong and healthy, then its rapid development and active growth will begin without delay. To grow such a flower you don’t have to resort to various tricks and additional means. If at the time of separation there were leaves on the shoots, then during rapid growth they may dry out. But there is nothing to be afraid of - give the baby a little more time so that it sprouts new leaves.
If the children of the mother (the main plant) turn out to be too weak and hardly develop, then they will need to be provided with greenhouse conditions. The greenhouse can be purchased at a specialized store or built with your own hands. In such conditions, the required high temperature and the required humidity level are always maintained. Moisturizing the young sprout should be done carefully. Never overwater a baby orchid. Otherwise, the root system of the flower may begin to rot - and this is a rather serious problem. The roots of the sprout, subject to proper and moderate watering, begin to grow quite quickly.
In the area where the pot with a young flower is located, you will need to ensure high-quality air outflow and inflow. The space should always be fresh and comfortable. It is recommended to provide lighting for the orchid shoot based on the main principle - direct sunlight for the described plant is very harmful. It is advisable to create diffused or shaded light. The sun's rays that penetrate into the home in the morning, along with the sunset rays, will not harm the orchids. After a certain time, it will be possible to plant the orchid sprout in a new pot, which will be more suitable for it in size and volume.