Phalaenopsis is a wonderful and beloved type of orchid, which nowadays can be easily purchased in specialized stores. If you already have this exotic plant at home, you can propagate it yourself.
One of the simple and affordable ways to grow phalaenopsis is vegetative propagation by children. This article is devoted to how to separate a baby from an orchid.
Reproduction by lateral layering
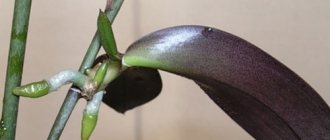
Orchid babies are young shoots of the plant that periodically appear on the stem and roots, but more often on the peduncle. They have their own miniature stem, nascent roots and leaves.
Reference! With proper care, babies can appear on their own, but you can wake up the “sleeping bud” on the peduncle - remove the protective scale and carefully treat it with cytokinin paste.
The role of children in the life of an orchid is difficult to overestimate, since it is their continuation. Propagating the plant by lateral layering is quite simple - this is the fastest way.
How to care after?
The conditions for small plants are different from those in which adults grow.
Water the young orchid as the substrate dries. The temperature must be maintained at +23 degrees.
Humidity should be very high, especially at first, preferably 100%. In the future, this figure can be reduced to 60%. Dim diffused light will be comfortable for planting.
Fertilize the young shoot for the first time after two weeks. The dosage is the same as for adult orchids. All medications are administered in liquid form.
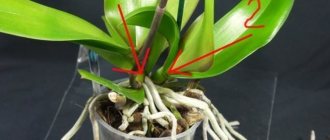
Where do the buds appear?
Children can appear on different parts of the plant:
On the peduncle , after the plant has faded, a young sprout appears.
It is worth noting that not one baby may appear, but several, and they can be located anywhere on the peduncle, both in the middle and at the very end. But usually only one process appears. Do not rush to remove the peduncle; create the correct temperature and proper air humidity so that the orchid sends out shoots that can later be planted. At first, the shoots are very small, but over time, small compactions will appear on the sides - roots will begin to form.- At the roots , children also appear quite often; in this case, when separating, you need to act with the utmost caution, since there is a possibility of damaging the roots of an adult plant.
- On the trunk – it is not recommended to remove these shoots.
They do not have their own root system. In addition, when separating, you can damage the stem of the plant, which can simply cause it to die. A baby may appear on the stem if the growth point begins to freeze. After the mother plant dies, the baby will continue to grow.
Caring for a transplanted plant
After the baby is transplanted into a separate pot, it must be cared for as an adult plant. Be sure to place the container with orchids near the window, this will provide a sufficient level of light.
You can resume watering three days after the baby is deposited. During the first time, you can add special mineral fertilizers and growth stimulants to the water; they will help speed up the rooting process.
It is important to note that after the first watering, you must wait until the soil is completely dry and only then repeat it.
It is imperative to provide the young plant with a sufficient level of humidity and temperature. Such conditions must be maintained throughout the year, then you can care for them as if they were an adult orchid. In just 3-4 years, with proper care, you can see the first flowering.
Helpful Tips:
- It is recommended to use clean water for irrigation;
- The shoot can be replanted only with a clearly formed root system;
- It is best to use a ready-made substrate, which is sold in flower shops. It has a balanced composition and will allow the young plant to take root faster;
- In the first days after transplantation, it is allowed to spray the plant with a spray bottle once a day.
After transplantation, the baby can be sprayed.
Consequences for the parent
Some novice flower growers do not remove children from the mother plant, especially if shoots have formed near the roots, mistakenly believing that this way the plant will be more bushy and beautiful. But this is wrong, since the mother plant spends a lot of energy on the development of the shoot, and if the baby is not removed in time, it may simply die.
So there are two main questions:
- When should you separate the baby from the plant?
- How to do it right?
Attention! A baby that was planted on time and successfully is a new independent plant in the collection. But the gardener is often faced with a choice - a mother plant or a baby plant, if a shoot appears on the stem.
When to plant a shoot?
If an orchid has babies, then the question arises: when should they be planted? There are several main signs of readiness:
- Overgrown roots.
While they are gone, the process should not be touched. The roots must be healthy, strong, and at least 5 cm long. It is worth remembering that the more roots a child has, the more likely it is that the transplant will be successful and the young plant will survive. You should not separate a shoot if it has less than three roots. - The right amount of real leaves .
A young orchid must grow at least 5 leaves; this is the only way it will have a high chance of survival after separation from the mother plant. Do not forget that good leaves are the plant's nutrition from sunlight and respiration. - The baby spent at least 8 months on the mother plant , but it is better if exactly a year passes after its appearance.
Do not rush to separate the baby from the mother, let it gain strength for further growth while on the mother’s plant. Growing the root system is a tedious and long process. Preparing items for replanting (tools, soil, pot).
So, the baby is ready for transplantation, now it’s time to prepare everything necessary for this exciting process:
- special substrate made from pieces of bark 1 cm long;
- sphagnum moss;
- a small plastic pot - with a diameter of 7 to 10 cm (it must be transparent);
- pruning shears, scissors or sharp knife;
- activated charcoal or cinnamon.
To prepare your own soil, you need to mix fine pine bark and sphagnum moss, you can add a little charcoal. The substrate should be well moistened, but not wet .
Read more about choosing soil and pot here.
How to properly separate a shoot?
This can be done in several steps:
- Sterilize the instrument.
- Carefully cut the baby from the mother plant. If it grows on a peduncle, then it is worth making oblique cuts on both sides of the shoot, so that the remainder of the peduncle is 1-2 cm. If the baby is formed at the base, then it is more difficult to plant it: make the cut as carefully as possible so as not to damage the roots, both on the mother plant and on the baby plant.
- The cut areas should be treated with cinnamon or crushed activated carbon. This must be done, otherwise pathogenic bacteria and infections may get into the wounds.
To finally figure out how to separate an orchid shoot, watch the video:
Basic recommendations
Before planting the baby, the sections need to be air dried for 30 minutes . The pot should be small; you can take a simple plastic cup and make several holes in it, both at the bottom and on the sides.
Transplantation into substrate
After separating the cutting from the mother plant, it can be immediately planted in the substrate, but it is still better to prepare it for planting:
- To do this, the cuttings are soaked for 15 minutes. in water in which growth hormone is dissolved. This will ensure faster root growth;
- When planting, moistened roots are less damaged and fit into the pot more easily.
Before planting the children, lay a layer of drainage (expanded clay, vermiculite or ceramic shards) on the bottom of the pot, after which the plant is lowered into it:
- the baby is placed in the container so that the lower leaves are above the surface of the soil;
- the substrate is poured in small portions while shaking and tapping the pot so that the soil is evenly distributed between the roots. There is no need to further compact the substrate;
- The plant should not be watered for the first few days to allow the cuttings to dry out.
partial shade for a while , then you can move it to diffused light.
Attention! The root collar of the phalaenopsis should be at the level of the edge of the pot.
In the future, the small phalaenopsis needs regular watering and lighting.
Detailed step-by-step instructions and photos
With root system
If the baby already has roots, then replanting a small plant will be quite simple.
The algorithm of actions is as follows:
- Take a plastic container with holes.
- Place a layer of drainage on the bottom, then a substrate mixed with moss. Moisten the mixture. But before this, it is worth spilling the soil with a pink solution of potassium permanganate or calcining it in the oven for disinfection.
- Place the baby in the cup very carefully, so that the growth point is at the level of the edges.
- Adding the substrate must be done with extreme caution, since the roots of the young plant are very delicate.
- The roots should be completely covered with the mixture.
- You should not water after transplantation, as an infection may get into an unhealed wound.
- Cover the plant with a transparent plastic bag - it will be a mini-greenhouse for better rooting.
Important! The substrate should not be very waterlogged, as there is a risk of tear rotting. At the same time, in the greenhouse it is necessary to ensure the optimal level of humidity for the young plant.
Without roots
There are situations when a baby grows and develops well on the mother plant, it can even bloom, but it does not want to produce roots. What to do in this case?
You need to proceed as follows:
- Place some drainage and moss in a plastic cup with holes.
- Make two holes in the side of the cup opposite each other for support.
- Install the support.
- Place the baby's socket on a support - it should not touch the ground.
- Place a plastic bottle with a cut bottom on top.
- The young orchid will remain in this state until roots appear.
It is worth observing the plant, since ideally the transplant should be carried out only after the roots have grown at least 5 cm . It is worth being patient, as this process is quite long and can take 4-6 months.
If it grows on a peduncle
If the orchid has sprouted on the peduncle, then the procedure is as follows:
- Use a sterile pruning shears to cut the baby from the peduncle.
- At the base of the rosette we find a scale that should be removed, since it is this that prevents the roots from developing.
- Now you can start growing roots in the air, since it is impossible to place the plant in a substrate without roots.
- We arrange a plastic cup with holes under the pot.
- Place drainage on the bottom and place moss on top.
- Make two holes at the top for support.
- Place the baby so that it hangs in the air without touching the moss.
- Cover the structure with a young orchid with a cut plastic bottle or plastic bag to create greenhouse conditions. The microclimate in the greenhouse should be close to tropical.
What to do if the orchid has a baby?
A baby orchid is a daughter shoot from an adult plant. After separation and rooting in the ground, it will have the same color and size as the mother plant. A baby orchid is a formed flower, only of miniature size. It has aerial roots, leaves, a stem, and if it is on an adult plant, it often produces a flowering shoot.
Why did Phalaenopsis produce shoots?
At the end of the flowering period, only the flower stalk remains in the pot. If the plant is strong, it has a bright green color without any signs of drying out. After some time the following will appear on it:
- kidneys;
- lateral peduncle;
- small leaves and root system.
Thus, shoots (babies) develop - formed orchids. They can appear both on the peduncle and in the leaf axils, rhizome, or from the bud.
According to flower growers, the formation of shoots in the area of the leaf axils or on the trunk is due to unfavorable growth conditions:
- prolonged drought;
- stem injury;
- development of the peduncle directly from the center of the rosette;
- dying off of the growing point.
Peculiarity! As a rule, such shoots do not form a root system for a long time, which affects the process of rooting the plant into the substrate.
Why transplant offspring?
If the plant is provided with proper care and the most comfortable conditions, it will delight you with its flowering several times a year. If children form on a flower, this is a great success, since you can propagate and grow more than one beautiful plant at home. This is the dream of all flower growers.
It is imperative to plant a shoot from an adult flower. Otherwise, it is fraught with such negative consequences as:
- significant load on an adult flower;
- wilting of leaves;
- the likelihood of disease in the mother plant.
In some cases, when shoots have appeared, flower growers make a difficult decision: to keep the baby or the adult plant?
Possible difficulties
The following problems may arise during transplantation:
- Infection .
This can not only lead to disease, but also to the death of the plant, so the pruner or knife must be sterile. - Decay .
Before planting the baby, you need to let it lie in the air for 30 minutes, then treat the cuts with ground cinnamon or wood ash. - If you cut off the shoot too early, it will die .
If there are several children on an orchid, then cutting everything off at once is strictly prohibited; the mother plant will simply die from the resulting injuries. Attention! Separate one baby first, the second can be planted as soon as the cut from the first is completely closed.
We have materials on orchid transplantation:
- when to replant;
- Is it possible in the fall?
- pruning roots during transplantation;
- transplantation during flowering;
- when releasing the arrow;
- after the purchase.