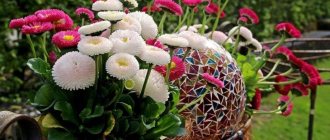
Numerous indoor plants not only have a decorative task of decorating our interior according to our taste preferences, but, and everyone knows this from school years, they enrich our air environment in apartments and institutions with their daily photosynthesis.
Contemplation of indoor plants pacifies, improves mood, occupies leisure time, and gives creative impulses to collectors. Many people are familiar with that creative itch when they encounter a new plant or see it in a photo, on a computer or TV screen. And then the task arises of obtaining a shoot or seeds for propagation of the favorite specimen of indoor flora.
Someone will say: what’s the problem - now everything can be purchased in shopping centers or at the market, and finally, you can order it via the Internet - they will send you any seeds. And at this stage, the lover can expect disappointment, which this article is intended to avoid. It is not enough to sow the resulting seeds in pots with soil and wait for healthy shoots; you need to know how to sow, how to moisten, and how long it will take for seedlings to appear that need proper care.
It is very important, at the very first steps, to learn everything about the most decorative house plant that you like, about the features of its growing season and propagation using seeds.
Features of seed propagation of indoor plants
At first glance, there is nothing simpler, and the seeds are usually inexpensive. You can buy seeds of the most exotic plants, cuttings of which cannot be sent by mail due to the risk of damage during transportation. Postal delivery of light bags with them will not present any particular difficulties - you just need to place an order.
So in theory, but in practice “surprises” are possible. Those who have encountered this can tell you about some of the pitfalls: are the seeds the right ones, what is their freshness and ability to germinate. Even seeds purchased in a store in the appropriate packaging may be from the series: “Don’t believe your eyes.” In addition, it takes quite a long time to grow the selected plant - cuttings are much faster. For example, a banana from a cutting in a home culture will bear fruit in the second year, and from seeds - in the third or fourth.
Even if you have the opportunity to collect seeds from plants you like, you need to consider whether this is a hybrid variety. Such seeds can sprout with unpredictable results due to the loss, most often, of varietal characteristics.
Basic mistakes
Below are the most common mistakes, familiarization with which will help prevent their recurrence when growing indoor plants from seeds:
- Expose seedlings to open sunlight immediately after transplanting into individual containers. Seedlings need light and warmth, but for the first 2–3 days they are not yet ready for it, so young seedlings will need to be kept in some cool place for several days.
- Using ready-made earthen mixtures purchased in the store to germinate seeds. The only exception is purchased soil intended directly for seedlings, since other options have too high a concentration of nutrients, and this can suppress germination.
- Initial acquisition of plants that are too demanding and for which it is impossible to create the necessary comfortable conditions. All varieties have individual requirements for lighting levels, humidity levels, temperature conditions, soil and other factors. You need to familiarize yourself with all the nuances before making a purchase to make sure that you can provide the required conditions in your home.
Houseplants grown from seeds
Theoretically, all plants capable of flowering can be propagated from seeds , but the method of such propagation can sometimes be so labor-intensive that it is not worth wasting time and experiencing failure. We will give you a list of indoor plants, the propagation of which by seeds at home will not cause any particular difficulties. These include: abutilone, asparagus, balsam, dracaena, crossandra, pelargonium, shefflera.
Plants that take a long time to sprout from seeds include the following species: Browallia, Washingtonia, Nolina, cyclamen of various subspecies and some varieties of palm trees. The mistake of inexperienced gardeners is the opinion that the seeds do not germinate, and they stop waiting for sprouts.
Note that certain types of indoor flora place increased demands on the freshness of seeds. For this reason, it is better not to deal with expired seeds at all. This applies primarily to such capricious ones as adenium, gardenia, hibiscus, coffee tree and murraya. And it is almost impossible to obtain seed material from bougainvillea, cacti, myrtle and fuchsia.
Basic rules for selecting seed material
Choosing the type and variety of plant
First of all, you need to take into account that not all flowers grown at home can be propagated by seeds. In some cases, it is simply impossible to grow a plant from seeds with your own hands; in other situations, it is extremely difficult to do this due to low germination or a long germination period.
However, there are also indoor flowers that can be easily grown from store-bought seeds, for example: asparagus, schefflera, balsam, abutilon, dracaena, pelargonium, crossandra, etc. Find detailed information about whether it is possible to grow a specific flower from seeds, you You can do it quite easily on the Internet.
Luxurious Homemade roses for 147 rubles (advertising)
Choosing a store and manufacturer
Preference should be given to trusted specialized stores. If there are none, then you should pay special attention to the reviews and reputation of both a regular flower shop and an online store. Also pay attention to the reputation of the company that produces the seeds.
Table of germination time of seeds of popular indoor plants
| Name of house plants | Fast germination from 4 to 12 days | Average germination from 12 to 17 days | Slow germination over 20 days |
| Ambutilone - Kanatnik | ✔ | ||
| Adenium | ✔ | ||
| Agave | ✔ | ||
| Balsam | ✔ | ||
| Begonia | ✔ | ||
| Washingtonia | ✔ | ||
| Gardenia | ✔ | ||
| Hibiscus | ✔ | ||
| Indoor pomegranate | ✔ | ||
| Crassula | ✔ | ||
| Oleander | ✔ | ||
| Pelargonium | ✔ | ||
| Sansevieria | ✔ | ||
| Streptocarpus | ✔ | ||
| Fatsia | ✔ | ||
| Date palm | ✔ | ||
| Hamerops palm | ✔ | ||
| Cyclamen | ✔ |
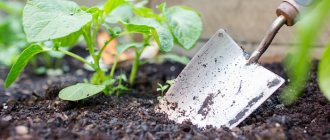
Proven methods for growing indoor plants from seeds at home
The entire process of seed propagation of indoor plants is divided into several steps: selection and storage in optimal conditions, preparatory processing of seed material, selection of soil and containers, sowing time, sowing of prepared seeds, correct care of sowing and seedlings. We will explain the entire technology in these steps:
You immediately need to decide on the location of their future growth: on the windowsill or in the open ground of the front garden. If there is open ground for planting, you should first of all take into account climatic conditions, hybrid properties and the correct sowing plan. It’s easier with indoor plants, but there are also certain rules:
- Let's start with a manufacturer and even a seller who you can trust due to their positive reputation. Feedback from flower growers on suitable forums will help you verify this. It is known from practice that a Russian manufacturer can be trusted - here they treat quality more responsibly than, for example, their Chinese colleagues, from whom you can either receive something that is not what you ordered, or an empty bag. Inexperienced people are attracted by the low price, which comes with a high probability of disappointment.
- It is very important to initially consider the growing conditions and growth volume of your chosen indoor plant. If, for example, it is intended for a small room, then palm seeds and some varieties of hibiscus should not be purchased;
- for north-facing window sills, it is better to choose shade-tolerant representatives of indoor plants, which is certainly indicated in their vegetative characteristics, which can be found on Wikipedia;
- The determining conditions for growing a full-fledged indoor plant are, in addition to the area of the room, its seasonal temperature and humidity;
- You should not purchase seeds of indoor plants for future use, because they are quite difficult to properly store and protect from mold. The storage location should be dry, cool and dark;
Technology for growing indoor plants from seeds
In general, the technology for seed propagation of domestic plants can be divided into several stages:
- selection and storage,
- sowing dates,
- seed preparation,
- soil and container,
- disembarkation
- seedling care.
Let's look at each point in more detail.
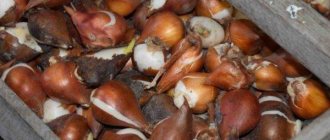
Seed selection and storage
In order to get a good result, you need to choose the right seeds.
Seeds of plants planted in open ground must be selected based on many factors: climatic zone, sowing plan, hybrid properties. For indoor flora, all this is not so important, however, there are several important nuances here.
Firstly, when buying seeds for home plants, you should carefully choose the seller and manufacturer. Their reputation is a guarantee that you will receive exactly what you ordered. Therefore, before making a purchase, you should carefully study the reviews of flower growers on the relevant forums.
In general, Russian companies are much stricter in quality control than their Chinese counterparts. As for seeds ordered from the Celestial Empire, it is rather a roulette - there is a chance of getting an empty package or a completely wrong plant, but, of course, the low price is captivating.
The second important factor in choosing seeds is the plant itself. The size of the adult specimen and the conditions under which the home flower is kept play an important role. If, for example, you want to decorate a small room, you should not buy palm seeds. If the windows of the room face north, the best choice would be shade-tolerant representatives of indoor flora. Room area, winter and summer temperatures, air humidity, lighting conditions - before purchasing, you should carefully study each of these parameters.
It is better to use seeds of indoor plants fresh and not to store them - germination is lost quite quickly. If it is not possible to plant the seed immediately, the packaging should be placed in a dry and dark place, protecting it from mold.
Sowing time
The best period for sowing seeds of the vast majority of indoor plants is the end of winter and the beginning of spring (February-March). At this time, all nature awakens: the day becomes longer, the sun shines brighter, and the warmth gradually comes. A seed planted at this time will germinate much easier, and the young shoots will be strong and healthy. Even cyclamens, the seeds of which are traditionally sown in September, germinate better in the spring.
Why shouldn't you sow indoor plant seeds in the fall? It's simple:
- The days are getting shorter and there is not enough sunlight. This makes the hatched sprouts look pale and too elongated;
- Due to central heating, the air in the room is too dry, which negatively affects germination;
- Due to sudden temperature changes (cold from window glass and heat from radiators), the seeds mold and die.
However, if you try and provide optimal conditions (consistently high temperature and humidity, additional lighting), seeds can be sown all year round and get good results.
Seed preparation
Before planting the seeds of houseplants in the ground, they need to be prepared. First of all, for better germination, they can be soaked in bioactive solutions:
- "Zircon". Soaking time – 12 hours. Solution – 1 drop per 150 ml of water;
- "Epin." Soaking time – 24 hours. Solution – 2 drops per 100 ml of water;
- “Potassium humate”, “Sodium humate”. Soaking time – 24 hours. Solution – 0.01%.
Thanks to artificial biostimulants, seeds germinate much faster, and the emerging shoots take root much better.
There are also natural (natural) growth stimulants: aloe juice, ash solution, honey, potato juice:
- Aloe juice. Soaking time – 24 hours. Solution – aloe juice and water in a 1:1 ratio;
- Ash. Soaking time – 4 hours. Solution – 2 tbsp. spoons of ash per liter of water;
- Honey. Soaking time – 5 hours. Solution – 1 teaspoon of honey per glass of water;
- Potato juice. Soaking time – 8 hours. Several tubers need to be placed in the freezer for several hours, then removed, defrosted and squeezed out the juice.
Some gardeners recommend disinfecting seeds before planting. A solution of ordinary potassium permanganate is ideal for this. The solution should be pale pink and the total soaking time should not exceed 15 minutes. After the procedure, the seeds must be thoroughly washed.
There are also more exotic ways of soaking seeds: in lemon or orange juice, in vodka, in paste, and so on. Whether to use them or not is up to you.
Bubbling seeds
Bubbling technology will help increase the germination of old seeds. Bubbling is the soaking of seeds in water saturated with air.
You will need: a tall jar filled with water about 2/3, and an aquarium compressor. The seeds are poured into the jar, the sprayer is lowered to the bottom, after which you can turn on the compressor. Air should be supplied for 12 hours, after which the seeds should be removed, slightly dried and sown.
Scarification of seeds
This term means breaking the integrity of the seed shell for better germination. Only hard-shelled seeds need to be scarified, for example, indoor banana, avocado, and date palm seeds.
The shell is carefully sharpened with a file, sandpaper or nail file to a soft layer, and there should be no through holes. You can also make cuts on the side where the shoot will subsequently appear.
Another, longer, method of scarification is to place the seeds in a mixture of sand and crushed stone and mix them for two months. The shell will gradually wear off. To facilitate the scarification process, hard seeds can be soaked for two days.
[!] Seeds in shells made from special compounds cannot be bubbled or scarified.
Soil and container for planting
The soil suitable for planting seeds differs from the soil mixture for adult plants. First of all, it must be loose, water- and breathable, sterile, and also contain a minimum of organic matter.
Ready-made options sold in stores include seedling mixtures and peat tablets.
It is also possible to prepare the substrate yourself. There is no single recipe; each option is good in its own way. All that remains is to choose the appropriate one, based on the available ingredients:
- floriculture classic - peat-sand mixture (1:1);
- peat, sand and coco soil (1:1:1);
- peat, sand, perlite (1:1:1);
- peat, vermiculite (1:1).
There is also an exotic, less common option - hydrogel for plants. It is used both in its pure form with the addition of complex fertilizers, and as an additive to the substrate.
After the soil mixture is ready, it needs to be disinfected - poured with a weak solution of potassium permanganate, frozen or, conversely, kept in a hot oven. To reduce the likelihood of soil acidification, you can add a little crushed activated carbon and Fitosporin (a drug against fungal and bacterial diseases).
As you know, for better seed germination, high humidity and heat are required. In order to create suitable conditions, gardeners sow seeds of domestic plants in greenhouses. There are store-bought options, which are plastic boxes with a divider and a transparent lid with holes. You can make the same thing yourself from a food-grade plastic container. It must be transparent and closable, there are no other special requirements. As a last resort, any container without a lid, covered with a plastic bag, will do.
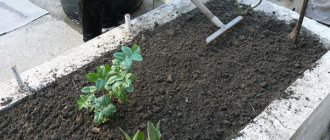
Planting seeds of indoor plants
So, the seeds are prepared, the substrate and container are selected, it’s time to sow.
This process can be described step by step as follows:
- At the bottom of the greenhouse we pour a layer of fine expanded clay, which acts as drainage;
- Place soil on top;
- We moisten the substrate to the base by spraying with water from a fine spray bottle.
- Without digging too deep, we plant the seeds.
The degree of deepening depends entirely on the chosen indoor plant. On average, the sowing depth is equal to two to three seed diameters.
[!] The seeds of some house plants (adenium, gloxinia) are not buried at all, but are simply laid out on the surface of the soil.
Further care is not difficult. Firstly, the greenhouse must be placed in the warmest place in the apartment. Some gardeners even place a container with seeds on the radiator, thus arranging bottom heating. This is a rather risky method, since there is a chance that the seeds will simply “cook”.
Secondly, you need to decide on the lighting. It is better to germinate some seeds in bright sunlight (adenium, eustoma, dionaea), others, on the contrary, in the dark (cyclamen). Depending on the preferences of the plant, we remove the greenhouse in a dark place or expose it to the sun. If seeds are germinated in summer, in the heat, open sun is contraindicated, the best option is slight partial shade.
From time to time, the seeds need to be ventilated by removing the lid of the greenhouse. The frequency of ventilation is about 15 minutes a day. In addition, the substrate should always be slightly damp.
All that remains is to wait for the first shoots...
Seedling care
After the seeds hatch and the seedlings grow by about half a centimeter, the upper part of the greenhouse must be removed, accustoming the shoots to normal room temperature.
Developing seedlings are usually very weak and sometimes remain unsteady on the ground. In this case, you can use a support or simply add and compact soil around the stem.
After the first pair of leaves appears, the seedlings can be pruned.
[!] Picking is the process of transplanting young plants from a common container into separate pots.
To do this, you need to take plastic cups according to the number of sprouts, filled with a soil mixture suitable for adult plants. For picking, you should select only strong, healthy seedlings, and discard thin and yellowed ones. In order for young seedlings to be easily removed from the ground, they need to be watered abundantly, then carefully removed from the soil using a spatula and planted in prepared cups.
[!] When picking, it is important not to deepen the growth point. If you do this, the plant will stop developing and may die.
In the future, when the seedlings grow a little, they can be pruned again or planted immediately in a permanent container.
As you can see, growing a home plant from seeds, although not easy, is still possible. And an adult green beauty, obtained from a small seed, can become a real source of pride for a gardener.
Pre-sowing preparation of indoor plant seeds
Just before sowing or germination, purchased seeds should be soaked in one of the well-proven bioactive solutions:
- “Potassium humate”, “Sodium humate” - in 0.01% aqueous solution for 24 hours;
- “Zircon” - 1 drop per 150 milliliters of water - for 12 hours;
- "Epin" - 2 drops per 100 milliliters of water - for 24 hours
Experience shows that soaking seeds before sowing in artificial biostimulants allows them to germinate and develop much faster with high survival rates.
There are also supporters of natural growth stimulants. These include potato juice, honey, aqueous solution of ash and aloe juice:
- ash - water infusion of 2 tablespoons of ash in 1 liter of water, soaking for 4 hours;
- aloe juice - aqueous solution in a 1:1 ratio, soaking for 24 hours;
- honey - an aqueous solution of 1 teaspoon of honey in 1 glass of water, soaking for 5 hours.
- potato juice - from several tubers, frozen in the freezer and thawed, squeeze the juice, soak for 8 hours.
A widely used home method is to disinfect seeds before sowing with a pink solution of potassium permanganate (potassium permanganate). Soaking should not last more than 15 minutes and should be completed by washing the seeds under running water. There are also unique ways of pre-sowing soaking in orange or lemon juice, in paste and even vodka.
Basic rules for sowing seeds of indoor plants
So, everything is prepared: processed and slightly dried seeds, suitable shallow boxes with a drainage bottom, purchased or formed planting soil for seedlings, glass or a transparent plastic bag. Place a drainage layer on the bottom of the box, usually made of expanded clay; I personally prefer eggshells, fearing the acid reaction of expanded clay. Place soil on top and moisten it with warm water to its entire depth.
Seeds are buried at a rate of two to three times the depth, and plants such as gloxinia and adenium are simply distributed on the surface of the soil. The best results for any form of sowing are obtained by a mini greenhouse, for which you place glass on the box or insert the entire box into a transparent bag, the top of which is tucked under the box. In both cases, there is no need to water in the next 3-4 days and the hatched seedlings will be clearly visible.
It remains to provide an even warm temperature not lower than +20 C, and from the moment of germination - sufficient lighting. As soon as shoots become noticeable, remove the glass or bag and water only by irrigation so that the soil does not crack. It is undesirable to place the box on a heater battery for heating - it is dangerous due to overheating and death of the seedlings.
It is necessary to decide on the lighting standard. Seeds such as adenium, dionaea, eustoma will germinate only in bright sunlight, while cyclamens require darkness for germination. If germination takes place in a greenhouse (under glass or film), then a periodic “walk” is required - the box is opened for 15 minutes (once a day). Do not allow the soil to dry out.
Caring for indoor plant seedlings
After the sprouts appear and they reach one and a half centimeters in height, open the closing part of the greenhouse, increasing the time of their “walk” so that the seedlings adapt to the external environment in 2-3 days.
To avoid lodging of seedlings, you can attach a support to them or add soil, as if to hill them up. When a pair of true leaves are reached, the seedlings can be picked (transplanted) into separate small pots.
Before transplanting, moisten the soil in the box in order to remove the seedlings for planting them in small pots with suitable planting soil with the least trauma to the roots.
When diving, use only strong and healthy specimens, discarding weak and unpromising ones. You need to remove them from the ground using a spatula in order to injure the root system of the plants as little as possible. As soon as the plants have formed into seedlings, they can once again be placed in a larger pot by transferring and adding soil, and then by transferring them into the main container, where it will develop into an adult plant.
Although it is not so easy to grow your favorite plant from a seed , it is, so to speak, gestation, when you get the embodiment of your floral dream in certain pains, be proud of yourself and admire this living green and blooming beauty, to the birth of which you have a direct connection . If you don’t know what kind of flower you want to see on your windowsill, try choosing from the list of plants that are mascots of the zodiac signs. Good luck in green creativity and home gardening!
Features and rules for growing indoor plants from seeds
The features of such growing indoor plants depend on the specific variety chosen, since they all differ in environmental requirements and have different growth periods.
However, there are a number of general rules that apply to all flowers, a list of them is given below:
- The seeds are pre-soaked; to do this, they are wrapped in gauze or a bandage, after which they are immersed in clean water and kept in it for about 2-3 days. At the same time, you must not forget about changing the water; it should be done at least once every 5-6 hours.
- There are plants for which an exception is made, since soaking their seeds is contraindicated. Such plants primarily include begonias and virtually all varieties of cacti.
- To germinate seedlings and their full development, it is necessary to maintain a special microclimate; its features depend on the level of frost resistance of the selected variety. Tropical breeds require a stable temperature regime of at least +28 – +30°C, while less heat-loving varieties will need a temperature of +18°C.
- Formed seedlings that already have 2–3 leaves need to be planted in individual pots. There is no need to delay this process, since they will interfere with each other’s development when they are in the same container.