Many novice flower growers wonder what to plant an orchid in? I’ll say right away that a pot is not the best container for growing many orchid species. Why?
Firstly, plastic glass-shaped pots are intended for indoor plants with a different root system that grows deep into the soil.
Even if the pot is transparent, supposedly “special for an orchid,” it will not feel comfortable in it, since this position of the roots is unnatural for it.
It will simply be more convenient for you to water with transparent walls, but epiphytic roots are not designed for deep penetration into the substrate.
Remember how most orchids grow in nature - their roots tend to the sides, clinging to the bark of trees.
Secondly, it is important for them that the roots dry quickly and evenly along their entire length.
And such glass-shaped solid pots significantly impede this uniform and rapid drying, as well as good air exchange.
It is better to plant an orchid on a block or in a basket (see the article “How to make a basket for orchids”) if you want to create conditions that are closest to natural.
But if this is not possible, and you still have to plant in a pot, then plant correctly! So that later there will be no excruciating pain for either her or you. You will find everything about how to properly plant an orchid in a pot in this article.
What should the pot be like?
If it is transparent, this is good and convenient for you, but transparency alone is not enough. The container should have many holes not only in the bottom, but also in the side walls. If they are not there, then you need to do it yourself, for example, using a sharpened soldering iron or burner.
Without holes, and therefore without air exchange, uniform drying of roots in a plastic container is practically unattainable. In addition, good air exchange reduces the risk of fungal and bacterial infections.
For moisture-loving orchids, it is enough to make holes in the bottom 1/3 of the pot. But for most, you still have to make holes almost along the entire perimeter.
It is very good if the flowerpot has legs, then there will always be an air gap between the bottom and the surface on which it stands, and this is an additional plus.
The size of the container should be appropriate to the root system, neither too large nor too small.
Exotic orchid: to replant or not
Before you think about how to plant an orchid, you should remember that for any flower, be it an ordinary geranium or an exotic prickly pear, any manipulation can turn out to be quite traumatic stress, after which a long period of recovery and rest is required. For overseas orchids, replanting most often ends with the suspension of root growth, a kind of conservation, when the plant seems to freeze, awaiting further events. However, contrary to fears, in most cases the flower “comes to its senses” and continues to grow as if nothing had happened.
Important
Precisely because orchids experience severe stress when transplanted into another pot, you should always be extremely careful, and most importantly, manipulate it no more often than once every two, or even better, three years. If you had to plant an orchid not according to the planned schedule, then it is better to postpone the event to spring, when it is in the phase of its most active growth.
Features and reasons
Like any other plant, an orchid is transplanted into another container for a reason; there must be good reasons for this. Even a beginner can figure out when it’s time to perform all the necessary actions and how to do it.
- As the plant grows, it can gradually deplete the soil in which it grows. Since it does not have the possibility of natural recovery, the problem can only be dealt with by replacing the soil with another one, more saturated with nutrients, vitamins, minerals and other substances.
- Regular abundant watering of orchids does not lead to anything good, since the rhizome can rot and then the situation can only be saved by an emergency transplant with cleaning of the damaged shoots.
- The soil in which sphagnum moss predominates should be changed once a year, and the one in which there is more coniferous bark can be left for three to four years.
- From cramped pots, the roots of flowers can begin to peek out and displace the soil, then there is no way to do without replanting into a larger container.
In the latter case, the roots begin to intertwine and completely displace all the soil from the pot, which negatively affects the development and growth of the flower as a whole. In order to control this process and plant the orchid correctly, it is better to choose a transparent pot, where you can clearly see what is happening inside.
Emergency measures
It is also worth talking not about planned transplants, but about emergency cases when there is no other choice. After all, it is better to subject a flower to stress, but save it, than to leave it to the mercy of fate.
- If the soil in the pots has completely decomposed and turned into dust and rot, then it’s time to start replacing it, otherwise the plant will die.
- When the roots begin to rot and this is already noticeable with the naked eye.
- As a result of the activity of parasites, the root system of the flower is damaged.
If there are uninvited guests such as tips, nematodes or scale insects, then you need to act quickly so that the “infection” does not spread to your other green pets. Many novice botanists are interested in whether it is worth disturbing a plant that has just been brought from the store and whether it should be immediately planted in a new pot. Since it is most often customary to buy a plant in bloom, it is not worth replanting it right away, but it is better to leave it until the time when it enters the active growth phase.
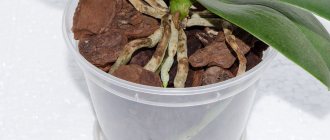
What should the substrate be?
For plastic dishes, it should be as little moisture-intensive as possible: tree bark of medium or large fraction, polystyrene foam.
Flower shops sell a special substrate for orchids. Sadly, for the most part this substrate is as “special” as “special pots”.
Where do the names of orchids come from?
It is better to prepare the substrate yourself. But if you don’t have such an opportunity, and you have to use a store-bought one, select the largest elements from it and use only those. There should be no peat or sawdust. Leave all the change for other plants.
Factors determining the type of planting
One of the reasons for such disagreement in determining the best planting method is the individuality of each specific situation. Firstly, there are many types of indoor orchids, and what is suitable, for example, for Cambria is not suitable for phalaenopsis.
Secondly, we all live in different conditions. The choice of planting method is influenced by the climate, the range of summer and winter temperatures, and the possibility/impossibility of organizing sufficient humidity. Daylight hours are important for an orchid: will you have backlighting or not? Where do you plan to place your beauty: on a ventilated windowsill, near a fire radiator, or are you ready to create heavenly conditions for her?
All these factors determine not only the choice of planting method, but also the future life and development of the plant.
Treatment of orchids before planting
It is recommended to plant orchids “dry”, that is, in the period between waterings, when the roots have already dried well.
Carefully inspect the plant, if necessary, remove all rotten parts so that they do not become a source of infection. Be sure to disinfect tools for processing, as well as sections after processing.
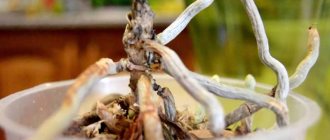
Check the roots especially carefully. They may look good on the outside but actually be rotten on the inside. Press your fingernail onto the shell and check each area along its entire length, especially at the base.
If the shell is pressed through, it means that the root inside is empty and therefore dead, it needs to be removed. Healthy roots are solid roots!
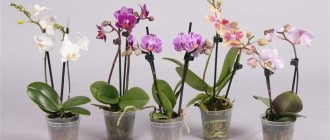
Other types of orchids for home use
In addition to the butterfly, flower growers choose the following varieties:
Wanda
Phalaenopsis propagation at home: examples by children and cuttings
The phalaenopsis orchid is not the only orchid that can exist outside the wild. For example, the vanda orchid, which is native to India, can feel quite comfortable in an apartment.
How to plant a Vanda orchid correctly? The requirements for its content are somewhat different from those required by phalaenopsis. Vanda, unlike phalaenopsis, which prefers diffused light, feels great in a well-lit place.
For your information! However, to avoid burns, direct sunlight on leaves and flowers should still be avoided.
In addition, Vanda is extremely thermophilic. The most acceptable temperature for these orchids will be 16 °C at night and up to 30 °C during the day. The optimal humidity for vanda depends on the temperature: the higher the temperature, the higher the humidity. And, in order to prevent rotting of the roots, a constant flow of fresh air should be provided. Like phalaenopsis, vanda is an epiphyte, which means the soil requirements are the same. Watering the vanda can be done in several ways:
- immersion Place the pot with the plant in a container of water for a few seconds and allow excess liquid to drain;
- Irrigation with warm water. This method is most preferable for vanda. It happens like this: the Vanda is placed in a bathtub and watered from the shower with warm water until the roots turn green. After an hour, it is necessary to dry the leaves from moisture;
- spraying. Some vanda breeders prefer this method of watering, since in this case the water from the roots quickly evaporates. To ensure that the plant does not suffer from a lack of moisture with this method of watering, it is necessary to increase the frequency of spraying.
With proper care, Vanda can bloom for up to 12 weeks. A decrease in the intensity of flowering or a lethargic appearance of the plant will make it clear that something is going wrong.
Vanda orchid
Lady's slipper
Another representative of orchids that can feel normal at home is paphiopedilum or, as it is called for its peculiar appearance, lady’s slipper. How to plant an orchid that looks like a goddess's slipper?
This orchid is a lithophyte, preferring rock crevices filled with humus. To place this orchid, a window sill oriented to the northeast or northwest is preferable. In addition, the lady's slipper can withstand a slight darkening. The temperature of this unusual orchid is 18-25 °C. To contain paphiopedilum, you can choose a ceramic or opaque plastic pot.
For your information! Soil requirements are generally the same as for other orchids. However, the lady's slipper will respond with gratitude if charcoal and pre-disinfected coarse river sand are added to the soil.
This orchid prefers frequent and abundant watering. However, it is important to regularly dry the roots to prevent rot. The humidity that the lady's slipper prefers ranges from 60-80%. This is ensured by placing the pot on a tray with water and expanded clay.
As a rule, Lady's slipper blooms in late autumn. Each rosette forms a single peduncle with one shoe. The presence of an open flower indicates that the plant is quite happy with the conditions of its detention.
Lady's slipper orchid
Basic principle of landing
I hope you have already understood that epiphytes cannot be planted in the same way as plants with a tap root system.
In a pot with an ordinary indoor plant, the soil begins to dry out at the top, but in the depths it remains moist for some time. And while this is normal for most plants, it is completely unacceptable for epiphytes.
Therefore, such dishes should be considered just as a stand, but nothing more.
The main principle of proper planting of orchids is that the substrate in the center should dry out just as quickly as the one on top.
Let's look at a few options:
First option
The first option will be based on the example of phalaenopsis. This planting method is suitable for all orchids whose maintenance conditions are similar to those of phalaenopsis and the entire Vandaceae tribe.
On the left is an incorrect landing:
- The container is solid, without holes;
- There is no drainage;
- The substrate is shallow and occupies the entire space, there is no air exchange;
- The base of the plant is located in the thickness of the substrate.
An orchid planted in this way will sooner or later begin to hurt.
The one on the right is correct:
- Container with holes;
- Large drainage made of granite crushed stone;
- A fairly large substrate in which voids are visible, which means air exchange is ensured;
- The base of the plant is slightly raised above the surface of the substrate;
- The most dangerous zone in terms of waterlogging has been eliminated - the center of the pot, where a large piece of foam plastic is placed, directly under the base.
Second option
The second method (using the example of masdevallia) is suitable for relatively moisture-loving orchids that like to be watered more often, but, nevertheless, they also do not tolerate stagnant water and their roots also need good aeration. These are bulbophyllums, draculas, miltonias, masdevallias, oncidium group and other orchids similar to them in terms of keeping conditions.
In the picture on the left, the same mistakes were made as in the first version. In addition, the substrate contains a large amount of moss - this is a very moisture-intensive material that retains moisture for a long time.
On the right is the correct landing:
- Powerful drainage, occupying half the pot, again with a piece of foam in the center;
- For such plants, the substrate layer should not exceed 10 cm. And for bulbophyllums, in general, the substrate layer is 2-3 cm;
- The moss is laid in a thin layer only on the surface and only along the edge of the pot.
Third option
Using Cattleya as an example. Suitable for all sympodial orchids.
The mistakes of improper planting are the same: shallow substrate filling the entire container; the rhizome is buried. In addition, the cattleya is planted in the middle of the pot, and this arrangement is only suitable for monopodial orchids.
On right:
- Large waterproof drainage, and in the center too;
- The rhizome is located on the surface of the substrate; you can make it rise slightly above it;
- And most importantly, due to the fact that the old bulbs are planted closer to the edge, free space is left for new growths.
Growing orchids at home
How to plant a cactus: examples at home
Orchid propagation is possible in several ways - stem shoots (babies), cuttings and seeds. At home, the first option is preferable.
Babies are young shoots that appear on root buds. Planting material that already has the rudiments of its own root system is preferable. A shoot that has a formed root system and 3-4 leaves is considered ready for transplantation.
After the baby is carefully separated from the mother plant, it is necessary to sprinkle the cut with coal. This is done in order to avoid the development of diseases and root rotting. The cut deck, after drying for 3 hours, must be planted in moist soil.
For the first few days, you should refrain from watering, limiting yourself to spraying with a fine spray bottle. When the young orchid has finally taken root, you can care for the plant as usual.
Orchid babies
Securing the orchid
Now the most important rule is that after planting the plant must be firmly secured. Because even the slightest wobble can negatively affect rooting. The root tips are extremely sensitive to mechanical damage and can stop growing even with a slight injury.
Each orchid grower fixes in his own way, who is good at what. Some tie the stems of the plant to sticks stuck into the substrate. Others are wrapped several times over the edge with cut nylon tights. It may not look very decorative or aesthetically pleasing, but it is reliable. Moreover, after rooting, all fastenings can be removed.
There are also special fasteners for plants; if you find them in flower shops or online stores, that will be great!
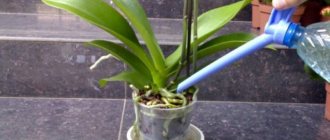
Watering after planting. When?
After planting, the orchid is not watered for as long as possible - 5-10 days, sometimes 2 weeks, depending on the condition. At the same time, it should be in a shady, cool place.
Basic mistakes in caring for orchids photo
At this time, instead of watering, it is recommended to spray the leaves and the air around them (not the substrate), but only in clear, warm weather. And when watering for the first time, it is recommended to add phytosporin to the water.
These tips will help you plant an orchid in a pot correctly and avoid common mistakes made by beginners. If you have anything to add to them, share your experience in the comments.
Author: Irina Baltaga Updated: March 31, 2020
- All about orchids
Comments
Krasnova Irina 03/13/2016 13:55 I really like your site.
I find a lot of information here that is useful to me. Thank you. Answer
Update list of comments
Care after transplant
After transplanting, place the orchid in a cool place, protected from drafts and sunlight. The desired temperature is about 20-22 degrees. Do not disturb the plant or move the pot unnecessarily. The orchid should stay in a shaded place for about 10 days.
Peculiarities! Phalaenopsis often grows not upward, but to the side. This plant requires staking. Wrap soft twine around the base of the stem and secure it, for example, to a hole in the side of a pot. After a few months, the garter can be removed.
Since Phalaenopsis is planted in moist bark, it does not need watering for the first 3-4 days. You can spray the moss, but make sure that water does not accumulate in the axils of the leaves.
More information can be found in the video below: