Flower growers managed to implement a completely acceptable method of growing epiphytes indoors, and today orchids in expanded clay are no longer a rarity, but a fairly common method for cultivating Asian exotic plants in temperate latitude rooms.
This method has many opponents. Drainage expanded clay contains salts that are undesirable for the root system of orchids. However, for such skeptics there is a simple explanation - drainage expanded clay is not suitable for use as a substrate.
Preparation
In order for the planting to be successful and the orchid to take root in a new place, you need to purchase everything you need in advance, and you should start with choosing a container.
Choosing the right container
It is better to use a glass container as a pot; it is more stable than plastic, and it looks more beautiful.
In addition, glass does not have a porous structure, which prevents root ingrowth. The shape can be different, but round is undesirable, since if you need to replant the plant, pulling out the root system without damaging it will be problematic. The round flask will have to be broken. For children and orchids with small roots, all kinds of glasses, glasses and even beer mugs are suitable, it all depends on your imagination or what you have on hand. Larger plants need a large capacity: multi-liter vases or even small aquariums in which several flowers can be planted at the same time. But you shouldn’t do this right away; it makes more sense to test a closed system on one plant.
Reference! You should choose a transparent vessel, this makes it easier to control the water level and observe what is happening inside.
You can find out more about orchid pots here.
Substrate
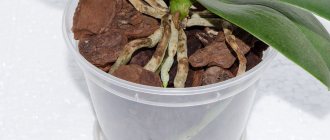
The substrate for planting in a closed container consists of several components that cannot be mixed, but must be laid in layers:
- expanded clay;
- sphagnum moss;
- bark or substrate for orchids;
- charcoal.
All this is sold in a flower shop, but bark and moss can be collected in the forest, if there is one nearby. Pieces of bark are preferably large, so that moist air can “walk” freely between them, and without traces of mold; they can also be successfully replaced with cones.
There is no need to boil, calcinate or disinfect anything; everything is poured into the container directly from the bags. It is advisable to purchase sphagnum moss alive, or when purchasing, choose one that has at least small green twigs; they will then come to life and the moss will grow.
You can find out more about soil for orchids here.
Orchid lovers may also like the following articles:
- about the Thai orchid;
- about growing a flower from seeds at home.
An interesting question: why do orchids need drainage?
Drainage is an important element in potted houseplants. And many gardeners, out of habit, add it to all pots. But orchids are clearly different from most plants.
Do they need drainage if the soil in which they grow in a pot is itself similar to drainage?
Drainage for orchids
Let's learn more about drainage for orchids. A drainage layer or drainage is a layer of inert, water-permeable material that is placed on the bottom of a pot or other container with a plant to quickly drain excess water during watering.
Orchids do not always need drainage.
Various materials can act as drainage, such as:
- Pebbles;
- Or shards;
- Expanded clay is most often used.
Does an orchid need drainage? Based on the above definition, drainage is used when the pot is filled with a fine-grained substrate. Orchids are usually planted in a substrate based on tree bark. Such mixtures, as a rule, consist of components of a large fraction, which allows the substrate to pass air and water quite freely.
However, each composition of the mixture can be distinctive from each other, and if we plant Phalaenopsis exclusively in coarse pine bark, then the presence of drainage here is absolutely useless, since the substrate easily allows all the water to pass through, so such pots are often soaked in basins of water rather than watered above.
It’s another matter if the orchid is terrestrial - it requires a heavier, nutritious substrate, therefore, the presence of a drainage layer is quite justified, since it will facilitate the outflow of excess water from the pot after watering.
Therefore, the answer to the question: “Do orchids need drainage?” is ambiguous and relative, it depends on what kind of substrate and pot are used:
- Relatively heavy, in a pot with solid walls or a flask (drainage is needed);
- Or light, in a perforated pot with holes (no drainage needed).
In some cases, if transparent pots, glass vases or flasks are used, the drainage layer may consist of multi-colored pebbles and serve a purely decorative function without providing any practical benefit.
You can also observe in flower shops that orchids have no drainage. This fact is also proof that orchids thrive without drainage.
Expanded clay
A lightweight, porous building material obtained from clay shale. Expanded clay may have:
- Various shapes and fractions;
- Inert;
- Durable;
- And very accessible.
Many experts use expanded clay for orchids.
These positive qualities have made expanded clay the most popular material for drainage in floriculture. It has no significant negative properties.
Styrofoam
Roughly speaking, it is a foamed polymer. Foam has:
- A light weight;
- Non-toxic;
- Does not create favorable conditions for the development of algae and fungi.
From a large piece of polystyrene foam you can obtain fragments of the size required in a particular case. However, when exposed to sunlight, it breaks down over time. Looks untidy in a pot. In general, it is inferior to expanded clay in terms of durability and practicality.
River pebbles, pebbles
This material is practical on a par with expanded clay. Heavy weight will prevent accidental knocking over of a large, sprawling plant.
Instead of expanded clay, you can use pebbles or pebbles.
- Very decorative;
- And it has a very attractive appearance, which will help create an accent in a potted plant.
Crushed stone, pieces of brick
Brick fragments are quite useful materials for drainage if expanded clay or pebbles are not available. The positive side is that crushed stone and brick can be found in the city on the street or at any construction site/abandoned site, that is, you can get it yourself without financial expenses. A negative property is the low decorativeness of the material.
Crushed stone consists of limestone and contains calcium carbonates, which is unacceptable.
Shells
A poorly applicable material, since the sinks primarily consist of limestone, which is unacceptable for the reasons stated above. Shells can also be randomly placed with the inside facing up and obstruct the flow of water.
Also, decorating pots with epiphytes with shells of underwater creatures, especially marine ones, is at least absurd from an aesthetic point of view.
Caring for an orchid in expanded clay
Growing an orchid in expanded clay requires less attention from plant owners - this is the opinion of orchid growers with experience in using expanded clay substrate.
Watering
In hot summer weather, water is constantly poured into the container; it is undesirable to allow it to dry for too long. It is noteworthy that after watering, after 2 hours, the upper granules are already dry, but at this time the roots of the orchid, even under the rhizome, remain moist and greenish. When they turn white, it's time to rehydrate the pot - about a couple times a week in the summer, when the weather is especially hot.
Some orchid growers also use immersion watering with this growing method, without leaving water at the bottom of the pot. The granules are saturated with moisture and release it to the roots for a long time, depending on the ambient temperature - longer in cool rooms, faster in warm rooms.
A certain problem is created by a sharp change in temperature in the apartment, when you should very quickly drain the water from the pot and dry the roots.
Feeding
An orchid in expanded clay is fed in much smaller quantities than when grown in bark. Fertilizers are dissolved in irrigation water in doses reduced by four or even six times those recommended by the manufacturer and indicated on the packaging.
Regarding the frequency of fertilizers, opinions of orchid growers differ, but the majority feed plants grown in expanded clay no more than once every 2 weeks. Some orchid owners add fertilizers through watering - once they moisten with clean water, the next time with fertilizers, and they also alternate the fertilizers themselves - mineral with organic.
During long-term use, it is recommended to wash the expanded clay substrate with distilled water to get rid of its salinity.
What expanded clay is suitable for an orchid?
If you plan to grow an orchid in expanded clay, then you should understand that you need to clearly know the selection criteria. For example, if you use drainage expanded clay, the salts contained in the water will gradually accumulate in it. Ultimately, this can negatively affect the orchid and it will not grow.
Many gardeners prefer garden substrate expanded clay. This option is environmentally friendly; high-quality clay is used for production, which has previously been purified from existing salts.
Why is it necessary to replant an orchid?
Replanting an orchid, especially immediately after acquisition, remains one of the most important measures for caring for it. Large woody elements of the substrate in which the flower grows may contain mold, spores of fungal diseases, viruses and parasites.
Conscientious flower shop sellers treat the substrate with special solutions to eliminate possible pests and pathogens, but not everyone does this.
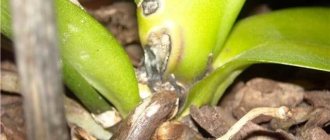
Using a substrate contaminated with fungal spores leads to dire consequences
If the gardener already has other orchids, then a new one purchased with untreated soil can cause diseases in the entire group of flowers. To eliminate possible consequences, the new plant must be isolated from the rest for a period of up to one month or until the end of the active flowering phase. In this case, you need to monitor the condition of the substrate daily. If the slightest signs of rotting, fungus, changes in the color and structure of leaves, parasites and their metabolic products are detected, therapeutic and preventive measures should be taken immediately. One of these measures is transplantation, which involves disinfection and change of substrate.
In addition, there are a number of certain conditions and signs that indicate the need to relocate an orchid:
- 1–1.5 years have passed since purchasing the plant;
- the root system is strongly constrained by the walls of the pot and pushes the plant out;
- the substrate retains moisture for a long time and has signs of decomposition and rotting;
- the flower is affected by disease or pests and requires resuscitation measures.
In addition, a plant older than two years needs to be replanted every 2–3 years.
Features of the technique
Most orchids are epiphytes that live in a “suspended” state. Clinging to the bark of trees with aerial roots, they receive moisture from the air or from streams of rainwater. They draw useful substances from dying layers and rotted leaves.
It is impossible to recreate a tropical climate in a residential area, but certain conditions can be brought closer to natural ones. At the same time, the presence of a substrate is not the most important thing when keeping an orchid. It is much more important to ensure uniform moisture, nutrition and air exchange of the roots.
There are many cultivation methods - in bark, on blocks, in hydroponics and even with bare roots in a glass pot.
The last option is not known to many, but it is very interesting, so it is worth paying special attention to it
How to choose a glass vase
Wide, stable vessels of spherical and cylindrical shape are preferred for placing orchids. Vases in the shape of a cube or glass are suitable. You can use double planters, in which the inside contains holes for drainage.
Definitely won't fit:
- narrow, cylindrical or rectangular containers - the roots will be cramped in them;
- pots that are too high - the plant “sinks” in them along with the leaves and flower stalks.
Before buying a vase, imagine your orchid inside: is there enough space for roots and how will the leaves be arranged? Consider the possibility of securing the plant in a vertical position.
What varieties are suitable
Among orchids, species that do not require a dry and cool dormant period or have massive roots are better suited for cultivation in vases.
The choice of variety depends on the planting method:
- Into the water - phalaenopsis and vanda.
- Expanded clay includes phalaenopsis, dendrobium, vanda, cattleya, oncidium, coelogina, phragmipedium.
- In perlite - orchids with thin roots - dendrobium, oncidium, cattleya.
- In large diatomite - vanda; in the middle - phalaenopsis, dendrobium, slippers.
Risks of infectious diseases
Causes
The cause of this type of disease is the accumulation of pathogenic microorganisms
: fungi and bacteria.
To prevent orchid diseases, it needs proper care.
It is enough to imagine a damp basement in a building or a corner of a house on the north side to understand how this happens. Fungi or bacteria gather and multiply
in damp, secluded places. A glass vase without any ventilation is an ideal place in this case.
Prevention
It is necessary to ventilate the plant periodically
and the container itself. For epiphytes, access to fresh air is extremely important. In turn, this minimizes the possibility of:
- Stagnation of moist air inside;
- And the appearance of mold, mildew and bacterial colonies.
It is also very important to keep the plant in conditions acceptable to it.
, that is:
- Provide sufficient;
- Optimal mode;
- And watering.
Treatment
The vase must be washed periodically, as it accumulates on the inner walls.
- Algae layer;
- And mineral deposits.
The disinfection procedure or prevention can be carried out using
- A weak solution of potassium permanganate (of course, the plant should be removed);
- Or fungicides.
Possible care problems
In case of improperly organized watering, the roots of orchids in a closed system rot, and the root collar also suffers from the same care error.
A plant with a rotten root system is removed from the substrate and the roots are washed well. Remove the rotted ones, clean the damaged areas of the velamen and dry well for 3–5 days. The contents of the flower container are either changed or washed and dried.
If you plan to continue growing the orchid in a closed system, plant it back in the glass pot and review the watering regime. The plant, which is subsequently planted in an open system, is treated with an antifungal agent, for example phytosporin
Another problem that orchid growers often talk about is the infestation of small midges. The reason is the dampness of the substrate. Usually, after a good drying - a significant break between waterings - the insects disappear on their own; sometimes the surface of the moss is sprinkled with dry mustard powder.
Green plaque on the inner walls of the container spoils the aesthetic appearance of the entire flower, but it is almost impossible to fight it.
Green plaque on the inner walls of the pot
Features of care
In order for a flower to live and develop well in a closed system, it needs to be properly cared for throughout its entire life.
The main sign that watering is necessary will be the disappearance of condensation on the inner walls of the vessel and a change in the color of the roots. They will turn from green to light gray.
Two watering methods:
- Using immersion, water is poured into a container so that only the root collar remains outside of watering. Water for 15-20 minutes, after which the water is drained by tilting the container and holding the soil with your hand;
- It consists in the fact that water is constantly poured into containers at the level of expanded clay and is not drained after watering. This method requires timely addition of water when it evaporates.
IMPORTANT! When choosing a watering method, the gardener focuses on the temperature in the room where the orchid grows. Since at low temperatures, constantly pouring water can help. rotting of the root system
rotting of the root system
The main difference is more rare feeding with small doses of fertilizers. This is explained by the fact that all fertilizers poured into the container with the plant remain there. Therefore, the dose is reduced by 10 times so as not to burn the root system of the plant.
And the regime is reduced several times, alternating fertilizers with irrigation with ordinary water.
In a closed system, fertilizing is done less frequently and in lower concentrations.
Possible problems
Sometimes, if not properly cared for, an orchid may die. To prevent this from happening, you must avoid mistakes in caring for the plant:
- If the plant is watered with cold water or too often, the result will be rotting of the root mass - the orchid is removed from the container and the roots are treated. After complete drying, after 5 days they are planted in their original place;
- From frequent watering, small white midges sometimes appear in the bark. In this case, watering is reduced, drying the soil. After complete drying, the midges disappear;
- It is impossible to fight green algae, which eventually appears on the inner walls of the pot. If there are too many of them, the flower and soil are removed, and the container is washed and sterilized. After this, it is suitable for planting.
Comfort conditions for orchids without soil:
- A plastic or glass vessel in which the entire root system is placed;
- The roots are not damaged by fungal diseases;
- No rotting;
- The container has constant humidity without sudden temperature changes.
Watering the plant is carried out as follows:
- Water is poured into half the container, but so that it does not reach the stem of the plant. And the orchid stands in the water for 2 days;
- After which the water is drained from the glass or plastic vase;
- For the next 3-5 days, the flower stands and dries its root system.
At the time of watering, fertilizer occurs, which is produced 2 times a month at the time of plant growth.
Fertilizer is necessary because the plant has nowhere to get nutrients from. Aqueous solutions that are easy to dilute to the desired concentration have proven themselves to be effective. But we must remember that any fertilizing should be applied only after watering to wet roots.
The frequency of fertilizing does not differ from the basic care of a plant planted in the bark. That is:
- In summer 2 times a month;
- 1 time in winter (if they are not blooming at this moment).
Transfer
Replanting is practically not necessary when cultivating the plant in this way. If after 2-4 years the root mass does not fit into the container, simply select a new one - higher and wider, and move the orchid there.
Most often, replanting an orchid without soil is not required.
Therefore, the roots are not injured during transplantation.
Advantages and disadvantages
The phrase “orchid in expanded clay” sounds somewhat contradictory. It is difficult to imagine a combination of a delicate flower and a hard, even rough building material. But in reality, everything turns out not so bad. In any case, amateur flower growers note the following:
- moisture is retained excellently;
- its flow from top to bottom does not cause problems;
- you can reduce the frequency of watering;
- the risk of “flooding” the plant is practically eliminated;
- expanded clay will not decompose, nor will it rot (that is, replacements will be required less frequently);
- the interval between flower transplants increases.
However, he also has weaknesses. Let's mention them:
- expanded clay is very heavy (which makes the container heavier when growing large plants);
- this substance works well at home, but is of little use for greenhouses;
- as soon as you tilt the pot a little, the filler begins to spill out;
- It is very difficult to place and firmly fix the support for the orchid.
What kind of land is needed?
Clover lawn: pros and cons
Orchids grown at home are divided into two types:
- ground;
- epiphytic.
They differ not only visually, but also in their growing environment. Therefore, the soil for these two species is different.
- For epiphytic plants, soil is not only a source of moisture and nutrition, but also a support. The soil must contain a sufficient amount of mineral and organic substances. For example, you can use 1 part charcoal and 5 parts bark. The following are suitable additional components:
- dry fern roots;
- drainage;
- natural leavening agents.
- Since terrestrial orchid species require intensive nutrition, the following soil is suitable for them:
- peat;
- pine bark;
- leaf humus;
- moss;
- crushed coal.
To improve the soil composition, if necessary, add cork material in the form of plates, turf soil and sphagnum moss.
Selection of capacity
Glass or plastic containers are most often used as containers for orchids in an autonomous system. The first option is more preferable due to its increased stability and more attractive appearance. Glass also does not have a porous structure, which makes it possible to prevent ingrown roots. Plastic vessels are attractive because, if necessary, you can make holes in them with some kind of hot metal tip in the event that this method turns out to be unsuitable for the plant.
The shape of the container can be very different, but a round one is least suitable, since it is difficult to remove rooted plants from such a container. The shape should also be either leveled or one where the edges widen upward. Constricted vessels make it difficult to evaporate moisture from the soil surface. In warm conditions this is an advantage, but as the temperature drops, excess moisture will provoke the development of fungal diseases.
The size of the container varies depending on the size of the plant. The largest specimens are planted in large vases or aquariums. It is practiced to grow several large orchids at once in a large container, but at first you should still place the plants separately in a closed system.
If possible, choose a transparent container. It is easier to control growth processes and fluid levels there.
How long can flowers grow using this method?
Fans of the traditional method argue that the closed planting method can be used temporarily, only for the period of resuscitation of the plant or raising the baby. At the same time, many years of experience of other hobbyists shows that with proper care and compliance with all rules, orchids remain healthy and live in a closed system for many years.
Whatever planting method is chosen, you should always remember that any living organism needs attention and care, and a careless attitude will destroy even the strongest plant.
If you find an error, please select a piece of text and press Ctrl+Enter.
Reanimation of an orchid in expanded clay
Many people are interested in whether expanded clay is needed for orchids and, if so, why. The answer is simple: thanks to it you can revive culture:
- Before planting, remove all rotten areas from the plant’s root system.
- If there are black spots near the growth points, they are treated.
- The cut areas also need to be processed. Foundationazole and charcoal are used for this.
- The root system is placed in a rooter for some time. Sent to dry (but should not be exposed to direct sunlight).
- Planted in a prepared pot, you will also need to use a special support.
After this, favorable climatic conditions are created.
Advantages of expanded clay
Planting an orchid in expanded clay in a closed system has a large number of advantages, among which the following points can be highlighted:
- The substrate perfectly retains moisture after watering, after which it gradually releases it to the root system of the plant. In addition, air circulates freely and the plant receives the required amount of oxygen.
- The number of waterings is sharply reduced, eliminating the possibility of water stagnation and excess humidity levels.
- If necessary, expanded clay can be reused and, after processing, the plant can be planted in it again. Over time, the material does not decompose and does not begin to rot.
- Quite easy to use, no mess.
And most importantly, an orchid planted in expanded clay begins to grow roots quite quickly. This is very convenient, especially when the selected variety has some problems with the development of the root system.
Planting in one pot: pros and cons
So is it possible to plant several orchids in one pot? The practice of planting a group of flowers in one container has existed for a long time; many people find it successful and use it successfully.
Proponents argue this by asking why plants shouldn't grow together if they:
- have the same conditions of detention and care;
- bloom almost simultaneously;
- occupy a smaller area;
- retain moisture in the soil and air longer;
- like some closeness of roots;
- having fallen ill, there is an equal risk of infecting separately growing orchids standing nearby;
- help reduce cash costs for purchasing pots, substrate and other related materials.
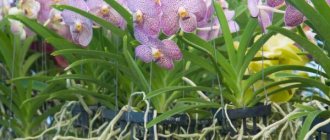
Orchids in a common container are lush, beautiful and unusual. And space is saved and the effect is stunning!
Opponents of group plantings are convinced that gardeners must be prepared for:
- difficulties with replanting due to the close intertwining of roots;
- the likelihood of flooding the roots, since it is easier to monitor their drying one by one;
- high risk of infection of flowers if one of them becomes infected.
In the natural environment, these exotic beauties, growing together does not prevent them from developing normally and blooming profusely.
You can grow several hybrid orchids in a common substrate at home. Of course, certain conditions and requirements must be taken into account
Does the plant need it?
To date, there is no clear answer on this matter. Some gardeners believe that drainage is not needed, it is of no benefit. Epiphytic varieties of orchids are air plants, the root system is on the surface. The drainage layer, on the contrary, retains moisture, preventing full air circulation.
Opponents respond by saying drainage is important. Terrestrial varieties of orchids, which prefer a soil mixture, do not tolerate the accumulation of excess liquid in the soil. Also, when watering orchids, the pot is buried in a container of water. The drainage layer helps eliminate unnecessary moisture and prevents the roots from soaking up excess liquid. Which side to choose is a purely individual decision.
What should not be used for drainage?
Important : It is not recommended to use organic materials as a drainage layer, because they are subject to rotting processes.
It is undesirable to use river sand, which can clog the drainage holes in the pot . Marble chips, when interacting with water, change the acidic composition of the soil, to which the orchid reacts sharply.
Eggshells, walnut shells, moss, dry leaves, and tree bark are also not recommended. These natural components have the ability to rot, which provokes the development of pathogenic fungi.
Features of transplantation: analysis of situations
Situations when it is necessary to separate the baby from the mother plant and replant it deserve special attention. In some cases, phalaenopsis can be planted not in the usual pot, but on a block or even in hydrogel balls. Let's consider these situations in detail.
Transplanting phalaenopsis babies
The formation of babies on phalaenopsis usually occurs from a dormant bud on the peduncle, and sometimes on the trunk. Such a shoot can be separated from the main plant when its roots, formed in the amount of 2-3 pieces, reach 4-5 cm.
Rules for separating and transplanting baby phalaenopsis:
- If the shoot is formed on the flower shoot, then it is cut off in such a way that fragments of the peduncle of 1-1.5 cm remain on the sides.
- The baby, formed at the base, is cut off at the point of attachment to the mother plant.
- After separating the cut sites on both the shoot and the main plant, they are treated with charcoal or activated carbon powder. In this state, the baby is left for 30-40 minutes to dry all the cut fragments.
- It is recommended to plant baby phalaenopsis in a substrate consisting of fine bark, charcoal and sphagnum moss.
- The planting container should be small; a plastic cup will do.
- You need to pour expanded clay onto the bottom, then lay out a layer of bark and a little sphagnum.
- After this, place the baby in the center of the pot and fill the inter-root space with substrate. You can lay a layer of moss on the surface of the soil.
You can water the transplanted phalaenopsis baby on the third day.
Orchid on a block
One of the ways to plant an orchid that is close to its natural growing conditions is to place it on a block.
The bark, the size of which is slightly larger than the size of the plant’s root system, is chosen as the base. You can purchase a block for planting in specialized flower shops or make it yourself
It is important that the base is not tarry or damaged by various insects
How to properly transplant a phalaenopsis orchid onto a block? The roots of the phalaenopsis are first “wrapped” in damp sphagnum moss, then in this form the plant is secured to a block using ordinary threads or fishing line. You should attach it carefully, without excessively squeezing the roots.
Over time, the roots will independently weave around the block and will be securely fixed in a natural way.
This planting method requires regular spraying of the moss and air around the plant to avoid drying out the roots. You can also moisten the flower by immersing the block a couple of centimeters in a container of water.
Transplantation into hydrogel balls: pros and cons
Often in the photo you can see phalaenopsis planted in hydrogel balls.
It is undesirable to use gel “substrate” for orchid plants on an ongoing basis due to its artificiality
Advantages of hydrogel:
- high ability to absorb and then release moisture to the plant or atmosphere;
- looks beautiful as a filler.
Disadvantages of hydrogel beads:
- deprived of substances necessary for phalaenopsis;
- Over time, they begin to mold or “bloom” from prolonged exposure to the sun.
Will an orchid grow in hydrogel? Not for long. Hydrogel is usually used only when it is necessary to reanimate a flower, for example, when there is a loss of leaf turgor. In this case, the plant is placed in aqua soil filled with water. It is left in this state for a couple of hours, after which the orchid is planted in the usual way.
Preparing a sandwich: planting an orchid in a closed system
Having decided to plant an orchid in a closed system, they decide on an important point - the plant will remain for a long time to grow in such conditions or until some problems with its general condition are resolved. For example, the resuscitation of an orchid that has lost its root system as a result of decay occurs successfully.
Choosing a pot
The container for planting phalaenopsis is selected plastic or glass. The good thing about a plastic vessel is that at any time it is easy to make holes in it with some sharp, highly heated pin, if the new method does not suit the orchids or the gardener does not like it.
The choice in favor of a glass pot is based on its decorative value. The assortment of stores will offer various beautiful vases, flowerpots, glasses or beer mugs for small orchids, which are much more stable compared to plastic ones. In addition, they are more convenient to rearrange due to the presence of handles. The only note about the shape is that it is advisable to choose a container that is flat or has edges that flare upward. Constricting vessels slow down the evaporation of water from the surface of the substrate. In constantly warm rooms, such a pot will be suitable, but as the thermometer drops, excess moisture in the substrate will provoke various fungal infections.
Glass pots for planting orchids in a closed system
Main substrate components
The composition of the substrate is no different from the usual cultivation of phalaenopsis orchids at home. The difference is that the components are not mixed, but laid in layers, like in a sandwich.
Substrate components:
- expanded clay;
- sphagnum moss;
- pine bark in fractions from 1 to 3 cm in size;
- charcoal, small amount.
Step by Step Actions
The fears of novice orchid growers about how to plant an orchid in a closed system are in vain. The steps in the planting process are simple and do not require special skills:
- The glass container is doused with boiled water for disinfection or sterilized according to the principle of preservation jars. Many orchid growers omit this step, considering it unnecessary.
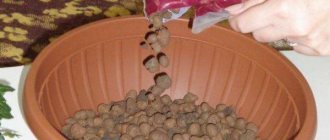
- At the bottom of the pot, approximately ¼ of its height, pour a thick layer of expanded clay, disinfected, scalded, or simply from store packaging.
- Lay a layer of sphagnum moss no more than 0.5 cm thick. Some orchid growers do without this layer.
- The rest of the glass pot is filled with a mixture of bark and a small amount of charcoal. It is preferable to use larger pieces - better breathability of the substrate affects the condition of the root system.
- The contents of the pot are poured with warm, settled water and left to soak for 30 minutes.
- The water is drained completely and the orchid is planted in the bark. The moss is soaked in water, wrung out like a sponge, and spread in a thin layer on the surface of the bark in the form of mulch, leaving free space around the root collar to prevent it from rotting.
The transplantation of the orchid into a closed system is completed, and the pot with the plant is placed at a permanent location in the apartment, observing all the phalaenopsis requirements for lighting and temperature conditions.
Planting an orchid in a closed system
The importance of making the right choice
Important criteria for a properly selected substrate for orchids: quality and composition. Compliance with the requirements ensures harmonious development, growth and systematic flowering.
Today, every flower shop offers a ready-made mixture developed specifically for this type of plant. But not every finished product can be absolutely beneficial for your flower, so be careful when choosing it.
Points to pay attention to:
The bark pieces are solid, strong, without visible damage. Size – up to 3 cm each
It is important that they do not crumble in your hands. The pieces of charcoal should not be larger than 2 cm and should not crumble. Moss should not be wet. A quality component – well dried and disinfected. If the substrate looks like a hard earthen lump, such a product is considered to be of poor quality. There should be no soil in the substrate, as it will accumulate moisture, harden and deprive the mixture of its ability to transmit oxygen. The substrate should be free of dust and moldy pieces.
What can be used as a drainage layer?
The most effective components are the following:
Expanded clay. One of the most common options. Does not contain toxins. Expanded clay allows water and air to pass through well, is lightweight and environmentally friendly. The material absorbs water and is also able to regulate water balance. Expanded clay is produced in different fractions. The size of the granules is selected depending on the size of the pot and root system
Please note that when you regularly fertilize your orchid, salt accumulates in the expanded clay. Therefore, the material should be washed regularly
Otherwise, the salts will burn the root system of the crop.
Expanded polystyrene or polystyrene foam. Small parts are used as soil loosener, and large parts are used as drainage. The material is not susceptible to rotting and disease. Polystyrene foam does not absorb water. The component also protects the roots from hypothermia. But it has one drawback - plant roots can grow into it.
River stones or pebbles. The main useful properties are water permeability and lightness. The main disadvantage is the inability to conduct heat. Therefore, it is recommended to place the orchid pot on the sunny side. In addition, pebbles and stones make the pot heavy.
Crushed stone and brick chips. You need to choose small pieces, preferably round in shape. This is necessary so that the edges do not damage the orchid rhizomes.
Landing rules
For planting orchids in expanded clay, a transparent plastic pot is suitable, allowing you to observe the progress of the development of the root system.
Drainage holes in the potted container must be formed in the walls; the bottom must be intact.
The optimal location depends on the volume of the pot:
- 0.3-0.5 l – above 1 cm;
- 0.5-1.0 l – above 1.5 cm;
- 1.5-2.0 l – above 2 cm.
For some types of orchids, for example, vanda, it is necessary to make additional holes for enhanced aeration over the entire area of the pot walls.
The expanded clay mixture is chosen depending on the variety being grown: for varieties with thick roots, the granules should be larger in diameter than for those orchids with thin root layers.
Planting is planned for spring, when the indoor flower begins the processes of growth and active root formation.
Before pouring into the pot, expanded clay is soaked in water for 24 hours, adding phytohormones.
Planting is carried out with the roots located in the surface substrate layer.
Planting several orchids in one pot
How to propagate an orchid at home: peduncle and other options
Some gardeners do not know how to plant several orchids in one pot.
The need for this may arise for certain reasons:
- if you want to pay tribute to aesthetics and watch a large bush bloom;
- if the removal of a child from the mother leads to her death;
- if there is simply no free space in the house.
But to implement this idea, it is necessary to create optimal conditions for the growth of all plants. Due to the fault of the gardener, problems can arise: the disease of one plant can spread to others (as well as pests attack all flowers at once), the transplantation process is complicated, and when the roots rot, it becomes more difficult to diagnose.
If these factors have not discouraged the desire to plant several plants in one container, then this can be done according to the following scheme:
- Pour the substrate into the pot to a third of its volume.
- Place the plants, carefully spread the roots on the surface of the ground (this procedure requires two people, so that one of them subsequently holds the flowers).
- Fill the remaining space with substrate.
Subsequently, it is recommended to take into account the conditions for caring for orchids so that they adapt faster.
Planting 2 orchids in 1 pot
Step-by-step instructions for moistening the soil during bud opening
At home
How to water a blooming orchid growing at home:
- establish regular watering with alternating evaporation of moisture (in a room with sufficient humidity and sufficient light - once every three days);
- It is better to underwater than to overwater. In summer, water evaporates faster, so you should water more during this period, and more moderately in spring. In winter, special control is needed, since the orchid often blooms at this time, gardeners make the mistake of moisturizing the plant in the same way as in summer. This is wrong; in winter, watering should be kept to a minimum;
- excess water is drained from the pan (the orchid is extremely sensitive to excess moisture);
- water with soft, settled water;
- water with warm water (about +37 degrees Celsius).
We wrote here about how to water an orchid at home so that it blooms well, and here we talk about how to do this if the flower grows in a pot or cache-pot.
On the street
For orchids outdoors:
- use soft (rain or heated melt) water;
- allow the soil to dry almost completely;
- water more often than if the orchids were in the room;
- Spray once every three weeks with a mixture of water and horticultural oil (or dishwashing detergent) to protect against insects.
Caring for an orchid requires certain knowledge. In the hands of an inexperienced gardener, this flower will not reveal its full potential, diseases will begin and flowering will stop. Most flowers of this species are not found in water in nature, due to the fact that their roots do not tolerate stagnant moisture and can rot from the salts in its composition.
The orchid is considered a finicky plant, but if certain rules are followed, this tropical beauty will thrive, regularly producing clusters of magnificent flowers.
If you want to grow a healthy and beautiful orchid that will please the eye, we advise you to read our articles on how to water a flower, including when transplanting it into another pot.
Treatment of orchids before planting
Planting an orchid at home requires compliance with certain mandatory operations. First of all, it is recommended to monitor the condition of the roots, because if something is wrong with them, the flower may die in a short time. Therefore, transplanting into a new pot should be accompanied by treatment of the rhizome.
Blooming orchid
Determining the condition of the roots
A transparent pot allows you to determine the state of the flower’s rhizome. If the soil does not allow you to see them, you should navigate directly during transplantation. Determining whether the roots are healthy or not is not difficult:
- green and silver colors make it clear that everything is fine with them;
- if they are brown and look dried out, they are not healthy.
Unhealthy roots require certain manipulations - they need to be cured and protected, while normal ones simply need to be processed.
Attention! It is also worth taking a closer look at the aerial roots of the plant, as they signal that the orchid is not feeling well.
What to process
If there are dry or rotten roots, they need to be cut to the fresh part, but the cuts should not be left just like that - they require disinfection. Processing can be done by:
- fungicidal solutions with the addition of copper;
- iodine;
- brilliant green;
- activated carbon;
- wood ash.
Many of the disinfectants can be found in your own first aid kit, and therefore there is no reason to worry.
Pruning Phalaenopsis Roots
How to carry out the procedure
Treatment can be carried out in several ways: by watering, spraying or immersing the pot in a solution. It is also recommended to disinfect the substrate - this can be done by mixing it with fungicidal powders.
Important! The chosen product plays a big role. It is worth giving preference to systemic drugs with a wide spectrum of action, since they can protect the plant from fungal diseases and pests
It is worth remembering that organic fungicides do not contain heavy metals, inorganic ones contain copper, and biological products treat the flower itself more carefully.
Peculiarities
Soil for orchids should not contain soil. Typically, a mixture consists of several components, each of which serves its purpose. Also, ingredients not only of natural origin, but also artificial ones, began to be added to the substrate for growing a flower. This is done to improve the quality of filling and living conditions of the plant.
The main requirement for the substrate is to prevent rotting of the root system by ensuring free access to oxygen. Some types of orchids are quite light-loving, so the universal substrate should not interfere with the free entry of light rays.
Soil for phalaenopsis orchids: main components and their characteristics
Proper soil is an integral part of the full development of orchids.
The soil for phalaenopsis is called a substrate and its choice is of decisive importance for the full development of the plant.
The composition is determined by the climate at the place of cultivation - temperature, humidity, light.
The structure and components are selected both according to conditions and hybrid characteristics, flower size, capacity characteristics, etc.
Only lush flowering and development will give the answer to the correct selection of the substrate composition.
The composition or mixture may include the following components:
- Tree bark;
- Sphagnum moss;
- Conifer cones;
- Charcoal;
- Vermiculite, perlite and expanded clay;
- Styrofoam;
- Peat;
- Fern roots;
- Coconut fiber, etc.
In modern flower retail outlets, a specially selected composition for orchids is available for sale.
But everyone, in principle, can prepare it on their own, following certain rules and recommendations.
Unlike natural components, synthetic ones have more disadvantages that you should pay attention to when choosing and preparing a soil mixture. When using polymers, it is worth knowing that under the influence of light, elements contained in air and water, decomposition processes occur, as a result of which a free form of styrene is formed
When using polymers, it is worth knowing that under the influence of light, elements contained in air and water, decomposition processes occur, as a result of which a free form of styrene is formed.
And it, in turn, penetrating into the roots, causes considerable harm to the plant.
In most cases, modern hybrid forms of phalaenopsis are not very demanding on the traditional composition of the soil.
But still, each maximizes its hybrid characteristics while observing certain proportions and composition of components.
The soil, or as experts call it, the substrate, must meet certain requirements:
- Be light;
- Moisture-intensive;
- Breathable;
- Loose.
Important! The main purpose of the soil is to create stability for the plant, close to the natural environment. Orchids use pine bark as the main component of the substrate, which has good aeration and moisture holding capacity.
Orchids use pine bark as the main component of the substrate, which has good aeration and moisture holding capacity.
Types of soil for phalaenopsis
There are many types of soils for orchids on the market. There are some with natural ingredients, some with artificial ones, or a mixture of both. Completely different proportions in the compositions.
It is very difficult for beginners to decide what kind of soil is needed with such a choice, and doing it yourself can be labor-intensive or simply lack the desire.
It is important to know the characteristics of your plant and understand the purpose of each component of the substrate and understand the proportions
Proportions
Proportions are determined by the conditions of the growing site.
- At high humidity, you can get by with just pine bark with a small addition of charcoal, no more than 5%.
- At average indoor air humidity (50-60%), sphagnum moss should be added to increase moisture capacity in proportions of 2 to 1.
- If the humidity levels are lower, then add moisture-intensive components in a ratio of 1 to 2.
Compositions
The composition of the substrate is also very diverse, but the main components remain the bark and very rarely some gardeners use leaf soil.
Different types of soils for phalaenopsis orchids.
The composition is determined by understanding the existence of the plant in nature.
As an epiphyte, phalaenopsis does not require rooting, but grows through symbiosis with crops of tree origin.
At home, this function is performed by the bark, which is parasitized by a large number of fungal cultures.
The remaining components are of secondary, but still necessary, importance for full development.
Main characteristics
In plant growing, expanded clay is used to improve soil, for drainage, and as mulch, which prevents waterlogging of seedlings. The material is also used as a separate substrate for growing plants.
The soil is replaced with expanded clay. For irrigation, a nutrient solution or water is used, but with the introduction of fertilizing throughout the growing season. What is attractive about expanded clay?
- The material is porous and highly hygroscopic. When watering, the liquid fills the pores and is retained in them for a long time. Flower growers and gardeners use this characteristic to grow moisture-loving plants. These include the orchid.
- Expanded clay is not destroyed by fertilizers and is resistant to humid environments. It will last a long time, up to 50 years. In the future, it may crumble, but it should not be discarded. It can be sifted. Large pellets are treated with an antiseptic and used again. Fine sand can be used to prepare soil mixture.
- Fungi and insects do not develop on expanded clay crushed stone, and pathogenic microflora do not settle. It protects seedlings from developing infections.
- The pH of the material is usually elevated, so before use it is recommended to normalize the acid-base balance of the substrate.
They do not produce special expanded clay for orchids. For growing flowers, expanded clay gravel with a medium fraction of 10-20 mm is used. It is sold under the name “drainage” or “flower expanded clay”. The manufacturer usually indicates what actions the material has been subjected to. Often, the drainage is already prepared for use, washed, sifted and normalized for acidity.
If there are no instructions from the manufacturer, then the substrate must be prepared. Typically, flower growers immediately process it, dry it and store it in plastic containers in a dry place.
Recommended: What is GrowPlant substrate?
Possible problems and risks when growing in expanded clay
When keeping orchids in expanded clay, you can encounter a number of problems.
Possible difficulties:
- Sudden temperature fluctuations. When the temperature changes, condensation accumulates inside the pot. This can lead to excess moisture. In this case, you need to drain all the water from the pot and dry the roots.
- Hypothermia. As the temperature drops, the granules cool and when in contact with the roots they can cause rotting and fungal diseases. Therefore, the temperature must be maintained at a sufficient level.
- Long survival rate. Due to a sudden change in soil, old roots are replaced by new ones. This may cause delayed budding.
- Uncontrolled moisture. Wet granules release water to the roots until they dry completely. However, if watering is not done in a timely manner, they begin to draw moisture from the roots.
- Root ingrowth. The expanded clay substrate often grows to the surfaces of the roots. When replanting again, there is no need to tear them off so as not to injure the velamen layer of the root system.
- Salinization of expanded clay. Over time, the soil can become saline with mineral deposits and salts. To clean such a substrate, it must be periodically washed with distilled water.
It is also important to choose the correct diameter of the drainage holes. If the holes are too large, expanded clay can easily spill out of the pot
With very small holes in search of air, the orchid can direct root growth vertically upward.
Planting methods
The choice of planting method depends on the type of plant, as well as your own preferences. It is believed that planting an orchid in a block requires less effort and care. However, such an opinion can hardly be called truthful.
How to make an orchid bloom at home
After watering, the owners often dry out the roots, and therefore it is worth watering the plant more often. For propagation, it is better not to take the seed for planting; the procedure is simpler by taking shoots (cuttings).
Important! The optimal time to transplant a plant is the growing season. If the plant remains in a dormant period, it may suffer during this process, which increases the risk of rotting processes.
Landing in a block
Planting an orchid in a block is the most practical method. It allows you to avoid frequent replanting of the plant; you can constantly see the roots to inspect the plant. The risk of damage and rotting of roots in this case is minimal.
Landing is carried out in the following way:
- It is worth placing sphagnum moss under the orchid.
- Holding the plant with your hand, straighten the roots of the plant, carefully secure it (over time, the flower itself will attach to the block, it is necessary to provide support for the first time).
- Cover the roots with sphagnum moss or bark on top to better retain moisture.
Immediately after transplantation, the plant needs to soften the conditions. The orchid needs to be sprayed frequently to maintain high air humidity.
Planting an orchid in a block
In the pot
It is necessary to grow orchids in pots if they do not like the soil to dry out completely. To do this, it is recommended to choose special containers with a large number of holes designed for planting these plants.
At this point, the question often arises whether it will be possible to plant an orchid in an opaque pot. This is acceptable, but then the plant itself may feel worse, and the condition of the roots cannot be viewed.
The landing plan is as follows:
- Prepare the container: make holes in the center and on the walls (if there are none). If you use a clay pot, it is worth attaching a metal frame to it, by which you can later pull out the plant without any problems.
- Pour drainage into the pot and fill one third with substrate.
- Carefully remove the flower from the old pot, shake off the old substrate, and rinse the roots with warm water. In this case, the root system should not be damaged. It is worth carefully inspecting the roots and cutting off any rotten or dry ones. Treat the cut areas with an antiseptic.
- Place the flower in the pot so that the connection of the roots remains at the level of the top edge.
- Distribute the substrate evenly between the roots, install a support, and compact it carefully.
To allow the plant to adapt and take root faster, it is worth changing the care system for at least 2 weeks.
Planting an orchid in a pot
Watering requirements
In order to bring maximum benefit to the flower and not harm it, when watering it is necessary to take into account the quality and volume of water, the needs of the plant, and the regularity of the procedure.
Information! When there is an excess of moisture, the acidity level increases, the soil stops breathing, fungal and bacterial infections begin to develop in it; when there is a deficiency, alkalization occurs, and small thin roots dry out.
Water for irrigation
For orchids, water is not only a source of moisture - it is a supplier of nutrients necessary for growth and flowering. If it is of poor quality and contains complex inorganic compounds, excesses of various minerals, pathogenic microflora, then this directly affects the condition of the roots, leaves, stems, the decorative appearance of the entire plant and becomes the cause of flower disease and sometimes its death. Too cold leads to putrefactive processes in the roots.
What kind of water can be used:
- settled tap water, at room temperature (or slightly warmed), if it is hard (lots of calcium and magnesium), then use methods to soften it (boiling, baking soda, vinegar, passing through a filter, settling, freezing);
- rainwater collected outside the city - apply after long-term settling in a cool room;
Yeast feeding for lush flowering of geraniums In winter, indoor pelargoniums almost stop growing. The reason for this is the short daylight hours and deficiency...
- warm (30°-35°C) boiled - soft, well absorbed by the roots, when boiling, chlorine compounds evaporate, salts precipitate, harmful microflora die;
- a mixture of distilled and tap water in a ratio of 1:2 if the water is very hard, in a ratio of 1:1 if it is of medium hardness;
- purified (filtered) – when passing through the filter, excess iron, calcium, and magnesium settle on it.
When to water
The guideline is the condition of the soil (substrate) - if it is wet, then there is no need to water, and the plant itself (leaves, pseudobulbs) accumulates a certain amount of moisture, which will save you if there is a slight delay in watering.
The time of watering is influenced by the conditions in which the flower is located - if the pot is not located in direct sun, there are no sudden changes in temperature, then the soil can be moistened at any part of the day; if it is in a cool room, then the best time is morning. The day is ahead, a lot of moisture will evaporate and by night the flower will be comfortable in a cool room.
In winter, the flower requires less moisture due to slower growth; with the arrival of spring, all processes are activated, so the volume of moisture added needs to be increased
During the period of bud setting and flowering, it is especially important to observe the norms and hydration regime
Methods for determining soil moisture:
- if the pot is heavier than usual, then the soil has not dried out;
- stick a dry stick into the substrate and wait a few minutes - the stick has become wet, which means there is no need to water it, if it remains dry, then moistening is required;
- there is condensation on the walls of the container - water it early;
- a greenish tint to the roots indicates a sufficient amount of moisture; if they are grayish-white, then watering is required.
Care after transplant
After the Phalaenopsis orchid transplant is completed, it requires specific care.
Temperature and lighting
The temperature regime is selected in such a way as not to overdry the flower, but also not to overcool it, because this can lead to wilting of the leaves and atrophy of the roots.
The regime of 25-28 degrees during the day and 18-25 at night is ideal for Phalaenopsis.
The amount of light is also very important for the period after the move. The flower is transferred to the shade and protected from direct sunlight
Watering
You can carry out the watering procedure after transplantation in a few days. This depends on how much the root system dried out during the move. If the transplant is carried out after flowering, then perhaps the Phalaenopsis enters a resting phase, during which care differs from everyday care. The frequency of watering is reduced, and the temperature also becomes lower.
In this article, we talked about how to replant phalaenopsis and provided step-by-step instructions for replanting a Phalaenopsis orchid.
How to grow roots in a phalaenopsis orchid?
First events
Washing
Important! Healthy roots are elastic, greenish-white; in the middle of the pot they are dark due to insufficient lighting. If the roots are old, they have a beige tint. Diseased roots are darker than healthy ones; they are soft, brown, black, dirty yellow.
To see this, you need to remove the phalaenopsis from the pot. Then shake the plant. Place the roots under water at 30°C, rinse and dry slightly.
Reanimation is needed if 95-99% of the root has rotted, and if 2-3 roots of 3-4 cm in length remain, then cut off the rotten roots, disinfect, and plant the orchid in a new container, making sure to secure it.
Throw away the old substrate.
Removal
Take a sharp knife, rinse it thoroughly and wipe it with alcohol, or disinfect it over a fire , cut off the diseased areas of the root.
Leave the dried and wilted leaves, they will fall off on their own.
But cut off the flower stalks.
Removing diseased roots.
Disinfection
To prevent the remaining parts of the root from rotting again, take a fungicide in powder.
Advice! Instead, you can use cinnamon or crushed charcoal.
Sprinkle the cuts with one of these products. It is not recommended to use brilliant green or iodine, as they leave burns.
Drugs to speed up the process
First you need to stimulate the growth of roots , and only then build them up. This determines how quickly the plant recovers. Soak the phalaenopsis roots in one of the solutions for half an hour.
Add one of the root growth stimulants to the water:
- Radifarm;
- Ribav-Extra;
- Etamon;
- Zircon;
- Succinic acid;
- Kornevin;
- glucose.
Make a solution from 1 liter of water at a temperature of 30°C and add a few drops of one of these products into the water:
- Radifarm . Add 1 drop;
- Ribav-Extra . Use 2 drops;
- Etamon . Take 1 ampoule;
- Zircon . Add 4 drops;
- Succinic acid . The stems and leaves of phalaenopsis are sprayed with a solution of 4 tablets of succinic acid and 1 liter of water;
- Kornevin . Pour 3 g of root into a basin with 6 liters of water. The water should be 25-27 degrees. Then a pot of phalaenopsis is placed in the basin;
- Fitosporin . They buy a bottle of phytosporin with the inscription “for indoor floriculture.” To prevent diseases, add 200 drops to 200 g of water. Twice a month the orchid is sprayed and the ground is watered;
- Glucose . Wipe the phalaenopsis leaves with a cotton swab dipped in a glucose solution. This will help the weakened flower gain strength.
Methods
In the greenhouse
You can take a 5-10 liter plastic bottle and cut off the top. Pour fine expanded clay into the bottom of the container, then put sphagnum, then place the plant so that the growing point from which the roots will grow touches the moss . Make a lid for the bottle.
Place the bottle in the light. The air temperature should be 22-28 C. Ventilate the greenhouse for 15-20 minutes every evening, and ventilate all night in the summer. To increase the humidity, you can put a glass of boiling water in the bottle every 3-4 hours.
It takes 3-6 weeks for roots to sprout. Phalaenopsis is transplanted into a small pot when the roots are 3-4 cm long. This will happen in 1-13 months.
In the substrate
You can make a substrate from peat moss and bark. With this method, roots begin to grow after 4-8 weeks.
In sphagnum moss
When planting in moss, you need to secure the orchid so that it does not wobble. It takes 3-8 weeks for roots to sprout.
On the bark
They take the bark, steam it and dry it. The flower is carefully fixed on a piece of bark so that its base is in contact with the bark.
Wipe the plant with thiamine solution. Phalaenopsis is not watered or sprayed. But the air must be humid. After 3 months, the crop will grow roots.
Growing roots on bark.
In and above water
Growing roots in water can be done in several ways, which are discussed below.
Alternating soaking and drying
The flower is placed in a wide and deep transparent container. The base of the root is slightly higher than the bottom. Every morning, a small amount of water is poured out so that the base of the root is slightly submerged in water, and after 4-6 hours the water is poured out and the roots are dried until the next day.
When water is poured into a container, sugar, honey or glucose is poured into it, 1 teaspoon per 1 liter of clean water. Once every 2-3 weeks, potassium, phosphorus and root are added to the water. The air temperature should be 24-250C, the container should be in the light, but not in direct sunlight.
Always in the water
Everything is done in the same way as the previous method, only the water is not drained, but changed once a week.
The disadvantage is that with this method only 10-15% of plants survive.
And those that grow roots have a hard time taking root when transplanted into a substrate.
Above the water
Growing roots above water is done as follows:
- The flower is placed in a transparent glass with water at the bottom, but the phalaenopsis should not reach the water;
- Close the container with a lid;
- Every day the plant is removed and left for 60 minutes. into a solution with sugar, then dry it and place it back into the container;
- Place the plant every other day for 1 hour in the evening in a solution of vitamins. This is done so that the vitamins are not destroyed by direct rays of the sun.
Growing roots above water.
Upside down method
This is the most reliable way. With it, the leaves do not fall off or rot. The leaves are collected so that they stand close to each other. Place the foliage with the upper tips down in a cut plastic bottle. Pour water into the container to cover 1/3 or ½ the length of the leaves. Coal is poured into the water.
Spray the base where the roots are located daily with water from a spray bottle. When the roots appear, plant the orchid, roots down, in a glass with peat moss.
Using succinic acid
Immersion in solution
You can simply immerse the container with phalaenopsis in a solution of succinic acid. It is not recommended to spray the leaves additionally:
- Immerse the flower in a solution of 4 tablets of succinic acid and 1 liter of water so that the rosette is in the solution;
- Secure the pholenopsis in this position, move it to the light, but without direct rays of the sun;
- The room should have high humidity and heat;
- From time to time add freshly prepared solution;
- After 2–3 months, the orchid will grow new roots;
- When the roots grow to a length of 5 cm, transplant the orchid to a permanent place.
Spraying with solution
If almost all the roots of the phalaenopsis have died , then spray the stems and leaves of the phalaenopsis every day early in the morning with a solution of 4 tablets of succinic acid and 1 liter of water.
Use a spray bottle with a fine nozzle, then the solution will disperse well.
An overdose of the solution is not dangerous , since a plant without roots will absorb only the required amount of solution. Before spraying, wipe the leaves with a damp cloth.
Sprinkling with powder
There is a third way:
- Crush 2-3 tablets of succinic acid to a powder;
- Sprinkle the petiole with powder;
- Then place the plant in a transparent container with holes for ventilation, filled with fine bark;
- Before the roots grow, water the phalaenopsis very rarely, but spray the leaves.
Using the foliar feeding method
The lower part of the plant is immersed in clean water. Prepare a solution by diluting 1 ampoule of vitamins B1, B6, B12 in 1 liter of water. The solution is applied to the leaves with a spray bottle twice a week.
This is a slow method; roots grow only after a month.
Peculiarities
In the absence of a growth point
Phalaenopsis without a growing point - the plant does not have upper leaves , since they rotted and fell off, but the rosette of the culture has 1-2 lower leaves.
Growth point.
Attention! The death of the growing point of phalaenopsis activates the activity of the buds that are still dormant.
Phalaenopsis without a crown, instead of a dead growing point, forms a baby on the peduncle or at the base of the rosette. To do this, clean out the rot, treat it with cinnamon, plant it in a pot with fresh bark, place a box with holes made in it on the pot with phalaenopsism.
When the roots rot
At the same time , cut off all rotten areas and sprinkle the wounds with cinnamon.
If there are only leaves
Phalaenopsis is fixed with sticks in a pot with substrates:
- you can use sphagnum moss;
- put expanded clay on the bottom of the pot, then mix fine bark and sphagnum moss;
- take fine wood bark, steam and dry.
The substrate is kept moist. To do this, spray the surface of the substrate with a spray bottle or immerse it in water at 1/3 of the height for half an hour. If there are absolutely no roots, then it will take about a year before full-fledged roots appear. To stimulate the growth of phalaenopsis, it is recommended to dilute 1 ampoule of vitamin B1 in 1 liter of water and spray the leaves.
Complete absence of roots.
Growing roots on a baby's peduncle
Trim the peduncle a little after flowering, leaving 1.5-2 cm above the “dormant” bud, then a baby will grow from the “dormant” bud. The plant should have enough lighting. The room temperature should be +27-30 degrees.
If the baby formed on the plant several months ago, but it still does not have roots, then wait a little longer and do not separate it from the mother plant.
Water the mother plant when the substrate dries out every 5-10 days, placing it in a bowl of water. Water the plant occasionally in the shower. Rinse the backs of the leaves. Add fertilizer every second watering.