How and when to divide a peony bush?
When starting to propagate bushes, you need to decide on the timing of when to divide peonies: the best time for this procedure in central Russia is considered to be the period from August 10 to 30.
After the soil temperature drops to 12-15 °C, peonies begin to grow suction roots, and at later dates of digging they will die when dividing. It is recommended to divide peonies at these optimal times, even if you plan to plant them at the end of September and later. It is better to keep the division in moss or sand in a cool place, protected from rain, before planting (even a month or more). You can start dividing even earlier, in the first ten days of August, and then continue the division as long as necessary. In the south, the division of peonies shifts to a later time, and in the northern regions, to an earlier time in accordance with the permissible planting dates.
In order to divide a peony bush, as practice shows, the plant must reach a certain age and grow sufficiently in the ground. Delenki from a 3-year-old peony rhizome and delenki from a 4-year-old peony rhizome are distinguished by more developed storage roots.
The most suitable for division are young plants 3-5 years old that have flowered twice. Peonies at this age have accumulated in their roots a sufficient supply of nutrients that contribute to the normal development of the division in a new place. Young plants are still easy to dig up, easy to divide, and the divisions look the most attractive. This work is within the capabilities of every gardener; 5-7 year old bushes, although they will produce more planting material, will require significant physical effort to dig up.
Before dividing the peony, count the number of stems: there should be at least 8-9. And the circumference occupied by the stems near the ground should exceed 8-9 cm. If the stems are brought together in a circumference of less than 6-7 cm, such a rhizome often cannot be divided into several parts, and it is better to wait another year.
The following describes in detail the technology of how to divide a 3-5 year old peony.
For digging you need two shovels: one bayonet and the other with a curved blade, pruning shears, a sharp large knife and two buckets. You should also prepare labels with the name of the variety in advance. Excavation is carried out on a dry day and, if possible, after a dry period when the earth crumbles easily.
The stems at a height of approximately 10 cm above ground level are cut with pruning shears, chopped, placed in the first bucket, and root trimmings are collected in the second. Having retreated 25 cm from the stems, the plant is dug around with a bayonet shovel to a depth of 35-50 cm, depending on the size of the root system. Any long roots that come across are carefully cut with a knife (secateurs): they break off easily.
Using a shovel with a curved blade, dig up the peony from below, cutting off the roots remaining below. Carefully remove the plant from the ground and, placing it on its side, carefully remove excess soil with a sharp rod. Then, also carefully, immediately cut the roots to 10-15 cm in length. If possible, wash the rhizome with a stream from a hose or watering can.
Then attach a label and take it to a shady and well-ventilated place until the evening. If there is no water for rinsing, you can leave the plant to dry in a cool shed protected from precipitation, proceeding directly to pre-drying.
In the evening, for pre-planting drying, the peonies are transferred to a closed, cool room and stored there for 2-3 days, laying them on film or cardboard. If the air temperature is high, you can cover the dug-up plants with burlap or similar woven material. For longer periods of time before dividing the plant, the covering fabric should be periodically sprayed with a weak light pink solution of potassium permanganate from a spray bottle, or the fabric should be periodically moistened in this solution, squeezing out excess moisture.
To divide a peony bush, you will need a table covered with film, a planed wooden block 8X50X4 cm. Grafting-type knives, a knife with a thick and sharpened blade, a scalpel, chisels, a hammer, brushes (tooth and clothes brushes with hard bristles), a jar of ash, a box of moss
The division process itself is the most difficult and crucial moment. And it is learned and improved with personal experience. However, some rules help him master it faster and successfully.
Remains of stems are removed completely to the base. First of all, the remaining long storage roots are cut to 8-12 cm, intertwined roots are removed and thin roots, 1 cm thick or less, are shortened to 3-5 cm. To divide a peony bush as experienced gardeners advise, you need to completely remove most of the old root with which the plant was planted. It usually differs in thickness and color (darker). Carefully inspect the peony from all sides. They estimate how many sections it can be divided into and where the cutting lines will be. Taking it with both hands, try bending it in different directions without much effort: sometimes you can feel that it can easily be divided into 2 parts with one cut. After this, further division becomes simple.
The general rule for propagating peonies by dividing the bush: first separate what is clear and simple, then the order of further division will become clear to you.
It is often easy to separate a section attached to the side or top of the rest of the rhizome: start there. Once you separate it, you will see what you can separate further. If the initial choice is difficult (this often happens with a large rhizome), you have to cut the rhizome in half through the center using chisels and a hammer.
Then clean the cuttings of rotten parts, sprinkle all the cut areas with ash (it’s convenient to use a toothbrush for this) and attach labels with the name of the variety. Place the cuttings in a box with slightly moistened moss and store in it until planting for at least 2-3 days. In such conditions, deli can be stored for 2 months or more, and in well-packaged postal items they can withstand long journeys throughout the country (and even abroad) lasting more than a month.
Watch the video “Propagation of peonies by dividing a bush” to better understand how this procedure is performed:
Dividing peonies in spring
Looking at the lush bushes of flowers, many gardeners want to increase the planting of these plants themselves. Reproduction of peonies by dividing the bush is a standard, but far from the only way to obtain planting material. These flowers can also be propagated by cuttings and seeds, if you know the basic rules of the process.
The main methods of propagating peonies with rules, features, photos and videos will be described in this article.
Herbaceous varieties can be propagated in several ways (methods): cuttings, layering, seeds, and dividing the bush.
Each of these methods has its own characteristics, some of which will be highlighted in this article. The most common method is to divide the bush.
Pros and cons of propagation by division
Dividing the bush is the easiest way to get young plants. Its main advantages are simplicity and effectiveness. It is enough to take an adult bush, dig it up and divide it into several parts. The resulting cuttings are planted in a previously prepared area.
But there are also disadvantages to this. If you cut the roots incorrectly, young bushes simply will not be able to take root in a new place and will die. In addition, this propagation option is suitable only for those summer residents who already have an adult and healthy bush on their site that can endure such a procedure.
Dividing a bush: video
If you are interested in how to propagate these flowers in the spring, we recommend that you watch the video, which shows in detail all the details and features of this process.
Stem cuttings: video
Despite the fact that cuttings are considered an unpopular method, we will consider this process in more detail using the information from the video.
How to propagate tree peony
Since the tree peony has recently become increasingly popular among gardeners, let’s look at ways to propagate it. Among them are methods of division, layering, seeds, cuttings and grafting.
Peony propagation by pruning
Sometimes the pruning method is called the Kästner method. This method was actively studied in the 1970-1980s. in the GBS of the USSR Academy of Sciences, it is suitable for milky-flowered peonies aged more than 6-7 years with the number of stems on a bush of at least 30.
Carry out in the usual time frame for dividing peonies, in the second half of August, in dry weather. They operate in the following sequence.
Before propagating peonies by pruning, the stems are cut at a height of 10 cm above the ground. The mother plant is dug in a circle, slightly retreating from the stems. Dig a groove of such a depth that the top of the rhizome with part of the renewal buds 2-3 cm above the outcrop becomes visible. Usually, a groove depth of 6-8 cm is sufficient for this. On one side, the groove is made wider so that a shovel can be horizontally placed in it. Use a shovel with a sharp, sharpened blade, preferably a curved one. The shovel is inserted into the widened part of the groove and the entire exposed part of the rhizome is cut off with a horizontal movement. The cut part breaks up into small non-standard divisions with 1-2 renewal buds. The cuts on the cuttings are rubbed with ash and placed for 2-3 days in a box with moss, like regular cuttings.
Then the divisions are planted in well-filled soil, densely, according to a 20X30 cm pattern. After growing, after 2 years they are transplanted with a lump of earth to a permanent place. All cuts on the mother plant are sprinkled with ash and covered for 2-3 days from rain. After this, add soil above the mother plant to the previous level. The next year, when the stems grow normally, the entire plant is dug up. Usually it easily breaks down into separate pieces. But often, after the first cutting, due to numerous wounds, the plant can rot and die.
A modification of this method can be considered the “partial trimming” method. It was invented and applied by A.K. Kolpakov. From the side, part of the rhizome is exposed to the depth of the usual cutting - 6-8 cm and 2-3 small non-standard cuttings with buds are cut off. Places of cuts on the mother liquor are sprinkled with ash, and then, after drying, with earth.
I'll give you peonies
Varub I will give you peonies. And I will hand it to you personally when we meet. I'll intoxicate you with the scent of flowers. You love them, I will notice that.
You remember this smell. In that bouquet, at the door, that I left. Even though we didn’t meet that day. Made them understand my feelings.
Those peonies opened life to us. There is no better smell on the planet. You and I merged with love. And a family was born.
Magic, one aroma. You and I then inhaled. And all night long with him. They kissed in love until the morning.
We knew love alone. Every hour, every moment, we were together. So much happiness and love these days. Having learned everything, the bride and groom.
Since then you have loved flowers. I will only note these peonies. I'll intoxicate you with the scent of flowers. I will give it to you personally when I meet you. https://stihi.ru/2012/08/05/3645
Peonies: propagation, cultivation and care
Author: Aleksey Firsanov
source: https://cottagesbusiness.blogspot.ru/2011/08/blog-post_23.html
Peonies reproduce vegetatively: by dividing root tubers, renewal buds, green and root cuttings, layering. Divide 6-8 year old peony bushes. Younger ones have small rhizomes and densely located buds, so they divide with difficulty. Diseases usually accumulate on the root tubers of old bushes; in the central, oldest part of the rhizome, small, weak buds are formed that are unsuitable for planting. Dividing begins in the second half of August before the formation of fresh adventitious roots, which are easily damaged during transplantation. They dig around the bush, surrounding it with a ditch the depth of a spade bayonet. Then, using a crowbar, the bush is rocked and carefully removed from the ground. Root tubers are freed from the ground. If the soil is light and relatively dry, shake it off. Wet, heavy ones have to be washed off with water from a hose. Peonies dug up and cleared of soil are left in the air for several hours. During this time they will wilt a little and will not be too fragile. Before dividing, the stems are cut to a height of 8-10 cm from the ground. The bush is inspected, a place with the fewest buds is selected, and a strong wooden stake is driven there. With this stake the bush is torn into 2 parts. Next, each part is divided using a sharp garden knife, first into large ones, and then into smaller, standard divisions. Such a division is a part of a root tuber at least 20 cm long with 3 or more large buds. Thick long root tubers are cut to 10-20 cm at an angle from the inside. Old, diseased, rotten parts of root tubers are removed or trimmed to healthy white tissue. When dividing, it is important to preserve the small young roots that grow from the rhizome. During all operations, root tubers should not be held by stem cuttings, since they easily break off and there are buds at their base. You should also not throw them on the ground, because the roots and buds may break off.
Peonies can grow in one place for 10-15 years. But division of the old rhizome must be carried out to rejuvenate and improve the health of the bush. Many varieties of peonies can be propagated from stem cuttings. From the stems cut at the base 2 weeks before flowering, cuttings 5-6 cm long with one leaf are cut and placed in a 0.05% heteroauxin solution in a dark place for a day. The cuttings are planted in a greenhouse or boxes with sand sprinkled in a 5 cm layer on top of the nutrient soil. The cuttings are buried 3-4 cm so that they do not touch the ground. For 3-4 weeks, the cuttings are kept under frames or film, shaded and sprayed on hot days. At this time, callus forms on the slices. Roots take another 4-5 weeks to develop, during which time ventilation is required. Renewal buds are formed only after 2.5-3 months. In the spring, when a sprout appears, the plant with a lump of earth is transplanted into open ground in prepared soil.
Open sunny areas, protected from prevailing winds, and slightly shaded at midday are suitable for peonies. Peonies do not grow well in dense shade near buildings, tall trees and bushes. Damp, depressed, poorly drained and especially marshy places are not suitable for growing peonies. Groundwater should not come closer than 1 m to the soil surface. Since deep holes are dug for peonies, they can be grown on almost any soil, creating a nutrient medium in the root-habitable zone inside the hole. On heavy, floating soils, holes are dug with a diameter of 60 and a depth of 70 cm. A drainage layer of 20 cm is laid at the bottom. On light soils, the depth of the hole is 50 cm. Then, 30 cm deep, the holes are filled with humus or compost, to which 100-200 g of lime and bone meal are added. 300-400 g, superphosphate 200 g and potassium chloride 100 g, and mix everything. The upper part of the pit is filled with the top layer of soil selected from the pit. The roots are covered with soil, slightly shaking the section to fill all the voids with soil, and compacted. The buds should be 3-5 cm below ground level. If the planting holes were filled before planting, then the divisions are planted so that the buds are at ground level. Then, when the earth shrinks in the hole, they will be at just the right depth. In this case, the plantings need to be hilled up a little so that the buds are covered with soil. If the cutting is deepened further, this can become one of the main reasons for poor flowering, or even non-flowering of peonies. For August planting, it is better to prepare holes in the spring so that the soil has time to settle. In the first winter, the plants are covered with peat or covered with a 15 cm layer of soil. In the spring, this soil or peat is raked out. Some of the peat or other organic material used for the cover can be left as a mulch layer. In the first and second years after planting, flowers are not cut; the resulting buds are pinched.
Caring for peonies includes the usual set of agrotechnical measures - weeding, loosening, watering. In case of dry weather, plants are watered until the end of June, which will allow them to form full-fledged renewal buds, and then 2-3 waterings are made at the end of August-September for the development of young adventitious roots. Water rarely and abundantly (up to 50 l/sq. m.) to soak the soil to the depth of the roots. Feeding peonies begins in the 3rd season. Fertilizer doses increase in proportion to the age of the plants. In the 3rd year, 15-25 g of ammonium nitrate is added in several doses, the first time immediately after the snow melts or at the moment when the sprouts reach a height of 8-10 cm; the last one is before flowering. From the time the leaves unfold until the start of flowering, peonies are also fed with diluted mullein (1:10) in 2-3 doses. The total volume of fertilizing applied should not exceed 10 liters per plant. Superphosphate and potassium chloride at the rate of 50 g per plant are applied three times: before flowering, 2 weeks after flowering and the last time at the end of August. By the 6-8th year, the doses of fertilizers are doubled. They are applied in dry or dissolved form into grooves 10 cm deep, made around the plants at a distance of 25-30 cm from the base of the stems. Peonies are watered into the same grooves. In the fall, add 1 bucket of compost per 4-5 year old plant.
Many varieties of peonies have large flowers that lie down especially after rains. Therefore, starting from the 3rd year, they need supports. Also, starting from the 3rd year, peonies are stepsoned - the side buds are removed and one central one is left on each stem. The flowers are larger and of better quality. Faded flowers must be removed, as fallen petals contribute to the spread of gray rot. In autumn, with the onset of stable frosts, around October 15, the stems of peonies are cut off, leaving stumps 1-2 cm high above the buds. For the winter, peonies are covered with a layer of peat or unripe compost. Covering with straw or leaves can cause fungal diseases. Peony flowers are cut early in the morning, in dry weather, leaving at least half of the stems intact on the plant, and 2-3 leaves on the cut stems. If plants are pruned more heavily, they will not set or develop replacement buds and this will impair flowering in subsequent years. Densely double flowers are cut off when the lower row of petals unfolds. If cut earlier, the buds will remain unopened or will bloom very slowly and then quickly fall off. You can prolong flowering if you cut off half of the young shoots 5-8 cm high on the bush, leaving a stump of 2-3 cm. At the same time, 2 lateral shoots begin to grow from the axils of the scale coverts. The flowers they produce are smaller, on thinner peduncles, and about 2 weeks later.
Source of the article: https://www.altbuket.ru/pg-id-2089.htm
Propagation of peonies by stem cuttings
The method of vertical stem cuttings is based on stimulating upward growth of the rhizome and the formation of new buds at the tips. Suitable for varieties of milkweed over 6-7 years old, the same as for the pruning method.
In the described method of propagating peonies in the spring, after the sprouts appear, a continuous fence (a box without a bottom), 20-25 cm high, is installed around the mother plant, which is filled with light soil as the shoots grow. The soil is periodically moistened. The buds must be removed. At the beginning of September, the fence is removed, the poured soil is removed and the plant is carefully exposed to the upper buds. Layerings - the newly formed upper sections of the rhizome with a bud at the base are cut off from the plant at the point of their connection with the old part of the rhizome. The resulting cuttings are planted in a garden bed for growing according to the same scheme as in the pruning method. The operation should be carried out in a dry time, the cuts should be sprinkled with ash and protected from precipitation for 2-3 days.
The most important advantage of the method of propagating peonies by stem cuttings is the production of healthy plants with a completely renewed rhizome and root system without old tissues, that is, a complete renewal of the peony.
But there is another side to the coin: the resulting cuttings are very weak, in the first winter there is a noticeable loss of some of them; it takes a lot of time to grow. The mother plant's normal physiological cycle is disrupted (it has not bloomed), and in the future it may stop blooming due to the consequences of burial. Numerous “wounds” will long affect the development of the plant, its health and flowering in subsequent years.
Is it possible to propagate peonies by seeds?
The seed propagation method is used exclusively for the selection of peonies.
Peony seed pod
Description and disadvantages of this method
Before propagating peonies using the seed method, you need to know about all the pros and cons of the method.
Flaws:
- low percentage of germination - about half of the seed does not sprout;
- Flowering of plants planted using this method occurs no earlier than after 5-7 years;
- germination duration – from 1 to 5 years;
- low decorative characteristics of flowers - a decrease in the brightness of color and doubleness of flowers in sprouted peonies.
The seed method can only be used on wild varieties.
Additional Information! Seed propagation is used extremely rarely by gardeners, because This method has a lot of disadvantages and is practically devoid of advantages.
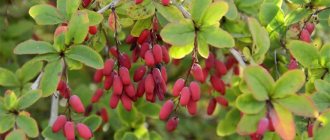
Procurement of seeds
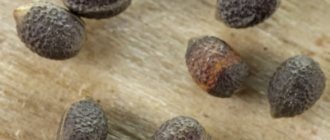
The peony seed pod is shaped like a star and is colored pale green. To get seeds, you need to leave a flower on the plant. Seed material will be formed around August. The seeds are collected and stored in the refrigerator.
Stratification
The slow germination of seeds is explained by their thick shell. To increase the chances of obtaining seedlings, a stratification technique is used, which can be carried out in two ways, alternately:
- Thermal. The seeds are placed in damp sand in a shallow container, which is placed on an electric heating pad. The sand temperature should be +30 °C. The crops are regularly moistened, the sand is cooled once a day, and then heated again. This phase lasts from 2 to 2.5 months.
- Kholodova. This method is used if it is necessary to activate growth points on the embryo. The seeds must be removed from the sand and placed in separate containers with peat. Peat is sprinkled on top with a thin layer of soil. The temperature of keeping seedlings is from +5 °C to +10 °C. The phase lasts 3 months.
To speed up the germination process, the seeds can be opened. To do this, the part of the stem that is located under the cotyledons is moistened. A piece of gauze is soaked in a 0.01% solution of any growth stimulator, and placed on the stem, fixed on top with a piece of fabric. The first shoots will appear in about 7-10 days.
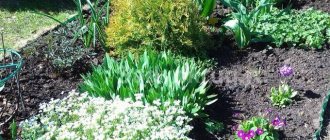
Peony seedlings
Caring for young seedlings
After the first seedlings appear, when stratification is completed, they need to be placed in a warm place, with a temperature from +16 °C to +18 °C. Ensures regular hydration.
Attention! Planting into the soil is carried out no earlier than in the month of May.
Reproduction of peonies by partial layering
To reduce the negative consequences of the vertical layering method, you can use a modification of this method. The partial layering method is the most suitable for obtaining cuttings from an old plant without digging it up and with a minimum of damage to it. The essence of the changes is as follows: I install a fence, 30-35 cm high, only over part of the mother plant, taking into account the planned number of divisions, preferably on the south side.
The fence is left over the plant for two years. In the first year, I fill the fenced part with 10-15 cm of soil. I remove buds only from the stems that fall into the fence. The rest of the plant blooms as usual.
In the fall of the first year, I leave the fence in place and raise the ground level inside it to its full height. In the second year the care is the same as in the first. In the fall of the second year, I remove the fence and carefully free the shoots from the ground. On the outside of the fence, I expose the plant below the soil level by 5-10 cm. I cut off the newly formed young parts of the rhizome with a knife and grow it in ridges, as described above.
The advantages of the method of propagating peonies by layering are obvious: the flowering of the mother plant is not interrupted, and due to the small number of cuts, the negative consequences for the mother bush are significantly reduced.
The cuttings obtained in the fall of the second year are close in size to small cuttings, and some of them can be immediately planted in a permanent place without growing. I will add to this that such cuttings have great growth energy and by the autumn of the first year after planting they catch up in growth with normal standard cuttings of the same age.
Peony: Ito hybrids
source: https://www.supersadovnik.ru/article_plant.aspx?id=1003532
Peony, ito hybrid
The selection of herbaceous peonies in the past, the 20th century, is marked by two main events: interspecific hybridization from the beginning of the century and the creation of intersectional hybrids (Ito hybrids) at its end.
Thanks to interspecific hybridization, the world of peonies has been enriched with varieties with bright colors - red, pink, and then coral, significantly different from the varieties of milky-flowered peony (Paeonia lactiflora). It was possible to obtain early flowering (2-3 weeks earlier) interspecific hybrids. Despite all their efforts, breeders for a long time were unable to obtain yellow herbaceous peonies - the long-time dream of flower growers. Success in creating yellow peonies came to the breeders of the Land of the Rising Sun before anyone else. In 1948, Japanese scientist and breeder Toichi Itoh selected a parent pair. The maternal variety was the herbaceous peony variety 'Kakoden', and the parent variety was the yellow variety of tree peony 'Kinko' ('Alice Harding'). As a result of 1200 crossings, 6 plants with a yellow color were obtained. Ito was no longer alive when the plants fully bloomed. The work was completed by his widow and assistant. Louis Smirnov, a Russian emigrant, owner of a nursery in the USA, purchased these new items from Ito's widow and then registered 4 yellow varieties in the American Peony Society (APS) Register in the herbaceous peonies section: 'Yellow Dream', 'Yellow Crown', 'Yellow Emperor' and 'Yellow Heaven' by Ito-Smirnov. According to the rules, the first name belongs to the breeder, and the second to the owner of the rights. After the author's name they were called Ito-peonies. Later, a separate section was identified in the AmOP Register: Intersectional Hybrids, meaning their origin from peonies from different botanical sections: tree and herbaceous. As a result, both names are used: Itoh hybrids and Intersectional Hybrids. Breeders continue intersectional hybridization using combinations of tree peonies— yellow (P. lutea) and tree peonies (P. suffructicosa)—and herbaceous mother peonies that can set seed.
Description . These are perennial herbaceous plants. The bushes are widely spreading, spreading to the sides, densely leafy, low (50-90 cm), with the ground stems dying off completely (or mostly) every year. Stems often deviate or bend. The leaves, similar to the leaves of tree peonies, do not fade for a long time in the fall until the onset of severe frosts, remaining decorative. The roots, like those of shrubs, are lignified, develop laterally and become less dense than those of herbaceous peonies. Information on the longevity of intersectional peonies has not yet been accumulated, but taking into account the longevity of the parent pair, it is possible to predict the long-term and fruitful life of varieties of this group. Externally, Ito peonies show characteristics of herbaceous and tree peonies. And although at first the varieties were classified as herbaceous, they can equally be classified as tree-like.
Signs of herbaceous peonies in Ito hybrids
- annually?the?completely?(or?almost?completely)?terrestrial?part of the?plant dies;
- flowering on the tops of annual shoots growing out of the ground in spring;
- the ability to “reproduce” by dividing the “rhizome” into “individual” planting segments.
Signs of tree peonies in Ito hybrids
- the external ?appearance of ?flowers,?their?structure, ?coloring,?more often?with?contrasting spots in?the?center;
- the bushes and foliage resemble tree-like ones in their appearance;
- the structure of the underground?part? -?buds?renewal,?formed?on?stems and?in?the axils of leaves?and?lignified?roots?are?closer in?hardness and?shape?to? tree-like.
Bloom . Flowering times range from early to late. In varieties obtained from tree peony, it occurs at an earlier stage, from yellow peony - in the middle and close to late periods. Flowering in many varieties is relatively long, up to two to three weeks, due to the gradual dissolution of the apical buds and the subsequent flowering of the lateral buds. The buds are shaped like chestnut fruits and are often brown in color. The flowers are similar in shape and color to tree-like ones, with spots in the center, and are often fragrant. When cut, they are more durable than tree peonies.
Collectors are alarmed by the fact that this year’s hot season has changed their ideas about the color and shape of flowers of some varieties. Instability of the shape and color of flowers has been noted depending on the age of the plant, external conditions and instability of hereditary characteristics. Some varieties sometimes produce bicolor flowers ('Lemon Dream', 'Prairie Charm'), half yellow and half lilac. Often Ito hybrids change color during flowering ('Julia Rose'). This year, stripes of a different color ('Viking Full Moon') and a change in color ('Hillary') have been noticed on many Ito varieties.
But varieties with yellow colors are still especially attractive: from pale yellow-green to rich egg yolk color (some also have contrastingly colored edges of the petals).
Reproduction of peonies using the Shlomin method
Another modification of the vertical layering method was developed and used by G. K. Shlomin.
The author began to conduct his experiment in the spring of 1982 with two-year-old bushes of the Vechernyaya Moscow and Cruiser Aurora varieties. He placed tall tin cans on the shoots, open on both sides. As the shoots grew, I poured nutritious soil made up of rotted manure, river sand and black soil into the jars, and periodically watered it with water. During the growing season, I watered the young plants twice with a weak solution of heteroauxin (1 tablet per 2 liters of water).
To prevent the jars from overheating, I wrapped them in cardboard and plastic wrap on top (on the sides, like a thermos, leaving the top open). In autumn the shoots formed a good root system. In September I cut them under the banks, at the base of the mother plants.
I planted the cuttings with a clod of earth in a permanent place in the soil, watered them well and mulched them with rotted manure (5-7 cm). With the onset of frost, it was insulated with peat chips (10 cm).
In early spring, I removed the cover, carefully and shallowly loosened the ground around the bushes, and added half a bucket of raw manure mixed with 100 g of wood ash, 100 g of superphosphate and 10 g of potassium nitrate under each bush.
The bushes have developed well. The following summer, some even had flower buds, but they were removed.
This method allows you to quickly propagate valuable varieties.
All varieties of the vertical layering method are applicable only for lactiferous peonies!
Cutting off part of the rhizome, without digging up the mother plant. This method is used in cases where it is necessary to obtain a small number of cuttings from a large bush, 2-3 pieces, and it is impractical to dig up the entire bush for them.
Carry out in the time periods usual for dividing varieties. A dry day is chosen for the operation. Carefully dig up and expose a part of the rhizome (to the depth of the roots), intended for separation from the mother plant. Using a sharpened bayonet shovel, the intended fragment is separated vertically and removed from the ground. An analogy with how one cuts a piece from a round cake is appropriate here. Cuts on the mother plant are sprinkled with ash, and the damaged part is covered from rain for several days. Then the resulting empty space is covered with fertile soil and chemical fertilizers.
This method is used only as a last resort. It is ineffective: little planting material is obtained, and the waste is large. The remaining part of the bush is sick and takes a long time to restore its decorative properties.
Peonies after flowering
Peonies have faded - what to do? Peonies bloom in late May or early June. Remove all faded flowers, after two weeks, apply a third fertilizing with phosphorus and potassium fertilizers and continue to water the plants regularly. In August, watering should become more abundant, since the period of formation of replacement buds begins, and the plant will need moisture.
How and when to plant lilies - proven tips
Preparing for winter
When the leaves and stems of peonies begin to turn yellow, watering should be gradually reduced, and when frost sets in, the above-ground part of the bush should be cut back almost to soil level. If you replanted old peonies or planted new ones in the fall, you will have to cover this area with a layer of peat mulch of 5-7 cm so that the weak peonies after transplantation feel comfortable in winter. In the spring, when peonies sprout, the mulch layer can be removed.
- Ginkgo biloba from seeds - simple instructions for successful cultivation
In the photo: Peony seeds
Peonies in winter
Peonies spend the winter in the garden. Old bushes are not afraid of frost, and if you have covered young peonies for the winter, you can rest assured that your flowers will not die.
Tree peony - growing and caring for an oriental beauty
Tree peony is a semi-shrub plant belonging to the Peony family. Today in the world there are over 480 varieties and hybrids of this flower, whose homeland is China. Almost all varieties of tree peony were bred by Chinese breeders. Over time, Japanese flower growers began to grow this plant. At the end of the 18th century, this decorative shrub became popular in Europe both in industrial cultivation and in home floriculture. Tree peony, planting and caring for which is not very difficult, is grown by those gardeners who managed to get a seedling. You can rarely find them on sale, and the cost in garden centers is very high.
Description of the bush
Tree peony is a tall deciduous plant, reaching 1.5-2 m in height with erect thick shoots of light brown color. Every year the tree peony grows shoots, turning into a hemispherical bush. It has lacy feathery leaves. Large flowers with a diameter of 13 to 22 cm, located at the end of the shoots. Depending on the variety, the flowers have a wide variety of colors and shapes. There are species with double, semi-double and simple flowers of yellow, crimson, white or pink. There are varieties with two-color flowers. Every year the abundance of flowering tree peony increases. It blooms two weeks earlier than the herbaceous peony and is a frost-resistant variety. The most popular hybrids grown by many gardeners include Green Jade, Sapphire, Coral Altar, Kiao Sisters.
Growing tree peony
Caring for this flower at home is not at all difficult and consists of the following:
- Tree shrubs are planted in late summer or early autumn. First you need to select a site. Tree peony likes to grow in elevated sunny places, away from trees and buildings that can create unnecessary shadow for it.
- Ideally, loamy soil is suitable for this flower. If planting is done on sandy soil, then it is mixed with clay, turf, peat and humus soil. The composition of loamy soil can be improved using organic matter and sand.
- The tree peony is very picky about the soil and planting site, on which its growth, development and life expectancy directly depend. This is a plant that can grow in one place for about a hundred years.
- If the plant is planted in an area with low groundwater, then the planting hole must be made with a depth and diameter of up to seventy centimeters. As a drainage layer, a 30-centimeter layer of crushed brick, gravel or coarse sand is laid on the bottom.
- Tree peony does not grow well in acidic soil. Therefore, if necessary, it is deoxidized using lime. Three hundred grams of the substance are added to one hole, then covered with soil and the plant is placed in it. When planting, the roots of the plant are straightened and watered abundantly. After the moisture has gone into the ground, the plant is sprinkled with earth so that the root collar is flush with the surface. If you plan to plant several plants, then the distance between them should be about two meters.
Watering
The basic care for this flower is the same as for the herbaceous peony. In addition to planting and growing, this species requires systematic watering, periodic loosening of the soil and removal of weeds from the area. Watering the flower is carried out at least twice a month. It is enough to pour 7-8 liters of water under one bush. In the summer heat, plants need to be watered more often. Starting in August, the frequency of soil moisture is gradually reduced until it stops completely. Loosening of the soil is carried out 1-2 days after watering, as soon as the top layer of soil dries out. The soil is loosened to a depth of five centimeters, then the plants are mulched with a thin layer of humus.
Feeding
In addition, caring for ornamental shrubs at home consists of regular application of fertilizers. This plant is a record holder for the consumption of elements such as potassium and nitrogen. It is fed with nitrogen-containing preparations at the beginning of the growing season. Then feeding with phosphorus-potassium fertilizers is carried out, starting from the moment of formation of flower buds and until the end of the growing season. At the flowering stage, in addition to phosphorus and potassium, nitrogen is added to the fertilizer. It is worth remembering that an excess of this element is detrimental to the plant. He may get gray rot. Therefore, it is better to underfeed him than to overfeed him. To protect the root system of the flower from burns, the soil is well moistened before each application of fertilizing.
Trimming
In the process of care, the tree peony needs pruning, which is carried out in early spring, before the beginning of the growing season. Shrunken and damaged branches are removed, and old ones are shortened by ten centimeters. Flower growers from China carry out rejuvenating pruning for peonies every ten years, cutting off the shoots almost to the ground. This procedure helps to awaken new kidneys. To ensure abundant flowering of the tree peony next season, the branches are pruned to the top bud. The full development and life cycle of the plant depends on proper pruning.
Transfer
The main care for peonies includes the procedure for replanting them.
These flowers react poorly to transplantation and are very difficult to tolerate. It often happens that a plant transplanted to a new place begins to hurt and cannot adapt for 2-3 years. During the replanting process, it is very important not to damage the root system of the plant. The bush is dug up along with a lump of earth so as not to damage the roots, and the soil is washed off with a stream of water. After this, you need to inspect the root system of the flower, removing rotten and damaged roots. All sections are treated with a weak solution of potassium permanganate, dried and sprinkled with charcoal powder.
Reproduction
Obtaining new bushes of this plant is carried out in several ways - by dividing the rhizome, cuttings and layering.
Some gardeners use the grafting method. Peony propagation using the first method is quite simple. The bush is dug up and divided into parts so that each section has several buds. Before planting, the cuttings are dipped in a clay solution for 30 minutes, then planted in the soil. It is worth remembering that this method is effective when propagating bushes five years old. They are planted at the end of August. Further care for young shrubs is the same as for adult specimens.
R
Propagation by cuttings is carried out in mid-summer. Semi-lignified shoots with one bud and a leaf are cut from a healthy bush. Before planting, the leaf on the cuttings is shortened by half. Then the shoots are planted in a soil substrate of peat and sand to a depth of about two centimeters. For successful rooting, the plantings are covered with film or transparent glass, creating greenhouse conditions. Caring for cuttings includes frequent ventilation and regular moistening. 2.5 months after planting, the plants are planted individually in containers and kept in greenhouse conditions until spring. As soon as the tree peony begins to grow, it can be planted in open ground.
Reproduction of peonies using layering is considered more labor-intensive and time-consuming. This process will take at least two years.
At the end of spring, healthy and strong branches are selected from the bush. On each of them, an incision is made on the side facing the ground. The incision sites are treated with one of the growth preparations. To secure the branch well, a peg is inserted into the cut. After this, the layering is buried in a ten-centimeter layer of soil. Caring for layering consists of frequent watering. After the branches take root, in early autumn, the plants are separated from the mother bush and planted separately in a permanent habitat.
Propagating peonies with a heel is the most effective and reliable way. It is used to grow these flowers on a large scale. This method is also used in home floriculture.
The grafting is carried out on the root system of the herbaceous peony. For propagation, cuttings of tree peony with several buds are used. The lower part of the shoots is sharpened and inserted into a cut made on the root of the herbaceous peony. After this, the place where the cuttings enter is wrapped in polyethylene. The grafted plants are placed in a container with sawdust in partial shade. A month later, after rooting, the shoots are planted in one container so that the lower bud is 5-6 cm deep in the ground. Greenhouse conditions are created for the plantings. Growing a tree peony using grafting takes about 1.5 – 2 years.
Tree peony is rarely grown by seed. Before sowing, planting material is stratified. This procedure consists of two stages - warm and cold processing. The seed material of this plant very quickly loses its viability during long-term storage. Bushes grown using this method will bloom, at best, only five years after planting.
Diseases and pests
Despite its high resistance to diseases, tree peony can be affected by pests and diseases. The reason for this can only be illiterate care. Plants after transplantation or old specimens become especially vulnerable.
- The greatest danger to this flower is gray rot. The plant is treated with a solution of potassium permanganate. 3 g of the substance is diluted in one bucket of water and sprayed on the above-ground part of the plant. You can replace this substance with a 7% solution of copper sulfate. Overly affected branches and leaves that are at the stage of rotting are removed.
- Sometimes tree peony can be affected by brown spotting. All affected parts of the plant are cut off and burned to prevent further spread of the disease. After this, the bush is treated with Bordeaux mixture of one percent concentration.
- Tree peony will require special care after flowering. All faded branches are cut to the upper axillary point. In the fall, before the plant goes into dormancy, it needs to be fed. Under one bush, bone meal and ash are added in equal parts of three hundred grams. The soil around each plant is then worked well.
- The basic care of this garden flower includes the stage of its preparation for wintering. Even though this is a cold-resistant plant, it will need shelter for the winter. Tree peony is not afraid of winter frosts as much as it is of spring thaw. During this period, the plant enters its growing season. An uncovered plant may simply die.
- To prevent this from happening, at the end of October or at the beginning of November, all the branches of the bush are tied, and the tree trunk circle is mulched with peat soil. With the onset of cold weather, the tree peony is covered. Spruce branches, foliage, and crushed bark are used as shelter, making a small hut out of them. This is excellent protection for the plant during winter frosts and spring frosts.
Caring for tree peony, as it turns out, is not at all difficult. Every gardener can grow several decorative flowering varieties of this species. The main thing is to create the right conditions for their growth and development in the garden.
LetovSadu.ru
Peony is rightfully considered one of the most beautifully flowering plants. The variety of species and varieties of this plant does not allow us to lose interest in it over the years. Recently, the attention of gardeners has been increasingly attracted by the tree peony (Paeonia suffruticosa). Reproduction of this magnificent shrub by division, layering, cuttings, grafting or seeds has its own characteristics, the subtleties of which even a beginner can do.