Do you have an orchid growing, but you don’t know how to replant it at home? Read the article, it contains a lot of useful tips and instructions.
The orchid, just like the rose, can be called the queen of flowers. Graceful flowers, decorative leaves, intertwining roots and stems create a plant of incredible beauty. But this flower, like all the others, needs good care, an important component of which is replanting. It needs to be done correctly and on time - the further development of the plant and the abundance of flowering, as well as the duration of the adaptation process, depend on this.
Read another article on our website that tells how to propagate an orchid at home with children, cuttings, roots, and seeds. All methods are described in detail.
This article describes the timing, as well as the rules for transplanting a home orchid. You will learn how to replant a flower after the store and why to do it at all. Read on.
Why replant an orchid when grown at home: is it replanted at all, is it possible?
Orchid transplantation at home
Various circumstances may arise under which a transplant is performed. Why replant an orchid when growing it at home? Is it possible to replant at all? Yes, this can and should be done. Here are the circumstances under which flower breeding experts advise doing this:
- Replanting is required once every 3-4 years after purchasing or replanting the plant.
- If it is noticed that the roots have begun to appear from the pot, i.e. it has become too small for the plant.
- If the orchid is very sick, all its leaves begin to turn yellow.
- Unsightly appearance and condition of the substrate in which the flower grows. Mold or severe dryness of the upper fragments has appeared on the surface, which indicates a loss of the filler’s ability to pass water and air.
- The plant does not bloom for several years, and then it needs a good shake-up in the form of a transplant.
- If necessary, divide the orchid.
If these signs are not observed, it is better not to touch the orchid - it does not really like to be disturbed. It is also not recommended to do this during the flowering process; it is better to wait until it is over, unless an urgent transplant is needed.
When should an orchid be replanted?
First, let's figure out when an orchid needs to be moved to another substrate:
- if you start to smell mold and rot from the pot;
- if you notice that there is less soil in the pot or it has settled;
- if the orchid has lost its attractiveness, began to wither and wither
- if the roots of the plant turn brown. The roots of a healthy plant should have a greenish color.
It is best to replant the plant in the spring, but if you see the above signs, then this must be done as quickly as possible and regardless of the time of year.
Timing: when can an orchid be replanted?
Replanting an orchid at home
This operation should be carried out when the dormant period of the inflorescences and the entire plant has ended. But there are types of orchids in which the dormant period is weakly expressed, for example, phalaenopsis, which blooms almost all year round with short breaks. Therefore, if new shoots of a plant do not develop in the absence of signs of disease, it means that it is entering a dormant period. This is the best time to replant. This time usually occurs in the spring - late February and March. This is the best time to replant an orchid.
When is it necessary?
As a result of a late or too hasty transplant, the orchid may die or stop blooming . Therefore, you need to clearly know when to replant the plant.
Criteria that help you understand that a flower needs a transplant:
- the substrate decomposed ahead of schedule;
- there are harmful insects in the pot;
- the roots began to rot due to too much watering;
- the substrate has “settled” and the flower is dangling in the pot;
- the root system has grown too much and no longer fits in the pot;
- A year has passed since purchasing the orchid;
- 2 years have passed since the previous transplant;
- the roots became wrinkled and pale;
- orchids need division.
We recommend watching a video about when orchids need to be replanted:
Frequency of orchid transplantation at home: how often?
Replanting an orchid at home
Many novice flower lovers ask the question: “How often to replant an orchid?” . What determines the frequency of transplanting inflorescences at home?
- The answer to this question depends on what composition of the substrate is in the container.
- It may consist of moss, and then it needs to be replanted more often - once every two years .
- If the main part of the substrate is bark, which decomposes more slowly, then you can replant it once every three years.
Of course, these dates are indicated for planned replantings, when the inflorescence looks completely healthy and has no signs of damage by insects.
The importance of timely procedure
Attention : An orchid is an epiphytic plant that, under natural conditions, grows on trees, wraps its roots around their branches and uses them as a support. Providing a plant with a comfortable climate at home is an almost impossible task.
In order for the root system to always remain slightly moist, orchids must be planted in soil that is made from the bark of coniferous trees and has high breathability, optimal acidity (pH 5.5-6.5) and a balanced ratio of essential salts. Over time, due to watering and fertilizing, the soil decomposes and becomes more dense , which reduces its breathability and prevents the root system from drying out after watering, which leads to its rotting.
In addition, tap water used to water the orchid increases the acidity of the soil, while the roots stop absorbing iron, and massive yellowing and falling leaves begin. Also, due to generous watering with tap water, the soil will accumulate salts, which will lead to burns on the roots.
At the same time, the soil may look good externally. If the orchid is not replanted in time, all this can lead to slow drying out or rotting of the roots and death of the plant.
Substrate for orchid transplantation at home: what is it made of?
Substrate for transplanting orchids at home
To transplant orchids at home, you need to choose a high-quality substrate. The health and further flowering process of the plant largely depends on this. What is it made of? You can buy a specialized one at retail outlets, but it comes in two types:
- For epiphytic (i.e. with aerial roots). It's called Phalaenopsis Mixture.
- For terrestrials - “Mixture for Cymbidium”.
The first mixture is used for flowers growing on trees with long aerial roots. Therefore, the substrate for them must be breathable, because the roots of these flowers take part in photosynthesis and they do not need soil, only moisture, to grow. The composition of such mixtures usually includes:
- Pine bark
- Ground fern root
- Activated carbon
- Cut cork
- Sphagnum in small quantities
The second type of mixture is denser, because it is intended for orchids living on the ground. It contains more of these ingredients:
- Sphagnum moss
- Lowland peat
- Leaf ground
- Coal
Sometimes various synthetic materials, such as perlite or foam, are used as a substrate. You can also use:
- Expanded clay
- Shell rock
- Pumice
The substrate can be made at home. Pine bark is used for this:
- First disinfect it - hold it over steam for half an hour or boil it in water.
- After this, dry and boil again. This treatment kills all pathogenic organisms.
- Place to dry again and then cut into pieces up to 2 cm .
To the bark prepared in this way, add dry and finely chopped sphagnum moss and just a little peat coal. You can now fill the pots with this mixture.
Why do you need to replant?
There are many reasons for replanting an orchid after flowering, but before the procedure you should weigh the pros and cons.
[adsp-pro-4]
Factors for urgent transplantation may include:
- rotting roots or lower leaves;
- the appearance of dangerous pests on the flower;
- excessively dry soil that has become unusable;
- exposure of shoots, pallor and lethargy of leaves, stunted growth of bulblets;
- growth of roots to such an extent that they do not fit into the pot;
- plant instability;
- a pot that is not the right size.
Attention. Hard water with a high content of iron and other heavy impurities enhances the processes of rotting and salinization of the soil.
There is no point in replanting a plant in another pot if it feels comfortable and looks healthy. It’s another matter if the roots turn black, mold appears and microorganisms appear - all this will soon lead to the death of the flower.
An orchid is replanted if the plant no longer has enough space in the pot.
Which pot is best to replant a home orchid?
It is better to replant the orchid in a transparent pot.
Most orchids have large roots that like to entwine the pot from the inside and even look out. Therefore, when choosing a new container for a flower, you need to focus primarily on the size of the root system. But, given that the base of the flower will grow further, you need to add a few centimeters to the diameter. Which pot is best to replant a home orchid?
Worth knowing: For a large orchid with intensive growth, you can buy a pot, as they say, “for growth,” so as not to replant it often.
Orchid lovers most often grow their “beauties” in plastic transparent pots or containers. What are the advantages of such containers? Here is the answer:
- The roots are clearly visible and you can constantly monitor their condition. With normal soil moisture, the roots are usually green, but as the substrate dries, they gradually turn gray, which indicates the need for watering.
- In plastic containers, unlike clay ones, the roots do not grow to the walls of the container and therefore are not injured during replanting.
Although clay containers have their advantages:
- In them, the base-root does not overheat, which is very important for orchids.
- Do not overwater the plant because the moisture will last longer.
- In addition, a clay pot is much heavier than a plastic one and therefore will not tip over. Orchids are planted in such pots, some of the roots of which completely dry out and die during the dormant period.
Be sure to make drainage holes in the containers. This will provide the roots with faster drying and ventilation, which will protect them from rotting. Flower lovers with no experience often overwater the plant for fear of drying it out. Drainage holes will help in this case too.
Worth knowing: Plastic containers have one drawback - they have a rather simple, not very sophisticated appearance, compared to the flower itself. To correct this shortcoming, you can buy a beautiful flowerpot that will completely hide the plastic.
There is another way out - you can put a plastic pot in a low glass vase. The space between the walls of the vase and the pot is filled with some kind of jewelry or tinsel, balls or floral fillers. This needs to be done carefully so that the multi-colored filler does not distract from the beauty of the orchid flowers.
Remember: Do not buy large containers for orchids. In small ones - up to 15 cm in diameter, it feels much better and blooms longer.
Right choice
Capacities
What should you place the orchid in? Is it possible in a regular ceramic pot?
The ideal pot for an orchid is a transparent container with many holes . Such a pot will provide free access of air and light to the roots and will allow you to monitor their condition. If ceramic pots are chosen for planting orchids, they must be glazed and have a sufficient number of side holes. In addition, it will allow you to control the moisture level in the substrate.
Tip : When choosing a pot, you also need to rely on the size and volume of the root system: it should be about 2 times larger than the roots.
We recommend watching a video about choosing a pot for replanting an orchid:
Earth
Depending on the type of orchid, there are 2 types of substrate:
for epiphytic orchids, consisting of fern roots, oak or birch charcoal, peat moss and pine bark;- for terrestrial orchids containing coal, peat, sphagnum moss, leaf humus and bark.
Ideal soil for any type of orchid includes charcoal, bark, peat, moss, fern roots, foam and chistos.
We recommend watching a video about the types of soils for orchids:
How to transplant children, one child, a shoot of a home orchid: step-by-step instructions
Replanting a baby home orchid
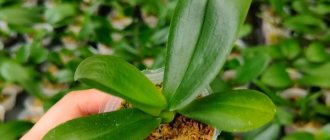
An orchid growing in normal, ideal conditions can produce young shoots, or babies. This is a great opportunity to propagate the plant. What should be done? How to transplant children, one child, a shoot of a home orchid? Here are the instructions step by step:
- The baby should have fairly long roots - more than 5 cm and 3-4 leaves - these are the most suitable parameters for transplantation.
- Children usually appear on the stem or near the root collar. Using a sharp knife, you need to cut off part of the stem with the baby, stepping back to the sides at a distance of about 1 cm . Sprinkle the cut area with coal.
- Prepare a small glass in advance, preferably a plastic one, and add a small layer of drainage.
- Place the baby in a glass and carefully cover it with substrate. for the first 3-4 days .
- Place the glass with the baby in a place where the air humidity is high. You can simply spray the surface of the window sill where the glass is located more often. Try not to get it on the leaves.
The baby will grow in such a container for about a year, after which it can be transplanted into a larger container. An orchid grown from a child will bloom in three years .
How to transplant an orchid into another pot after flowering?
Deadlines
During transplantation, the roots of the plant suffer the most . They recover more easily in the spring, when it is better to replant the orchid. In late autumn and winter, it is better not to create a stressful situation for the flower.
If there is no need for urgent replanting, then it is better to disturb the plant no earlier than after three years.
If there is a reason for an urgent transplant of an orchid, then we do this only if it has faded. The exception is the appearance of pests. In this case, the transplant must be immediate.
Reasons for sympodial and monopodial orchids
Indoor orchids can be sympodial (they are also called “many-legged”) and monopodial (“single-stemmed”). Knowing what species the plant belongs to, you can determine when to replant:
- in sympodial orchids , these include dendrobiums, cattleyas, oncidiums, the transplant can be judged by rootless sprouts that have appeared recently;
- The time of transplantation of monopodial orchids is judged by the tips of the roots, which begin to turn green. These include vanda and phalaenopsis.
The main reasons for urgent plant transplantation are:
- roots that have occupied the entire container and require a larger pot;
- exfoliated and dried out substrate, which has become more moisture-intensive, leading to rotting of the roots;
- presence of pests and dangerous microorganisms;
- excess moisture and lack of ventilation, leading to rotting of the roots.
This orchid needs to be transplanted into a larger pot.
Preparation for the procedure
For transplantation, you need to stock up on tools and supplies:
- small garden pruning shears;
- scissors with sharp blades;
- alcohol to disinfect instruments;
- coal for treating damage to roots;
- pieces of pine bark and foam;
- a disinfected pot, transparent and with ventilation holes.
Substrate
Special stores offer substrates called:
- “Mixture for phalaenopsis”, consisting of cut fern roots, pine bark, cork, sphagnum moss, oak or birch charcoal, suitable for epiphytic orchids;
- “Mixture for orchids”, consisting of sphagnum, crushed coal, sieve humus, peat, cut bark, suitable for terrestrial orchids.
You can prepare the soil yourself from dry pine bark, which is repeatedly boiled and dried for several days, then finely crushed and mixed with dry sphagnum.
Important! An orchid cannot be transplanted into wet bark.
Capacity
The orchid pot should be:
- plastic, maintaining the necessary humidity;
- sizes corresponding to the root system;
- transparent, which is very important for epiphytes;
- with holes for root ventilation.
The best option for a pot.
If you feel that a plastic pot does not harmonize with the beautiful flower, place it in any other larger one, filling the resulting free space with pebbles or shells.
Attention! Do not use a ceramic container for planting exotic butterflies. Their roots can grow to the walls.
Technology
Trimming
To know how to properly prune a faded peduncle, look at its condition. Do not rush to cut it if it does not dry out , since the peduncle shares the nutrients accumulated in it with the plant, and may even bloom.
If the peduncle dries out, gradually cut off the dried part until a stump of about 1 cm remains.
Watering
Watering before transplanting the orchid into another container is not recommended. If damage occurs during transplantation, it will heal faster on dry roots than on wet roots.
It is allowed to water the substrate of the dendrobium when it is removed from the container. But after this, the root system is allowed to dry by placing it on a dry towel for 8 hours.
Disposal of old container
Removing a plant from an old pot and cleaning the roots from the old substrate must be done carefully, without damaging the roots.
Before removing the plant, you can crush the pot in your palms so that the roots move away from the walls of the container and pieces of soil.
Important! If the spine is stuck in the hole, it must not be torn off. It is better to release it by cutting the container.
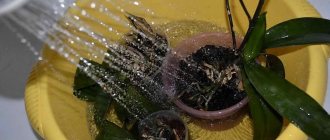
We remove the substrate by shaking the plant. If this does not help, then immerse the roots in settled water for 20 minutes, but be sure to dry them after washing.
What to do if the roots have grown to the ceramic? Submerging the pot in water for a short time will help free up the embedded roots. If this does not help, you will have to carefully break the container without damaging the root system.
If the roots have grown to the pot, soaking them in water will help.
Washing, processing and drying roots
Having taken the plant out of the container, you need to thoroughly rinse the roots under running water and inspect them:
- if harmful organisms are detected, treatment with special means is necessary;
- if rot is detected, the roots are cut off and the cut sites are treated with fine crushed coal or an antifungal agent;
- To get rid of old leaves that have lost turgor, yellowed or even dried and dead roots, we use a sharp knife. We disinfect it with a fungicide, and treat the cuts with charcoal powder.
Then we leave the orchid freed from the pot for 8 hours to dry the roots before planting it in a new container. If the root looks dry and hollow, then it is usually called dead. If, when squeezed, an unpleasant liquid in the form of mucus is released from the root, then it rots.
Such roots are dead.
Placement in a new pot
Planting a plant in a new container is carried out in stages:
- At the bottom of the container we place drainage from small pieces of polystyrene foam or charcoal; expanded clay or shards familiar to flower growers are not suitable for the orchid;
- when placing a plant in a pot, shake it, evenly add the substrate in small portions, and add smaller substrate on top;
Important! We do not compact the soil! We don’t bury the plant in the container, but we also don’t let it wobble.
- spray generously both the substrate and the roots.
Sympodial orchids need a place in the pot closer to the edge of the pot, as they grow horizontally. Monopodials are placed in the center of the container; they are upward growing plants.
Adviсe:
- When transplanting an overgrown flower, you can divide the rhizomes for its propagation . Separated young bulbs can be planted in the same way as an adult plant, but in a smaller container;
- When replanting an orchid, you can see traces of spider mite activity . If it is detected, use an acaricide;
- When planting a flower, do not immerse the aerial roots in the substrate ; they will fix themselves where it is convenient for them.
Further proper care of the phalaenopsis orchid plant after transplantation, growing conditions
After replanting, you need to provide proper and timely further care for the orchid. Here are the conditions for growing a phalaenopsis orchid plant:
Proper care of an orchid is to shade the window so that the sun does not burn the leaves of the flower.
- As mentioned above, immediately after the transplantation is made, the container is placed on a sunny windowsill for a week, but shaded from direct sunlight. Otherwise, if this is not done, the orchid leaves will lose their decorative appearance, wrinkle and become wilted.
You can water the flower after transplanting only after a couple of weeks.
- water the plant after replanting only after 2 weeks . The fact is that orchid roots are susceptible to various fungal diseases. Therefore, the root system needs to be slightly dried to avoid this. Find out how to properly water an orchid here .
Spraying the plant so as not to dry it out
- But, in order not to dry out the plant, spray the leaves, or, even better, wipe them with a wet sponge. In this case, under no circumstances should water get into the depths of the rosette of leaves. This can lead to their rotting.
Orchid grows at optimal temperature
- It is important to maintain optimal temperature. The orchid does not like heat, it needs a temperature no higher than +21-22°C , but it should not fall below 18°C . Otherwise, the inflorescences get stressed, which is very undesirable for these sissies.
Feed the orchid
- A blooming orchid needs feeding. Use only mineral mixtures. Organic ones are not suitable for feeding flowers, since they can introduce diseases into the soil.
Excessive nitrogen nutrition can cause leaf growth to the detriment of flowering. Nowadays you can find special fertilizer compounds for orchids in stores. In any case, it will be good to use an all-purpose fertilizer for flowering plants. They must be diluted strictly according to the instructions so as not to harm the flower. They need to be added along with water for irrigation.
Caring for a transplanted plant
Optimal conditions
The conditions for keeping the plant after transplantation should be especially gentle . We place the container with the flower in a place where direct sunlight does not reach. We control the air temperature in the room, which should be about 20 - 22 degrees. Humidity should be slightly higher than usual.
Watering
Features of watering after transplantation include spraying the leaves using a sprayer.
Full watering is possible only after 5 days after transplantation . This is necessary for plant roots that have experienced stress for regeneration and complete recovery.
Watering is possible 5 days after transplantation.
Top dressing
Fertilizers for the transplanted orchid are applied one month after the procedure . Fertilizers special for this plant are sold in stores.
If there is no flowering after transplantation: what to do?
Lack of flowering after transplantation
After transplantation, the orchid should increase its green mass and bloom after a certain time. This usually happens after 3-4 months . But what if the inflorescences do not appear for much longer? What to do if there is no flowering after transplantation? This problem can occur for several reasons:
- The plant is overfed with nitrogen fertilizers , active leaf growth is observed, they become larger than they should be during normal development. In this case, feeding should be stopped for a month.
- The transplant was not carried out in a timely manner . For example, if for some reason an orchid was transplanted at the time when it bloomed last year, then it most likely will not bloom this year. The plant will direct all its energy to restoring its root system, and not to flowering.
- Perhaps you made mistakes during transplantation . If the plant is not firmly fixed in the substrate, then when you move the pot, it begins to dangle in it, and the roots and stems will receive microtrauma. The plant does not have the opportunity to direct its energy to flowering, experiencing constant stress.
- Insufficient lighting and low humidity . You need to move the pot to a lighter windowsill and spray its surface to increase the humidity of the surrounding air.
Follow these tips, and your flower will soon delight you with its unique blooms. It's worse when the plant begins to wilt. What to do? Read on.
Possible problems
After
After transplanting an orchid, its leaves may begin to fade or turn yellow . This may be due to too little remaining root system or improper watering. In the first case, a problem with leaves is the norm and as soon as the orchid grows roots, it will immediately produce new leaves.
If the problem is improper watering, then it should be urgently normalized. The leaves can also deteriorate due to exposure to sunlight, so the orchid must be kept in the shade for a week after transplantation.
During the procedure
During planting, orchids' roots can take a long time to heal . This happens if the old pots were heavily flooded with substrate - the roots become too wet and after cutting off the damaged roots, the cut points begin to rot, even after being treated. Therefore, the plant must be thoroughly dried before pruning.
What to do if your home orchid withers after transplantation?
A home orchid withers after transplantation.
Most likely the plant is sick. If planting rules are violated, when mechanical damage to the roots occurs, the leaves do not receive full nutrition. What to do if your home orchid withers after transplantation? Here are the tips:
If you watered a lot, replant the plant:
- With good watering and stagnation of liquid at the bottom of the container, especially if there is no drainage, the roots may begin to rot.
- Then the wilting will soon be replaced by yellowing of the leaves and the plant may die.
- Here an emergency orchid transplant will be needed to save it.
Control pests:
- Another reason could be a pest attack.
- Spider mites, the worst pests of indoor plants, thrive in dry air.
- It can be difficult to notice them right away - they are very small and the bad effects begin to appear when there are a lot of them.
- Whiteflies and scale insects also harm orchids. Providing optimal air humidity will help to significantly reduce the number of these insects.
Protect from the sun:
- If the orchid is not protected from direct sunlight, its leaves will begin to wilt.
- This indoor flower feels best on windows that face east, where the sun appears only in the morning and for a short time.
Containers must be provided with drainage holes, and they need to be made not only at the very bottom of the container, but also on the sides to ensure good air exchange for the roots.
When to start replanting an orchid
Depending on the orchid variety, flower transplantation is carried out at different times. They are not tied to a specific time of year.
For all varieties of orchids, the time shortly after flowering is considered favorable. During this period, young leaves actively grow and roots grow. The plant easily adapts to a new substrate.
Important! The orchid tolerates replanting more easily 12-15 days after the last bud has dried.
How to properly water a home orchid flower?
Well-groomed orchid flowers
Watering a home orchid flower is carried out by immersion in water, the temperature of which is not lower than +20°C , so as not to cause stress to the plant. How to do this correctly? Here is the answer:
- To do this, take a cup with warm liquid and place the container with the plant in it for 20 minutes .
- Then take it out and place it on a wire rack to drain off excess water.
- Then place the flower in its usual place.
In winter, the number of waterings should be reduced, but in summer, on the contrary, this should be done more often, at least twice a week. It is necessary to monitor the pseudobulb - if it has lost turgor, then watering is necessary.
Important: It is forbidden to take long breaks between waterings. The orchid is a tropical plant that naturally lives in times of frequent rain and high humidity. Therefore, drought is detrimental to it.
How to care for an orchid after transplantation?
If you did everything correctly, the plant’s adaptation period will be a month. To make this period easier, it is better to follow the following conditions. The transplanted plant should be placed in a dark place to avoid exposure to sunlight.
- Risks of an individual entrepreneur
Orchid seeds: tips for choosing and rules for growing a flower from seeds. Tips for sowing and growing (120 photos + video)
Miltonia orchid: how to plant, care and grow a flower with your own hands. 125 photos of a special type of orchid
The temperature should not rise above 20 degrees. After about four days, you can water it with boiled water by lowering the pot into a container for half an hour. Only after two weeks can it be watered again.
You can feed the orchid with fertilizer after a month. It will also be beneficial to water the leaves of the plant every day. In general, the orchid survives the transplant well and in two months it will delight you with new flowers.
How to replant an orchid flower if the root is rotten: tips
Replanting an orchid flower if the root has rotted
Infrequently, but there are cases when novice gardeners, as a result of improper care, have the roots of an orchid rot. This can happen to all the roots or to a large part of them at once. Is it possible to save the plant then? How to replant an orchid flower if the root is rotten? Here are the tips:
- To revive orchids whose roots have completely died, you need a small window greenhouse.
- In the container where the leaf rosette will be located, you need to pour a small layer of drainage - this can be expanded clay or pebbles.
- Place sphagnum moss on top, which is previously kept over steam and dried.
- Now moisten the substrate and place the leaf rosette in it.
- Transfer to a greenhouse, where a constant temperature should be maintained within +21 - +27°C and high humidity of about 100% . The light should be bright, but diffused - direct sunlight is detrimental to leaves during this period.
After 3-4 weeks of this regime, root rudiments will begin to appear at the base of the leaf rosette and then they will begin to grow. Epin , to the water for irrigation .
If a diseased orchid has several living roots left, or even just one, the chances of saving it increase:
- After trimming the rotten roots, you need to rinse the remaining living roots under warm water and sprinkle the cut areas with charcoal.
- A pre-prepared pot up to 8 cm in diameter is filled with ordinary substrate and a leaf rosette with roots is planted in it.
- Next, the plant is treated as in the first case, placing it in a greenhouse.
If everything went well, new roots will begin to grow in 2-4 weeks .
Step-by-step instruction
Next, we will consider step by step how to plant a plant at home, and also present the rules for replanting an orchid.
- Removal from the pot .
First, the orchid needs to be watered to soften the bark and make it easier to remove from the pot. Also, before taking out the flower, you need to knead the pot a little in your hands or lightly tap it. If difficulties arise, it is better to carefully cut the pot with scissors. Important : Under no circumstances should you damage the roots of the plant! - Washing the roots . In order to remove the old substrate from the roots, it is best to place the orchid in a container with warm water and leave for about 15 minutes or half an hour. You can also rinse the roots under running water, but you must make sure that water does not get into the axils of the leaves.
Inspection of the root system . After washing and drying the roots, the orchid must be carefully examined. If pests are found, they must be eliminated by soaking the plant in warm, filtered water and then treating it with insect repellent. If dry or rotten roots are found, they must be trimmed with sterile instruments and the cut areas treated with an antiseptic.- Removing old leaves . It is necessary to remove all lower, dry, yellowed and lifeless leaves. You also need to get rid of soft hollow bulbs. All sections must be treated with a disinfectant.
- Drying . You need to dry the orchid for at least 2 hours at an air temperature of +18-22 degrees, placing it on a clean towel. All cut areas should be tightened and dry.
- Placing the substrate and plant in the pot . First you need to place drainage at the bottom of the pot, then place the plant in it, covering its roots with a layer of new substrate. It is important to adhere to the following rules: The substrate must be evenly distributed throughout the root system.
- There is no need to bury the flower deeply - the growing point should be on the surface.
- Also, do not bury the aerial roots of the orchid.
- There is no need to compact the soil too much - after a while the roots will attach themselves to it, but we must not forget that the flower should not dangle loosely in the pot.
We recommend watching a video about the step-by-step diagram and rules for transplanting an orchid:
Is it possible to replant a flowering orchid while it is blooming?
You can replant orchids during flowering, but in the most urgent cases.
There is only one situation in which you can replant a blooming orchid - if it is in danger of dying for any reason and you need to choose one of two:
- The orchid will fade, but then die, having spent its last energy on flowering.
- The peduncle is cut short, but later with good care, the plant is completely restored and after a while it will bloom again.
What to do in the second case? Adviсe:
- Prepare fresh substrate and pot. How to do this has already been said above in the text.
- Cut the flower stalks of the orchid to about 2/3 of the length. By the way, the flowers can be placed in water - they will last for almost a week.
- Carefully remove the plant from the pot and inspect the roots, cutting out any rotten ones.
- If the substrate is in normal condition, i.e. there is no mold or its smell, it is not overdried or, on the contrary, very waterlogged, then in this case you need to try to preserve it as much as possible without shaking off the roots. Otherwise, proceed as with a regular transplant, the procedure of which has already been described.
- Now you need to place the plant in the pot and secure it well there.
All that remains is to put the orchid, transplanted during flowering, into the greenhouse and observe how it will feel further. Do not forget to follow all the rules for caring for this flower, which are no more complicated than the rules for caring for other indoor flowers.
Garter
For the first time, before rooting and adaptation, it is better to tie up the orchid. It is important that it stands tightly in the pot and does not wobble from side to side. When installing the support, try not to damage the roots, because all cracks and injuries are potential sources of rot.
Photo: agrosetka74.ru
How to care for an orchid at home
Preparing the substrate for transplantation
The easiest way is to buy ready-made soil in a specialized store, but the greatest interest is in preparing the soil yourself. The standard set of components for the substrate is represented by dry bark of deciduous or coniferous trees, humus, peat, and bog moss. This composition can be diluted with pieces of perlite, polystyrene, pine cones and expanded clay. Since expanded clay performs the function of drainage, it should be in the form of crushed stone in the substrate, not sand.
Preparation of the substrate comes down to several steps:
- bark and peat are crushed into small chips;
- the moss is left in water for a day to get rid of insects;
- the finished elements are steamed and dried.
The substrate for planting orchids can be purchased at the store or made yourself.
For orchids that need regular feeding, a substrate made of humus, peat, coal and bark in a ratio of 3:1:1:1 is suitable. To reduce water intensity, a composition of pine bark and charcoal at a ratio of 5:1 is popular - this allows for good air circulation. Flowers planted on a block will appreciate a mixture of pine chips, coal and chopped sphagnum (5:1:2).
Attention. The finished soil should not be compacted, because the roots of the orchid are very fragile and must be handled with extreme caution.
Basic rules for replanting a plant during flowering
The orchid is a whim in everything. This applies to the pot in which it will grow and bloom, the special soil, and the tools you will use when replanting. Therefore, you need to thoroughly prepare for this important event.
For transplantation you will need:
- Pot. The walls are transparent. The size of the container is larger than the volume of the roots in diameter and a couple of centimeters in height. The characteristics of an orchid impose certain requirements on the flowerpot. He must:
- Be transparent, since the orchid root system takes an active part in photosynthesis.
- Have holes for water drainage in the required quantity.
- It is not recommended to transplant the plant into a very spacious container, otherwise the plant will delight not with flowers, but with lush greenery.
- Be glazed from the inside (if the choice fell on ceramics), which will allow the roots not to stick to the walls of the vessel.
- Equipped with a small leg for free air circulation.
- Soil .
Ordinary soil will not suit a sissy orchid. You will need a special mixture consisting of tree bark. You can add coconut fiber, charcoal, moss. Orchids are even grown on expanded clay. Large expanded clay (size - 1-2 centimeters) is used as drainage. In nature, orchids grow not only on trees, but also in rock crevices. - Tools . The set of tools for transplantation is small. You will need sterilized sharp scissors or a utility knife.