Almost all gardeners know about such a flower as Sedum (or sedum). After all, this is the most common ground cover plant, against which other garden flowers stand out perfectly. In indoor floriculture, succulent types of sedums also complement flower arrangements and are highly valued for their unpretentiousness. How to choose a sedum variety that can live indoors and not cause trouble to its owner? We will tell you about this now.
The genus Sedum (lat. Sedum) is quite numerous. It is part of the Tolstyankov family, which contains more than 30 plant genera. Note that sedum occupies most of this family and has more than five hundred different species. These are low shrubs, succulents, and herbaceous plants. In their natural environment, they can be found in mountainous areas with dry climates in North America, Europe and East Asia. A larger number of sedum species have been discovered in Mexico.
Indoor sedum - description
Sedum, also known as “sedum” (by the way, from Latin this word is translated as “calm down, slow down” - that’s why sedatives are called sedatives, depressants, calming the nervous system) belongs to the Crassulaceae family. By the way, the famous money tree belongs to it. Like Crassula, sedum is a succulent.
This means that such plants are characterized by a hot climate; they have almost no need for moisture, because they accumulate it in their dense, thick leaves, much like cacti. But their basic need is a large amount of sunlight, without it the plant will quickly become ill.
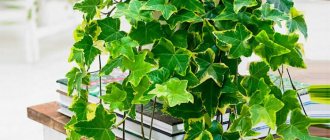
Like many succulents, sedum pleases with its unpretentiousness and at the same time attractive appearance: it is bright, juicy, green, and will delight you with greenery almost all year round.
Most sedums are perennial, although there are also annual or biennial varieties. There are up to six hundred types of sedums. The species differ significantly from each other, but they are always unpretentious, hardy plants.
What does sedum look like?
Depending on the variety, sedum can be a shrub, a creeping plant, or it can have long, strong shoots directed upward, making them resemble aloe or fern.
As a rule, it has small leaves, dense, thick, juicy, and strong to the touch. The shades of the leaves vary: most often sedum is green, but it can also be white, yellow, red-colored, pink, and blue. There are even multi-colored varieties, for example, leaves that are green on the outside but pink on the inside, or green and red leaves on the same bush.
The shape of the leaves also varies: it may be a small bush, there may be ears of many small shoots tightly adjacent to each other, there may be leaves collected in a kind of green rose.
Now about flowering. Most often, the inflorescences are collected in umbrellas, but sometimes the flower grows alone, rising high on a peduncle above the leaves. The most common varieties are those with yellow flowers, but the flower also comes in red, blue, and white.
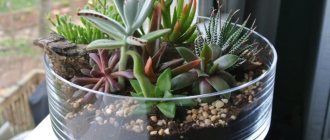
Due to the variety of varieties, sedums are equally often used both for decorating gardens and for home cultivation.
Where it grows - the birthplace of the plant
Mexico, East Asia, North America.
Flowering time
Depends on the variety, but most often they start in the summer and finish in early autumn.
Landing
Seeds are sown for seedlings in March or April. The deadline for planting white sedum in the soil for any method of propagation is May.
Apply potassium-phosphorus fertilizer or a small amount of manure. Dig cuttings or parts of divided sedum bushes into the prepared area of land and water.
Sedum album prefers poor soils. On fertile lands, it will not be able to show the typical varietal color - the leaves will remain green and will not acquire red-brown decorative shades.
How to care for Sedum at home
Sedum is unpretentious, but still you shouldn’t buy it, put it in a corner, and forever forget about its existence. Any living creature needs care and the right conditions for life, especially since taking care of sedum is not at all difficult.
What to do after purchase
It makes sense to do the following:
- Choose where your new pet will live, taking into account its needs regarding light, humidity and temperature;
- Clean up the place, wipe off the dust;
- If you already have green pets, then it makes sense not to immediately add sedum to them, but to wait a little. The fact is that your pets or the sedum itself may be infected with pests that easily jump from one plant to another. If after a week all the flowers feel good, then the sedum can be added to the neighbors.
- Should I replant sedum after purchase? Not required, but recommended. On the one hand, they are undemanding to the soil, on the other hand, store-bought soil has too few nutrients, so not a single plant will survive in it for long. It is advisable to replant in soil that you know for sure has enough nutrients for the plant.
Lighting
The more light the better; it is almost impossible to burn the sedum. Place it on a south-facing windowsill where it will receive plenty of sun. There is no need to shade it; sedum loves direct sunlight. In the summer you can even take it out onto the balcony; it is also not afraid of drafts and is favorable to fresh air.
If you want your sedum to feel good even in winter, then it will need lighting. This is especially true for red varieties; they urgently need a lot of light. Due to lack of light, all varieties of sedums stretch out, fade, and lose their decorative properties.
Content temperature
In summer – 25-28⁰С or even higher. In winter – 14-18⁰С, but without loss of lighting.
Humidity
The plant is unpretentious to humidity. It is equally difficult to overdry it and to over-moisten it with moisture from the air, from the atmosphere. No need to spray.
How to water sedum
With moderate watering, it is almost impossible to dry out sedum, since it absorbs moisture with its leaves and retains it for a long time, but it’s easy to overflow. It is important not to allow water to accumulate and stagnate in the pan: this will quickly cause the roots to rot.
In summer
Only when the earthen lump is at least half dry, that is, approximately once a week.
in winter
Twice less than in summer - once every two weeks.
Fertilizer and feeding
They start feeding in March and end in September, monthly. Feed with fertilizer for succulents and cacti.
Care
White sedum is undemanding in care.
- No fertilizing is needed as it prefers poor soil.
- Watering should be moderate - carried out only immediately after planting and during drought. Do not allow water to stagnate in the soil.
- Weeding of this type of sedum must be carried out regularly, since the plant does not tolerate strong shade and loses its decorative appearance.
- Trimming. After flowering, it is necessary to remove the peduncles, but it is important not to damage the leaf buds of the stems.
Reproduction Sedum
It is easy to propagate sedum, it takes root easily, and takes root easily. To plant sedum, you will need the following tools.
Required Tools
Propagation by leaf, dividing a bush or cuttings will require:
- A sharp tool with which you separate a cutting, leaf or part of a bush.
The tool should be as sharp as possible, well sharpened, so that you don’t have to saw or break off part of the plant, since such creases leave wounds through which infection can enter the plant, plus wounds with creases are more difficult to heal, the plant will need more strength for this.
The instrument must also be disinfected (wipe with alcohol) to avoid infection. In fact, sedum is hardy enough to get by even without it, but it’s better not to take risks; the plant’s hardiness does not mean that it can be treated completely carelessly.
- Crushed activated carbon to sprinkle on the sections. This is also necessary to prevent infections.
- Container for planting cuttings.
Growing from seeds does not require such tools; you only need the seeds themselves and a room with suitable conditions.
Regardless of the propagation method you choose, when separating a part of a plant (be it a leaf, a cutting, part of a bush, or a seed pod), it is important to do so in one cut, like a surgeon with a scalpel. It is also important to cut above the growing point and at a 45-degree angle to make it easier for the plant to grow new growth.
Leaf
Just pinch off a leaf (healthy, thick, strong, bright green) and leave for a couple of hours to dry the cut. Then plant it in a separate small container (just a plastic cup will do). There is no need to make a greenhouse, and there is no need to bury it either. Watering is infrequent: moisture may cause the leaf to rot. Don't forget to ventilate and provide fresh air.
The leaf will send out roots in a couple of weeks, and after another couple of weeks you can transplant it into a permanent pot.
Handle
It is no different from propagation by leaf, but cuttings are a more reliable process, since the leaf is less willing to send out roots and take root, unlike cuttings. A cutting differs from a leaf in that you are separating not just one leaf, but a small part of the plant - a branch with a stem and several pairs of leaves. It needs to be left for a couple of hours just like a leaf, and then planted.
To care for it in the same way as for a leaf, the main condition is constant access to fresh air and light. There is no need to over-water the plant; the young plant may rot.
You will know that the cutting has taken root (usually after a couple of weeks) by the fact that new small leaves will appear on it. After another two weeks, it can be planted in a permanent pot and cared for like an adult plant.
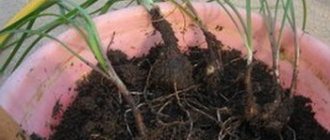
Dividing the bush
Suitable for propagating young plants (no older than four years). It is best to divide the bush when replanting, so as not to expose the plant to additional stress.
It is enough to simply separate a part of the bush with everything that an adult plant needs for life (root, stem, several leaves) from a young, healthy plant, plant it in a separate pot and care for it as if it were an adult plant.
Seeds
A more labor-intensive method, it is usually used by professionals because it allows you to organize the cultivation of a large number of sedums at the same time.
Propagation by seeds is carried out in autumn or spring. You will need to purchase seeds from the store and stratify them, that is, sift them and put them in the refrigerator for two weeks. When purchasing, pay attention to the expiration date: the “younger” the seeds, the better they germinate, and vice versa.
You will also need a container: shallow but wide, filled equally with peat and sand. It will need to be moistened before the seeds go in.
Mix the seeds with dry sand and pour them onto moist soil without deepening them, then cover with film or polyethylene. Place the container in a room where the temperature does not drop below eighteen degrees, in a place where the seeds will receive a lot of sunlight. The greenhouse must be periodically ventilated and the soil must be moistened.
The first shoots will appear in two weeks. You can plant it in a separate container when the sprout has two leaves of its own.
Growing from seeds
Sedums are grown from seeds and by cuttings.
- Parts of the shoots are separated from the main one and dried in a shady place for 2-3 hours.
- Then they are planted in the soil in a permanent place.
- If the weather is rainy, then sprinkle the cuttings with wood ash powder, this will protect them from rotting in wet soil.
Propagation by seeds produces an adult flowering plant in two years. Small seedlings with two leaves are immediately planted outside.
Attention! When planting, you need to take into account the ability of sedums to cross-pollinate, which results in the emergence of new hybrid forms and colors.
Video about growing sedums from seeds:
Transplantation of decorative Sedum
Transplanting sedum is, in fact, quite simple: the plant is unpretentious, resilient, and copes with the stress of replanting easily and naturally.
The sequence of actions for transplantation is as follows:
- Prepare a new pot and soil (you will read more about what kind of pot and soil you need below). The pot should be filled halfway, not completely.
- Turn the pot of sedum over and carefully remove it. You need to act delicately and carefully, since the plant has fragile stems.
- When replanting, it is convenient to inspect the roots, because at normal times they are not visible. If you over-water the sedum, the roots may rot. If this is the case, then trim off the damaged, rotten parts.
- If everything is in order, place the plant in a new pot and fill in the remaining soil, and then moisten it slightly.
- Place in the shade and do not touch for a couple of days. Water next time when the top layer dries down to a centimeter.
Sedum may shed its leaves after transplantation. It's okay, this is normal, its leaves are just sensitive. They will grow back.
When can you replant?
Sedum is a stress-resistant plant, so it can easily tolerate transplantation at any time of the year, even during flowering (which is usually not typical for tropical plants: when transplanted during flowering, they become stressed and drop their buds).
How often should indoor sedum be replanted?
Infrequently. A young plant (up to three to four years old) is replanted once every two years, and a mature plant (over 3-4 years old) once every three to four years, or better yet, once every five years, in order to rejuvenate and replant the plant.
An exception is replanting for sanitary purposes, for example, in case of severe thrips infestation.
Priming
You can buy ready-made soil for succulents or make your own. The composition of the soil includes leaf soil, turf and sand (one part of each), plus a little crushed brick and charcoal.
Another option: one part sand and humus, two parts peat.
Pot
Low, wide, but always with holes for drainage. The roots develop slowly, the root system is small, so it is not even necessary to change it to a larger pot when replanting.
Diseases and pests of Sedum and their treatment
Gardeners and plant growers love sedum precisely because it practically does not get sick; it is a very disease-resistant plant. The only thing that can infect sedum is various types of fungi. They appear from waterlogging of the plant, if it lives at home, or from humid, damp weather, if it grows in your garden, outside the house.
Fungal infection (in other words, rot from excess moisture) is noticeable by the blackening of the leaves. If this happens, then the damaged shoots need to be cut off and, if possible, reduce the humidity around them: reduce watering, move the flower closer to the heating devices, to a drier place, or cover it from the rain.
Basically, sedum suffers from pests. You can’t do anything with them, they are present in the life of any plant simply because this is how nature works: insects appear around and look for food and good conditions. Unlike fungus, pests most often appear in exactly the opposite environment - dry and too warm.
So, let's talk about common sedum pests:
- Aphid
Symptoms: Aphids are visible visually - they are tiny green bugs. In themselves, they are practically not dangerous, but they feed on the juices of the plant, weakening it and making it more susceptible to other infections. If you have aphids, the leaves of the plant will dry out, turn yellow, and brownish dots will be visible - these are the places where the insect has eaten.
What to do: treat the plant with insecticides. Insecticides for currants are suitable - they are more gentle and will not burn sedum leaves.
By the way, an interesting fact: the milk of aphids is eaten by ants!
- Thrips
Symptoms: curvature of the upper parts, yellow spots on the leaves that look like streaks, then holes form in place of the spots, the leaves wither and fall off.
What to do: the main means of control are insecticides. However, in the case of thrips, it is important to act quickly, because they reproduce extremely quickly, and also to isolate the plant affected by thrips from others, since they easily climb onto other plants. For prevention, it is even useful to remove the top layer of soil from other plants - perhaps there are already pest larvae there.
- Grooved mower
Symptoms: in the early stages of infection by this pest, the edges of the leaves simply look gnawed, but then the mower puts the larvae in the roots of the plant, and the entire body suffers - it looks sick, yellowed, lethargic, and twisted.
What to do: remove them from the plant, but this must be done at night, since this pest is active only at this time. You need to place white paper under the sedum, shake off the pests from the plant and destroy them.
- Caterpillars.
They often appear in mid-summer and are visually noticeable. They can be lured by placing cabbage leaves under the board and destroyed, and the sedum itself can be treated with Actellik.
Difficulties of maintenance
The main difficulty is maintaining the white sedum coating in ideal condition for the landscape.
- When it freezes or dries/gets wet, bald spots form in the plant mat. The problem is eliminated by planting new bushes or sprinkling layerings with soil.
- Sedum can grow strongly and unevenly. In this case, simultaneously with weeding, the overgrown stems are cut off.
Sedum coatings of this type begin to degenerate after 5 years, so they need to be completely renewed periodically. White sedum is light-loving. In shaded conditions, its development stops: the leaves become smaller, the stems become elongated, and flowering may not occur.
White sedum will perfectly complement any landscape composition - it will create color spots in rock gardens and rock gardens, and will help disguise voids in flower beds. It is unpretentious and, if you follow the rules of care, can delight you for a long time with its original appearance and aroma.
Popular varieties and types of sedum with photos and names
As already mentioned, the sedum genus includes many different species (up to 600!). All of them are unpretentious, hardy, beautiful - all you have to do is choose which one you like best.
Adolf's sedum (Sedum adolphii)
Sunny, summer flower: the composition of the leaves resembles a rose, the leaves are dense and thick, golden-green at the base, with pink tips.
Weinberg's sedum (Sedum weinbergii)
The complete opposite of the previous variety: here, too, roses are made from leaves, but they grow in a lush bush, and their color is silvery-white, especially in the sun, or silvery-green without the sun.
Gregg's sedum (Sedum greggii), or sedum diversifolium (Sedum diversifolium)
This variety is most often used for outdoor cultivation. They form lush bushes, bloom easily, the flowers are lush pink buds.
Siebold's sedum (Sedum sieboldii)
Very similar to the previous variety, but the buds are smaller, round in shape, and have a delicate pink-lilac hue. This variety is also called October daphne.
Sedum compactum
Despite the name, this variety can occupy large areas, it’s just that its leaves are really quite small, forming small prickly balls.
Red-colored sedum (Sedum rubrotinctum)
A very bright, unusual variety of deep red color with only small splashes of green (although the ratio of red to green may vary).
Linear sedum (Sedum lineare)
The variety is called linear because of the leaves: they are elongated, such as a narrow oval, forming many stars. The outer side of the leaves is green, but the underside is lighter, making it appear as if each leaf is bordered by a light stripe.
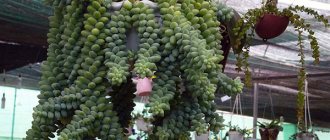
Morgan's sedum (Sedum morganianum)
A creeping variety of sedum. The leaves form long, thick ears of soft green color. Looks very nice, looks great in a flowerpot.
Sedum potosinum
The coloring is similar to the “Adolf” variety, but the stems, studded with short thick leaves, are not long and stick out upward, five to eight stems on one bush. Suitable for growing on a desktop.
Sedum stahlii
An unusual bicolor variety: from dark green to purple, with small, round, thick leaves, suitable for lovers of exotic, gloomy plants.
Creeping sedum (Sedum humifusum)
This variety is actively used for decorating gardens: it grows into lush, low, bright green bushes (and the flowers are yellow), the leaves gather into roses.
Sedum pachyphyllum
A miniature variety of soft green color with pink tips. Suitable for growing at home. The leaves are thick, slightly curved, reminiscent of Shrek's ears from the cartoon.
Trelis' sedum (Sedum treleasii)
A variety slightly reminiscent of the previous one, but without the pink tips of the leaves, their shade is cooler, and their shape is wider, forming thick ears.
Sedum burrito
Another miniature variety with light green, delicately hued small round leaves. If you let them grow, they will start to hang from the pot.
Sedum Kew
A creeping variety that grows into a lush bush and is often used to decorate gardens. The leaves are thick, soft green in color, tapering towards the tip, forming large shaggy ears.