Lavender seedlings from seeds can be successfully planted and grown at home. The optimal sowing time for open ground is early February. To grow lavender from seeds at home in a pot, sowing can be done almost all year round.
The video in this article shows basic recommendations for agricultural technology for this crop. Pay attention to the photos of different varieties - choosing the right one is very important. “English”, “Voznesenskaya 34”, “Yuzhanka” - these varieties are most suitable. Lavender angustifolia is not picky about the conditions for growing from seeds - it can grow successfully even in unfavorable climatic conditions.
Lavender from seeds at home can turn into a fragrant and useful plant at home or on the site, if you carefully apply all the basic agricultural techniques of the crop. When growing lavender from seeds at home, it is very important to properly prepare the seedlings. And for this it is even more important to observe the timing of sowing and picking.
Plants are often used to obtain medicinal raw materials. In some regions of our country, angustifolia lavender is grown en masse, essential aromatic oils are obtained from it, and medicinal balms and other remedies are also boiled and created based on this herb. Many gardeners try to grow lavender on their own plot, and some at home in a pot. In any case, lavender will delight everyone with its pleasant aroma and stunning appearance.
See how to grow lavender from seeds and seedlings at home and in your garden:
What does it mean?
Since the seeds of some plants go into a state that resembles animal hibernation during the winter, they need to be immersed in conditions close to natural so that they sprout in the spring.
You can simulate this process at home , which will allow more seeds to come to life at the right time. Lavender seeds also need this manipulation.
Attention ! Stratification is the process of keeping seeds at a certain temperature for a long period of time to speed up their germination after planting.
The procedure allows you to achieve the following results:
- increasing the number of quality seeds from which flowers can be grown;
- hardening of the seed, which helps strengthen the plant’s immunity and its resistance to changeable weather conditions.
Thus, stratification is a kind of imitation of the winter period with gradual (spring) warming , which awakens the seeds and stimulates the growth and development of the plant.
Stratification is not required for those crops whose homelands are considered to be southern regions where there are no severe frosts. Plants whose seeds ripen in the first half of summer do not need this procedure. For these crops, it is enough to soak the planting material for a day in warm water.
As for lavender, stratification of its seeds is extremely necessary, since otherwise there will be no shoots or the sprouts will be weak and non-viable .
What is seed stratification and how to do it at home
The artificial creation of natural awakening processes for seeds is called seed stratification . This procedure can be done at home. In order to sow the seeds of some perennial plants in the spring, we will have to imitate the natural conditions of winter, in which a seed that has fallen into the ground is covered with leaves and snow, saturated with moisture and microelements, and its shell becomes soaked, preparing for the spring awakening.
What is seed stratification
Stratification - keeping seeds in a humid environment at a low temperature for 2 to 5 weeks. This procedure triggers embryonic sleep in the seeds, after which, once in warm soil, real spring and active germination begin for the seed. Without pre-cooling, the seed may simply rot in the ground.
As it turned out, it is advisable to stratify the seeds of all perennial herbs - oregano, thyme, rosemary, lavender, hyssop, lemon balm, tarragon. A year ago I sowed without stratification, and as a result, a large number of seeds never sprouted. But at that time it was not critical - 2-3 spreads per pot were enough. And yet the rules are the rules.
When should you start?
This procedure is quite time-consuming.
On average it takes about 1.5 months. It turns out that you need to start preparing lavender seeds for planting in January-February. The timing of sowing seedlings serves as a guide. If you plan to start planting in March, then the optimal time to start stratification is the end of January. A more exact date depends on the region :
- Moscow region and central Russia - January 15-20;
- southern regions - the first days of January;
- Ural, Siberia, Far East - the first days of February.
Stratification usually takes from 30 to 40 days.
Under what conditions is it carried out?
Lavender seeds do not germinate without preliminary preparation, so they need to be “shaken.” To do this, gardeners use several methods, but more often the procedure is carried out at home, using cold or heat .
In some cases, the method of natural stratification is used, but it does not always give a positive result. To do this, you need to sow lavender seeds in a seedling bed before winter. For obvious reasons, this method is not suitable for regions with severe winters, unexpected thaws, and recurrent frosts without snow.
This is why experienced gardeners prefer to carry out stratification at home. To do this, you can use the refrigerator , having previously placed the planting material in a humid environment, as well as warming the lavender seeds in hot water for 10-15 minutes.
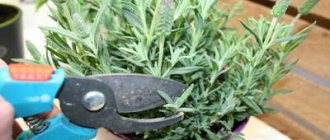
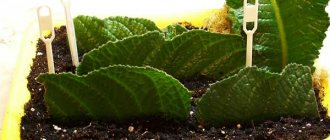
Picking seedlings and caring for young lavenders
Lavender is picked only when the plant has formed one pair of true leaves and the third or fourth full leaf begins to develop . As a rule, even young lavender seedlings first grow roots, and at this stage quite powerful roots are formed, which will not have enough space in a shallow bowl.
Lavender is transplanted carefully, but the plants tolerate this procedure easily. It is advisable to plant in individual pots or cups with a diameter of 5-6 cm, but large boxes can also be used, leaving a similar distance between plants. For lavender seedlings, you can use a peat-sand mixture or a lighter substrate for indoor plants with the addition of perlite and sand. Long-acting fertilizers can be added to the soil.
Lavender is transferred to new containers, trying not to destroy the earthen ball, carefully pressing the soil around the seedlings to speed up rooting.
Basic Rules
The stratification procedure should not scare novice gardeners. It is enough to follow the basic rules and take into account some nuances:
If you choose the sawdust method, it is important to stir them periodically.- When not only lavender seeds, but also other plants, are hardened in the refrigerator, it is necessary to label each jar or bag so that there is no confusion when planting the seed.
It is important to indicate the start date of hardening and other information that will be useful.
- Lavender seeds should be placed on the shelf in the refrigerator that is closest to the freezer, since it is coldest there. In this case, the optimal storage temperature should remain within 3-5°C.
- It is recommended to stratify seeds in agroperlite, since it retains moisture well. It can be used either alone or mixed with sand.
- After the hardening procedure, the seeds should be kept in a solution of the Epin drug.
- The specified stratification periods cannot be reduced, as this will negatively affect the degree of development of lavender during the period of the first shoots.
- Exceeding and lowering the temperature is extremely undesirable. In the first case, the seeds may germinate, but in the second, they may die.
Important ! A key part of lavender stratification is maintaining a moist environment. To do this, the material must be constantly moistened.
Seed preparation
Before planting lavender seeds as seedlings at home, it is important to prepare them - stratify them. This stage is considered the most important and difficult.
Stratification is a procedure that is necessary for certain types of plants. It helps the seeds to ripen. To do this, they must be placed in the cold. For example, perennial seeds, after flowering at the end of summer, fall into the ground and remain in it all winter. This stratification is called natural. There is also artificial stratification, during which the seeds are placed in the cold, for example, in the refrigerator.
With natural stratification, seedlings should be placed in places where water does not stagnate. You can also place them in containers, cover them well on top and leave them outside. In this case, they are not at risk of severe waterlogging and freezing without snow cover.
With artificial stratification, you will have to create cold conditions yourself. To do this, take a suitable container, pour wet peat into it (you can use peat tablets), add sawdust and sand. Then the seeds are mixed with the prepared soil mixture. Afterwards, loosely close the container with a lid or cover it with film. Place the container in the upper part of the chamber, where the temperature does not exceed +5°C. This is what is considered ideal. It is worth leaving it there for 1.5-2 months.
Pixabay
Unsplash
- Country cottage area
6 mistakes when growing seedlings that will ruin all your efforts
How to stratify at home?
There are three main ways to stratify in the cold. You should choose the most suitable and convenient one :
- on cotton pads;
- on sawdust;
- on the sand.
Each of them has its pros and cons.
On cotton pads
It is believed that this is the simplest and most understandable way to stratify lavender seeds. The procedure algorithm is as follows :
- Take one cotton pad and divide it into two parts to create a top and bottom layer.
- Sprinkle lavender seeds on one half and cover with the other.
- Place the disc on a saucer and moisten the disc using a spray bottle. This way the moisture will be distributed evenly.
- Place the disc in a bag or glass container.
- Leave on the table for about a day. After this, transfer to the refrigerator.
Next, you need to monitor the disc and make sure it does not dry out. It needs to be moistened periodically.
On sawdust
For this method, you should prepare clean sawdust in advance. The sequence of actions is as follows :
Pour boiling water over the sawdust.- Cool and then squeeze out excess moisture.
- Mix them with lavender seeds.
- Transfer to a glass jar or plastic bottle.
- Leave for three days at room temperature.
- Place in the refrigerator.
Attention ! There should be approximately twice as much sawdust as seeds.
On the sand
This method requires clean sand. The procedure algorithm is as follows :
- Mix lavender seeds with plenty of clean sand.
- Moisten thoroughly.
- Transfer to a suitable container and close tightly with a lid or film.
- It must be kept at room temperature for a day, and then put in the refrigerator.
The sand needs to be moistened as needed, but there is no need to over-moisten it , since the seeds may rot.
Lavender propagation
In reproduction, both angustifolia and other types of lavender are almost similar. Regardless of the degree of winter hardiness, representatives of the genus Lavandula retain common features and differ only in details - the size of leaves and flowers. Without exception, all lavenders are easiest to propagate vegetatively : the plants produce a large amount of shoots, and both layering and cuttings take root well. But in this way you can only get lavender of the variety and type that you already have or are on the market (and rare varieties with interesting colors and unusual species are, as a rule, rare). And the number of “offspring” will always be more or less limited.
If you want to grow a new variety of lavender and get a large number of seedlings, significantly saving both time and money, then you can use a less popular, notoriously difficult method - growing lavender from seeds. In practice, seed propagation of lavender is not at all so tricky, since the only difficulty - stratification - is overcome quite simply.
Possible difficulties and errors
First of all, you need to pay attention to high-quality seed material. If the lavender seeds are not trustworthy, then most likely the sprouts will not appear. In this case, even stratification will not help.
When purchasing, you need to check the integrity of the packaging : there should be no dents, damage or tears.
You should find labeling with a description of the variety, recommendations, and expiration date of the seeds. They must be intact, identical in size, without stains or the smell of mold. If the seed is cheap compared to competitors, then it is more likely to be of poor quality.
You should take seeds from a trusted manufacturer.
It is important to strictly follow all recommendations regarding timing and temperature conditions , otherwise the lavender seeds will not undergo stratification and there will be no seedlings after planting.
Carefully ! The decrease in temperature of planting material after stratification should be smooth.
If a method using sand is used, it must be disinfected . If you do not do this in time, before the procedure, you may later find mold in the container with the seeds. The problem is easily solved: you need to take any suitable fungicide and treat the sand.
Another common problem: lavender seeds sprouted in the refrigerator. For a while, you need to open the containers and expose the planting material to light, for example, to a window. In this case, the seedlings will outgrow a little, but after planting they should return to normal.
Instructions for sowing lavender seeds for seedlings
A guide will always help you do any task correctly, which will describe all the steps in detail. And planting this crop as seedlings is no exception.
Selection of seed
The rule for choosing high-quality and good seeds is very simple: you need to buy them from a trusted manufacturer and in a store that enjoys a good reputation and has positive reviews. The packaging must contain detailed information about the variety, cultivation rules, expiration date, etc.
Note! If you like lavender seeds, which have a suspiciously low and attractive price in contrast to other varieties, then it is better to pass by such packaging, perhaps the seed is defective or of poor quality.
You can also collect seeds yourself if you are already growing a crop on your property or your neighbor has one. After collection, it is important to store them properly (in a dark, dry place, in an airtight container).
Important! Experienced gardeners and flower growers advise using the freshest seeds for the best germination.
Soil preparation
To grow lavender seedlings, you need to choose nutritious, loose soil. You can plant it either in purchased universal soil for seedlings or indoor plants, or in home-prepared soil.
To prepare the soil mixture with your own hands, mix the following components:
- garden soil (3 parts);
- humus (2 parts);
- sand (1 part).
Before use, you need to prepare the soil for growing seedlings, and it doesn’t matter whether you bought it or prepared it yourself. Be sure to disinfect the soil for seedlings, but this must be done in advance (ideally 2-4 weeks). An effective method of disinfection: steaming, for this you need to put the soil on a cloth in a colander and place it over steam for 30 minutes, stirring regularly. After this procedure, it is recommended to water the soil mixture with biofungicides to restore soil microflora, for example, Fitosporin, Trichodermin.
After disinfection, sift through a sieve with large holes.
Selection of capacity
It is best to plant lavender seeds for seedlings in wide and shallow containers. The optimal depth of the planting container is 7 centimeters. Wooden, plastic boxes or some bowls will do.
Note! For some reason, there is a false opinion that supposedly individual containers are not suitable for growing seedlings. But this opinion is wrong! Just like in a general container, lavender can also be sown in cups, plastic cassettes and peat tablets.
Step-by-step photo instructions for sowing lavender seeds for seedlings
As soon as the specified period has expired and the seed has undergone mandatory stratification, you need to start planting. Detailed step-by-step instructions with photos will help you correctly sow lavender seeds for seedlings:
Step 1: Prepare a container.
As mentioned above, you can choose (depending on your preferences) almost any container. The photo shows a small bowl:
Step 2: Make drainage holes.
Since the container must have drainage holes to remove excess moisture. If you don’t have them, be sure to make them yourself! Just be careful when handling sharp objects.
Step 3: Lay down a drainage layer.
Now you need to fill the bottom of the container with drainage, which will contribute to the optimal level of humidity. You can use, for example, fine expanded clay and perlite. As you can see in the photo below, perlite is used in the master class. The thickness of the drainage layer is 1 or 1.5 cm.
Step 4: Fill the container with soil mixture.
Pour the soil so that there is a small distance (2-3 centimeters) between the soil and the edges of the container.
Step 5: Water the soil using a spray bottle.
Use clean, settled water at room temperature.
Step 6: Sow the lavender.
You can transfer the seeds to the surface of the soil simply with your fingers or using tweezers or a toothpick.
When sowing, maintain the optimal distance between seeds - about 2 centimeters.
Step 7: Cover the seeds with soil or sand.
After you have sowed the seeds on the surface of the soil in a bowl, you need to sprinkle them with a small amount of soil or clean river sand. Layer 3 mm.
Step 8: Lightly moisten the soil with a spray bottle again.
Step 9: Cover the container with a lid or film.
Now you need to complete the final stage of sowing lavender: create a mini-greenhouse for germination of seedlings. To do this, cover the container with seeds and soil with a lid, glass or plastic bag as standard.
Step 10: Label the seedlings.
In order not to confuse lavender seedlings with other seedlings, it is recommended to attach a tag with the name of the crop or write it with a marker. You can also write the variety and planting date.
Step 11: Transfer the container to a warm place.
It is necessary to place the bowl in a warm place, for example, next to a heating radiator. During the day, the temperature in this place should be maintained at +19-22°C, and at night +15-18°C.
Important! As noted above, lavender seeds can be stratified after planting in the ground . If this option is more convenient for you, then plant the seed according to the photo instructions described above.
And then, instead of a warm place, place it in the refrigerator for 35-40 days or 1.5 months. Check and moisturize regularly. And after the optimal amount of time has passed, move the container to a warm place.
Planting in peat tablets
Many gardeners sow various crops for seedlings in peat tablets. The product is very convenient - you do not need to prepare soil, containers, or dig in the future.
Scheme for planting lavender seeds in peat tablets:
- Place the tablets in the tray (the side with the hole in the non-woven material should face up) and pour warm water into the bottom of the container, but so that the stream does not fall on the products themselves.
- Leave for half an hour and allow the peat products to swell.
- After the specified time, drain off the remaining water.
- Make very small indentations in the products using a stick.
- Using a toothpick, transfer 2-3 seeds into one peat tablet (in case some seeds do not germinate, and if they all germinate, then you can then select the strongest seedling and carefully cut the rest with scissors).
- Move the peat slightly so that a small layer, literally 2-3 millimeters, covers the seeds.
- Spray the products from a spray bottle on top and also cover with a lid to create a mini-greenhouse.
Advantages and disadvantages
Stratifying lavender seeds at home has the following advantages:
- has a positive effect on the rate of seed germination;
- allows you to achieve friendly shoots;
- lavender seeds awaken faster from hibernation;
- future flowers are resistant to changeable weather;
- the stratification procedure affects the production of more primordia;
- Plants show strong immunity and can resist diseases and insect pests.
There are no downsides to stratifying lavender seeds, since this is a necessary procedure for this crop. Without it, planting material will not sprout. Therefore, it makes no sense to talk about whether it is worth carrying out in relation to a given plant.
Possible disadvantages include only an incorrectly performed procedure . That is why experienced gardeners recommend adhering to the basic rules.
Advice! If stratification is carried out for the first time, it is better to use the method on cotton pads. It is considered to be the simplest and most effective.
How and when to plant lavender seedlings
Despite the fact that lavender tolerates picking normally, it is important not to miss the right moment and carry out the procedure on time, but when do you need to pick seedlings? The timing of the event is determined by the seedlings - 2 true leaves should form on the plants and at the same time the second pair of true leaves begins to grow.
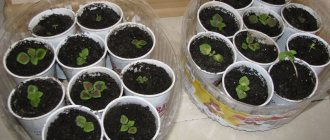
For picking, you need to choose individual containers , for example, bulk plastic cassettes, cups made of peat or plastic. The diameter of the container is about 10 centimeters.
The soil for filling a new container can be used the same as for planting, only you need to add more sand to it and be sure to add perlite or vermiculite to make it lighter.
Note! Seedlings grown in peat tablets do not need diving. Seedlings can be planted in open ground directly in tablets.
Step-by-step instructions will help you properly pick lavender seedlings at home:
Step 1: Make a drainage layer at the bottom of the container, fill the container with soil and level the surface.
Step 2: Water the seedlings 1-2 hours before the event.
Step 3: Using a pencil or other object, make indentations in the middle of the container.
Step 4: Using a small spatula, spoon or wooden stick, carefully pick up the seedling along with the earthen ball.
Step 5: If the central root is too long, pinch it a little with your nails.
Step 6: Plant the seedling in the hole, the roots should be straight and not bent.
Step 7: Compact the soil around the seedling.
Step 8: Water the seedling.
How long does it take to sprout after the procedure?
So that the first shoots do not have to wait long, and the seedlings show good health, it is necessary to provide them with high-quality care.
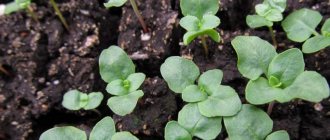
If you regularly and properly care for the seedlings, the first shoots will appear in about two weeks . On average, lavender seeds germinate within a month.
However, despite the successful stratification, good care of the emerging sprouts will be required, otherwise all efforts will be in vain. Lavender seedlings need to be provided with:
- proper watering regime;
- placement on the sunny side of the room;
- additional lighting in the form of a special lamp;
- optimal temperature in the room at night and during the day;
- sudden changes in temperature during the day should not be allowed;
- daily ventilation.
At a certain period, seedlings will need to be planted . Transplantation into open ground should take place in May. The exact date varies by region.
Important ! For lavender, soil with a neutral or slightly alkaline reaction is most preferable. If the soil on the site is acidic, it is recommended to add dolomite flour or wood ash.
Growing Lavender
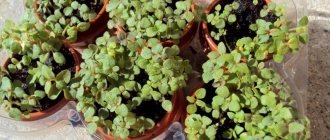
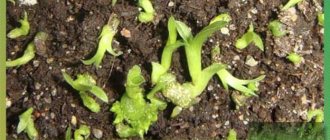
After the friendly lavender shoots appear, remove the glass or film from the containers as soon as possible, but continue to maintain light soil moisture. Young seedlings should be placed in the brightest light possible (preferably on a sunny southern windowsill). If there is not enough sunlight, add additional light to the lavender, increasing the daylight hours to 8-10 hours.
Transplanted lavender seedling grown from seed. © Gary Pilarchik