Gladioli are a garden decoration. But few people decide to grow this beautiful flower, all because gladioli require special care.
At the end of each summer season, flower tubers must be dug up and stored. The easiest way to store gladioli bulbs at home is in the refrigerator.
Information on how to properly prepare flower tubers, how to store and plant them in the new season will help you achieve the desired result - lush flowering in the spring.
We will tell you in the article whether and how to properly store gladioli in the refrigerator.
Are bulbs allowed to be stored in the refrigerator?
You can store gladioli bulbs in the refrigerator in winter. This is very convenient, as the refrigerator maintains ideal storage conditions.
Optimal storage conditions:
- air temperature - no more than 4°C;
- humidity -75%;
- lack of sunlight;
- good ventilation.
Warm storage activates the growth of the bulb, and prolonged exposure to low air temperatures causes freezing of the seed. Storing gladioli bulbs in the freezer is strictly prohibited!
Control of parasites
If dangerous pests such as thrips have managed to infect the crop, you need to know how to deal with them and how to store diseased tubers in winter. The success of overwintering depends on the timely detection of parasites in tubers.
Unfortunately, thrips is the least noticeable creature that can camouflage itself in the seed of gladioli, so gardeners often do not have time to notice it when examining the bulbs. To avoid storing affected specimens together with healthy ones, after removing them from the ground, it is necessary to carefully inspect each area.
To combat thrips, before moving the bulbs to wintering, it is necessary to use a highly effective product. For example, you can use :
- Alcohol solution. Experienced flower growers claim that alcohol is the main enemy of any flower pests. And thrips are no exception. To get rid of such parasites, just place the tubers in a glass container, and then put a swab soaked in alcohol in there and carefully close the jar. Within a few hours, dangerous creatures will appear on the surface and die. If this does not happen, the procedure can be repeated.
- The drug "Actellik". This product must be diluted with liquid in a ratio of 2 grams per liter. Then you need to place the seed in it and hold it there for five minutes. Then the bulbs are further dried at a temperature of 20−25 degrees Celsius.
- Decis solution. This product is sold in hardware stores and comes in the form of ampoules. Two ampoules are diluted in 10 liters of warm water, after which the excavated seed is placed in the prepared solution. After 30-40 minutes of treatment, the tubers are dried.
Healthy!
There are other effective means of combating thrips or any other parasites. The main thing is not to ignore the need to treat the bulbs before placing them in the house for winter storage.
Preparation
must be properly prepared before storing in the refrigerator
The dug up planting material is carefully sorted (only strong, dense tubers without signs of rot or other damage are selected).- The sorted tubers are dried.
To do this, planting material is folded in one layer into mesh boxes, after which it is sent to dry in a warm, dry place (the air temperature should not fall below +24°C). Drying lasts for at least forty days (at the end, the babies are removed from the tubers, the dried stem and roots are cut off). - The bulbs are dipped in a weak solution of manganese (a few granules per liter of water are enough) for thirty minutes, after which the tubers are sent to dry again for another week. Treating the bulbs with antiseptic solutions is a very important step; it helps preserve planting material during storage from fungal and bacterial infections.
Flower tubers prepared for storage must be immediately sorted into varieties so that in the spring, when planting, there is no confusion.
Harvesting gladioli bulbs
How to prepare gladioli for winter storage? The main thing is to comply with the cleaning deadlines. Only timely dug up planting material will be well stored. The main reason for its death in winter is fungal diseases. Timely processing and high-quality drying will help avoid losses.
Excavation time
Only fully mature bulbs are stored well and produce abundant flowering the following season. For them to accumulate enough nutrients, a little more than a month should pass from flowering to digging. This is the case if the gladiolus was cut for a bouquet. If the plant is allowed to bloom in a flowerbed, another half a month must be added to this period. Experienced flower growers plant gladioli by variety, this makes it possible to clearly determine the timing of harvesting the bulbs - the flowering time of each variety is known.
Advice ! In order not to forget anything, it is better to write down the date when a particular variety bloomed.
If the bulbs are planted chaotically, it is more difficult to determine the timing of harvesting. There are patterns that you should focus on.
- The approximate harvesting time is mid-September, in warm autumn and later.
- The early varieties are dug up first, followed by those that bloom in the middle period, and the last ones are the late blooming ones.
- Gladioli grown from baby plants are harvested later than those grown from bulbs.
Advice ! Among the varieties of the same flowering period, those that have a dark color are the first to be harvested - their immunity to fungal diseases is weaker.
The timing of harvesting also depends on the weather: in dry autumn, you can keep the bulbs in the beds longer, rains can force them to be removed even if they are not fully mature. This will not greatly affect the quality of the planting material if the bulbs are well dried and covered with a layer of paraffin. In this case, choosing a baby is even easier - it is not yet separated from the mother plant and there will be less losses. In wet autumn, experienced flower growers carry out a test dig earlier than usual. If the bulb is infected with a fungus, you cannot wait to clean it. To protect gladioli planting material from thrips, it is better to carry it out before the air temperature drops below 10 degrees Celsius. Otherwise, pests will concentrate at the base of the stem and can hide among the dry scales.
Advice ! Cleaning is carried out in sunny, dry weather.
Harvesting bulbs
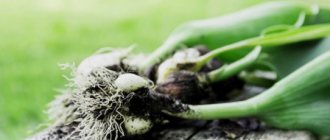
What is the best way to dig up bulbs? A pitchfork, a scoop and a shovel will do, the main thing is not to injure them and collect all the kids. It is problematic to preserve damaged planting material until planting. What do you do immediately after digging?
- The stem is trimmed, the length of the stump should not exceed 1 cm, or better yet, even shorter - most often the thrips that attack gladioli settle precisely at its base. When using pruning shears, it should be disinfected after each cut in a strong solution of potassium permanganate.
- The mother bulb is removed. If this does not work out right away, separate it after drying - the resulting suberized layer will help to do this with ease. You should not leave the old onion - it can be a source of infection.
- The roots are removed, but not from the bulbs obtained from the children. Their root system is only slightly trimmed. This way they will dry out less in winter. The roots of such bulbs are removed immediately before planting.
Advice ! You cannot get rid of covering scales on the bulbs; they are cleaned shortly before planting.
Now is the time to send the collected planting material to dry. But first it needs to be processed.
Processing gladioli bulbs before storage
The dug up bulbs need to be washed well from the soil. It is best to do this on a sieve under running water - each variety separately. Then – prevention against fungal diseases and pests:
- a solution of a fungicide, for example, “Maxima”, diluted according to the instructions or in 3% potassium permanganate, the bulbs are kept in it for about half an hour;
- karbofos solution according to the instructions.
Advice ! It is convenient to carry out processing by placing the planting material of each variety in a separate fabric bag.
Next, drying is carried out.
Drying bulbs
If all operations were carried out on a sunny day, allow the bulbs to dry in the sun. Further drying consists of two stages:
- about 3 weeks at temperatures from 25 to 30 degrees;
- up to 6 weeks at temperatures from 20 to 25 degrees.
For drying, planting material is laid out in 1-2 layers, with paper or fabric underneath. You can place the bulbs in wooden boxes with a mesh bottom and sides. Before storage, they are inspected again and all patients throw them away without regret. If this is a valuable variety and the damage is minor, you can try to save the bulb by cutting off the sore spot until healthy tissue appears and smearing it with brilliant green. But it will have to be stored separately from the rest of the planting material.
Advice ! Do not dry the bulbs close to heating devices, otherwise they may simply cook.
How to preserve planting material until spring?
Before loading the bulbs into the refrigerator, each one is wrapped in newspaper (preferably in two layers) and placed in a plastic bag with holes for air. Store planting material in the bottom drawer of the refrigerator intended for vegetables and fruits.
If there is no free space in the vegetable container, a bag of gladioli bulbs can be placed on a glass shelf located on top of the vegetable box.
If flower tubers begin to germinate during storage, the bag must be moved to the top shelf (lower temperatures will slow down the development of a new flower).
During storage in the refrigerator, gladioli bulbs are inspected for spoilage at least once every two weeks. Tubers with the slightest signs of rot are immediately put aside, otherwise all planting material will very quickly become covered with spots of rot.
Storage conditions
To preserve gladioli for the winter, it is important to pay attention to the principles and conditions of their storage. Such plants easily endure winter not only in the cellar, basement or other dark space, but also directly in the house. Only for this you need to take care of certain conditions of detention, which include maintaining the required temperature, lighting conditions and humidity.
First of all, you need to take care of the temperature . It is no secret that gladioli can be stored longer in a cool environment with a temperature of 4−12 degrees Celsius. If this indicator is higher, the tubers will begin to produce green sprouts, which will lead to their death.
When storing at home, it is advisable to place such seed on a glazed balcony, using wooden boxes with ventilation holes and a lid that allows air to pass through. It is necessary to prevent the plants from suffocating. The structure should be moved to the balcony and placed on a shelf. If the temperature on the balcony is below zero, the bulbs should be covered with warm material, for example, old clothes or a fur coat.
Healthy!
An excellent alternative for a balcony is a regular refrigerator. The advantage of this method is the ability to independently change the temperature regime, which will allow the bulbs to remain in the best possible shape.
Each seed should be wrapped in newspaper and placed in a plastic bag. Small holes are made in it through which air will be supplied. Each package is placed in a separate compartment and stored there until the spring season arrives. Gladioli are normally stored together with fruits or vegetables.
When and how to take it out after winter storage?
Gladiolus bulbs are taken out of the refrigerator thirty days before planting (the necessary period for the formation of full-fledged arrows and pecking of the bud).
Considering that it is recommended to plant bulbs when the air temperature in the morning reaches at least 10°C (beginning of May), it is necessary to remove flower tubers from the refrigerator no later than the beginning of April.
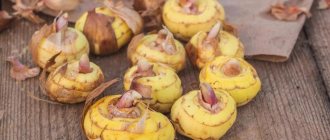
After removal from the refrigerator, each onion is freed from scales and sorted by size and appearance. Quality tubers are shiny, pale yellow or cream in color, with dense white root buds. Wrinkled, shriveled, and spotted bulbs are planted separately.
After the planting material has been sorted, the tubers are placed in boxes (in one layer), tops up . The box is placed in a dry, warm, dark place. After 2-3 weeks, when the dormant buds have hatched and reached at least 4 cm, the flower tubers can be planted in the ground.
Gladioli tubers planted in the ground immediately after refrigeration will take root, but you should not expect lush flowering from such plants.
Gladioli: when to peel in the spring after purchase
If gladioli were purchased in the spring, the husks must be removed from them immediately. This will allow you to assess the condition of the bulbs. In order not to introduce disease or insects, the corms are stored separately from their own planting material, and before planting they are treated with Maxim preparations, dried, after two days they are irrigated with a 1% solution of Bordeaux mixture, only then they are planted.
How to plant?
Immediately before planting, gladiolus bulbs are soaked either in a special solution to strengthen the root system (sold in specialized flower shops) or in clean warm water. After six to eight hours of soaking, the tubers are saturated with moisture , after which they can be planted in the flowerbed.
The location for future planting of gladioli must be chosen in sunny, open areas (the flower loves the sun and warmth) with loose soil. Additionally, each hole is fertilized with organic fertilizer, ash, and sand is added. Seven days after planting, flower seedlings are fertilized with humus.
For active flowering, gladiolus needs a large amount of light, air and free space. Therefore, when planting, a distance of at least 15 cm must be left between the holes.
How to trim gladioli for storage
The stems of gladioli are cut off, leaving a small stump (0.5 - 1.0 cm) near the corms. I advise you to leave just such a small stump, since by autumn thrips, a very common pest of gladioli, gathers closer to the base of the stem. By pruning shorter, we reduce the possibility of damage to gladioli by thrips during winter storage. Here are the basic rules for trimming gladioli for the winter:
- In adult corms, the roots and the old, mother corm are removed immediately. This reduces the drying time of planting material and prevents the spread of diseases.
- In juvenile bulbs grown from baby bulbs, the roots are only well shortened and removed the next year in preparation for spring planting.
After pruning gladioli for the winter, the corms are washed from the soil and treated in a solution of potassium permanganate (potassium permanganate) 5-10 g per 10 liters of water for 20-25 minutes.
Alternative options
In order for gladioli bulbs to retain their vitality and delight with their lush color in the spring, it is necessary to observe optimal storage conditions : low air temperature and high humidity.
There are several options for how, in addition to the refrigerator, to organize storage of bulbs in the winter at home.
Waxing
Coating gladioli bulbs with paraffin is a reliable way to preserve planting material in your apartment until spring. The paraffin shell reliably protects the bulbs from drying out and blocks the growth process.
Algorithm of actions:
- A paraffin candle is heated in a water bath.
- A gladiolus bulb is dipped into melted paraffin (temperature no higher than +70°C), after which it is immediately transferred to cold water.
During the waxing process, it is necessary to ensure that the bulb is completely covered with an even layer of wax. Otherwise, air penetrating through the cracks can cause the tuber to dry out.
To wash off the paraffin, just hold the onion in warm water for a few minutes. Attention: do not brush off the wax; this may damage the gladiolus tuber.
On a glazed loggia or balcony
A good place to store gladioli bulbs in an apartment in winter is a covered loggia. Planting material is sorted, laid out in a thin layer in cardboard boxes and placed on a stool or table. A good place is the window sill of a wooden window frame.
During storage, the required air temperature in the loggia is maintained by opening the window or doors to the room. Regular ventilation helps maintain the required level of air humidity .
During prolonged winter frosts, boxes with flower bulbs are covered with thick woolen rags and moved closer to the balcony door.
Never place boxes with gladioli bulbs on the concrete floor of the loggia (there is a high probability of freezing the planting material).
It is strictly forbidden to store gladioli bulbs:
- in the bathroom (high humidity is the main cause of rotting of tubers);
- without husks (protective dry leaves can be removed from the bulbs only after drying, otherwise the risk of plant infection increases sharply);
- in sealed packaging bags (lack of ventilation during storage is the first step to rotting of the gladiolus bulb);
- in direct sunlight (the sun dries out gladioli tubers, making them unsuitable for planting).
Never store assorted gladioli bulbs in the same container. Firstly, when planting, it will be simply impossible to figure out which variety is where, and secondly, the close contact of healthy and rot-infected tubers leads to rapid deterioration of all seed material.
Correct digging
When removing a corm from the ground, it is important to maintain its integrity. Do not stick a shovel into the ground near the base of the plant. It is necessary to make an indent of 15–20 cm and pry up a clod of earth along with the bulb, after which, by pulling the leaves, the plant is brought to the surface.
The planting material is sorted directly on site; the bulbs are immediately placed in separate containers so as not to confuse the varieties in the future. The leaves are shortened with scissors, leaving no more than 2 cm of their length. A tag with the name of the variety is placed in each box.
8 ways to store gladioli in winter
Adviсe
To prevent gladioli tubers from taking root during storage, before storing them in the refrigerator, they are thoroughly dried and placed in gauze nets.
Alternatively, the tubers can be wrapped in toilet paper (as soon as the paper starts to get damp, it is changed).
Gladioli bulbs are dug up for storage thirty days after the flower shoots wither. There is no point in keeping the tubers in the ground. High humidity and low temperatures activate the process of tuber rotting and the proliferation of bacteria and fungi.
If it is not possible to wait for the gladiolus to bloom, first of all, cut off the still blooming arrow, and after fifteen days, dig up the tuber. It is better to dig up bulbs not with a shovel, but with a pitchfork . This will protect the planting material from damage by the sharp blade of the bayonet.
Timely pruning of flower stalks
Gladioli flower stalks should be trimmed immediately after flowering. This will not only help keep the flowerbed tidy, but will also allow the plants to accumulate strength for the winter. If the flower shoots are not removed in time, seeds will begin to set on them, which will cause an outflow of nutrients from the bulb.
In this case, you cannot remove the leaves of gladioli. The leaf apparatus is involved in photosynthesis. It is through the leaves that the bulb receives nutrition and matures for wintering. The next 50 days after the flowers wither, the necessary substances accumulate in the underground part of the plant. Dig out the bulb when the leaves just begin to turn yellow, without waiting for them to completely wither.
Why dig up gladioli?
It is recommended to dig up gladioli for the winter due to the fact that they may die. A sharp drop in ground temperature is detrimental to them. It is important to properly dig up the plant in the fall and process it, and then put it away for winter storage. If there is a basement or cellar, the problem of storing planting material does not become acute. It is simply placed in boxes with sand and sent for the winter. It must be borne in mind that not every cellar is suitable for storing bulbs. For example, the temperature in it should be no lower than -3 degrees, in conditions of low humidity, otherwise the plant will rot and die.
An equally important reason for the need to dig up tubers in winter is their sensitivity to various diseases. If wintering is provided in the ground (this is indeed possible in the south of Russia), the bulbs may not germinate due to fungal or viral infection. To prevent the development of these problems, gardeners not only dig up the material, but also process it before sending it for the winter.
When to dig
The recommended period for digging up the material is 1 month after the flower shoot has set. It is recommended to wait this time if the soil and ambient temperatures are moderate and there is no risk of frost. During this time, the bulb will receive a maximum of nutritional components from the peduncle, which will ensure its lush flowering and successful reproduction in the next season. The optimal temperature for extracting material from the ground is not lower than 10 degrees plus.
Advice! It is not always possible to wait for the natural completion of flowering due to the approaching cold weather. In this case, you need to cut off the flower shoot in advance and dig up the bulb after 15 days. The planting material will not suffer from this.
Recommended timing for digging up gladioli depending on the region:
- middle zone of the Russian Federation - mid or late September;
- Leningrad region. - beginning of September;
- Siberia - August.
What time should you do this?
Plant bulbs must begin to be dug up after they have flowered and about 35 to 45 days have passed. Approximately this will be the second half of September or the beginning of October.
You shouldn’t delay this matter too much; you shouldn’t keep the bulbs in cold soil for a long time. You can visually inspect the bulb and if it is covered with scales, then the bulbs are ripe and can be dug up.
This should be done as follows:
- To begin with, large bulbs are dug up, after which small ones are carefully removed and finally all the children are removed from the soil. The best way to do this is either with a pitchfork or a shovel with a wide base.
- It is better to remove them when the weather is warm outside. It is better if there is no rain on this day, since in this case it will be possible to easily shake off the soil from the bulbs.
- Also, the soil should not be very dry, otherwise it will make it difficult to remove the babies, who can continue to sprout for a long time. And this can lead to mixing varieties, which is undesirable.