Gorgeous bright gladioli are the favorite flowers of many gardeners. These plants can decorate any area, always look great, and can also be used for cutting. Gladioli are often grown in open ground, however, pots can also be used. In the article we will learn how to grow gladioli in pots, find out all the intricacies of this process, and get acquainted with the varieties most suitable for this purpose.
Description
Gladiolus is a bulbous perennial plant belonging to the iris family. The flower is also found in the wild: in some Asian, South African and European countries. Scientists have currently discovered about 200 species of this wonderful plant.
External characteristics
Gladioli grow quite tall, have smooth straight stems reaching 50-200 cm. The leaves of the plant are very elongated (see photo), sword-shaped, also very long (50-80 cm).
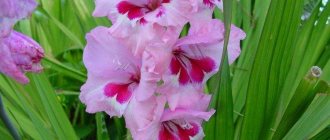
As for the flowers, they are the main decoration of the plant. The buds have an elegant funnel-shaped shape and always consist of six petals. The shades of the buds can be different: most often they are yellow, pink, purple, red tones. A special feature of the plant is its inflorescences: the buds do not grow singly, but are collected in oblong groups consisting of approximately 15-22 flowers.
Reproduction of gladioli
Several methods of propagation are used - by seeds and small baby bulbs. The last method is more common. How to grow gladiolus from children?
Tuber buds are an excellent material for propagating fennel. Children are formed on the main bulb. They are small in size. In order to speed up the flowering of this planting material, it is sown in containers in March. The sowing depth is from two to three centimeters. The baby gladiolus will grow in a container until September. Plant care is the same as for flowers grown from large corms. At the end of the season, the baby increases in size to three centimeters. Next season, such corms will become excellent planting material for full-fledged flowering plants.
Varieties
Since gladioli grow quickly and quite strongly, not all varieties are suitable for planting in a pot. It would be right to choose varieties that are not very tall: species reaching a height of 25-60 cm are best suited. Next, we will get acquainted with the most popular varieties of gladioli suitable for pot growing.
Tinkerbell
The variety belongs to the butterfly-shaped species, it looks very beautiful and impressive. This gladiolus grows to a height of 45-75 cm, which is quite suitable for pot cultivation. The color of the petals is orange, bright, while the throat of the buds is yellow.
Moscow white stone
A domestic hybrid reaching 60 cm in height. The plant is very unusual and beautiful, it has graceful petals with a corrugated texture. Note that about 40 buds bloom simultaneously on this gladiolus: the spike-shaped inflorescence turns out to be very lush and elegant.
White City
This is a primrose gladiolus, which boasts a bud diameter of about 5-7.5 cm. The color of the petals is snow-white, the inflorescence consists of 23 magnificent buds
Bow Peep
Dwarf gladiolus: pot growing is ideal for it. The plant usually reaches half a meter in height, sometimes it can grow up to 65-70 cm. The buds have an unusual corrugated texture and are colored in a delicate apricot shade.
Georgette
A very beautiful variety, also suitable for open ground. The color of the petals is red and yellow.
Growing conditions
Let's find out what conditions are best suited for growing potted gladioli.
Location and lighting
Gladioli love abundant but diffused lighting. It is better not to keep the flower in direct sunlight, as this can cause burns to its delicate petals. In a pot, gladiolus can be placed on a balcony or windowsill, protecting it from the midday sun.
In summer, you can also place the pot in the garden: always in a well-lit area. The flower needs 12 hours of daylight. In winter, this condition cannot be achieved with natural light, so artificial lamps must be used.
Temperature
Although gladioli are heat-loving plants, they can also thrive in moderate temperatures. The optimal temperature is considered to be +20 degrees. Flowers do not like extreme heat and may even die if they are grown indoors in the summer without ventilation and air conditioning. The plant also needs to be protected from wind and drafts.
Priming
The substrate for potted gladioli must be fertile and permeable. During its rapid growth and flowering, the plant consumes a lot of nutrients, so it is necessary to take care of fertilizing the soil in advance, before planting.
The soil structure should be light, loose, and have excellent permeable qualities. The best choice would be to purchase a specialized substrate at a flower shop.
Choosing a pot
Choosing a suitable container for growing gladioli is not an easy task and is very important. As for the material, in this case it can be anything: plastic, ceramics, clay. In addition to containers, you can take a closer look at flower pots and flowerpots, which can also be used to wonderfully decorate your space.
It is very important to select a pot commensurate with the height of the flowers. If we talk about medium sizes, then the diameter of the container should not be less than 30 cm, and its depth should be at least 40 cm. In general, the deeper the purchased pot is, the better.
Choose containers that are quite large, since even dwarf gladioli are quite massive compared to other house flowers. The volume of the pot should be at least six to seven liters, and preferably about ten. Moreover, it is better to plant several gladioli in one container at once: this way the flower arrangement turns out to be more spectacular and lush.
The flowerpot must be equipped with drainage holes: gladioli cannot tolerate stagnant water at all. Place the container on a tray so that the water has somewhere to drain after watering.
Planting gladioli in pots and caring for them
Bulbs are planted in the spring. Many gardeners do this in May, but some plant gladioli in March. These plants need long daylight hours to develop well. Therefore, when planting early, gladioli are illuminated with phytolamps.
Make holes in a pot filled with soil and place the bulbs in them. Add soil mixture to the sides so that the top of the bulbs remains open. As the plant grows in size, the soil is gradually replenished. When planting in pots to grow gladioli at home or in a summer cottage, the bulbs are placed densely. The distance between large bulbs should be 10 cm. For small specimens, 7 cm is enough.
Important!
Before planting, to speed up germination, the holes are watered with water with flower fertilizers dissolved in it. After planting is completed, the plants are well watered.
Conditions of detention
Containers with planted flowers are placed on the east or south side so that they are protected from drafts. If daylight hours are short, artificial supplementary lighting is provided. Gladioli do not like extreme heat. It is preferable for them to be at a temperature of +20 degrees. Therefore, in the summer heat they are not left on a brightly lit windowsill. If possible, the plants are transferred to the garden. To prolong flowering, the air temperature should be +13 degrees.
Gladioli have a massive and heavy stem. To prevent it from breaking or bending, it is recommended to tie the plant to a support. To do this, take wooden pegs.
To obtain good quality planting material after flowering, the peduncle is cut out and the leaves are left. In this case, irrigation is not completed and fertilizing is applied regularly. When the foliage fades naturally, it is cut off. After this, the containers are moved to a cool room.
With the onset of autumn, the bulbs along with the children are removed from the ground, but not divided immediately. The planting material is given time to dry. Then the bulbs are separated from each other.
Watering
For beautiful flowering, gladioli need a lot of water, but the soil should not be too wet. Plants are watered every other day. If containers with flowers are kept in the open air at the dacha, in the summer heat the frequency of watering is increased and the plants are irrigated twice a day.
Drops of water during irrigation should not fall on the leaves. This leads to disease and rotting. Watering is carried out with settled water at room temperature. To keep the soil moist, cover it with mulch. This eliminates the need to frequently water the plants and prevents the appearance of weeds.
Fertilizer application
For beautiful and abundant flowering, gladioli are regularly fertilized. Fertilizing is applied by root and foliar methods, using mineral complexes for flowering plants. For the first time, fertilizers are applied at the stage of formation of the third leaf on a young plant. Then apply fertilizing when the sixth leaf appears. The third portion of fertilizing is applied when flower stalks begin to form.
You can use an alternative scheme and apply fertilizer every week in small portions. In this case, mineral supplements alternate with organic ones. Then the gladioli will grow quickly and bloom luxuriantly.
Landing
Let's learn how to plant gladiolus in a pot.
Selection of planting material, preparation
When choosing a gladiolus variety suitable for rooting in a pot, you should first of all keep in mind the fact that not all varieties grown in open ground are suitable for indoors. It is important that the plant is not large in size: otherwise its cultivation in a pot will be problematic. Large-flowered varieties are not suitable for closed ground: their root system grows strongly, and the flowers themselves reach significant sizes.
The best choice would be a dwarf or small-medium flowering variety. Choose a variety that reaches a height of 50-60 cm in adulthood. If gladiolus will grow at home on a windowsill, you can choose an even smaller variety with a height of 30-40 cm.
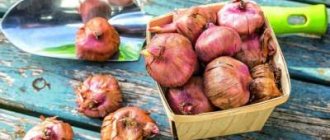
When purchasing planting material, pay attention to the condition of the corm. It is important that it is not damaged, rotten, healthy, and strong. There should also be no stains, mold, or very dry areas. The size of a tuber suitable for planting is usually 2-4 cm.
Preparation
Inspect the bulbs and free them from dry scales. Under the scales, pockets of bacterial and fungal infection are often hidden: therefore, be sure to remove them.
Then the planting material should be disinfected in a fungicide solution. This treatment will help gladioli resist fungal diseases. Cytovit is the best solution: soak the bulbs in its solution for 6-12 hours. Additionally, you can treat the planting material with a root stimulator, which will help the bulbs take root faster and grow more actively.
Preparatory procedures are carried out in advance: about 2-3 weeks before rooting itself. The time from disinfection to planting should be spent in a closed, dry container. By the time of planting, healthy specimens will already sprout. Planting material that has not sprouted can be safely thrown away: it is unfit for further use.
Landing dates
The best time to plant these flowers is spring: from the end of March until approximately May 15th. In southern latitudes, planting can be done earlier, but for most of our regions warmer times are still suitable.
Process
- Drainage is poured into the bottom of the pot, which is designed to protect the gladiolus roots from excessive moisture. You can use expanded clay, gravel or broken ceramics or tiles as drainage.
- A layer of fertile soil is placed on top of the drainage. The soil is well moistened.
- The bulb is buried 7-12 cm. When planting several bulbs in one pot, leave a distance of 6-7 cm between them.
- Cover the bulbs with soil and compact the soil a little.
- Place the pot in a place protected from drafts and well lit. During the germination period, rainwater should not be allowed to enter the container - that is, you should not leave the plant outside for the first time.
Planting and further storage
In open ground conditions, gladiolus begins to be dug up in the second half of September or October. In indoor conditions, it blooms a little longer, which delays the planting time. If you are interested in planting and caring for gladioli on the balcony next year, you need to take a number of actions:
- Stop watering flowers 10 days before planting;
- After the required time has passed, carefully dig up the bulb. Under no circumstances do this by simply pulling part of the peduncle! Such manipulations may damage the root base, and the planting material will not survive until spring.
- After digging the bulbs, use your hands to remove any remaining soil from them, and definitely do not shake them or knock them on a hard surface.
Before storing, carefully remove any remaining soil from the bulbs with your hands.
- Cut off most of the stem, leaving a “stump” of a couple of centimeters of stem.
- Place the bulbs in a warm, dry place and leave them to dry completely for 10-14 days.
- You can store the tubers in a cardboard box or paper bags in the refrigerator. This can also be done in the cellar, but provided that the temperature in it is maintained no higher than 3-5 degrees.
Finally, I’ll tell you a little trick that many gardeners resort to for better storage and protection from drying out of the bulbs. This kind of manipulation will not take much of your time, but it will help the bulbs hold out until the next planting.
To do this, you just need to dip the tubers in paraffin melted to 35 degrees and immediately lower them into cold water. You will then remove the resulting thin film immediately before planting.
You can plant flowers no less beautiful than in the photo
Features of care
Let's find out what kind of care gladiolus needs when growing it in a pot.
Watering
Flowers in pots dry out faster and more often than those growing in open ground. Therefore, the approach to watering in this case should be special. Although drought should not be allowed, these plants cannot tolerate waterlogging even more. The optimal watering regime is three procedures per week. If the weather is very dry, you can water more often.
During moisturizing procedures, make sure that water does not get on the buds and foliage. If moisture gets in, the vegetative part of the gladiolus may begin to rot. In addition, only soft and warm water should be used for irrigation.
Top dressing
In order for gladiolus in a pot to actively grow and develop and bloom luxuriantly, it needs regular feeding. You can use a complex mineral composition or a universal fertilizer for flowering plants.
Potted gladiolus is fed for the first time after its first leaf has formed. In this case, it is recommended to use nitrogen and potassium. After the appearance of the fourth leaf, a second feeding is carried out. Nitrogen and potassium are added again with a small addition of boric acid. When the sixth leaf appears, 10 grams of nitrogen and 15 grams of potassium are added.
During flowering, feed your gladiolus with a complex mineral composition that includes all the necessary microelements. At the end of flowering, feed the plant with potassium and phosphorus: these minerals will help the bulb recover and strengthen.
Attention: in addition to mineral fertilizers, you can feed your gladiolus twice a season with a growth stimulator: Zircon or Epin.
Loosening the soil and mulching
The soil in the pot should always be loose and permeable. The loosening procedure will help ensure this. It is advisable to carry out the procedure after watering, when the soil on top has already dried out a little. Loosening will help break up the dense crust that has formed and increase the permeability of the substrate.
To prevent the water from evaporating too quickly, it is recommended to mulch the surface of the soil in the pot. Humus and peat are suitable as mulch, which will also nourish the soil.
Garter
Although gladioli in a pot do not grow too long, a garter will not harm them. Under the weight of the inflorescences, the stems of the plant can fall to one side and break: it is best to prevent this problem. This often happens when there is insufficient lighting: in this case, the stems grow too weak and frail. Tie the plant carefully so that its stems are not pinched.
Trimming
After flowering has finished, there is no need to trim gladioli immediately. The bulb feeds through the leaves, grows stronger and grows in the ground, and is restored. By cutting off the leaves and stems early, you will deprive it of nutrition: therefore, you will not have planting material for next year.
Wait until the foliage dries naturally, continuing to water and feed the flower moderately. After the leaves have completely dried, the green part is trimmed: 6-9 cm of the stem remains on the surface.
Wintering
After trimming the pot with the bulb, place it in a cool and dark room. At the beginning of October, remove the tubers from the ground and inspect them for spoilage, rot, or damage. If in doubt, treat each bulb with a fungicide or disinfectant.
Dry the bulbs under natural light, then put them in the refrigerator for winter storage. It is best to place planting material in cardboard boxes. If you have a basement, it is better to store gladiolus tubers there.
Reproduction
Potted gladioli can be propagated in several ways:
- seeds;
- tubers;
- corms.
Next, we will consider each option in detail and find out its features.
Seeds
This method is not very suitable for amateur cultivation of gladioli, since it is time-consuming, troublesome, and the result often differs from what was expected. Seed propagation is usually used by scientists for breeding purposes: in this way new varieties of gladioli are created.
Note that when using this method at home, the result is often a plant that is very different from the mother plant: with a different color of the petals, bud sizes, even height. However, if you are determined to try this difficult propagation option, we recommend collecting the seeds yourself. Take planting material from plain gladioli: their maternal properties are preserved in the best possible way.
Tuberbuds
In gladioli, tubers are thickened scales on the stems. One bulb can produce from 15 to 100 such children per season. Tubers with a diameter of 0.5-1 cm are optimally suited for further reproduction. If the children are too small, you can grow them in nutritious soil.
It is recommended to plant gladioli tubers in the spring: first in a common container. The container is covered with film, ventilated, moistened, and the most favorable conditions are created. In such an improvised “kindergarten”, the children germinate within a month, after which they are seated in separate pots. The plants will be able to bloom at the end of the current season.
Corms
The most common and most effective method. The corm replaces the mother corm and is located on the second tier of the gladiolus root system. If the size of the corm allows, it is usually divided into several parts before planting: this way you can grow not just one flower, but several.
Caring for gladioli in pots
We have already looked at how to plant gladioli bulbs at home. Now let's take a closer look at the basic rules for caring for gladioli in pots:
- Skewered plants are quite capricious when it comes to soil moisture. They love moisture, so if there is insufficient watering, they quickly wither and may even die. However, at the same time, they are no less sensitive to an excess of water in the soil. Problems with soil moisture are directly reflected in the flowering stem, which stops growing and becomes bent, which causes irreparable damage to its decorative qualities.
- Since it is impossible to say how often and in what volume a flower should be watered (it all depends on weather conditions, the size of the plant and the volume of the pot), each gardener must determine the optimal watering regime himself. Taking into account the fact that the soil in pots dries out faster than open ground, gladioli should be watered at least three times a week on hot summer days. To increase the moisture resistance of the soil, you can mulch using peat or humus.
- When beginners ask whether it is possible to plant gladioli in a pot, one of the main questions that worries them is the feeding regime. In order for the plants to bloom beautifully and luxuriantly, it is recommended to fertilize them regularly. Both root and foliar feeding are suitable for these purposes. Mineral complexes can be used as fertilizers. The first feeding is carried out after the young plant acquires its third leaf. The second time, fertilizing is applied after the appearance of the sixth leaf. When the inflorescences begin to form, a third portion of fertilizer should be applied. However, there is an alternative system - weekly feeding in small doses.
- Experienced gardeners recommend not limiting themselves only to mineral supplements, but alternating them with organic fertilizers. Only in such a complex can plants be provided with rapid active growth and lush flowering.
- Since the flowering stem of gladiolus is very long and heavy, it is recommended to tie it to a wooden peg to prevent the stem from breaking during the flowering period.
Problems
Gladiolus in a pot is threatened by the same diseases and pests as in open ground. Fortunately, since the plant is located in a “closed area”, it is still less likely to be affected by misfortunes.
The greatest danger comes from fungal diseases and pests such as aphids and spider mites. Gladiolus is affected much less frequently by caterpillars in a pot than in a flower bed. Sometimes viral diseases also occur: such gladioli must be urgently destroyed along with the tubers.
Important: hybrid and selection varieties are more likely to get sick, since genetically their immunity is quite weak.
It is necessary to begin treatment only after it has been reliably established what exactly the flower is sick with. It is also important to establish the cause of the problem. Most often, the causes of the disease are associated with improper agricultural practices or waterlogging of the flower.
Pests
As for pests, it is better to carry out preventive spraying than to destroy them later. The insecticides Karbofos and Aktara are suitable as preparations: they are also used if treatment is necessary.
To prevent slugs and thrips, you can sprinkle the soil in pots and flowerpots with tobacco crumbs. You can also use regular salt or dry mustard powder as a protective measure: such safe substances are best suited for home use.
So, we learned how to grow gladiolus in a pot. The method is excellent for cultivating dwarf and small varieties of plants. Gladiolus looks amazing in a pot, decorates any landscape and interior, and caring for it is no more difficult than usual.
Growing gladioli indoors and outdoors
Gladiolus belongs to the iris family; there are about 5,000 varieties in the world, varied in shape, appearance and color.
A distinctive feature of gladioli is their long flowering period and long life after cutting. Is it possible to plant gladioli in pots? Yes, this flower is great for landscaping balconies and loggias, flower pots can be displayed on paths in the garden and on a summer cottage; lush flowering can transform an apartment or a private house. For every amateur or professional gardener, growing gladioli will be an interesting and exciting activity, and if all the rules are followed, you can achieve a stunning effect - long-term and lush flowering until the fall.
Continuous flowering of gladioli is maintained by planting additional seed rhizomes in pots, cache-pots or containers every 2 weeks. This method is ideal for low-growing gladiolus varieties.
