Gladioli are one of the most favorite flowers on the site. They decorate any area and flower garden with a variety of shapes, colors, and flowering duration. This is the result of proper care for them. And here the moment of digging up the flower is important. When to dig up gladioli, or maybe you don’t need to dig them up at all? Probably, novice gardeners will be interested in knowing the answers to these questions.
Why do you need to dig up gladioli for the winter?
Gladioli are heat-loving plants that can winter safely only at above-zero temperatures outside if they are first covered with covering material for the winter. Russia has a rather harsh climate, so the flower, which reproduces by bulbs, must be dug up for the winter.
When the outside temperature reaches +9°C, most plants go to sleep to begin a new growing cycle in the spring.
In addition to low temperatures, gladiolus is also threatened by other dangerous factors:
- infectious diseases;
- fungi;
- rot;
- pests;
- rodents.
Therefore, even in warm climates, there is a high risk that the plant will not overwinter in open ground. Knowing how to properly dig up and store gladioli in the fall, you can propagate expensive varietal material and successfully preserve it for later planting.
Do I need to dig up gladioli for the winter?
Galina Aleksandrovna Kizima
Well-known gardener-practitioner, candidate of technical sciences. He runs the “6 acres” column in the Kaleidoscope newspaper, gives lectures at the Gardener’s House and on Radio Maria, and is the author of many articles and books on gardening.
Gladiolus has a two-tiered root system. Tuber buds form on the mother bulb in its upper part. If a large bulb dies in winter from freezing or excess moisture in the soil, the tuber will go deep into the soil along with the root system and die due to lack of nutrients.
Possible storage problems
Most often they are associated with latent diseases and non-compliance with temperature and humidity parameters during storage. The reason may also be improper preparation of planting material - insufficient drying time, not treated against thrips and diseases.
- Under-dried onions. They can get botrythiosis - spots that are light brown in color. Diseased bulbs will have to be thrown away, and the rest will have to be treated with a fungicide and dried.
- Gray-green mold is how the penicillum fungus manifests itself. The reason and actions are the same as in the previous case.
- The bulbs dry out a lot. Too high a temperature is to blame. Perhaps the planting material simply did not have time to mature. Unripe bulbs are waxed.
- Thrips were observed on the planting material. They are fought by keeping the bulbs for 30 minutes in a solution of “Inta-vir” or “Tseneba”. Three days of drying will be required.
- Germination too early. High humidity and temperature are to blame for this. The bulbs are emerging from dormancy and preparing for the growing season. Reduce the temperature to 1 degree Celsius to slow down the process and reduce air humidity.
- The bulbs are softening - the temperature is too low, they are simply frozen.
In order to detect problems in time, a regular inspection of planting material is carried out - at least once a month, and if signs of diseases have already been identified, then more often.
Share
Optimal timing for harvesting gladioli for the winter
All bulbous plants are dug out of the soil for the winter immediately after flowering. Before this you need to let them ripen. If this is not done, the bulb will not have time to accumulate nutrients that will help it survive the winter and then bloom profusely next summer. An unripe bulb may shoot without flower stalks or may not sprout at all after planting.
The surface part of the gladiolus will help you choose the right time. As soon as it completely turns yellow and dies, you can start working.
If you need to speed up the aging process of varieties that bloom in September, cut off the upper stems with flowers, leaving three at the bottom. The cut is made with a sharp knife at an angle of 45° and treated with potassium permanganate so that the gladiolus does not become infected with fungal and infectious diseases.
The timing should be based on the type and variety. Early flowering varieties are dug up earlier. After them, late varieties are dug up in the fall.
Experts also recommend following the digging order, taking into account the colors of their buds. First, you need to remove varieties whose flowers have the following colors:
- black;
- burgundy red;
- purple;
- purple;
- blue.
These species suffer more than others from mold, mildew and infectious diseases. To propagate rare varieties, it is imperative to leave shoots with flowers to allow the seed to ripen well.
Flowers grown from children are dug up last so that they have time to grow to normal size.
Bulb processing
Dug up and washed corms require further care before storage, which consists of disinfection and drying. First you should pickle the bulbs and “babies”.
To do this, they need to be sorted and processed in one of the following ways:
- place in a 1–2% solution of potassium permanganate for 30–40 minutes;
- you can use a Maxima ampoule dissolved in 2 liters of water, the exposure time is 30 minutes;
- or dissolve an ampoule of Decis in 5 liters of water and treat with this product for 40 minutes. bulbs;
- or use the Fundazol solution for half an hour, and then treat the material with solutions of potassium permanganate or boric acid.
There are other options for disinfection: 20 g of chlorophos per 10 liters of water and 10 g of potassium permanganate for the same amount of liquid. Leave in each solution for 20 minutes, rinse, and then immerse first in water heated to +50°C, then in cold water.
Did you know? Ancient warriors wore bulbs around their necks as amulets that protected them from death.
Drying is very important - it prevents rotting . At a temperature of about +30°C, the bulbs are dried for a week, then at +20°C they are dried for one month. Before the process, you should cover the corms with gauze, which are important to lay out for drying so that they do not touch each other.
By the way, adult planting material needs to be cleared of husks, but children should not, because the husk serves as protection for them. If the gardener does not have a place where the temperature can be controlled, he should dry the material for 2 months in a ventilated area or in the sun, but avoid direct rays.
How to properly dig up gladioli bulbs
Flower growers should know how to properly dig up gladioli in the fall and then store them all winter. First, remove the tying material. Then they dig up the bulbs. Garden tools should be inserted vertically into the ground at a distance of 7-10 cm from the stem so as not to damage the roots.
The earthen ball is lifted on a shovel, after which the gladiolus is pulled out of the ground by hand by the stem and placed on a prepared area. All the children gather from the hole so that the soil does not become clogged in the spring.
The stems are cut off or broken off immediately. The soil is removed from the bulbs. If necessary, they can be washed and then dried in an open place. The main onion is separated by cutting off its roots completely. Only intact specimens should be stored without damage. Plants can only be dug up in dry weather.
How to plant?
Immediately before planting, gladiolus bulbs are soaked either in a special solution to strengthen the root system (sold in specialized flower shops) or in clean warm water. After six to eight hours of soaking, the tubers are saturated with moisture , after which they can be planted in the flowerbed.
The location for future planting of gladioli must be chosen in sunny, open areas (the flower loves the sun and warmth) with loose soil. Additionally, each hole is fertilized with organic fertilizer, ash, and sand is added. Seven days after planting, flower seedlings are fertilized with humus.
For active flowering, gladiolus needs a large amount of light, air and free space. Therefore, when planting, a distance of at least 15 cm must be left between the holes.
Preparation and processing of corms
Having studied the rules of digging and specified the time, you will need to carefully study the methods of processing the bulbs. When to dig up gladioli after flowering in the open ground at a dacha in the fall in the Middle Zone or in another Russian region, how to process them and how to properly store them in winter - all this is important for preserving gladioli until next spring.
How to cull corms
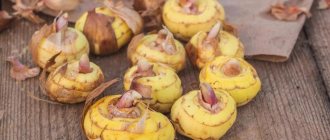
Below in the photo we see a fully matured corm.
Signs of maturity of the gladiolus corm:
- Full-blooded root scales; the baby is “dressed” in scales.
- The scales of the baby are dense and dark.
- The baby is easily, without effort, separated from the corm.
During the growing season, one peduncle grows from the corm, and one young (replacement) corm with children is formed. Beginners often worry that they won't be able to figure out where the babies are and how to get them off.
Mariska Member of FORUMHOUSE
The children are impossible not to notice. Association: a large river mother mussel with a bunch of baby mussels clinging to the shell.
It happens that not one bud awakens in the corm, but two or three. In this case, two or three peduncles will grow and two or three replacement corms will form. In the spring, inspect each corm again, and if you notice that there is not one sprout, but two or three, leave the strongest one and break off the rest.
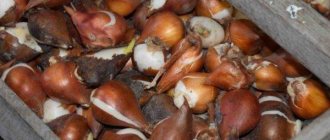
On average, corms of one gladiolus replacing each other live 3-4 years; Every year the corm becomes flatter, and its productivity and immunity decrease. It is because of this that old bulbs are discarded and burned, but unscrupulous sellers willingly slip them to newcomers. Unfortunately, it will not be possible to obtain a good, flowering plant from such a corm. When buying, look carefully, here are the signs of an old onion:
- it is flat;
- she has a wide bottom.
Otherwise, there may be such a sad picture - it looks like there is a flowerbed full of gladioli, but you still won’t get any flowers.
Valucha Member of FORUMHOUSE
This year I have a problem with gladioli - none of them bloom fully, all the buds turn yellow and wither.
We also do not take into storage children whose shells have burst or their corms are damaged.
Methods for storing gladioli bulbs
In order to get beautiful gladioli next year, you need not only to know when to dig up the bulbs in the fall and how to store them in the winter, but what place to store them.
First, the planting material needs to be kept for a month in a warm room, where the temperature is kept at 20-25°C, regularly checking it for integrity. Specimens with rot and deformation are rejected, after which only the whole material is sent for winter storage, having selected the optimal option for wintering gladioli.
You can store it in different places where the following conditions are met:
- air temperature from +3 to +8°С;
- humidity no more than 65-70%;
- lack of light.
Different places may meet these conditions, so the gardener will always choose the most suitable option for winter storage of gladioli.
In the apartment or on the balcony
City residents can store bulbs in their apartment between balcony doors or window openings, placing them in cardboard boxes. The ideal option would be an insulated loggia with a cabinet on which you can control the air temperature.
If there is a strong drop in temperature, bring the bulbs into the room or additionally cover the boxes, protecting them from freezing. You can store planting material in a foam or cardboard box with small holes for ventilation.
In the cellar or basement
Owners of a country house can store seeding material in the basement or cellar along with vegetables. The box should be placed in a remote corner so that it does not absorb moisture. For storage, wooden boxes with sand are used, which are installed on racks.
In the trench
In the south, gladioli can be stored in prepared trenches 80 cm deep and 70 cm wide. The bulbs are laid out in wooden boxes, covered with sawdust and installed in the trenches.
A layer of straw or dry leaves is placed on top, and then covering material. Laying in trenches should be carried out in warm weather, when frost has not yet set in.
In a refrigerator
If there are few flowers on the site, you can store them in a regular refrigerator, in the vegetable compartment, wrapping each bulb in several layers of paper. At the end of winter, the bulbs need to be taken out, dried in a dark, warm place and wrapped again in paper, placing them on a shelf with a lower temperature.
In bags
Most often, bags made of natural fabric are used as packaging. As a rule, garlic or mothballs are placed in them to protect against pests.
This packaging allows air to pass through well and protects from light. If there is a shortage of space, they are hung in a dark, cool room.
In a warm attic
If you have a country house with an insulated attic, you can store gladioli in boxes there, placing them closer to the pipe. Each bulb must be wrapped in paper so that the moisture does not erode from them, sorting them according to variety.
In the pantry
In such a place you can hang the bulbs in bags or in old nylon tights under the ceiling. It is important that the room temperature is kept at +7...+10°C.
In the ash or in the river sand
To maintain an optimal microclimate, the bulbs can be stored in wood ash or river sand, which is pre-calcined in the oven. It is important that they remain dry throughout the winter.
The bulbs prepared for winter storage are covered with ash or sand so that they are completely covered.
Preparing for winter
During harvesting, gladioli should be shaken off the remaining soil and placed in various containers. To avoid misgrading before planting, all containers must be marked with inscriptions or tags. Young bulbs must be stored separately.
Proper drying
This procedure is used mainly for tubers from previous seasons. The process can be divided into the following stages:
- Drying bulbs outdoors. The place should be well ventilated, since the presence of wind will significantly speed up the removal of excess moisture. The duration of such drying is about two days.
- The tubers dry either under a canopy or in a room with a good ventilation system for about a month.
- Cleaning the bulbs from soil residues. The procedure should be carried out carefully so as not to remove the husk.
- Tubers placed in a clean container are dried for 6 to 8 days.
Please note that the drying time directly depends on the weather. The best temperature is between 22 and 32 ºC. In this regard, the exact timing of preparing gladioli for storage is determined strictly individually each time. Young bulbs should be dried for a month at a temperature of 25 ºС.
Disinfection and additional treatment
Disinfection is mandatory for any planting material. The tubers are processed with a thirty percent garlic infusion. To prepare it, you need to infuse three large cloves and about 30 g of garlic in 100 g of water.
The average time for keeping tubers in such a liquid is 8 seconds, but the period directly depends on the size of the gladiolus. For children, a two-second treatment is enough. The solution is very hot, and therefore it is necessary to ensure that your hands are protected when working with it. To do this, it is recommended to use tweezers or rubberized gloves.
Experienced gardeners use paraffin treatment. This shell protects the bulbs from external influences and mold, from which it is very difficult to protect them. To implement this technique, you need to melt several candles in any suitable container. After this, the paraffin should be cooled slightly and the tubers should be dipped into it. Gladioli are laid out on a hard surface and left until a dense, impenetrable shell is formed.
For your information!
Some gardeners apply liquid paraffin with a brush. But this method is time-consuming and requires patience.
Features of gladioli corms
To begin with, it should be noted that you will have to store the corms in the winter. What it is? This is what botanists call the underground shortened modified shoot of a plant - the highly thickened underground part of the stem, which contains nutrients. In a real bulb, unlike a corm, nutrients accumulate in the scales. Pay attention to the difference in the structure of a real bulb and a corm:
There is no need to store corms from the previous year; part of the gladiolus stem is carefully trimmed before storage.
Features of the plant and indications for digging up bulbs
When deciding whether to remove the bulbs from the ground for the winter, it is worth starting from the prevailing climatic conditions. In particular, in the southern regions in the cold months the temperature remains mostly at zero; digging up gladioli in the fall is not relevant here. During the period of frost, it is advisable to cover the plantings with a protective material, for example, agrospan or film.
In the middle and northern latitudes, harsh and long winters are expected; the autumn preparation of gladioli, in addition to digging, consists of protecting them from disease and freezing. It must be remembered that in the north the plant is planted quite late, in some cases the bulbs do not reach maturity. The harvesting period for fennel in mid-latitudes is the end of September; frosts begin by these days.
How to store tubers in an apartment
You can store flower tubers in an ordinary apartment, but you need to create certain conditions. The apartment has many suitable storage spaces:
- Loggia, if it is glazed.
- Balcony opening.
- Pantry without heating.
- Place by the front door.
To avoid drying out, you need to pour dry sand into a plastic bag and place the bulbs there. They need constant ventilation to prevent mold from appearing. If traces of it are found, you need to remove the affected areas and treat the sections with potassium permanganate. The remaining onions are treated with Fundazol solution and must be transferred to another bag.
But what if there are a lot of bulbs? The tubers, wrapped in newspaper, are placed in a single layer in cardboard boxes. It is recommended to store gladioli in winter away from heating, where it is always cool.
Storage at home
It is necessary to choose a place where the temperature does not fall below 0°C, but does not exceed 20°C. After processing, the bulbs are placed in a box, holes need to be made in it. If the right temperature and humidity are maintained, the bulbs can be stored for up to two years in the basement. Instead of the basement, you can put the box in the pantry.
You can also use old nylon stockings in which gladioli tubers are placed. The stockings are then hung on hooks. Inspect the bulbs regularly to ensure they are not dry or damaged.
You can also store bulbs in the attic of a private house, only if it is heated. The corms are placed in a box, which is placed closer to the pipe.