Do you have no indoor flowers because you often go on business trips? Organize automatic watering for indoor plants with your own hands and you will forget about worrying about the fact that your favorite flower may die from thirst in your absence. The instructions for organizing automatic watering will also be useful for those who do not know who to trust to look after their flower collection while on vacation.
DIY automatic watering system for one plant
My neighbor did not take credit for this idea, but said that he had seen a video on the Internet that described in detail the simple process of making self-watering drip irrigation for indoor flowers. He has already organized such a system at home and now he and his wife can live at the dacha for weeks without worrying about the plants left in the city apartment.
I also decided to use this option, although I’m not very good with technology. This time everything worked out great for me. I’m sharing a life hack with you, I hope it will be useful to someone. Before you begin, prepare everything you need:
- plastic bottle;
- corrugated straws for cocktails;
- soldering iron or screwdriver;
- glue gun with hot glue.
Automatic watering is done individually for each home flower. You will need as many plastic bottles as there are green pets living in your apartment. The container volume may vary. If your absence will not last longer than a few days, a liter bottle will be enough. If you are away for a couple of weeks, you will need to stock up on a larger container (well, at least a five-liter bottle).
Manufacturing instructions
You can create an irrigation system in a few minutes. I'll tell you how to proceed step by step:
- To begin, make 2 holes in the wall of the bottle (one higher than the other). The lower one should be located 2 cm above the bottom level. To make the holes the right size (look at the diameter of the straw) and with smooth edges, use a soldering iron or a screwdriver heated over a fire. Make the second hole 1 cm higher than the first.
- Apply hot glue to one of the straws and place its tip in the bottom hole so that the piece of straw that ends up in the bottle is quite long.
- Insert the second (upper) straw into another hole (its tip inside should be shorter) and also secure with hot glue.
- Now cut the outer part of the first tube shorter, and leave the second (upper) longer. The corrugated part of the straws should be on the outside, due to this it will be easy to give them the desired position.
The hot-melt adhesive hardens almost instantly, and the bottle is now ready for use. Fill it with settled water for irrigation, having previously clamped the ends of the tubes with office clips, “frogs”, so that the liquid does not spill out. After this, screw the cork onto the neck of the bottle.
How to use the device
The operation of such a device from a bottle is explained by the laws of physics. Place the automatic watering system next to the flower pot, directing the tubes into the tray. As soon as you remove the clamps from each straw, water will flow from the bottom and the top will begin to suck in air. When the water level in the pan reaches the spout of the top tube, air will stop flowing into the bottle and water will stop flowing.
At the moment when the roots of the flower draw moisture from the pan, the system starts working again and supplies a new portion of moisture. Please note that this method is only suitable for moisture-loving plants whose roots do not suffer from waterlogging. This list includes cyperus, bamboo, drooping reed, calla, rush, nephrolepis, spathiphyllum, balsam. Heat increases the water needs of these plants. For other indoor flowers, other automatic watering methods are more suitable.
Ready-made systems
Complete system using hoses, tubes, etc. delivers water from the main source to all connected plants. Its dimensions can be changed depending on need. Schematically it can be represented like this:
- A-source (faucet).
- B-conductor (hose, tube).
- C-end point (nozzle, funnel).
A regulator is used for connection. He controls the pitch. Irrigation of the soil occurs in a timely manner.
There are 3 types of connection:
- Remote.
- Direct.
- Using a connector.
Specialized stores have ready-made automatic watering systems, for example, Hozelock. They can be used for growing both indoor plants in pots (2 pcs.) and in garden plots with an area of 9 sq.m.
Attention! Mini equipment from AquaDeco has been developed for house plants. These small balls are filled with water and placed in the soil to the level indicated on it. The ball releases the required amount of liquid into the soil.
Automatic irrigation systems are very diverse.
Blumat
Widely known among flower growers.
Advantages:
- automatic water supply at any time of the day;
- the equipment is easy to maintain;
- durability;
Flaws:
- frequent contamination of filters and tubes;
- frequent filling of the tank.
Pots with root feeding
People call them smart pots. It works on the principle of molecular movement. The system has a reservoir from which water itself flows into the root system.
The root system absorbs liquid on its own
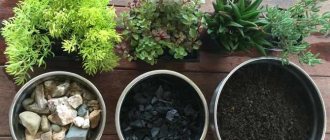
Detailed description:
- The flowerpot consists of 2 vessels: 1 - the decorative flowerpot itself, 2 - a reservoir, which is invisible and performs the function of root drainage.
- The roots, reaching the water, absorb the required amount.
- Filling occurs through a special hole.
- There is a sleeve to remove excess liquid.
Attention! The smart pot independently controls soil moisture thanks to an indicator. Fits perfectly into the interior of any home.
Organizing drip irrigation for your favorite indoor plants with your own hands is not so difficult. A flower lover can try to make a watering system on his own, or he can purchase all the necessary accessories in specialized stores.
Automatic watering from drippers
Many people use medical droppers in their gardens. They can also be used for watering indoor flowers in the absence of the owners. The method is similar to a wick irrigation system. In this case, you don’t have to do anything:
- Fix one end of the dropper tube near the soil surface.
- Lower the opposite part of the tube with the attached weight into a vessel with water, which should be placed above the pot.
- Open the system by adjusting the water supply with a tap.
In your absence, water will enter the soil in microdoses. Practice adjusting the system; the moisture supply should be such that the soil does not become waterlogged. Using a large bucket as a container, you can water several plants at once in this way. Of course, each pot must have its own dropper.
How does drip irrigation work for indoor plants?
Automatic watering of indoor plants is a technical solution that allows you to water flowers much less frequently, but at the same time more efficiently. There are two methods: circulation of the same liquid, which allows excess moisture to drain into the pan, or an option that reduces the loss of liquid during its evaporation after sprinkling.
IV
Kinds:
- Upper. You can adjust the frequency of drops falling from above.
- Subsoil. The liquid is applied directly into the soil of the pot using a dropper or funnel.
- Root. Moisture rises from the container under the pot to the top of the plant.
The irrigation system is made using medical droppers. For small flowers, the following are used: a container with water, a dropper and a tube, which is inserted into the ground located in the pot. If the flowerpot is large, then several tubes are used at the same time.
Important! Flowers planted in flower beds around the house can also be watered using automated drippers.
Drip irrigation using a wick
Wick irrigation is based on the principle of using a capillary system. Some people use a wick for this purpose all the time, but this method is only suitable for small plants, for example, violets. If you are suddenly going to the sea, you can temporarily switch to wick watering all the flowers in the house.
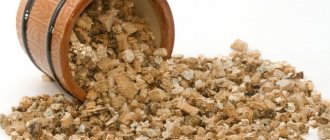
Another limitation is due to the fact that the soil in pots where this method of irrigation is used must be loose. Typically, a moisture-permeable substrate contains peat or vermiculite granules. Only in this case will water well moisten the earthen ball. For large plants you will need not 1, but 2-3 wicks per pot.
The cord should absorb water well. It is better to take a synthetic fiber rope. It is very easy to check the moisture permeability of the cord. Place it in a cup filled with water and watch how quickly it sinks. If the cord immediately sinks to the bottom, it means it can be used as a wick. Wick watering is convenient because several plants can be fed from one container at once:
- To arrange the supply of moisture, lower one end of the cord into a container of water standing on the windowsill.
- Secure the other end of the rope to the surface of the ground or dig it in lightly.
- Adjust the water flow rate by changing the height of the container. If you raise the vessel higher, the water will flow faster. And vice versa.
Do not use natural fiber rope as a wick. Due to moisture, it begins to rot and ceases to conduct water efficiently.
Features of installation and use of wick irrigation
It is much safer to use active automatic watering methods, one of which is the wick system. You can assemble it with your own hands without any problems, you just need to perform the following manipulations:
- We take an impressively sized container, fill it with water, and place it so that pots with greenery can be placed around it.
- We cut a long cord of fabric fibers into pieces. We lower one end of each element into water, and bury the other end into the ground of the flower.
- If the manipulation is carried out at the stage of replanting indoor plants, then it is better to pass the cord through the holes in the bottom of the pot.
- After the preparatory stage, you need to moisten the earthen ball and make sure that the wick is also thoroughly wet and supplies moisture.
Contrary to popular belief, the system is positioned in such a way that replenishment is carried out from the bottom up, and not vice versa. Otherwise, the moisture will be too active and may cause root rot. The effectiveness of a home-made device and the duration of its action depend on the needs and dimensions of the sample.
Watering is the most important procedure for the nutrition and growth of all plants on earth. Water carries all the substances and minerals necessary for life. Photosynthesis and metabolism directly depend on it.
Excessive amounts of moisture in the soil can lead to rotting of the root system, disease and death. All plants have different needs. It depends on the climatic conditions and the homeland of green pets. Using an automatic watering system for indoor plants, you don’t have to worry about the wrong dosage. The plant itself will tell you how much liquid it needs.
Attention! The most common fertilizers when using automatic watering systems are urea and potassium. Phosphorus can be used only under conditions of maximum dissolution
Houseplants require constant care. Timely watering comes first in importance.
Watering through plastic bottles
The simplest watering can be made from an ordinary plastic bottle without any additional equipment. Many people are familiar with this method, again from their gardening.
How to organize it:
- Cut off the bottom of a clean 2-liter bottle. You will pour water into the resulting funnel.
- Make a small hole in the cork using an awl or drill.
- Screw the stopper onto the neck of the bottle, after covering it with a layer of gauze to protect it from clogging. The gauze should be pressed firmly against the lid, filling the threads.
- Turn the finished watering can upside down and dig it into the top layer of soil or hang it so that the lid almost touches the ground.
All that remains is to fill the bottle with water and the moisture will seep drop by drop into the ground. It is clear that the number of plastic bottles will be equal to the number of pots. For small pots, use smaller bottles.
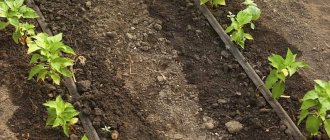
Source of moisture underground
The main goal of any watering is to saturate the plant’s root system with water. It is very convenient when the source of life-giving moisture is located in close proximity to the roots, that is, buried to a certain depth.
To set up drip irrigation, take a bottle (1.5 liters) left over from mineral or carbonated water and make holes in the plastic.
The bottle can be positioned in two ways: neck up or neck down. Let's look at these two options separately.
The container is buried in the ground with the neck down.
Take an empty bottle and use an awl or thick needle to make 2-4 holes with a diameter of 1 mm in the neck. The more holes, the faster the water will flow.
A piece of cotton or nylon material should be placed inside the bottle. This is necessary to ensure water filtration and protect the holes from clogging with small debris that may accidentally fall into the container. The bottom of the bottle is cut off, but not all the way, to create a kind of cap. It protects moisture from rapid evaporation, and lifting the lid makes it easy to add water.
The bottle is buried 2/3 of the height near the plant, 5 cm away from the stem. It is necessary that the holes be located on the wall that faces the roots, otherwise the water will not reach the desired goal and will not feed the plants, but the path between them. If one bottle is buried between two plants, then holes must be made on all sides, in a circle.
The bottle is positioned upside down
This method of organizing watering using plastic bottles is not much different from the previous one. The only difference is that holes for water outlet are made in the lower part of the bottle, 2.5 cm away from the bottom, and the container is buried upside down to a depth of 15-20 cm.
With this arrangement of the bottle, you will have to use a watering can or funnel to add water, since the inlet is quite narrow. But the liquid in the container is better protected from the ingress of any small debris - which means there is no need to use filter material. In addition, animals and birds will not be able to drink from a container with a tightly screwed lid, and all the water will go to the plant.
In cases where it is necessary to extend the watering time, you can use a 5-liter plastic container. Several holes are made in one wall of the bottle, and a small cap is cut out in the other, located opposite. The container is buried horizontally, with the holes down and the lid up. Water is added through the top window.
Purchased flasks
You've probably seen colored plastic flasks in gardening stores, painted to look like funny faces with a long narrow nose. So, they are used just for automatic watering. Additionally, the devices serve as original decoration. Fill each flask with clean, settled water and insert it into the pot with the plant, spout down.
According to the laws of physics, water will not flow into damp soil. Moisture will begin to flow out of the flask little by little when the soil dries. Due to the small volume of cones, this method will not help during your long absence. However, flowers will be able to survive separation from you for several days even in the heat.
Rod irrigation system
There is another variation of the bottle drip irrigation system .
You can do it yourself. To do this, you need to make only one hole in a plastic bottle, and then insert an empty ballpoint pen into it. Of course, the writing tip should be removed from the rod in advance, and the remaining paste should be removed. This can be done with regular alcohol. The rod in the structure must be directed to the area where watering is required. You can fix the tube using garden varnish or ordinary plasticine. If necessary, you can bury the bottle a little so that it does not fall.
Using hydrogel
You can provide plants with the necessary supply of moisture using a hydrogel. Its granules first absorb a large amount of water, and then gradually transfer it to the roots of the plants. Whether to use this method is up to you. It is quite labor-intensive, but the pots look aesthetically pleasing without any overhanging “devices” and water containers cluttering up the windowsill.
Although, if no one visits the apartment in your absence, this circumstance does not matter. In this case, however, you will have to spend money on miraculous granules. The pots are transferred into more bulky containers, which may need to be purchased in addition.
How to do it correctly:
- Before leaving, move each flower along with a lump of earth into a larger pot, having first poured a 4-5 cm thick layer of hydrogel on the bottom of the container.
- Fill the voids on the sides with granules as well, tapping the walls.
- Then water the soil and hydrogel generously, adding water gradually, allowing it to be absorbed.
- After this, cover the surface with film to prevent the moisture from evaporating too quickly.
By the way, hydrogel is a reusable material; it can be used for a long time after transplantation. This option is convenient for summer residents who live on their property all summer and visit their city apartment from time to time. The hydrogel can be removed later, during the next transplant. This material is inert and does not harm the flowers at all.
What you need
To make your own drip irrigation from bottles, you will need:
- Knife for cutting containers. You can use scissors.
- Sewing needle for punctures. But it is better to use nails or an awl.
- Plastic bottles. For making drip irrigation, containers with a volume of 1 to 2 liters are suitable. If the system is installed under bushes or young trees, then you can use 5-liter bottles.
- Nylon tights. If necessary, they can be replaced with cotton material.
- Empty ballpoint pen refill.
Capillary mats
This new product is a great help for gardeners who do not have the opportunity to regularly water their home plants. The capillary mat is a mat made of hygroscopic material. For watering, you will need two large trays of such size that one fits into the other. You need to pour water into the bottom tray. Place a second tray on top with holes made in the bottom, on which place one or more capillary mats (depending on the area of the tray).
Place pots with flowers on the resulting structure, which can absorb moisture coming from below through the drainage holes. You can do it differently by placing bowls with flowers on a mat, the edge of which is immersed in a container of water. In this case, the pots must be removed from individual pallets.
The choice of ways to water flowers in your absence is huge. Everyone can choose the least burdensome option for themselves. If neither method completely suits you, it is better to plant the plants in advance in special flowerpots with a built-in automatic watering system, which are containers with a double bottom. On average, the moisture reserve in such pots is enough for plants for a month.
How to water indoor flowers on vacation? Preparation
Houseplants need watering all year round, but watering houseplants during the holidays often causes difficulties or concerns for many of us.
The closer we leave, the more often the question arises of how to water indoor plants so that they survive until we return. Therefore, every gardener tries to ensure sufficient watering of indoor flowers during the holidays in different ways and methods.
We will tell you about different watering methods and give useful recommendations.
An important point in providing indoor plants and flowers with moisture is to prepare them for the lack of usual watering. Carrying out preparatory work significantly increases the plant’s resistance to future “drought”.
- Depending on the types of plants and indoor flowers, they can do without standard watering from 7 to 15-20 days.
If there is no watering for more than 20 days, it is best to use an automatic watering system. We will talk about it later in the article.
- Carry out the last feeding of indoor plants and flowers no later than 14-16 days before departure. After feeding, plants need more water to absorb minerals.
- 2-3 days before departure, cut off all buds and flowers from house plants, as well as as many leaves as possible (several large ones or more small ones, but in moderation, without much loss for decorativeness). The more green mass, the faster the plant evaporates moisture. During pruning, check all plants and flowers again for diseases and pests (first inspection 7-8 days before).
- Move plants and flowers deeper into the room to reduce the air temperature and light level around them, and as a result reduce the rate of water evaporation. Place pots of plants as close to each other as possible. This will create a zone of high humidity in the room.
- Before leaving, water your houseplants a little more than usual to ensure the soil mixture is well saturated with water. Some types of them are best watered using the immersion method. After watering, it would be good to surround the pots with damp moss.
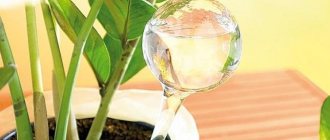
Colorful cones
Original sprinklers were invented by domestic manufacturers - multi-colored cones that are filled with water, inserted into a thin stem and stuck into the ground.
As the soil in the pot dries, oxygen penetrates the stem, pushing out of the flask exactly as much water as the flower needs .
Ideal for watering house plants, as well as greenhouses, gardens, etc. This method has its advantages:
- practicality and originality of the solution;
- additional interior decoration;
- no threads, droppers, complex designs - everything is beautiful and simple.
The simplest drip irrigation
The system described above will be viable longer if it is provided with a source of moisture . You can make small holes in the caps of plastic bottles, turn them over and place them between the pots, ensuring that moisture seeps out drop by drop.
Bottles can be stuck directly into the ground. The capacity of each bottle is selected individually - 0.5 liters is enough for one plant, and for large plants in tubs, you may need several 2 liter bottles.
For rules for caring for stephanotis at home, read our material.
Why do calathea leaves dry out? You will find the answer to this question in our article.
Despite the simplicity and artisanal nature of this method, there are production devices that work on this principle.
They consist of a glass bulb connected to a container immersed in the ground to distribute moisture evenly.
This is the principle used by Austrian Blumat irrigation systems , which can be purchased in our stores.