Most moisture-loving plants are native to the hot, green tropics and jungles. Epiphytes are no exception, the most common representatives of which are the fascinating orchids.
An unusual fact is the spread of orchids not only in the humid tropics, but also on beaches, stony mountains, tundras and semi-deserts. It is easy to guess that their appearance, due to adaptation to living conditions, differs from the epiphytic orchids we are used to growing in indoor pots.
Description and photo
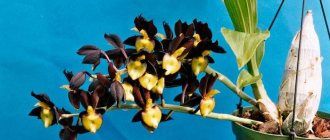
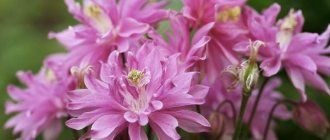
The Narbonne orchid, or Phalaenopsis Anthura Narbonne, a member of the orchid family, has a red veined color.
The color of the petals is predominantly salmon, coral, tomato, and terracotta.
Refers to a type of indoor flowers and plants.
- The length of the inflorescence is 20-25 cm.
- Leaf size – 15-20 cm.
- Sheet width – 7.5-10 cm.
- Plant height – 50-60 cm.
The color of the leaves is approaching dark green.
Photo of Phalaenopsis Anthura Narbonne orchid:
The primary color of the edge is red, the secondary color is yellow, ocher.
Benefits and harms
The orchid rhizome, which has the shape of a bulb, has medicinal properties . In folk medicine, people have also learned to use the leaves of the plant to treat colds. Together, the rhizome and leaves gave an excellent effect in treatment:
- burns and their consequences;
- eliminating the inflammatory process;
- treatment of abscesses.
The plant was also used:
- for the production of tonic tinctures;
- as an immune stimulant;
- as a means to improve the functioning of the gastrointestinal tract.
The plant does not cause any harm and is not poisonous . May cause an individual reaction in the form of an allergy.
Since ancient times, parts of the orchid have been eaten, oils and perfumes have been made from it, but none of the above has caused negative consequences.
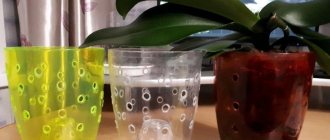
Priming
Substrate for planting and transplanting orchids can be purchased at the store.
It is also fashionable to grow orchids using hydroponics. The most common material for planting orchids is expanded clay . Its advantage is accessibility and cost-effectiveness. The structure of expanded clay is similar to bark, but its disadvantage is the accumulation of salts if the composition is incorrectly chosen.
The best option for an orchid would be environmentally friendly garden substrate expanded clay made from high quality clay. The main advantage of expanded clay is its ability to retain moisture after watering and release it to the plant in the right amount, which eliminates harmful stagnation of water.
For planting, choose transparent containers and cut drainage holes on the sides.
An excellent soil option for beginners would be ceramis , which can greatly facilitate the care of a demanding plant and even revive it. Seramis is a mixture of clay balls that imitates soil. Allows the root system to breathe, take in moisture and nutrients, and significantly reduces the risk of developing diseases.
Home care
In order for the Wild Cat to please the owner with its flowering, it is necessary to adhere to the basic maintenance recommendations:
- The place should be well lit, preferably with diffused sunlight. If necessary, the plant should be shaded.
- It is recommended to purchase a special substrate, which will contain pine bark, peat and moss. A glass or plastic container is suitable, allowing you to monitor the degree of humidity.
- In summer +25...+30 degrees is considered normal temperature, in winter – +20 degrees. Humidity required is 40–60%. It is not recommended to allow sudden temperature changes, low humidity and drafts.
- Watering is carried out as necessary, at least 2 times a week in summer, less often in winter. It is also recommended to periodically feed with special fertilizers during the growth period along with watering. Spraying is not recommended.
- Transplantation is carried out as needed (approximately once every 2 years). It is recommended to carefully remove the flower from the pot, inspect it, remove damaged parts and place it in a new container without watering it for several days.
- You can propagate in several ways. The first is for children. The children that appear on the peduncle must grow (roots up to 5 cm), and then they are carefully separated and planted separately. The second is by dividing the peduncle. After flowering, if there are buds on the peduncle, it is cut off and divided into parts (at least one bud per part) and placed in greenhouse conditions for rooting. The third is by division. A well-developed rosette is divided into parts, leaving 2-3 leaves on each, and planted in separate containers.
- Common diseases - gray mold and fusarium - are fought with fungicides, and thrips insects - with insecticides.
Planting (growing from seeds)
Orchid seeds look like cream-colored dust and ripen in capsules, each containing 4 million seeds. Orchid seeds do not have nutrients, so they live in symbiosis with fungi.
To successfully grow an adult orchid, the plant must first be pollinated, then carefully collect the ripe seeds.
Step-by-step instruction:
- Purchase jars with tight-fitting lids.
- Preparation of nutrient substrate. 15 g of agar-agar is poured into 250 ml of water for several hours. Add 10 g of glucose and fructose, agar-agar, to boiled water. The solution is stirred in one direction.
- Heat the mixture in a water bath until it becomes jelly-like.
- Distribution into jars of 30 ml each.
- The jars are tightly closed with a lid and sterilized within half an hour.
- Next, the containers should be left for 4-5 days.
- The seeds are disinfected with 2% peroxide for 10 seconds, after which they are transferred to jars.
- After about a year, the sprouts are transplanted into prepared soil made from crushed bark, moss and activated carbon; transplantation occurs by carefully twisting the sprouts from the substrate in a circular manner.
- Further care as for an adult plant.
Caring for Cattleya Orchid at home. Details
Cattleya orchid blooming
The Cattleya Orchid plant blooms at home only when it reaches a certain age and size. Typically, flower stalks begin to actively form in those specimens that have 4 or more mature pseudobulbs. Cattleya flowers have extraordinary beauty, a variety of colors and a delicate, pleasant aroma. To ensure flowering lasts as long as possible, after the buds open, the plant is removed from direct sun to partial shade.
How to make a cattleya orchid bloom
In order for the cattleya orchid at home to regularly delight you with abundant and long-lasting flowering, it is necessary to organize the most comfortable living conditions for it: bright light, moderate air humidity, proper watering, etc.
Temperature
For active growth and development, cattleya needs warmth: during the daytime the air temperature should be +22-+25°C, at night it should drop to +18°C. During the rest period, the plant is transferred to a cool room with an air temperature of about +10°C.
Spraying
Caring for a cattleya orchid at home does not necessarily have to include an activity such as spraying. This can be done if it is necessary to increase the humidity in the room where the plant is located, while preventing drops of water from getting on young shoots and growing points.
Lighting
For the formation of flower buds and subsequent flowering, cattleya requires constant bright sunlight. However, on hot days the plant can overheat under the rays of the sun, so in summer it should be shaded during the midday hours. This measure will also protect against burns on the leaves.
Watering a cattleya orchid
In summer, cattleya is watered frequently, but the substrate is allowed to dry out between waterings.
When top watering, it is important to ensure that moisture does not remain on the young shoots of the plant; this can cause rot. The optimal way to moisten the substrate is to immerse the pot in another container of water for 20-30 minutes. You can also periodically give the cattleya a warm shower.
Cattleya orchid pot
The container for growing cattleya can be anything: the plant is kept in plastic or ceramic pots, in hanging baskets and flower pots, or simply on pieces of bark. If a flower is grown with a closed root system, when selecting a pot for it, you should immediately think about future replanting.
Priming
For indoor cultivation of cattleyas, they use a special orchid substrate, sold in flower shops, or prepare a soil mixture yourself, mixing fine pine bark with polystyrene foam and sphagnum moss fibers.
Feeding and fertilizer
The homemade cattleya orchid needs additional feeding only during the period of active growth. At the beginning of the growing season, the plant is fertilized with preparations with a high nitrogen content, and later phosphorus and potassium fertilizers are used. When preparing nutrient solutions, carefully monitor the dosage of fertilizers, since their excessive application can lead to the death of the root system. “Overfeeding” cattleya also often provokes increased growth of greenery to the detriment of flowering.
Transfer
Cattleyas really don’t like it when their root system is disturbed, so they should be replanted only if there is a real need: when the plant becomes too crowded in the pot or when the old substrate has almost completely decomposed. Replanting a cattleya orchid is carried out as follows: the plant is carefully removed from the pot along with the substrate using “squeezing” movements, and the old soil is washed off with water. Damaged and rotten roots are cut off, the sections are treated with crushed coal
The new substrate is soaked in water for a while, allowed to drain, and then the plant is carefully placed in a new pot.
Trimming
There is no need to trim your cattleya. To maintain an attractive appearance, you can and should periodically remove damaged leaves, wilted flowers and old peduncles.
Care
The first two weeks of staying in a new place are quarantine (lack of direct sunlight, watering and fertilizers).
Temperature
Maintaining optimal temperature in summer – +22 C, in winter – +12-15 C.
Lighting
The light is diffused, it is advisable to stay in the shade in summer, and on a windowsill in winter.
Watering
Moderate without flooding, which will be facilitated by high-quality drainage to eliminate excess moisture and a container with drainage holes.
Top dressing
The best choice for fertilizer would be special products created for epiphytes.
Good store-bought options are Tsitovit, Agricola, Flower Paradise and fertilizers containing phosphorus, nitrogen, potassium and other microelements.
Trimming
Regular pruning is a decisive factor for the health of the plant. Pruning is done after flowering is complete , or if resuscitation is necessary.
Transfer
The optimal time for replanting is after complete flowering, usually in late spring or summer, with complete preservation of the root system.
Care instructions
Selecting a location
Cattleya orchid: description of species, cultivation and propagation
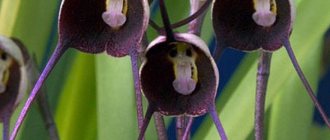
Phalaenopsis Kaoda is best placed on windowsills on the western and eastern sides to avoid direct sun, this is dangerous for the orchid. It is desirable that the lighting does not deprive this special flower of soft, warm shades, leaving only dark silhouettes - spots, because Kaoda petals are dense, not transparent, they will simply fade in unfavorable lighting.
Preparing the soil and pot
- Pot. It is recommended to grow this plant in pots or wooden slatted baskets. The diameter of the pot is usually average, up to 12 cm.
- Substrate:
- The base is medium-sized pine bark or coconut chips.
- You can put sphagnum moss on the surface of the substrate to dry out the roots.
- Moss serves as an indicator for watering time. When it has dried to a “crunch”, after 1 - 2 days the orchid needs to be watered.
- Good drainage is required for air circulation to prevent the roots from rotting.
- Sometimes peat is added to keep the substrate from becoming saline.
Temperature
Kaoda orchid loves warmth and soft light; moderate temperature conditions are desirable. The most optimal temperature in hot summer is 24 – 32°C, in winter the permissible temperature range is 16 – 22°C.
Humidity
In terms of air humidity, this phalaenopsis is quite patient and flexible, but humidity below 40 - 45% is undesirable. In summer we increase the humidity; regular spraying of the flower is recommended. In this case, you should avoid getting water on the flowers and buds.
Lighting
Lighting is standard, as for all phalaenopsis, partial shade, without access to direct sunlight. Blooms well and grows in completely uniform artificial light. In spring and summer. Bright diffused light.
The orchid does not tolerate direct bright sun. Do not expose the leaves to the risk of burns; monitor the lighting.
Watering
During watering, carefully protect the rosettes and leaf axils so that water does not get there. Stagnation of water in these places can lead to rotting and further death. Immediately after watering, you can place the orchid under a fan, then all excess moisture will evaporate and will not cause harm.
- In spring and hot summer. Once a week, spill the soil with warm water on top of the pot, preventing water from accumulating. Soaking in water is not recommended. It is best to water in the morning. It is necessary to water only when all the roots have become a uniform silver-gray color.
- In autumn and winter. More rare and careful watering, approximately once every 10-14 days.
Watch a video about proper watering of an orchid:
Top dressing
- Fertilizer is usually combined with watering to ensure even distribution of nutrients.
- Fertilizing is applied every 2 - 3 weeks during active growth of leaves and roots.
- It is better to use organic fertilizers.
- Flowering plants are not fertilized so that the buds do not fall off, and the orchid blooms longer.
- Once a month we feed with fertilizers for orchids, strictly following the instructions.
Watch a video about proper feeding of an orchid:
https://youtube.com/watch?v=6DdQe_D6_20
Transfer
We replant the orchid when the substrate begins to decompose. If you planted an orchid in the bark, the “shelf life” of the soil usually expires after 2-3 years. Transplantation is desirable when the plant “sits” very tightly in the pot, it is cramped, the pot is “overflowing” with roots on all sides.
Watch a video about proper orchid transplantation:
Reproduction
Propagation of the Narbonne orchid is carried out:
- By cuttings (by separating the top of a plant or peduncle from the mother).
- A shoot (appears naturally). The shoot is located at the base of the root of an adult plant, on the peduncle or stem of the mother plant.
- Peduncle (appears at the place where the leaf is connected to the stem, looks like a root).
- Seeds (formed in boxes on inflorescences).
Diseases and pests
Fractures on the leaves can be mistaken for a disease, but these are only the consequences of injury, infrequent watering or excess nitrogen.
Diseases:
- Viral mosaic disease . The disease is expressed in the appearance of black spots with a white rim on the leaves. Unfortunately, no home remedies have yet been found to treat this disease.
- Fungal diseases . Signs of fungal diseases of orchids include yellowed leaves and black spots on them, rotting leaf bases, and gray rot. Basically, fungal diseases are treated by treating the location of the flower pot with a 10% solution of sodium hypochloride or a 25% solution of any detergent that contains active oxygen.
- Aphids, mealyworms and scale insects . An effective way to combat such pests is the use of folk remedies. A solution of 1 liter of water, tbsp. l. salt, tbsp. l. soda and 10 grams of household liquid were sprayed on the plant.
How to properly care
Miltonia orchid. important tips for caring for an orchid at home
In order for the Kaoda orchid to bloom and always look healthy and beautiful, it should be properly cared for. Following step-by-step care instructions will help when growing this species of Phalaenopsis.
Selecting a location
Phalaenopsis Kaoda Twinkle prefers well-lit places. It is best to place the flower pot on the windowsill on the east or west side. It can be dangerous for a flower to be exposed to direct sunlight, so the light is diffused.
Note!
If there is a lack of light, the orchid will not grow, it will fade and stop developing.
Preparing the soil and pot
An ordinary pot and classic soil are not suitable for growing an orchid. Flowers of this species can only be grown in transparent or translucent containers. The diameter of the pot is most often chosen around 10 cm.
A special substrate is used as soil, the basis of which is crushed bark of coniferous trees. Flower shops sell specialized soils for growing orchids. Experienced gardeners recommend using moss, for example, regular sphagnum. It is used as an indicator of humidity. After the moss is completely dry, water the flower a few days later.
Indoor microclimate
As already noted, Phalaenopsis Kaoda loves illuminated places, but without direct sunlight. The light is made diffused. Sometimes tulle between the window and the pot is enough. The duration of daylight hours should be 12-14 hours.
On a note!
In winter, additional lighting is most often required. In summer it is convenient to use reflective foil.
The plant loves warmth. The temperature should not fall below 25-30 degrees. In winter, temperatures may be slightly lower, maximum 26 degrees.
Due to the fact that the plant’s homeland is a tropical area, the air humidity should be high. You can increase humidity by spraying the plant and the space around it
But it is important to ensure that water does not get on the flowers and leaf rosette.
Watering
The substrate is moistened upon request. The need for watering is judged by the condition of the roots and soil. Dry roots are silver-gray in color, while wet roots are green. The soil should remain dry for several days.
Watering can be done in several ways.
- Irrigation. Classic soil spraying. In this case, you need to make sure that water does not get into the leaf outlet.
- Soak. A very convenient method in which the pot is placed in a low container of water. Then the flower is left to soak up water, taken out, allowed to drain off excess moisture and sent to a permanent place.
Watering is best done in the morning. In winter, moisture is reduced.
Top dressing
Fertilizers are applied only during the period of active growth. The frequency of fertilizing is 2 times a month.
On a note!
Do not fertilize during the flowering period. If fertilizers are applied during the formation of buds, they may fall off or the flowering period will be shortened.
To provide adequate nutrition, use specialized fertilizers designed for orchids. Such compositions contain all the components necessary for the growth of the crop.
Transfer
The substrate is changed at intervals of once every 2-3 years. During this period, soil decomposition occurs. It gets compacted and does not allow air to pass through well, accumulates moisture, which can lead to rotting.
In some cases, an emergency transplant is required:
- yellow and brown roots are visible through the walls of the pot (signs of rotting);
- there is not enough space for the plant in the pot;
- the roots began to disappear.
If there is not enough space for the root system, you do not need to take a pot that is too large, just increase it by a couple of centimeters.