Those who visit their dacha on short visits or are physically unable to water the plants every day, dragging a ton of water in the evening, will be interested in learning how to make drip irrigation with your own hands in a greenhouse or in garden beds. The implementation of this idea frees you not only from hard work, but also from worries about plantings that may not wait for the arrival of the owners who work in the city or who have even left for vacation. A smart automated system will take care of them.
It is especially important to ensure regular watering of young plants and seedlings Source market.yandex.ru
Operating principle and advantages of the system
The drip irrigation system supplies moisture directly to the roots of plants, moistening only the soil next to them and not irrigating the rows. At the same time, saturation with water occurs for a long time and evenly, and due to targeted point supply and reduced consumption, significant savings in life-giving moisture occur.
In addition to saving, this approach to watering allows you to get other bonuses:
- reduction of physical costs for maintaining a greenhouse or garden;
- the possibility of leaving the site unattended for several days, and in the presence of an automated system – even longer;
- activating growth and increasing crop yields due to regular watering and the supply of nutrients to the roots, as well as oxygen, which easily penetrates into the soil that is not covered with a caked crust between the rows.
Water is absorbed into the ground point by point, leaving it dry and loose Source poliv123.ru
When deciding how to organize drip irrigation in a greenhouse, many nuances are taken into account, from the type of water source to the type of plants grown and their irrigation requirements. But in any case, such a system will consist of main and distribution pipelines connected to the water source. The latter of which are equipped with water supply elements individually for each plant or small group.
Distribution pipeline system diagram Source mojateplica.ru
Review of ready-made drip irrigation systems, their characteristics
The Zhuk drip irrigation system from a domestic manufacturer is one of the most popular among gardeners. It can be connected to a centralized water supply or to a storage tank. If you use the latter option, the kit includes a level tube, through which you can control the amount of water remaining in the barrel. Manufacturers produce “Zhuk” drip irrigation systems for 60 plants and 30 plantings. Usually the device is equipped with a timer and a filter. You can additionally buy “Zhuk” drip irrigation, designed for 20 plants.
The ready-made drip irrigation system “Zhuk” is the most popular on the domestic market
“Kaplya” irrigation kits are equipped with emitter tapes with dropper pitches of 0.3 m. Thanks to the complex labyrinth of channels inside the dropper, the possibility of clogging is eliminated. The system is designed for an area of 25 m2. Can be connected to both a water supply and a storage tank. The controller is not included in the set.
A more reliable analogue of the Zhuk irrigation system is the Water Strider model, which is designed for drip irrigation of small greenhouses. The set consists of a 12 m long hose, a controller, 40 drippers and connecting elements. The system is organized for watering exclusively from the container, since the operating pressure in the network should not exceed 1 bar. The barrel is most often located at a height of 50 m.
The Belarusian drip irrigation system “Akvadusya” has several varieties suitable for watering areas of different sizes. It can be equipped with or without a controller, connected to a water supply or storage tank.
Drip irrigation "Urozhay"-1 is also produced with long-length emitter tapes. The system can be additionally equipped with a filter and automation. Another budget option is the Pomodor drip irrigation system with drip tubes, external drippers and a timer. The kit also includes special splitters to facilitate installation of the system. The most expensive model contains a controller and a submersible pump.
Scheme of operation of the drip irrigation system "Aquadusya"
The Istok irrigation system includes a 25 m drip tube with a pitch between droppers of 30 cm. The device is equipped with a filter and fittings necessary for connection to a storage tank. Some models are equipped with a controller and pump.
Today you can buy a drip irrigation system, which includes all possible elements. But such a solution requires significant financial costs. A more economical option is to create such a mechanism from ready-made components. In addition, you can make your own irrigation system for your dacha using scrap materials, such as plastic bottles and medical droppers. The choice depends on the nature of the territory, its area, the number and type of green spaces, personal preferences and financial capabilities of the owner.
Design elements
Today, ready-made drip irrigation systems can be purchased in stores. They are selected according to the total length of the distribution branches, the type of drip lines, the distance between them and other parameters, which will be discussed in detail below. But many gardeners are interested in how to arrange drip irrigation in a greenhouse with their own hands, and whether it is possible to use improvised materials available on the farm.
Could be so. But in order to make a decision, it is better to first study the design in detail.
Sources of water and equipment for its supply
Water can be supplied to a drip irrigation system from a centralized water supply system, a natural reservoir, a well or a borehole. But the most common option is a large container installed on an elevated surface. The water in it is first settled and warmed, and then fed into the pipes by gravity.
Serving from a barrel is the most convenient solution Source yandex.ru
In all cases, except for watering directly from a centralized water supply system, it is necessary to install a pump that pumps water into the pipes at a given pressure. Or feeding it into a distribution container. The type and parameters of the pump depend on the type and depth of the source.
Since any water, even purified tap water, contains impurities in the form of fine sand, silt, particles of rust and undissolved salts, before watering the greenhouse, you need to take care of installing a filter. Without it, the system will quickly become clogged with debris and require cleaning. The main elements – the droppers – are especially affected.
The mesh filter is the most popular, inexpensive and easy to use Source yandex.ru
Pipelines
To distribute water throughout the entire bed or greenhouse, you need a main supply line and branches extending from it along each row of plants. The main pipeline is connected to a water source and equipped with a shut-off device. Most often this is a ball valve, but in an automated system connected to a pressure line or well pump, a solenoid valve is used.
The main line is made of plastic or metal pipes; watering hoses are less commonly used:
- Metal pipes are strong and durable, but their use in a drip irrigation system is not recommended due to their lack of resistance to corrosion. Rust microparticles quickly clog the drip holes.
- Watering hoses are subject to mechanical damage and are not durable.
- It is best to choose the option of making irrigation in a greenhouse with your own hands from PVC or HDPE pipes. These materials are distinguished by their reasonable price and sufficient mechanical strength, they do not corrode, and deposits do not form on their smooth internal walls.
Main line made of polypropylene pipe Source decorateme.com
See also: Catalog of country house projects
In ready-made systems, the role of distribution pipelines is played by drip tubes or drip tapes - flat thin-walled hoses with built-in drips. They come in two main types: emitter and slot:
- The emitter tape has a labyrinth inside with flat droppers located at a certain distance from each other. It can be compensated, which always ensures a constant flow of water from each drip, and uncompensated - its water flow through the drippers differs depending on the distance from the main line and the slope of the area. This type of tape is not cheap, but it does not clog easily and can be used for several seasons.
- The internal labyrinth of the slotted tape is equipped with droppers in the form of long slotted holes. They get clogged easily, so before you water the greenhouse with your own hands using this type of tape, you need to take care of a high-quality filter. But it costs much less than the emitter one, which, however, is offset by the short service life of 1 season in the open ground or a maximum of 2 seasons in a greenhouse.
Fragment of an emitter tape Source isanshop.ru
Drip tapes also differ from each other in such parameters as the total length, the distance between the droppers and their consumption characteristics, and wall thickness.
Note! Most belts are rated at around 1 bar. Therefore, they are used in gravity systems or a pressure reducer is used when connecting to a pressure water supply.
Drip tubes made of low-density polyethylene have thicker walls, so they can withstand high pressure and can work in pressure systems. They are also convenient because they are often produced without holes - they are made independently at the optimal distance for each crop. And external droppers are inserted into the holes or connected to the pipe using thin short hoses.
Drip tube with outlet for 4 droppers Source ekotec.com.ua
In ready-made kits you can find everything to assemble the system, including tubes of different diameters, droppers, adapters, bends for different numbers of outlets, and even pegs for fixing the tubes at the desired level. But all these elements can be purchased separately or replaced. For example, a very relevant question is how to make drip irrigation with your own hands in a greenhouse from a PVC pipe, since it is cheaper than its polyethylene counterparts, as are fittings for assembly.
Special droppers can be replaced with medical ones. They are good because each has a flow-regulating device in the form of a wheel that pinches the supply tube. But the tubes of medical droppers are transparent, which leads to rapid blooming of the water in them and, as a result, their clogging and the need for rinsing.
Homemade system of PVC pipes and medical droppers Source ro.aviarydecor.com
If you choose between drip tapes and tubes, then each type has its own advantages and disadvantages. The pipe system is more durable, it allows you to regulate the water flow and supply it individually to each plant. What is important when growing cucumbers, tomatoes, peppers and other “piece” crops. But it is more expensive than tape and more difficult to assemble.
Tapes are convenient to use when growing root crops, herbs, and strawberries. They are relatively inexpensive, easy to install and clean.
Automation
If the owners do not have the opportunity to constantly be on the site and monitor the condition of the plants, you can think about how to make automatic watering in the greenhouse with your own hands. This can be easily done by equipping the system with a timer. Depending on the functionality, such devices can not only turn on and off the water supply at a given time, but also individually control several lines, monitor the pressure in the network and the operation of pumping equipment, and serve as a water consumption meter.
How to make drip irrigation with your own hands from plastic pipes and hoses
When arranging a drip irrigation system from ready-made components, it is necessary to opt exclusively for high-quality products so that it lasts for many years and money is not wasted. The irrigation scheme should be quite simple, with a minimum number of connectors. At the junctions of elements, the pressure weakens, which contributes to the accumulation of small particles of debris.
Installation of the system is preceded by the creation of a layout diagram of all its component elements, and this, in turn, depends on the layout of the site and the location of the beds. The diagram should indicate the source of water supply, the main pipe and outlet hoses so that you can calculate the amount of materials needed. It is better to use a plastic barrel as a source of water supply for drip irrigation. This material does not corrode, which will not only increase the service life of the product, but also eliminate the possibility of clogging the system with rust particles.
Polypropylene pipes for drip irrigation are more preferable
A main pipeline, which can be made of metal or plastic, is connected to the water supply source. A more preferable option is to lay polypropylene drip irrigation pipes with your own hands. The main branch is located perpendicular to the beds and has a larger diameter than the outlet pipelines. All do-it-yourself drip irrigation elements made from plastic pipes are connected with compression fittings. After the shut-off valve of the water supply, a coarse filter is installed on the main line.
If drip tapes are used as outlet pipelines, then holes are drilled in the line for their fastening using starting fittings. The hoses are placed as close to the row of plants as possible. A plug is installed at the end of each tape. Next, the system is checked for functionality.
If you plan to lay the system underground, you need to dig a trench 30-70 cm deep under the pipelines. You need to fill the bottom with a layer of crushed stone and lay the assembled system. Next, it is tested, after which it is backfilled with soil. You can study the installation process in detail in the video of drip irrigation at the dacha.
Important! Drip irrigation pipelines laid underground are highly susceptible to clogging.
To make drip irrigation, you need to purchase high-quality components
Video description
Useful video on the topic:
See also: Catalog of companies that specialize in the installation of metal structures - canopies, greenhouses and others
Timers can operate from mains or batteries, be mechanical, electro-mechanical or electronic:
- The mechanical timer is manually controlled and has only one function. Before you start watering, you need to turn it on and set the time after which it will stop supplying water. This device is convenient if the area is small and is under constant supervision. It eliminates the need to turn off the water on time and generally keep this concern in mind.
- The electronic-mechanical device can already do more: it provides the specified frequency and duration of watering, independently controlling the system in accordance with the program.
Electronic-mechanical timer with output to two lines Source growsvet.ru
- Electronic controllers are capable of executing up to 16 commands when connecting to them additional devices that monitor soil and air humidity, temperature and other environmental parameters. They can be programmed to different modes for each crop. They are expensive, but they allow you to not have to worry about watering at all, no matter what the weather is like outside and no matter how long the owners’ absence.
When deciding how to make automatic watering in a greenhouse with your own hands, you need to decide in advance on the optimal irrigation mode and choose the most suitable timer in terms of price and functionality. It is installed at the beginning of the system on the main line and does not particularly complicate the process of its assembly.
Electronic timer connected to the central water supply Source treetrekkers.com
Components of an irrigation system and their characteristics
The main element of the system is the water supply source. It can be represented by a water supply system, a well or a water-measuring tank, which is installed at a height of at least 1.5 m. The next required element is a filter for drip irrigation with your own hands, thanks to which the system will not become clogged with various small debris.
Automatic watering system: how to make automatic watering at your dacha (read more)
The device can be vortex, disk or mesh. The latter option is considered more popular, which is due to its low cost. The vortex filter is used for irrigation systems of large areas. The disk element is characterized by excellent performance characteristics and high cost, which is not at all justified for small summer cottages.
Metal or plastic pipes are used to transport water.
If the source of water supply is a well or well, the system must be equipped with a pumping unit. The most appropriate option is considered to be a centrifugal type of device. The DIY drip irrigation distribution network consists of pipelines and hoses. For the main trunk network, metal or plastic pipes can be used. Metal products are strong, reliable and durable. However, the material is subject to corrosion, which will result in damage to the system.
Polyethylene or polypropylene pipelines are a more acceptable option. The products are characterized by strength, a smooth inner wall, which eliminates the possibility of deposits forming inside the system. Plastic pipes can withstand temperature fluctuations and the negative effects of aggressive substances.
Self-assembly
Having figured out how drip irrigation works in a greenhouse, you can move on to choosing a ready-made kit or assemble the system yourself from individual components.
Drawing up a diagram and calculations
Regardless of the decision made, you first need to draw a diagram, indicating the location of the beds, their length, location of the water source and other details.
On this diagram, the main and distribution pipes are drawn in order to calculate the length of each and determine the number of connecting elements - couplings, angles, tees, plugs, etc.
Approximate diagram Source idei-dachi.ru
When choosing from ready-made kits, it is necessary to take into account the pressure for which the system is designed, the number of droppers in the set, as well as the distance between them. As for their assembly, detailed instructions are included with each kit.
Advantages and disadvantages of the drip system
The initial goal when creating drip irrigation was to compensate for the insufficient amount of water for irrigating plants. Later it turned out that this method is preferable to traditional means. The following advantages are noted:
- saving water resources - there is no expense for row spacing;
- obtaining early harvests - the development period is reduced, the fruits ripen quickly;
- saturation of the root system - slow moisture supply ensures
- rapid growth and obtaining more nutrients;
- reducing the possibility of soil waterlogging - the risk of developing diseases (powdery mildew, various types of rot, black leg, etc.) is reduced;
- no burns on the leaves - water goes directly to the root;
- reduction in the number of weeds - there is no excess moisture;
- no risk of soil erosion - best aeration;
- increase in yield by 30-40%;
- application of mineral and organic fertilizers during irrigation.
At first, this system was installed only in greenhouses or greenhouses, but later it began to be used in open areas.
However, drip irrigation also has disadvantages:
- Control over devices - incorrect calculation of water flow will lead to excess moisture and death of plants. You need to monitor the filling of the barrel. To ensure automatic watering, a timer is installed.
- Cleaning the holes - they become clogged due to their small diameter. You can't increase it, because... water will flow out without reaching all the nozzles. Use a filter installed at the beginning of the system (a piece of foam rubber), which can be removed and washed.
- The barrel and the receiver-distributor must be covered - this protects from debris and insects.
Video description
You can watch the video for installation master classes:
Note! The pitch between the holes in the drip tape or between the droppers on the tube is selected in accordance with the location of the irrigated plants. If these are onions, carrots, greens and other crops that grow quite closely, it should be about 20 cm. For tomatoes, eggplants and cucumbers, the distance increases to 30-35 cm, so that each bush has its own dropper.
Also, before auto-watering in a greenhouse or garden beds, you need to decide on the volume of the watering tank, which will depend on the number of plants being irrigated and their need for water. This is especially true in cases where automatic replenishment of the container is not provided in the absence of the owners.
DIY drip hose
If a homemade drip irrigation system is constructed with a conductive hose laid out on the ground or placed on a support, its functions can be performed by:
- ordinary single-layer or multi-layer rubber hose;
- hose made of polyvinyl chloride;
- silicone hose.
When you plan to bury the water supply system into the soil, it is safer to build it from plastic or polypropylene pipes. Such a conductive hose will be less susceptible to corrosion and temperature changes.
In any case, the conductive hose must be suitable for making holes in it for inserting medical or other types of droppers with tips and not allow water to pass through in places not intended for irrigation.
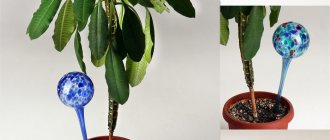
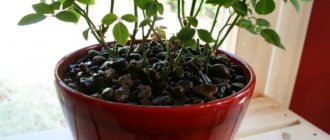
Plastic bottles for drip irrigation
There is another budget-friendly way to do drip irrigation in a greenhouse yourself. It is based on the use of empty plastic bottles of different sizes: the larger it is, the less often you will have to fill them with water. For example, to water tomatoes or cucumbers growing in normal soil, a 1.5-liter bottle is enough for 2-3 days, and a 6-liter bottle will free you for 7-10 days.
Of course, this method is not suitable for large areas, but for greenhouses or small beds it is quite suitable.
You can organize watering using plastic containers in different ways.
The underground method involves digging a bottle next to the plant to such a depth that water flows from pre-made holes to the roots. The number and diameter of holes are selected in accordance with the type of soil, since water seeps into sandy soil quickly without lingering at the roots, and in clay soil it stays at the surface for a long time.
The penetration of water into the soil depends on its type Source mainavi.ru
The bottle can be placed down or upside down. In the latter case, the bottom is cut off, but not all the way, to form a kind of lid that protects the cavity from debris. If the neck is facing upward, then a hole is pierced in it to allow air to enter and prevent the container from flattening as it is emptied.
To prevent the holes from becoming clogged and silted, a kind of coarse filter made of thin mesh fabric or old nylon tights is put on the plastic container.
Another option for underground drip irrigation is carried out using nozzles in the form of a narrow long funnel, which are screwed onto the bottle instead of a cap. But they are produced only in containers up to 2.5 liters.
Such attachments can be purchased at specialized garden stores Source otomate.ru
The surface method of drip irrigation is also very common. One and a half bottles with a cut off bottom and a hole made in the lid are hung over the garden bed so that the drops fall under the roots of the plants. The basis of such a suspension system can be two supports dug into the ground, between which a strong wire is stretched.
This homemade design can be improved by inserting an empty ballpoint pen with the head removed or the same medical dropper into the hole. It is advisable to seal the connection with silicone sealant, putty or, at worst, plasticine.
Particularly convenient in this type of watering is a dropper, which can be directed exactly to the right place and the intensity of the water supply can be adjusted. And hang the bottles higher so that they do not interfere with the plants and warm up better in the sun. If you do this without using droppers, drops of water may fall on the leaves, causing burns on them.
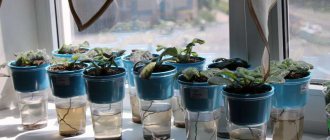
Drip irrigation from medical droppers
Of course, this is the same economical design. It has its advantage if different varieties of crops are planted on the site. And they are watered in different quantities. The downside is the periodic flushing of clogged droppers. But you can’t do without this with any drip irrigation equipment.
Installation
You will need to purchase:
- disposable medical droppers;
- hoses for distributing water over ridges;
- stands for storage containers;
- shut-off and connecting fittings for hoses and droppers (taps, plugs and tees).
It is better to take dark-colored equipment, then the droppers will be protected from algae.
- First you need to lay out the hoses over the area with the ridges.
- The first end of the hose is connected to the pressure line. The second one should be muted.
- The main is connected to a barrel of water. It is raised no less than 2 meters above the ground. Then the necessary water pressure will be provided to the entire garden.
- After all the pipes are connected, it is necessary to make notes in which places the droppers will be located.
- We make holes and insert medical droppers into them. The other end is brought to the roots of the crops.
- Well, for a longer service life, it is worth installing fine filters in front of the supply line.
This design has many advantages: significant water savings, watering occurs independently, you just need to open the tap. Moisture does not get on the leaves of plants and this is not the whole list. In a word, with its help you can simplify the entire process of caring for a plant.
Video description
Video about the device of drip irrigation from bottles:
Any of these methods allows you not only to water the plants, but also to feed them - just add liquid or dissolved fertilizer, herbal infusion, mullein infusion, etc. to the water.
Unfortunately, such a system cannot be called perfect, because you still have to fill the containers often and with your own hands. In addition, in extreme heat and when the owners are absent from the dacha for several days, the bottles will not cope with the task of proper watering. And their appearance will not decorate the site in any way.
There is no rain, but there is drip irrigation...
The basis for irrigation is water. And the most correct method is watering from a container:
- in it the water warms up and settles between waterings, and this has a beneficial effect on the plants;
- There are always water savings;
- Fertilizers are added directly to the container to feed the plants;
- the water container should be plastic: a small rust stain can cause clogged holes;
- The container must be filled only with clean water or filtered.
Drip irrigation creates conditions for earlier fruit ripening and increases productivity. And in comparison with traditional methods of watering (hoses or spray sprinklers), it is more practical in terms of water consumption: water from the droppers goes directly under the root of the plant, that is, there is almost no evaporation of moisture.
Modern technologies make it possible to make the irrigation system fully automatic: once at the beginning of the season, the controller is programmed (the required parameters for the time and frequency of water supply are entered) and that’s it.
The main condition is that there must always be the required amount of water in the system. However, the main disadvantage of such an irrigation system is the financial side; automation costs money.
The main advantages of using a homemade drip system
Do-it-yourself drip irrigation using improvised means significantly saves money on purchasing the necessary materials and equipment. The second advantage is the quick possibility of replacing a damaged part of the system with a spare one: a craftsman who has built drip irrigation on his site will quickly see its weak points and repair them using available spare materials (or purchase them at already familiar places of sale).
General advantages of homemade drip irrigation:
- Beneficial effect on plants. Moisture enters precisely under the roots, without clogging the soil or creating a crust. Overmoistening is eliminated, the roots breathe intensively throughout the entire cycle of growth and ripening of vegetables and berries. Plants are not injured, unlike when a significant flow of water hits them from above during sprinkling.
- Significant savings in water consumption, reduction in wear and contamination of the irrigation system with impurities and slime.
- Crop losses from pests and diseases are reduced. Fungicides, insecticides, and other protective agents applied to leaves during treatment are not washed off with running water during watering.
- Drip tapes are conveniently located even in areas with uneven terrain; the formation of puddles in some places and drought in other beds is not allowed.
- Weeds grow less because they do not receive water. In the places where they grow, the soil remains dry.
A uniform, targeted supply of water to the roots at a temperature close to the soil temperature ensures stable yields in the beds.
Have patience and skill, make your own drip system in your garden. Save labor costs and water consumption in the future, and enjoy a good harvest!