Indoor callas stand out from other plants with their unique colors. Various species differ in the shades of their buds. If you wish, you can create a whole flower garden on the windowsill using only calla lilies.
For all its beauty, the flower does not require titanic efforts to maintain and can decorate the home of even a beginner in floriculture.
People can find other names for calla lilies:
- calliper;
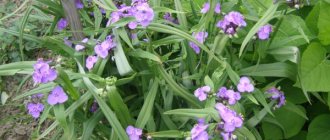
- zantedeschia or arum, which means the same genus of the family Araceae (shown in the photo).
The energy of home calla lilies smooths out conflict situations in the home and is able to improve relationships. It is also believed that flowers have a beneficial effect on the health of their owners.
Home care
Taking care of a pet is absolutely easy. Calla is not picky and not capricious. The main thing is to find out what and how to do, and follow the recommendations below.
Location and lighting
On the one hand, the whitewing prefers good lighting, but on the other hand, it does not tolerate direct sunlight. So you will have to look for a compromise - illuminate all year round, but always with diffused light.
It is not recommended to keep the flower in the back of the room, since the white calla will refuse to bloom in such conditions, and the colored varieties will become faded and ugly.
Temperature
If the room where the calla lilies are kept is too warm and dry, then you will not see the calla blooming. In addition, in such conditions the plant will be susceptible to pest invasion.
Depending on the color, the temperature regime will be different:
- White callas. During the growing season, maintain the temperature within +20°C, reducing it after flowering to +10 degrees. The calliper should rest in cool conditions for a couple of months.
- Colored callas. They love warmth even more. During flowering, provide them with +24°C. And then keep it for a whole month at +27°C. In such conditions, buds will form better and the tubers will ripen faster. Do not water the flower during this period.
After this, having removed the leaves, send them for the winter, covering them with sawdust. During storage, the temperature should be within +3-5°C.
Watering
White Richardias love watering and high humidity more than their colored relatives. While the calla lily is developing, it should be watered quite often. At the same time, make sure that the water does not stagnate in the pot. Wait until the top layer of soil dries 1 cm, and only then pour a new portion of water. 15 minutes after watering, drain excess liquid from the pan.
Colored specimens should be re-watered less frequently - when the soil mixture has dried 3 cm in the pot. At the same time, pour warm and settled water onto the very edge of the pot. When preparing for the rest period, sharply reduce the number of waterings of white callas, and do not water colored ones at all.
Air humidity
The air around the calla lilies should always be moist. Therefore, you will have to spray your white pet twice a day (it is better not to carry out this procedure with colored ones). In addition, you can wipe the leaves with a damp cloth, and place the flowerpot with a flower in a tray with damp expanded clay.
White callas, accustomed to growing in a swamp, require a humidity regime of 70-80%; colored specimens will need 60%.
The soil
The soil mixture for Richardia must be fertile. Select soil for aroid plants at flower shops. You can collect the substrate yourself. To do this, mix the components in the following proportions:
- 30% humus;
- 30% turf land;
- 30% leaf soil;
- % sand;
- 5% clay.
For 3 kg of soil, it is advisable to add 1 tbsp. superphosphate.
Feeding and fertilizers
While the plant is actively developing, it should be fed regularly. In this case, you should alternate organic fertilizers with mineral ones. Before flowering, eliminate fertilizers that contain nitrogen. And apply them when the inflorescences are formed. You can also use urea during this period.
Calla will be grateful to you if you water it with eggshell infusion during the flowering period. In the summer, your pet should be fed every two weeks.
Make sure that the fertilizer does not get on the petals, otherwise the flower may lose its brightness of color.
Transfer
Having brought the calla lily from the store, you should transplant it into another pot. For white flowers, choose a container according to the size of the bulb. For colored people, deep and wide ones are suitable. The depth of the flowerpot should be three times the diameter of the tuber.
The bottom should be lined with a drainage layer of sand. Pour the sour earth mixture on top of it. Plant the seedling in a not very deep hole.
Gradually begin to increase the temperature in the room. After 2-3 weeks, you can start watering and feeding your pet.
Around the beginning of June, calla lilies should be dug up and faded leaves and shoots should be trimmed. After this, transplant it into a new pot. If you replace the top layer of soil, you can do this procedure after 2 years.
How to replant callas
In the process of replanting home calla lilies, you should take into account important nuances on which the further growth of the flower depends:
- When planting in a new pot, you do not need to add a lot of soil, as this may cause the roots to begin to rot.
- Between transplants, the top layer of soil should be replaced with new soil at least once.
- After changing the substrate, the roots experience severe stress, which is manifested by a long lack of growth. In this case, you should not take any measures, you just need to provide comfortable conditions for the plant.
- Damage to the tuberous skin can destroy the flower ; it must be handled very carefully when planting.
- Calla lilies belonging to the same species can coexist in one pot, and it is better to plant a mix of calla lilies of different colors of bracts in different pots. Different species are capable of suppressing each other's growth.
- Transplantation is carried out annually.
Calla is demanding on the capacity of the pot. The extensive root network does not tolerate crowded spaces in which flowers may not appear. Even high-quality fertilizers will not help. Therefore, one plant should have 20 x 20 cm of soil.
This video shows how to transplant Calla.
Callas prefer soil that is porous, that allows air to pass well to the roots and does not retain moisture.
Before transplanting a flower, you need to prepare a suitable substrate: mix sand and humus in equal proportions and add 2 parts of leaf soil.
To replant a plant, add a layer of drainage to the bottom of the new pot and a layer of substrate on top of it. The roots are carefully straightened and covered with soil until the leaves begin.
Bloom
Usually the serpentine blooms in the second year. The tall peduncle is topped with small flowers, wrapped in a bright leaf-spread. At this time, the plant needs frequent watering and regular feeding.
At the end of flowering, remove the tuber from the pot, shake off the soil mixture, and rinse under running water. Let it dry. After a few days, carefully separate the leaves. Leave it for 2 weeks, then remove the roots and rotten parts, wrap it in paper and leave it alone. Keep in a room with a temperature of +16-18°C and do not wet it under any circumstances. After 3-6 months, you can plant the tuber in a new flowerpot.
Key Features
Growing this crop, like any other plant, requires following some rules of agricultural technology, and the main feature of these flowers is that they can be grown both in the garden and indoors. However, wherever the plants grow, caring for and planting calla lilies in the open ground or in a pot imply following some recommendations, which are as follows:
- Callas need shallow planting, that is, the root system should be barely covered with soil to avoid root rot.
- What experienced gardeners are accustomed to calling a calla flower is actually considered the covering leaf or blanket that wraps the inflorescence spadix. In fact, the flowers of this plant are inconspicuous and small, although quite fragrant.
- After planting, garden callas will not sprout until they have formed their own root system, so do not be nervous if there are no shoots for a month.
- When digging up tubers, you must be very careful, as they can be easily damaged.
Indoor or garden calla lilies are a living barometer: watery droplets, like tears, form on the cover and tips of the leaf blades before the rain. Each plant blooms for about 1 month.
Reproduction
You can get new calla lilies in three ways:
- tubers;
- shoots;
- seeds.
Tubers
Use this method exclusively for colored plants. Separate the small daughter tubers from the adult tuber. They are so small that they will have to be grown. Deepen the seed into the soil mixture to a depth of 4 cm. In April, you can plant them in separate pots. While the nodules are developing, maintain the room temperature at +20°C. Maybe a little more, but not less.
By shoots
In this case, a shoot is taken from the main stem and placed in a nutrient substrate. As soon as the roots appear, you need to transplant it into a separate pot with a drainage layer and fertile soil.
Seeds
It is advisable not to use this method for novice gardeners, as it will be incredibly difficult to get new bushes. Even experienced flower lovers do not always produce shoots. But if you want, you can try.
Pre-soak the seeds in a growth stimulator for about 6 hours. After removing, set aside for a week in a warm place. When you notice that the seeds have sprouted shoots, plant them in a container. The planting depth should not exceed 1 cm. It is best to water the planting through the drainage hole in the bottom.
Growing garden varieties
These plants are able to effectively decorate an area with their unusual flowers, so many gardeners are happy to grow calla lilies in their garden. The clearings in which these crops grow look like an Arabic ornamental painting: the root system forms young shoots of leaves every year, and attractive arrows of flower stalks appear among them.
Speaking about caring for and planting calla lilies in open ground, you should pay attention to the fact that these plants prefer to grow in fertile soils and spacious areas. However, during the hottest times of the day, crops are recommended to be shaded. In direct sunlight, the leaves begin to wither, dry out and fall off. Therefore, next to the callas, it is best to plant trees or bushes that will provide the flowers with life-saving shade after lunch.
The soil in open ground should be acidic or slightly acidic. In addition, during care and planting, garden callas need to be provided with a good drainage layer, since stagnation of moisture in the root system is detrimental to the plant. The optimal soil composition is: sand, soil, leaf humus and peat, which are taken in equal proportions.
Diseases and pests
If you don't pay enough attention to the whitefly, diseases caused by fungal infections can occur.
- Gray rot. Develops due to high air humidity. If you notice a gray coating, use fungicides. And ventilate the room as often as possible.
- Root rot. It affects the plant due to excessive watering. In some cases, it will not be possible to save the bush. But you can try replacing the affected substrate with a new, dry one. And be sure to treat with a fungicide.
- Bacterial rot. In this case, it will not be possible to save the calla lily; don’t even try.
- Anthracnose. Leaves brown spots on the leaves. If you do not apply a fungicidal drug, they will dry out and crack. Before treatment, remove all affected parts of the plant.
A delicate flower can succumb to attack by parasites. Most often this is:
- Spider mite. It can be found on the underside of leaves. Wash the leaves with soapy water. In particularly advanced cases, the use of chemicals will be required.
- Aphid. Small green dots occupying the bush will lead to yellowing of the leaves and buds. First, try using a soap solution. If this does not help, purchase special chemicals.
Characteristics of calla lilies and species diversity
The plant is distinguished by bare flower stalks and large basal leaves. The shape of the plates is represented by arrows with variations according to the species. The color of the plates is bright green or dark green. Many hybrids have white spots on the leaves.
Calla lilies bloom at different times of the year. It depends on the type of plant. Flowers are called large ears of corn, which are wrapped in multi-colored blankets. In fact, calla blooms with small flowers, densely located on the cob itself. They give off a pleasant vanilla aroma.
Calla zantedeschia
Today, Zantedeschia is the unifying name for the species of calla lilies Ethiopian, Elliott and Rehmann, as well as their interspecific hybrids. Previously, Zantedeschia meant only Ethiopian and marsh callas. But not so long ago it was decided to unite all the beautifully flowering callas into one genus. All of the above species are grown for cutting and exported commercially from South Africa. To avoid confusion, they decided to combine them under one name.
Calla zantedeschia
Zantedeschia is also called Whitewing and Arum. In various botanical reference books you can find names derived from zantedeschia: zantedeschia, zantedeschia, tsantedeschia, tsantedeschia. In some sources, in the old fashioned way, only white flowers are called zantedeschias.
Ethiopian
Ethiopian rhizomatous calla is primarily distinguished by its root system. Unlike tuberous species, it is represented by a rhizome capable of producing a large number of offspring. This is a fairly large species that can reach more than a meter in height.
The leaves are heart-shaped and arrow-shaped and have a dense, fleshy texture. They reach half a meter in length and a quarter of a meter in width. The color of the leaves is bright green. Some varieties have white spots on the leaves.
Ethiopian
A flower blooms on a tall and powerful peduncle. It consists of a yellowish cob and a white funnel-shaped blanket, expanding upward.
The following varieties of the Ethiopian species are considered the most common:
- A green goddess with an extraordinary veil, the color of which represents a sharp transition from white to bright green.
- Childsiana is a compact bush characterized by very long flowering.
White calla lilies bloom twice a year: the first lasts from May to June, the second from September to October.
What is Calla Mix?
Some sources indicate the existence of a plant species called Mix. It is a large bush with colorful flowers. In fact, such a species does not exist. A mix is several different Zantedes varieties grown in one pot. Based on the fact that the rhizomatous species does not tolerate neighbors in its flowerpot, these are tuberous hybrids of the Rehmann or Elliott species.
Elliot
Representatives of the Elliot species are large calla lilies growing from tubers. A distinctive feature of this species are the leaves. They are quite large, heart-shaped and always have thick white specks on a dark green background.
Elliot
The original color of the bedspread was yellow on the inside and yellow-green on the outside. The cob is also yellow. After a wave of hybridization, many new colorful varieties appeared:
- Vermeer with carved wavy leaves and an unusual color of the bedspread - on a white background it looks like a wide purple stroke has been drawn.
- The black-eyed beauty is a creamy blanket with a dark purple center.
The classic representative of the species is the Yellow Corner variety.
Remanna
Representatives of this species are miniature tuberous flowers, the height of which does not exceed half a meter. The original bright pink bedspread served as a good material for creating chic hybrids of lilac, purple and almost black.
Remanna
The most interesting varieties of the species are the following hybrids:
- Evening with dark purple, almost black flowers.
- Indian Summer - this variety is distinguished by an unusual garnet tint of its bedspreads.
- Chameleon is a combination of peach and golden shades in the color of the bedspread.
Many of Rehmann's species have speckled leaves, similar to Elliot's species.
Care errors
If you are not lazy and properly care for your calla lily, it will look young and beautiful. If the grower does not act correctly, the appearance of the flower will deteriorate significantly.
- Calla does not bloom. Due to lack of light and fertilizing during the growing season. If you haven’t replanted a flower for a long time, it won’t lose color either.
- The leaves dry out and turn yellow. Possible overmoistening of the soil mixture and low temperature in the room. The same symptom will be observed in dry air and too high a temperature.
Forcing domestic varieties
Homemade callas are grown at air temperatures from 22 to 25 degrees in the summer. In winter, the air temperature in the room should drop to at least 14 degrees. Plants prefer to grow in a well-lit place, but must be protected from direct sunlight in the afternoon. Calla lilies should also be protected from drafts.
Soil for domestic varieties should have an acidity of about 6 pH. It is recommended to add peat with sawdust or sphagnum moss to the nutrient soil.
The tuber for forcing should be about 6 cm in diameter. It is planted with the convex side down in a pot, the diameter of which should be at least 25 cm. The tuber is planted to a depth of 5 cm. After planting, the soil must be watered with a fungicide solution.
Folk signs
This noble plant is even mentioned in the Bible. It turns out that it was the calla lily that grew near the cross with the crucified Jesus. Therefore, it is considered a good sign to keep a pot with a coil in your home. He will definitely bring faith, purity and good luck to the house.
Calla can protect your home from bad energy. If there is a quarrel between husband and wife, you should bring the flowerpot into the bedroom, and soon they will make peace. And if you place a pot near a sick person’s bed, he will invariably get better.
The presence of calla lilies in the office will facilitate successful negotiations and conclusion of deals.
Replanting an indoor calla plant
Planting and maintaining the house is easy. In March, rhizomatous callas are transplanted into larger pots. Any nutritious soil with plenty of peat will do. For example, a mixture of leaf, turf soil, peat and sand in a ratio of 1:1:1:0.5. Sand plays an important role for potted plants. The admixture of sand gives the earth looseness, warmth, and freshness. It is advisable to use coarse river sand washed in clean water.
When replanting, remove the remains of dried leaves.
Kinds
We are used to seeing white callas. They look noble, and a snow-white blanket envelops the inside of the flower, which can be yellow, pink, greenish or orange. They usually bloom in May and are pleasing to the eye until the end of summer. They have rhizomes.
Mixed callas surprise with perianths of various colors and shades. The breeders tried to ensure that there were a great many of them. They belong to tuberous crops.
At home, they most often contain the following types:
- Elliott is a profusely blooming species with a contrasting color: greenish on the outside and yellow on the inside, with white spots scattered on the leaves;
- Ethiopian - the leaves grow up to 45 cm in height, and the stem and flower on it stretch up to a meter;
- remanna - grows up to half a meter, possessing bright pink and red flowers;
- amethyst – has a pleasant aroma and violet flowers.
Be sure to try growing these beautiful elegant flowers at home. You can use them to form bouquets and present them to your loved ones or brides. Just a little attention to the plant, and it will repay with beautiful and lush flowering.
Calla (calla) - what kind of flower is it
White classic variety
White callas are quite common all over the world, including in Russia. Here they are found almost throughout the entire territory - from the European part to the Far East, in temperate climates and more southern latitudes. The plant can be seen especially often along the banks of rivers and lakes, and sometimes in swamps.
Brief description of what it looks like
In general, the calla flower is simple, but at the same time very graceful and elegant. Large leaves, planted on long stems, rise above the ground by 5-100 cm, depending on the variety.
Flowers in the wild are quite small - usually no larger than 1 cm - and are always only white. They are shaped like a funnel - narrow at the base, they gracefully expand towards the top. But the varieties bred by breeders can boast not only larger flowers, but also a rich selection of colors.
There are not only white flowers, but also yellow, red, orange, pink, purple and even black flowers. It is not surprising that calla lilies in a pot can decorate any windowsill, not to mention the garden.
For reference! The old Russian name for calla lilies is whitewing. However, today this name is almost never used. But the Latin term zantedeschia is often used.
Planting a plant
Growing calla lilies in the garden requires preliminary preparation of planting material. Country stores offer a large selection of a wide variety of tubers and rhizomes. They are purchased in advance and stored until spring in a dry place at a temperature of 5-7 degrees. At higher temperatures, tubers begin to actively germinate.
When to plant callas in open ground in the spring and how to prepare the tubers? Preparation of rhizomes and bulbs begins in April. First, you should remove all rotten, dried specimens. All high-quality tubers are treated with a fungicide and planted with the tubercle up in flower pots for germination. The container is filled with nutrient substrate. The tubers need to be buried a couple of centimeters. Sprouts appear at a constant temperature of 20-22 degrees.
Before planting the tubers in the garden, the plants are hardened off. To do this, they are taken out to the balcony, terrace or garden every day for a few minutes. Every day the time is increased.
With the onset of warmth, hardened plants are planted in open ground, maintaining an interval of twenty centimeters. Medium-sized callas are planted at a distance of forty centimeters from each other, and tall ones - half a meter.
When transferring calla bulbs from a pot to a planting hole, you should be careful not to damage the root system. After transshipment, the rhizomes are watered.
You can plant plants without prior germination. This is done as soon as the threat of return frosts has passed. However, this method does not allow you to enjoy early flowering.
How to choose planting material?
To plant calla lilies, tubers or divisions of rhizomes are most often used, less often well-ripened seeds. It should be taken into account that during seed propagation, the characteristics of the variety are not fully inherited, especially if it is a hybrid, while vegetative methods of propagation guarantee the transfer of the appearance of the mother plant to young seedlings.
Important! Please note that such popular types of calla lilies as Elliota and Remani are propagated by tubers, while the magnificent Ethiopian calla lilies are propagated by division of rhizomes.
To get a good result when choosing planting material, you must follow a few simple rules:
- Purchase tubers or cuttings from a reliable , certified manufacturer . This will ensure varietal purity and healthy material.
- The tuber should be dense, tight, without dents, damage, brown patches of fusarium damage or wormholes.
It is also better to avoid purchasing overdried, wrinkled tubers. Advice . Carefully inspect the acquired tubers or rhizomes, clean the damaged parts, remove the affected roots, sprinkle the cut areas with foundationazole powder. - It is necessary to have one or more clearly visible sprout buds or completed sprouts of light green or white color, without yellowing, rotten or dried out tips.
- The rhizome cutting should be clean, with flexible, intact roots , without rotten areas. If leaves are present, it is important to ensure that there are no round, light brown anthracnose spots on them.
Important! Gray rot is a real scourge of moisture-loving calla lilies. This disease can be suspected if there is a gray fluffy coating on any part of the plant, under which rotting areas appear.
Childsiana
One of the most popular varieties of Ethiopian Calla has magnificent funnel-shaped white flowers, the center of which stands out in orange. These rather compact plants are leaders in indoor culture and, thanks to the snow-white cover of the inflorescences and abundant flowering, are often used in flower arrangements.
Planting calla lilies in open ground
Selection of planting material
When choosing a variety of garden callas, you need to consider several different options and decide on the most suitable one, which will please you the most in appearance and will suit the growing conditions. The most popular and widespread varieties among gardeners are calla “Ethiopian” and “Rehmanni”. These varieties are considered very capricious, but have all the decorative qualities. Large, eye-catching flowers rise on the stem at a height of about one meter and bloom for a long time.
Germination of tubers
Tubers of garden calla lilies are pre-planted as seedlings. This method is considered more effective. Germination can begin in early spring (around the end of March). To plant each tuber, you need to choose an individual small flower pot or a large container for all the planting material. The soil mixture is suitable for universal purposes, intended for flowering indoor plants or seedlings. Plantings must be watered regularly 2 times a week.
It is recommended to subject sprouted tubers to hardening procedures, starting approximately a week before transferring the tubers to an open area. To reduce the risk of stress in plants during transplantation and to preserve the root part, it is recommended to use the transshipment method with complete preservation of the earthen clod.
SEASON 2022: WE CHOOSE AND PLANT CALL LIAS ACCORDING TO THE INSTRUCTIONS - FLOWERING IS GUARANTEEED!!! / Garden guide
Landing rules
Calla lilies are planted in prepared beds in May, when frosts have passed. Before planting, the tubers must be prepared by keeping them in a solution of potassium permanganate for about half an hour. After processing, they are carefully examined for lesions. Such areas should be cut off, and the sections should be covered with green paint and dried. If the tubers are dry, they should be wrapped in a damp cloth for a couple of days until they become dense again. In addition, before planting, you can treat them with specialized fungicides. This will protect the plants from infection.
In the garden plot, it is recommended to choose only sunny places for planting callas or, in extreme cases, semi-shaded ones. Flowers love warmth and abundant light, and even in slight shading, their growth and development changes slightly in a negative direction. Although these capricious flowers can get burned from the scorching rays of the sun during the midday hours, it is better to shade their leaves during this period of time. The landing site should not be in drafts.
It is desirable that the soil is fertile and has a low acidity level. Before planting, the soil should be dug well, simultaneously introducing the necessary nutrients into it. A complex mineral composition (about 35 g per 1 sq. m) is suitable. For tubers, prepare holes about 5-10 cm deep, maintaining a distance between them of about 30-40 cm. The tubers are placed in the holes, covered with soil and the bed is watered abundantly. It is not recommended to heavily compact the soil on the surface of the planting hole. After this, watering is stopped for about a couple of weeks.
The appearance of sprouts will take some time - do not dig up the flowerbed to make sure the tubers are viable. Until the calla grows roots, shoots will not appear. Typically, sprouts begin to hatch 2 weeks or even a month after planting.
Garden callas are not planted before winter: the plants do not overwinter in open ground.
Storing callas in winter
In mid-latitudes, callas cannot overwinter in open ground. Dead foliage should be removed and tubers dug up. They are washed thoroughly and dipped in a solution of potassium manganese for half an hour. Then the tubers must be washed again and kept in a dark place until they dry. The tubers are then placed in paper bags and stored in a cool place, for example, in a vegetable drawer in the refrigerator.
The dug up rhizome should be stored in a cool place, but it can also be stored as tubers. However, it must first be slightly dried and the foliage removed. You need to check how the planting material is doing once a week. So, if the temperature is too high, it will begin to dry out, and if the humidity is high, rot may appear.
A houseplant is usually left in a container during its dormant period. It is transferred to a cool loggia or veranda. In the case when calla lilies are deliberately deprived of a period of rest, provoking its further growth, this leads to a lack of flowering.
Storing calla tubers in winter. Store the tubers in the winter call.