Kniphofia (Kniphofia) is a herbaceous perennial belonging to the Asphodelaceae family. It grows naturally in Madagascar and Africa. The genus consists of 75 species. Their cultivated hybrids are grown in the garden. The botanist I. I. Kniphofa was the first to describe the beautifully flowering plant. Kniphofias are thermophilic, so they grow best in the southern regions.
1.Description - what the flower looks like
The genus Kniphofia, Tritoma or Kniphofia includes perennial flowering plants with numerous, bright green leaves collected in basal rosettes. The rhizomes are short and thick.
The leaf blades are glossy, linear, entire or covered with very fine teeth, slightly bent along the central vein. The leaves can reach 90 cm in length.
In late spring - early summer, the bushes throw out several vertical flower stalks with multi-flowered inflorescences at the top. The inflorescences are spike-shaped, 10–20 cm long, and consist of several dozen tubular flowers. The surface of the buds is covered with sparse pubescence.
Gradually opening, the flowers often change their color from rich red to light yellow, due to which the inflorescences are often colored in several shades at once. In appearance, the inflorescences resemble burning torches, which is why European flower growers gave the plant another name - “torch lily.”
After flowering, achenes are formed - capsules containing small, black seeds. Among the 75 species included in this genus, both evergreen and deciduous plants are found.
The plant received its name in honor of Johann Hieronymus Kniephof (1704-1763), a German physician and botanist.
↑ Up,
Height . Depending on the type, plant height can range from 25 cm to 2 meters.
Kniphofia: plant description and characteristics
Kniphofia flower: plant photo
Growing in its usual natural environment, kniphofia remains green all year round. The height of kniphofia varies between 0.6-1.5 m. But a species such as Thompson's kniphofia can grow up to 300 cm in height. Kniphofia has a short, thick rhizome and long sword-shaped leaves that make up a basal rosette. Its leaves are often used to decorate bouquets. From the middle of each rosette grows a peduncle, which in shape can be compared to a spike or lupine. The inflorescence consists of small scarlet and yellow flowers. Kniphofia has one interesting feature: the buds of its flowers are painted red or coral, and the flowers themselves are yellow. Kniphofia begins to bloom in mid-summer. After flowering ends, kniphofia bushes do not lose their attractive appearance.
2.When does kniphofia bloom?
The flowering period begins in May - June and lasts a very long time. Tubular buds, opening sequentially - from the base of the inflorescences to their tops, prolong the flowering time.
Some varieties are able to bloom in August and September. With timely pruning of flower stalks with wilted buds in the summer months, re-blooming in the fall is possible, although it will be less abundant. Often such flowering is interrupted by frost.
↑ Up,
Features of winter care
For the Kniphofia plant, care and cultivation depend on the climate zone. Thus, in middle latitudes, a long-lived flower can delight with its flowering for no more than 2-4 years. At the same time, in the south its life expectancy increases significantly.
Hydrangea Grandiflora - description, planting and care in open ground
For the Middle Zone, where in winter the air temperature drops to −22-25 °C, it is especially important to prepare for the upcoming frosts. So, immediately after flowering, all flower stalks are removed. With the onset of frost, the leaf plates are tied and covered with a thick layer of peat. Spruce branches made of spruce branches are laid on top and covered with waterproof material.
Note! For covering, you can use roofing material or a special covering film.
In the spring, the entire structure is removed. Damaged and frostbitten leaves are removed.
Varieties and types:
3.1. Kniphofia berry - Kniphofia uvaria
A fast-growing evergreen perennial up to 150 - 180 cm high with large inflorescences that change shade from pink to yellow as they bloom. The flowering period for this species begins in May - June and lasts until the first frost. Plants of this type will feel best in the southern regions.
↑ Up,
3.2. Hybrid Kniphofia - Kniphofia x hybrida
Plants are called hybrid. obtained from crossing different species. Positive features of such specimens include increased resistance to frost, long-lasting and abundant flowering. Hybrids are bred to improve the characteristics of species plants. The disadvantage of such plants is that when grown from seeds, most daughter bushes will not inherit the varietal characteristics of their parents.
↑ Up,
3.3. Kniphofia Flamenco - Kniphofia flamenco
Plants of this variety reach a height of 60 to 90 cm and are characterized by very long flowering. The flowering period begins in the first half of June and often lasts throughout the summer.
↑ Up,
3.4. Kniphofia Alcazar - Kniphofia alcazar
The shoots of this flowering perennial reach a height of 60 - 80 cm and bear at the tops large, oblong inflorescences consisting of orange, delicate buds. The first buds form already in May.
↑ Up,
3.5. Kniphofia Tucka - Kniphofia tuckii
This species is characterized by high frost resistance; these plants are easily grown in the conditions of the Middle Zone. The height of these perennials is usually 70 - 90 cm. Numerous candle-shaped inflorescences of plants are formed in May - June. Perhaps this is the only species that can be left for the winter in the open ground, provided there is good shelter.
↑ Up,
3.6.Kniphofia Flaming Torch
Plants of this variety reach a height of 120 - 150 cm; during the flowering period they decorate themselves with large multi-flowered inflorescences, consisting of several dozen drooping tubular flowers. The color of the inflorescences changes as they bloom from light green to burgundy. Flowering occurs in late spring.
↑ Up,
3.7.Kniphofia Ice Queen
A characteristic feature of this variety is the presence of light inflorescences consisting of greenish or lemon-yellow flowers. As they fade, the lower buds turn white. The bushes reach a height of 120 cm, the flowering period begins in the first half of June.
↑ Up,
General description with photo
Planting and caring for Kampsis in open ground, reproduction and cultivation
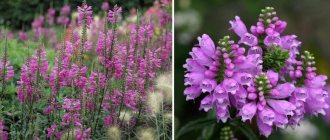
Initially, the Kniphofia genus was assigned to the Liliaceae family, however, after a refined systematization, it was assigned to the Xantorreidae family. It is an evergreen decoratively flowering perennial with a dense basal rosette formed by dense narrow arrow-shaped leaves. In mid-summer, a tall bare peduncle shoots out from the center of this rosette, at the top of which a plume-shaped or racemose dense inflorescence of the original type is formed.
The flowering itself is interesting and unusual. The buds that look like small bells in different varieties can begin to bloom both from the bottom of the inflorescence up and from the top down. As they open, they can change their color several times in the palette characteristic of this species. For example, from red to orange, then to bright yellow and finally becoming light lemon. Moreover, as flowering progresses, this metamorphosis in individual specimens can occur several times.
The plant can also be found under other names: tritoma, kniphophia or notosceptrum.
4.Planting and care in open ground
Since Kniphofia grows in hot and dry areas, it should be given a sunny and warm location in the garden.
An excellent solution would be to place plants on the south side of buildings and structures. Heating up during the daytime, the walls of buildings will give off additional heat to the flower at night. Make sure that moisture from the roof does not reach the ground in this area.
To obtain additional heat, you can use large stones - during the day they will accumulate solar heat, and at night they will gradually release it to the flowers. Direct sunlight should hit the bushes for most of the day.
↑ Up,
Plants prefer a slight drought rather than constantly moist soil, so planting should be done in light soils with a high content of river sand.
Flooded areas and dense clay soils that hardly allow moisture to pass through after watering or rain are not suitable for planting. The plant loves nutritious soils with a high content of well-rotted organic matter - peat, animal manure or humus.
↑ Up,
4.1.How and when to plant
Seedlings are planted in the garden only in the second half of June - early July, when the weather is consistently warm. In a cool and humid atmosphere, plants die easily.
The seedlings are first hardened off for 7-10 days, acclimating them to new living conditions. To harden, flower pots are taken outside and left there for 2 - 3 hours. Gradually, the time of such hardening is increased.
For young plants, it is worth choosing a semi-shaded location, and in the second or third year, move them to a brightly sunny place.
↑ Up,
To grow a flower, prepare a plot of land - dig it with a shovel and weed it out of weeds. The soil is mixed with river sand and food is added - rotted organic matter, wood ash or mineral fertilizers for flower crops.
For planting, planting holes are made, the distance between which will depend on the size of the plants and the planting pattern. As a rule, about 30 - 40 cm of free space is left between low-growing varieties, while for tall varieties and species it is worth leaving a distance between holes of 60 - 80 cm.
The depth and width of the holes should slightly exceed the size of the root system. It is advisable to place a drainage layer in the form of river sand at the bottom of the holes - it will prevent the occurrence of root rot due to stagnant moisture.
↑ Up,
The day before planting, water the plants abundantly, allowing the substrate in the pot to become soft. Seedlings are planted using transshipment, keeping the root ball intact. Make sure that the crown of the plants remains level with the ground.
The planted bushes are watered, and the soil around them is lightly compacted to remove air pockets. After planting, you can put a small layer of mulch on the site, consisting of sawdust, small pieces of bark or straw. Mulch should not prevent air from penetrating into the soil - the plant’s root system should breathe.
↑ Up,
When planted with rhizomes, during the first 2 - 3 weeks the plants often show no signs of growth - at this time the root system is actively growing under the soil surface. Only when the plants are well rooted does the formation of the above-ground green part begin.
In the first year, kniphofia usually grows leaves and roots; the first buds will decorate the bushes only in the second year after planting.
↑ Up,
4.2.How to care
Plants grown in the garden will need timely watering, fertilizing, loosening the soil and weeding. Periodically, to maintain an attractive appearance, the flower stalks with withered buds are cut off with sharp pruning shears. This pruning stimulates plants to form new inflorescences.
Sanitary pruning is carried out in the spring - leaves damaged in winter and old, dying leaf blades are cut off.
↑ Up,
Water the flower only when the soil dries out, if the weather has been dry and hot for a long period of time. Watering is carried out with warm water in the morning or evening. Watering during the day is not advisable - moisture evaporates too quickly from the surface of the soil, without having time to penetrate into the depths.
When watering, make sure that moisture does not get into the axils of the leaves and onto the flowers and buds. After watering, the soil is usually loosened and the area is weeded to remove weeds.
Tall varieties and types of flowers will need support - gusts of wind can easily break the flower stalks.
↑ Up,
4.3.Fertilizer
Kniphofia responds well to both mineral compounds and organic matter. They add food only 2-3 times per season. The first fertilizing with nitrogen mineral fertilizers is carried out with the appearance of the first leaves - such compositions will help plants quickly form green mass.
As soon as flower stalks appear, you can add potassium and phosphorus compounds for flowering plants. After flowering, potassium fertilizers are applied to strengthen the root system - for example, wood ash is added.
↑ Up,
4.4. Shelter for the winter
In order for the wintering of kniphofia to be successful, the plants should be properly prepared for it. In the autumn months, when the air temperature at night often drops below zero, the long leaves of the flower are tied into a bundle and laid on the ground. You can also braid the leaves instead of tying them. Peduncles are cut at the base with a sharp sterile pruner.
For insulation, the bushes are sprinkled with a layer of humus or peat. Dry fallen leaves or spruce branches are placed on the mulch. In order to protect the plants from excess moisture, an additional plastic film or piece of slate is placed over the spruce branches.
↑ Up,
The shelter is removed when the snow melts and the top layer of soil warms up sufficiently. Unfortunately, plants do not always survive winter; most often the cause of death is a large amount of melt water or untimely removal of the cover, as a result of which the flower simply withers away.
Not all species have good frost resistance - Kniphofia Tukka feels best in the conditions of the Middle Zone.
↑ Up,
4.5.When to dig
In order to preserve kniphofia rhizomes for a long time, they should be dug up and placed in a cool and dry place for the winter - for example, in a cellar.
Plants are dug up in the second half of October or early November, when frosts often occur at night. The bushes are taken out of the ground and shaken off any remaining soil.
The roots are carefully examined and if there are rotten or dead sections, all diseased parts are cut off to healthy tissue. Leaf blades should not be trimmed.
↑ Up,
4.6.Storage in winter
To ensure that the rhizomes do not lose their life-giving moisture during storage, they are buried in the ground in large flower pots. During the winter, plants are stored in the basement, keeping the soil barely moist.
The air temperature in the room should be 5 - 8 degrees Celsius. Planting in the garden is carried out in late May - early June.
↑ Up,
Protection from pests and diseases
Parasitic insects and mites attack weakened plants if the African species is not properly cared for. Pests can settle on leaves and buds if there are other garden plants, berry bushes and fruit trees nearby where leaf-eating parasites live.
What to do:
- When identifying thrips and aphids, insecticides are used; acaricides are needed to destroy spider mites.
- The treatment is carried out in long sleeves, wearing a respirator and plastic goggles. Hands must be protected with rubber gloves.
- For prevention, experienced flower growers advise spraying Kniphofia bushes four to five times a season with decoctions and tinctures based on natural ingredients: garlic, onion peels, pyrethrum flowers, tobacco leaves.
Important details:
- The plant rarely gets sick, most often root rot develops - a problem associated with excessive watering. In case of severe blackening of the stem, wilting of the leaves, or the appearance of a grayish-white and black coating, the affected plants are removed from the soil.
- If the disease is in the initial stage, the affected area is small, then treatment with fungicides (powerful antifungal drugs) will help. Chemical and biological agents have a good effect.
- Fungicides are applied not only to the plant, but also to water the soil. It is important to prepare the working solution correctly so that the product has the optimal concentration. Repeated processing is often necessary to consolidate the effect.
- Work with fungicides is carried out in compliance with the same rules for protecting the body as when spraying and using the liquid form of acaricides and insecticides.
5.Reproduction
Two methods are suitable for propagating kniphofia: growing from seeds and dividing rhizomes.
5.1.Growing from seeds
In the southern regions you can get seeds from your own plants. To do this, in the summer months, during flowering, the largest and most brightly colored inflorescences are marked and marked by tying them with colored thread. After flowering, wait for the seeds to fully ripen.
The seeds are removed from the boxes and sent to dry in a warm and well-ventilated room for 2 - 3 days. Planting material prepared in this way does not lose its viability for 2 - 3 years if stored in a cool and dry place in paper bags.
↑ Up,
When propagated by seed, varietal plants may lose their attractive appearance. In the conditions of the Middle Zone, seeds rarely ripen completely.
Plants are sown using seeds at home to obtain seedlings. Sowing of seeds is carried out in the second half of March or early April. Beforehand, you can keep the seeds in warm water with the addition of growth-stimulating drugs for half an hour.
↑ Up,
Prepare seedling boxes with transparent plastic lids for planting. There should be drainage holes large enough at the bottom of the containers to allow water to drain out.
Expanded clay or small pieces of foam are laid as the first layer. Fill the box with a nutritious flower soil mixture and thoroughly moisten its surface with warm water using a spray bottle. Peat mixed in equal quantities with river sand is suitable for planting.
↑ Up,
5.1.1.Sowing
Seeds are laid out on the surface of the soil and covered with a layer of soil about 3 - 5 mm thick. The boxes are covered with lids and left in a well-lit place without direct sun access. The room temperature should be between 18 and 24 degrees Celsius.
Every day the cover is removed, the crops are ventilated and any water condensation that appears is wiped off. If you follow this agricultural technology, the first shoots may appear within 2 - 3 weeks. When the sprouts appear, the cover is removed.
↑ Up,
5.1.2.Caring for seedlings
Keep plants in a warm room, keeping the soil evenly moist, but not waterlogged. When each bush has 2 true leaves, a dive is carried out.
For seating, prepare small cups with drainage holes and a moisture-wicking layer. Fill the boxes with the same soil in which the seeds were sown.
↑ Up,
The plants are carefully lifted and transferred along with the root ball, being careful not to destroy it. After diving, watering is carried out. After 10 days, when the plants have become sufficiently accustomed to the new place, the first feeding is carried out.
Nitrogen-containing compounds are used as the first fertilizers, diluting them to a quarter of the dose recommended on the package. The plants are grown until early July and planted in the garden. The first buds will decorate such specimens at the age of 2 - 3 years.
↑ Up,
5.2.Transplantation and division
Every 3 - 5 years, adult bushes can be divided into parts; division is carried out in the first half of May. You can determine whether the bush can be divided by the appearance of small daughter leaf rosettes in the leaf axils.
Plants are dug out of the ground and cleared of soil residues. The root system is pruned, removing diseased and dead root shoots. Plants are divided into parts by hand or using pruners.
The wound surface resulting from such division is sprinkled with crushed charcoal powder for drying and disinfection. The bushes can be left in the fresh air for 3 - 4 hours to dry the wounds.
↑ Up,
The delenki are planted in a permanent place, protected from direct sun for a week. For another 2 - 3 weeks, make sure that the soil does not dry out.
Division is quite difficult and sometimes all parts of the kniphofia die. The first flowering occurs in such plants in the second year after division.
Division helps to rejuvenate the bushes, this is especially important in regions with severe frosts - adult plants tolerate winter worse than young ones.
↑ Up,
Kniphofia: growing from seeds
Kniphofia flower: plant photo
Anyone can grow Kniphofia in the simplest way - by planting seeds, through seedlings. Seeds begin to be planted at the very end of March or at the beginning of April. To plant kniphofia, take shallow boxes. They must be pre-disinfected and then filled with soil mixture for flowers. The seeds are carefully scattered over the surface of the soil, and then they are lightly sprinkled with soil on top. Then it is advisable to cover the top of the boxes with film, which must be lifted regularly to ensure access to oxygen. Before emergence, the boxes can be placed on the windowsill. They need to be watered systematically. The first shoots will appear no earlier than in 15-20 days. Until this time, you must not forget about ventilation and watering so that the soil does not dry out.
After the shoots appear, they should be under the film for some time. They should be accustomed to indoor conditions gradually. To do this, it is necessary to lift the film every day, constantly increasing the time for which the plants remain uncovered.
When the kniphofia has its first pair of true leaves, it needs to be planted in individual containers. Small glasses are suitable for this. It is worth remembering that this plant does not tolerate sudden changes in temperature; kniphofia reacts very poorly to cold weather. Therefore, the room temperature must be stable. Seedlings need to be sprayed regularly with a spray bottle. There is no need to feed the seedlings, because the mixture for planting them is initially saturated with all the substances necessary for the flower.
6.Use in landscape design
Depending on the size, tritoma can be grown both as a bright accent in the center of a flower garden (tall species), and as a border plant, serving as an edging of the borders of flower beds and garden paths.
Kniphofia can not only decorate the garden, but also does not lose its attractiveness for a long time when cut. Trim flower stalks early in the morning or evening using a garden knife.
↑ Up,
Choosing a landing site
Light-loving kniphofia will not bloom in the shade; the roots are also afraid of dampness. So, plant bushes in places with bright sunlight. Avoid low-lying areas and flooded areas; it is better to choose a site on a hill; if groundwater is close, build a high bed.
The soil must be moisture-absorbing, allowing water and air to pass through. Sandy soils pre-filled with humus are ideal (apply it for digging 30 days before planting, spending 3-4 kg per square meter of land).
7.Home care
Rhizomes can be planted in pots in the spring. Make sure there are drainage holes in the bottom of the containers and place a drainage layer on the bottom of the pot. Fill the pot up to half the volume with a nutrient substrate consisting of ready-made flower mixtures.
Your own soil mixture can be made from garden soil with the addition of leaf and turf humus, peat and well-rotted manure.
Place the rhizomes on the ground and add soil so that the surface of the soil after compaction is 1 - 2 cm below the walls of the pot. Water the plants and leave them in a warm place with good lighting.
↑ Up,
For a permanent location, it is worth choosing brightly lit south-eastern or south-western window sills. Water the flower carefully after planting, gradually increasing the amount of moisture as the leaf plates develop. After flowering, the frequency of watering is also reduced.
Since the flower in a flower pot has a limited feeding area, for abundant and long-lasting flowering, mineral fertilizers with a high content of potassium and phosphorus are applied 2 times a month. Fertilizing is carried out after heavy watering, adding fertilizers to the moist soil. In the fall, feeding is stopped and the plants are sent to rest.
↑ Up,
During the dormant period, it is worth taking the flower to a dark, cool place, reducing watering to a minimum, simply protecting the soil in the pot from drying out completely.
If the plants begin to show signs of new growth, they are again taken out to a well-lit place, replanted in fresh soil and begin to gradually water and feed.
For growing at home, it is better to choose compact varieties of kniphofia.
↑ Up,
How to grow kniphofia
Growing gumi bush: planting, care and propagation
Growing and caring for kniphofia will not cause much trouble if you immediately choose the right place. An area where water stagnates is absolutely not suitable - the plant will not bloom well, and the roots may die. But on a heated hill with fertile and drained soil, the southern beauty will take root wonderfully. You can prepare special soil: mix turf and leaf soil, humus and sand in equal parts. Stones are often placed around bushes of low-growing species. As they heat up, they will transfer heat to the ground.
Kniphofia is propagated by seeds, although in the middle zone they do not always have time to ripen. More often they use the vegetative method, planting daughter plants.
Stores often sell a mixture of several types of seeds. They should be sown towards the end of March in containers with nutritious soil. Then the plantings are covered with film and left for 14-21 days. Such a “greenhouse” will have to be ventilated and moistened from time to time, possibly by spraying. Shoots usually appear together, gradually they will get used to room temperature and acquire 2-3 leaves. In July, the stronger plants are transplanted to a permanent place; approximately 40 centimeters of distance are left between the rows and holes. Young specimens will bloom in the second or third year of life.
In 3-year-old kniphofias, daughter shoots begin to appear from the buds in the axils of the lower leaves
Then you can dig up the bushes in April or early May, carefully separate the daughter rosette with roots and plant it in the soil. Young seedlings need regular watering and light partial shade; in a year they will bloom
About once every 5 years, it is advisable to dig up the perennial and divide the rhizome.