Transplanting rhododendron in spring and autumn: which is better
Transplanting rhododendron bushes to a new location or the first planting is carried out both in spring and autumn. Of course, you need to follow some simple rules.
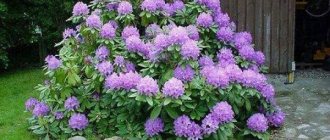
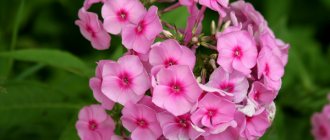
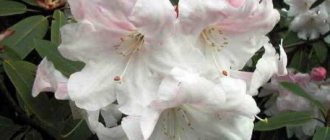
Rhododendrons - a delightful garden decoration
- In spring, rhododendron is transplanted depending on the region of growth from April to May. In warmer places a little earlier (Middle Zone), and in colder places a little later (Siberia, the Urals, etc.).
- In autumn, it is better to transplant from September to mid-October in order to be in time before the first frost.
- It is better to plant or replant deciduous shrub species only in the spring, so that they have time to take root well and survive the winter.
- In conditions of strong temperature changes and the presence of extremely low temperatures, it is also better to transplant and plant in the spring, for better adaptation to the climate.
Important! It is strictly forbidden to disturb the plant during flowering and two weeks after its end.
Features of proper care
Due to the specific roots and microflora, the time when rhododendron can be transplanted to another place is determined depending on the growing conditions of the crop. Acidic heather soil is considered ideal for azaleas. The plant should not be disturbed if it is dormant. also avoid excessive watering and frequent tugging: after changing the place of initial growth, the flower should settle down. To preserve the microflora, when planting an azalea in a new container, only the top layer of soil located near the rhizome is removed, and not the entire earthen lump.
After the rhododendron is transplanted to another place in the fall, its watering is resumed no earlier than the fifth or sixth day. For these purposes, settled or filtered water at room temperature is used. The period of acclimatization and restoration of the root system lasts about two months. By maintaining comfortable conditions, recovery occurs in a shorter time.
Azalea is a very capricious and whimsical indoor plant, so the abundance and quality of its flowering directly depends on the conditions of its maintenance. If there is a need to transplant rhododendron in the fall, you should carefully monitor the level of humidity and temperature in the room. It should also be remembered that during this period the formation of future buds and flower buds occurs. And the procedure must be carried out according to the above established algorithm, in order to avoid damage and infection of the root system.
Similar articles:
When is it better to whiten trees in the garden - in autumn or spring?
Petunia - types, care, reproduction and transplantation
A detailed description of the flowers that can be planted on…
Where to choose a place for transplantation
Rhododendrons have a shallow root system and do not tolerate excess moisture well, so it is strictly forbidden to plant them in places with stagnant groundwater, in lowlands or wetlands. It is also worth considering that the shrub is quite shade-loving, so the optimal planting location will be the northern or eastern side of the site, without direct midday sun rays.
When to transplant lilies from one place to another
A good solution would be to plant bushes under the canopy of taller trees, but only with a deep, taproot system, otherwise the rhododendron will not have enough nutrition. The plant works best adjacent to tall coniferous trees.
On the question of whether it is possible to plant rhododendrons in the sun: this planting option is possible, but only on the condition that direct sunlight does not fall on the plant from 11 a.m. to 4 p.m. Rhododendron will do well with only diffused light or light shading. At the same time, deciduous varieties prefer more sunlight than evergreen ones.
Important! It is necessary to choose places for planting where there is no strong wind, otherwise the plant may not survive the winter.
A bad place for planting would be an open area with prevailing winds, as well as places near buildings where there are frequent drafts - if in the summer the plant does not suffer much from this, then in the winter there is a high risk of the bush freezing.
Preparation of soil and containers for transplantation
It is very important to consider what kind of soil rhododendron likes: preference is given to acidic soils, with a pH of 3 to 4.5. The optimal solution would be peat soil, but you can prepare the substrate yourself. The main criteria are good air permeability and drainage, so it is important to ensure good soil looseness.
Transplanting clematis to another place in autumn, spring or summer
Depending on the type of soil on the site, the substrate is made in various ways:
- for loam, a mixture of high-moor peat, humus, pine needles and garden soil directly is suitable, and the proportion of peat should be greater;
- for sandy soils, the proportion of loam, peat and humus increases.
One of the best soil mixtures for rhododendrons, regardless of the characteristics of the underlying soils, is high-moor peat, humus, pine needles and sand in a ratio of 3:2:1:1. It’s a good idea to add about 40 grams of mineral fertilizers to it and mix thoroughly.
It is important to know! Manure, sawdust, black soil, lower peat and foliage should not be added to the substrate for rhododendrons.
If the transplant is carried out not in open ground, but in a planting container, it is necessary to select its dimensions based on the current size of the root ball, + 20-30% of the volume. This allows the development of the root system to continue. It is important to ensure good drainage to avoid water stagnation and root rot.
How to plant rhododendrons in open ground
Place in the garden
Rhododendron, like all flowering shrubs, still loves the sun (otherwise it will not bloom very profusely). However, the plant requires mandatory partial shading, especially at lunchtime, otherwise the leaves may get burned.
In other words, you need a place with light partial shade. It is great if from 11-12 am until 3-4 pm the plant is not exposed to direct and burning sunlight. Moreover, the shrub does not tolerate drafts, but it definitely needs to provide a flow of fresh air. For example, it is good to plant rhododendron near fruit trees (the same apple tree), which would slightly shade the bush during the day, at a distance of about 1.5 meters from the crown.
Note! At the same time, deciduous rhododendrons (yellow, Japanese, Kamchatka) can grow well in sunny areas, while evergreens in such open places will suffer from winds, drying out and sunburn.
As for what is best to plant rhododendrons with and create a beautiful composition, the best neighbors will be plants of the heather family, as well as conifers, in other words, all crops that love acidic soil.
Required soil
Rhododendrons can only grow in acidic soil (pH 3.5-5.5) . In ordinary neutral or even worse alkaline conditions (pH 6-7 and higher), these plants will grow very poorly, literally for 1 season, and then they wither and disappear (as a rule, they simply do not survive the winter).
Why is that?
The fact is that rhododendrons, like other heathers (blueberries), have mycorrhiza on their roots , through which they feed (receive water and nutrients), in other words, their root system develops in close symbiosis with these specific fungi. Moreover, mycorrhiza can only live in an acidic environment .
Therefore, to fill the planting hole you will need acidic high-moor peat . It is sold ready-made in garden centers or you can dig it up in a forest swamp.
You will also need coniferous litter (these are needles and twigs of coniferous trees that have fallen on the soil, for example, there is pine litter), you can also collect it in the forest, and you need to collect it not dry (it should be discarded), but rather loose and smelling of mushrooms. These components must be mixed in equal parts .
Advice! However, first you should find out the acidity of the soil in your area .
Or you can simply purchase special ready-made soil for heather, azaleas or rhododendrons .
In this case, the soil must be well -drained, moisture- and breathable .
If the soil is too heavy and clayey, in other words, the moisture will stagnate, then the bushes will simply die, the same applies to nearby groundwater (closer than 1 meter).
Planting pit
Despite the fact that a rhododendron pot is usually small, the planting hole needs to be large enough; it should be about 3 times larger than the root system of the seedling. dimensions are as follows: depth - from 50-60 centimeters, width - 60-80 centimeters, depending on the size of the seedling and soil.
Important! If the soil on your site is clayey, then a 5-10 cm drainage layer should be laid at the bottom. You can use any inert substance as drainage, that is, gravel, crushed stone, and coarse sand are suitable.
If you want to plant several rhododendrons nearby, it is advisable to do this at a distance of at least 1 meter from each other.
Video: personal experience of growing rhododendrons
Direct landing
Step-by-step instructions for planting rhododendrons in open ground:
- Choose the optimal location in your garden plot.
- Prepare the planting hole and soil mixture to fill it.
- Fill the hole halfway with soil (do not add any heaps!).
- Gently knead the pot, pull out the seedling along with the earthen lump and place it on the ground.
- The root collar of the plant should be slightly above ground level, so either add or remove soil from the hole. The fact is that these ornamental shrubs do not like to be planted with the root collar buried.
- Fill the remaining space with nutritious soil mixture, and then compact it slightly.
- Pour liberally from the watering can, wait a little for the soil mixture to settle, and then add more soil.
- All that remains is to mulch the hole with the remaining pine litter or pine bark (about 3-5 centimeters), fresh pine sawdust . Mulch will help retain moisture and prevent the soil from overheating.
Advice! It will be very beautiful if you mulch the surface of the soil with cones.
Video: how to plant rhododendrons
Choice of neighbors and transfer distance
In order for the bushes to grow and develop well, it is necessary to choose the right place with favorable “neighbors”.
Why do rhododendron leaves turn yellow and what to do?
An ideal neighborhood would be to plant next to conifers such as larch, spruce or pine. In the garden plot, apple trees, cherry trees, pears and oaks will be good neighbors.
Important! It is strictly forbidden to place plants next to elms, birches, maples, chestnuts and lindens.
Another aspect to consider when planting is the distance between rhododendrons and their neighbors. Thus, it is necessary to retreat at least one and a half meters from buildings, and at least 2 meters from large trees and shrubs. A distance of 1.5-2 meters should be maintained between the bushes themselves.
Transplant technology step by step
Caring for rhododendron in open ground
In order for rhododendron to grow well and bloom profusely in your summer cottage, it needs proper and timely care.
Rhododendron, like all heathers, does not tolerate drying out of the soil. And the peat mixture in which this shrub grows dries out very quickly, especially in the summer when the weather is hot. Therefore, it is worth paying regular attention to the plant and watering it .
Soil moisture is also very important for rhododendron.
Advice! In the first 2 years, it is highly recommended to do surface spraying in dry weather, in other words, water directly over the crown.
Weeds should not be allowed to grow in the tree trunk of the bush. To avoid this, it is recommended to mulch the tree trunk circle even at the planting stage and, if necessary, add additional mulch, as well as weed and loosen.
Top dressing
In early spring, to feed rhododendron with any nitrogen-containing fertilizer . For example, you can prepare a solution of ammonium nitrate (20 grams per 10 liters), or even better, use a more acidic nitrogen fertilizer - ammonium sulfate .
If your rhododendron bloomed profusely, then mandatory summer feeding is required to replenish its strength.
As for such fertilizing, it is advisable to do 2-3 fertilizing with acidic fertilizers during the summer. Ready-made fertilizers for azaleas, rhododendrons and other heather crops are excellent for this .
The second (potassium-phosphorus) feeding of rhododendrons in the summer should be done at the end of July. For this you should use potassium sulfate (20 grams per 10 liters of water), as well as superphosphate . (30 grams per 10 l).
Important! Never feed your rhododendrons with wood ash! This potassium fertilizer has an alkaline reaction .
At the end of flowering in the first 2-3 years, it is advisable to quickly and carefully remove faded inflorescences so that rhododendrons do not waste energy on producing seeds.
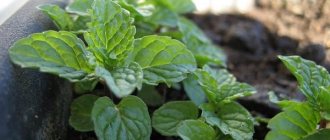
After the rhododendron has flowered, if it feels good and you take care of it properly, it will definitely produce young shoots. If they do not appear, then this is a clear signal that the care is incorrect or insufficient (for example, watering).
Video: caring for rhododendrons
Rhododendrons are quite winter-hardy (withstand temperatures dropping from -25 to -40 degrees), however, in the event of a snowless winter, the plant may freeze, so it is advisable to cover the tree trunk with a layer of mulch of 5-8 cm (for example, fresh pine sawdust ).
Note! You can read more about caring for rhododendrons in the fall and preparing them for winter in this article .
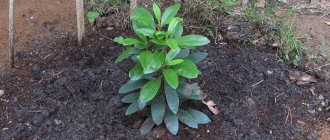
How to transplant a rhododendron to a new place
First of all, you need to dig a suitable planting hole for rhododendron: its depth should be about 30-50 cm, depending on the size of the root system, and its width should be 50-80 cm. A drainage layer is poured into the bottom of the hole, then the seedling is tried on: it is necessary to take into account that the root collar of the plant cannot be covered with earth, so it should rise 3-5 cm above the total surface of the earth.
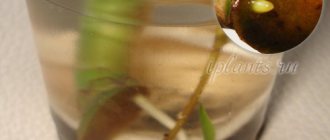
Before transplanting a rhododendron bush to another place, it is necessary to moisten the root system abundantly: if the root ball is dry enough, then it should be placed in a container with water for an hour or two, until air bubbles stop rising from the roots.
The finished drained hole is spilled with water to shrink the soil, then a bush is planted in it and covered with the prepared substrate. The plant is watered abundantly in the circle around the trunk - if the soil shrinks, then the substrate is added to the required level.
Important! The final stage is to carefully mulch the soil from pine needles, peat or foliage in a layer of up to 6 cm. The newly planted plant is shaded for 7-14 days, and in case of winds, a support is installed.
Second transplant to a permanent place
Rhododendrons tolerate transplants well, both in the first years of life and in adulthood. Usually, after growing a small bush at home, the plants are planted on a common ridge to grow and gain strength, and already in the 3-4th year of life they are planted in a permanent place of growth.
Regardless of the number of transplants, the general requirements for them are the same, so any manipulations are carried out according to a standard algorithm.
Instructions for planting rhododendron
- Dig a planting hole: depth – 31-41, and width – 55-75 cm (deeper and wider than the root ball twice). The dimensions are due to the fact that the root system grows wider than deep.
- At the bottom, make a drainage layer - 8-10 cm of broken brick (red only), crushed granite, sand, pebbles or small gravel.
- When planting a seedling, water it generously, and if the container contains a dry earthen lump, then soak it for 60-150 minutes (until air bubbles stop coming out) in water to saturate it with moisture.
Soaking the root ball of a rhododendron seedling before planting - Try the seedling in the hole (neck at ground level) and add soil mixture. Remove the seedling and water the hole with 5-6 liters of water to settle the soil and saturate the lower layer to increase survival rate.
- Place the seedling at the required depth - the root collar should be at ground level (the same as it was in the container). But due to the fact that the substrate will sag, you need to raise it by 3-5 cm when planting. If you plant it higher, the bush will freeze more in winter and overheat in summer, and if it is too low, it will begin to rot and bloom poorly. Gradually pour and compact the soil mixture on top and sides so as not to leave an air cushion.
Planting depth of rhododendron seedling - Water a 30-40 cm seedling with 6-8 liters, and a 60-90 cm seedling with 10-12 liters of water in the tree trunk circle so that the soil is moistened to a depth of 20-25 cm. If the soil settles strongly, add substrate.
- Be sure to add a 6-8 cm layer of mulch from peat, pine needles, heather soil or birch, oak or linden leaves on top to retain moisture, increase acidity and the amount of humus. But do not cover the very base of the flower (root collar), so as not to provoke damping off of the bark in winter. It is better to sprinkle it with coarse sand to prevent rot from stagnant water.
- Shade the seedling for 7-12 days, depending on the weather, with a newspaper cap or cloth.
- When planting one specimen, provide support for the first 2-3 months so that it is not swayed by the wind. The stake must be driven into the ground at an angle, towards the prevailing winds, and the seedling must be tied to it.
Rules and tips
- It is better to dig the planting hole and fill it with soil mixture in advance. If you plant in the spring, then in the fall, and if in the fall, then 2-3 months before planting.
- It is better to plant rhododendron in cloudy and damp weather.
- When planting a seedling in a container, you need to carefully trim the outer roots (“felt”), which have died due to prolonged contact with the walls of the container. Otherwise, it will be difficult for young roots to break through their layer to the soil. You can make 3-4 cuts across the root ball, and then straighten the roots down and to the sides. There is no need to completely destroy the lump! At the same time, many gardeners note that there is no difference, and you can plant a whole clump from a container without manipulation.
- It is better to plant 2-3 year old seedlings in a quiet and shady place so that they do not suffer from moisture deficiency. The width of the hole is 30 cm, and the depth is 20-25 cm. In the 4-6th year, transplant the bush to a permanent place according to the basic instructions. This method is especially important to use if the permanent location is located in a windy and sunny area of the garden.
- If a bush being planted in a permanent place has buds, then it is better to remove them (except for 2-3 pieces to evaluate the beauty) so that it takes root better.
How to feed the plant
When rhododendron is transplanted, a small amount of mineral fertilizers is already added to the soil mixture. The next feeding is done 3-4 weeks after planting, when the plant takes root.
In the spring, before flowering, plants are fertilized with organic mixtures - blood meal, half-rotted cow manure or horn meal. You can infuse the manure for 3-4 days in water, and then water the ground around the bushes with the resulting slurry, but first moisten the ground well with plain water.
Mineral fertilizers that do not contain chlorine - superphosphates, nitrogen, phosphorus and sulfate substances such as potassium, calcium, ammonium, magnesium - have a good effect on the growth and development of shrubs.
Important! In summer, from mid-June until September, fertilizing is not carried out.
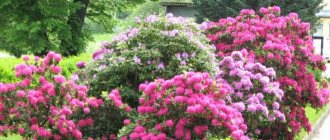
Proper transplantation is the key to good growth, development and flowering of the bush
Caring for rhododendron after planting
In the first year after planting or transplanting, the seedling needs regular watering. It is especially important to water and spray frequently in hot weather from April to August, because the seedling has a small root ball and dries out quickly.
Every 2-3 days, water with 4-6 liters of water, and it is advisable to spray every day.
There is no urgent need for fertilizing; timely watering is much more important, but it is advisable to apply complex mineral fertilizer after rooting (15-20 days after planting). Apply 30% of the recommended dose for an adult plant.
The compositions of fertilizers are given in the article on plant care - see the bottom of the page.
In the fall, be sure to mulch and cover for the winter with spruce branches or covering material (lutrasil, agrofibre). Drive stakes around the perimeter of the bush and wrap around them.
Difficulties and problems
With a competent approach, no difficulties should arise, especially if you take into account the timing when you can transplant rhododendron from one place to another, and the locations of the bushes themselves.
Important! One of the recommendations that can help avoid problems is to pay attention to the internal compass of plants: when replanting, you need to take into account the orientation of the bush to the cardinal points and place it in a new place in exactly the same position - this will reduce stress and allow you to adapt faster.
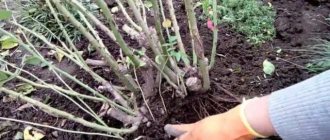
A common difficulty for gardeners is also often digging up a bush from its usual place, so it is better to follow some simple tips:
- thoroughly moisten the soil before digging up the plant;
- carefully loosen the soil with a pitchfork or rake at a distance of up to 80 cm from the base of the bush;
- Using a pitchfork, dig the soil around a circle 100 cm from the root collar and to a depth of 30-40 cm.
This scope is taken in order not to damage the superficial and widely spreading roots of the bush. After which the bush can be carefully removed from the ground and transported to a new planting site. If there are dried roots, they can be cut off, but the main thing is not to deprive the root system of its usual earthen coma.
When can a rhododendron be transplanted to another location? If it has grown greatly or needs more favorable conditions, or it can be done simply at will. Different types of rhododendrons are the same in one thing - they are not afraid of transplantation, and if you follow simple technology, the plants will remain grateful and will delight you with lush flowering for a long time.
First aid for rhododendrons. Replanting and pruning
Photo by the author. A lot of time has passed since the publication of the first part of the article about rhododendrons. You have questions, and I have some thoughts on caring for the “aristocrats” of the garden. The coming spring season, naturally, also revealed errors that need to be worked on, but more on that a little later. To begin with, I will try to answer in more detail the questions that you asked in your comments.
Why do evergreen rhododendrons' leaves turn yellow and fall off?
Here we are not talking about any fungal diseases that are expressed in varying degrees of leaf spotting, but rather about complete yellowing of the leaf blade. This natural process occurs en masse in rhododendrons starting around mid-August. The fact is that the leaves of evergreen rhododendrons do not live forever, but only 2–4 years. It’s not surprising to you that pine and spruce trees shed old needles every fall, just as rhododendrons get rid of old leaves to give life to new ones. The more stressful conditions the rhododendron finds itself in, the shorter the life of its leaves. Usually the leaves turn yellow and fall off at the bottom and in the depths of the crown, thereby contributing to its lightening. I still recommend not leaving fallen leaves under the crown, but collecting and burning them in order to prevent diseases. But the yellowing of the leaves not entirely, but only between the veins, is a manifestation of ordinary chlorosis caused by a lack of magnesium and iron in the diet. This happens in both deciduous and evergreen rhododendrons. There may be several reasons for such fasting. Firstly, there is a basic lack of the elements iron and magnesium in the soil. The fix is easy - use specialized fertilizers for rhododendrons with microelements. A couple of times a season, in May and until the end of June, apply foliar fertilizing with “Ferovit” and “Tsitovit” (in turns, with an interval of 10 days), add “Zircon” to the solution as an immunostimulant and “adhesive”. Secondly, the pH level of the soil shifts towards an alkaline reaction, as a result of which the rhododendron cannot absorb the iron it needs so much. Nowadays, easy-to-use soil acidity testers are available for sale. Take advantage of them. In principle, annual mulching with acidic high-moor peat and the use in the spring of special fertilizers for rhododendrons, containing a large percentage of “acidic” components, namely ammonium sulfate and sulfur, and in early autumn - potassium sulfate, solves this problem. It is worth recalling that the best water for watering rhododendrons is rainwater or from natural reservoirs. The third reason for chlorosis may be the general depressed state of the rhododendron, especially its root system, due to severe soil compaction, flooding, or the presence of a large layer of dead old roots (the root ball was not disturbed before planting). It turns out that the roots suffocate, stop working and developing, and therefore stop feeding your rhododendron properly. I consider this to be the main cause of chlorosis in most cases. This leads to the answer to the following question:
What to do if the soil around the rhododendron is compacted?
First, analyze the cause of the compaction. How correctly did you prepare the soil mixture to fill the hole for the rhododendron, and was this hole wide enough? Ideally, its size should be at least 80 cm in diameter and 40 cm in depth. If you planted rhododendron in regular garden soil or in a temporary, small hole, now is the time to correct the situation. I propose two methods: The first method is radical. Dig up your rhododendron and transplant it into a hole that has already been prepared according to all the rules. I don't think it grew much in such harsh conditions, so you can easily cope with it. At the same time, check the condition of the roots, to what extent they have developed along the periphery. It may turn out that they are still in the same position of the “container” in which the rhododendron grew before the sale. In this case, before planting, carefully trim the lump in several places with a breadboard knife. Watch the position of the root collar - under no circumstances should it be buried! After planting, water the rhododendron with a solution of Mycorrhiza powder (according to the package instructions) or a mixture of Kornevin and Zircon (10 g and 1 ampoule per 10 liters of water, respectively). Repeat in a week. During the summer, monitor the humidity, if necessary, add mulch, the layer of which along the periphery of the crown should be at least 8-10 cm. If the main soils on the site are clay, make it a rule to mix mulch with sand every spring or autumn. From experience, I noticed that such a transplant is only beneficial for rhododendrons. The second method is without digging up the rhododendron. It is very important to determine the boundary of the root ball here. To do this, rake off the mulch and soil, starting from the root collar. By running your hand, you will immediately notice where the dense felt of the roots ends. Stepping back 5–10 cm from this boundary, dig a trench about one and a half shovels deep and about 30 cm wide. In a wheelbarrow or on a film spread in advance, prepare a substrate for filling the trench: 1 part excavated soil, 1 part sand, 2 parts acidic high-moor peat ( pH 3–4). To this amount of the mixture add a bucket of leaf humus or 4 liters of vermicompost, you can mix in a little coniferous pine litter or crushed bark. Mix everything well and tamp tightly, fill the trench. Water and mulch.
Questions about crown formation
The topic is quite extensive, and I will return to it in subsequent articles. Therefore, I will focus on the main points.
Restoring crown density and leaf cover in evergreen rhododendrons
This need arises, first of all, after an unsuccessful winter - the leaves are very frozen or have received severe sunburn. Rhododendron will sooner or later drop damaged leaves, leaving all branches bare. If it is still small, then it is enough to trim off the leaves that have lost their attractiveness and remove all the upper flower buds (such a donation will be justified) and growth buds. During the season, new shoots will grow from axillary and dormant buds, at least in double quantity. If an adult specimen is severely damaged, we resort to pruning the stems. Don't be afraid to do this. Take a close look at the stems - along each there are barely noticeable dormant buds. Cut at a height of 40–50 cm. Cover the cut with varnish. After the shoots grow, make sure that there is no too long knot left at the end of the stem (the buds may not all germinate). In this case, cut the stem again by 1 cm at an angle of 45 degrees towards the new shoot. All pruning operations must be done at least until mid-May in order to give new shoots time to get stronger and mature before winter.
The exceptions will be deciduous rhododendrons (azaleas) and varieties of obtuse rhododendron (Rhododendron obtusum). In these species, towards the end of May, buds will begin to emerge on seemingly lifeless stems. Then grab the pruning shears. Pay special attention to all victims. For prevention during the season, regularly treat rhododendrons against diseases and pests. This is especially true for evergreen rhododendrons, the beauty of which must be protected especially carefully.
Aesthetic shaping
In this matter, be guided by your taste and what you want to get from rhododendron and how quickly. You can do nothing except sanitary pruning. Let deciduous azaleas demonstrate their graceful, natural form, and it will not be difficult to trim the bare bottom of the Katevbinsky rhododendron (R. catawbiense) varieties if you select partners that are suitable in terms of growth and growing conditions. These can be low-growing conifers, perennials, for example, hostas, or the same rhododendrons from more compact varieties and groups. Another question is if you want to have a dense, rounded bush and flowering throughout the crown. Then your choice is the Yakushiman hybrids (R. yakushimanum), which demonstrate the required qualities without any formation. Don't want to limit yourself to just this look? Then you will have to work hard and be patient. Before picking up the pruning shears, carefully inspect the bush - maybe it will be enough to simply remove the top bud from the slightly protruding shoots. This applies primarily to young rhododendrons. On already mature bushes there will probably be old shoots that are much ahead of the bulk of the branches in the crown and are very bare below. So they need to be trimmed in accordance with the desired shape of the bush. Now comes the hard part. Those new shoots that grow from the cut stem will most likely not be able to set flower buds for the next year. What we will end up with is that half of the crown will bloom, and half will not. There are several options to solve this problem. The easiest thing is to do nothing, but be patient. After 3–4 years, under favorable conditions and appropriate care, the rhododendron will regulate its flowering itself. Well, if you are ready to create one hundred percent ideal conditions and sacrifice flowering in the same year, then the second option is suitable. About a week after pruning, we break out all the upper buds, growth and flower, on all shoots left unchanged. A strong mature bush is capable of laying flower buds for future flowering on most regrown shoots already in the fall of the year of pruning. The third method is suggested by experts - the next year, immediately after flowering, we break out both the faded inflorescences and the young shoots that emerged from the growth buds of non-flowering shoots. For my part, I would recommend removing these sprouts a little earlier, as soon as they begin to grow. Then the rhododendron will not waste its energy on the fact that it will be removed anyway.
Work on mistakes
“Sveta, your rhododendrons probably feel like they’re on a hot frying pan!” - this is how my good friend and rhododendron fan reacted to a photograph of part of my rhododendron, bathed in the merciless spring sun. If in the spring my pets are saved by shelters specially built in the fall, then in the hot and very dry summer of 2022 they were left without any protection. Due to the lack of soil and air moisture, under such extreme conditions, even Yakushiman hybrids that are very tolerant of the sun received severe burns of leaves on the southern side of the crown. Of course, I will not transplant mature plants into the shade. In addition, the conifers, designed to shade them, will soon grow and finally fulfill their duty as protectors. But if such heat repeats, I will not be lazy and will definitely install shade screens for the entire hot period. And this, by the way, can easily inspire creativity and the creation of interesting garden compositions.
To be continued…
Subscribe to our newsletter to be the first to know about new articles and promotions!
Buy rhododendrons in our online store.