Why replant?
Transplantation (transfer) of compact plants is carried out when the flower becomes cramped in the old pot. This is evidenced by the roots that begin to crawl out of the ground. Due to the overgrown root system, pelargonium experiences a lack of nutrients in the soil, which may lead to its death in the future.
In addition, transplantation should be performed in the following situations:
- Due to carelessness, a lot of water was poured into the container with the flower. High soil moisture causes root rot;
- despite proper and balanced care (watering, fertilizing), geranium grows poorly and does not bloom;
- the shoot was exposed from below;
- soil contamination by parasites and pathogens is observed. In this case, transshipment is of a preventive nature in order to prevent the development of the disease after treatment of geranium;
- damage to the pot. It can be damaged due to physical impact (falling from a windowsill) or due to prolonged exposure to sunlight;
- soil depletion, which is not removed by fertilizing. Periodically, you need to add new soil to the pot in order to naturally replenish its nutritional composition and prevent the appearance of pests;
- the need to propagate the plant by dividing the rhizome.
As you can see, there are many reasons for transplanting geraniums.
The transplant process is as follows:
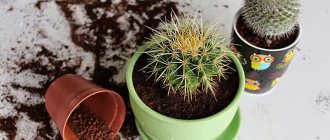
- You need to prepare everything necessary for transplantation: pot, soil. A small container is needed. One in which there is too much space for rhizomes will lead to waterlogging of the soil and disease of the plant. It is better to take a ceramic option rather than a plastic one. You can use almost any soil for planting the crop, since geranium is completely undemanding. Both ordinary garden soil and universal soil for flowering crops are suitable. You can make a mixture yourself, for example, this: river sand, garden soil, peat, taken in equal parts. A mandatory step is to sterilize the soil and pot.
- Drainage is placed at the bottom. You can purchase it at the store or use brick chips.
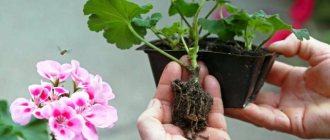
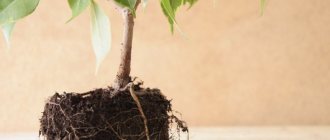
- Geranium is dug out from a flower bed with a lump of earth. In order not to damage the root system, the plant can be watered in advance.
- After this, you need to inspect the rhizome for damage, signs of disease or decay. If something alerts you, these parts need to be cut off with sharp scissors.
- Next, the bush should be lowered into the pot, and the voids between it and the walls should be filled with earth. In this case, it is necessary to compact the soil surrounding the rhizome.
- After the transplantation procedure, the plant is watered and placed in a dark place for a week. And after the expiration of the specified period, the geranium can be moved to its designated place in the house.
- In the future, the crop can be fed 2 months after transplantation.
We recommend that you read what folk remedies to use to make geraniums bloom magnificently.
Transplant timing
Typically, compact plants are replanted in the spring. However, there is no strictly defined time for performing this procedure. Therefore, if necessary, transshipment can be carried out at any time of the year. But it’s worth knowing that the speed of the flower’s establishment in the new soil directly depends on the season.
Plants adapt worst and longest to new conditions in winter. This is due to the fact that in cold weather all processes in geraniums slow down. During the summer months the flower blooms almost all the time. During this period, it is not recommended to touch pelargonium, as stress may cause it to stop blooming. So it turns out that it is best to transship in late winter, spring or autumn. It is noted that the fastest adaptation of the plant to a new pot and soil is observed in February, March and April.
Many gardeners plant pelargonium in the garden during the warm season. Typically, planting in open ground is carried out in May. During such transshipment, the plant can be propagated by dividing the rhizomes. In the fall, the flower is transferred from the garden to the house for wintering. You need to have time to carry out this procedure before the start of cold weather and the first frost. Otherwise, the geranium will freeze and is unlikely to grow at home.
Conditions for growing geraniums at home
In order for geraniums to grow and bloom well at home, they need to be provided with proper care. Fertilizing is done with mineral complexes. Closer to the beginning of spring, you need to apply potassium and phosphorus fertilizers, excluding those containing nitrogen. In this way you can achieve lush spring flowering. In winter and autumn, fertilizers are applied once a month, and in spring and summer - once a week. Before the transplantation procedure, feeding is stopped several weeks.
For normal wintering, the crop needs to be provided with a temperature of around +10°C, although regular room temperature is also acceptable. Do not choose south-facing windows for geraniums. She is, of course, light-loving, but midday direct sun should be avoided. Do not keep the plant in partial shade or shade. Before planting in the garden in the spring, you can take the pot out to the balcony for acclimatization.
Geranium loves abundant watering with settled water at room temperature. She also needs to provide good air humidity and spray regularly in winter.
Do you grow geraniums in the garden and move them indoors for the winter? How does your plant tolerate transplants?
Soil selection
To minimize the stress that pelargonium will receive during transfer to a new pot, you need to choose the right nutrient soil for it. When choosing soil for this indoor plant, you can consider different soils. The simplest option is to use standard ordinary soil for universal purposes. It is suitable for most plants grown in apartment conditions. Perlite and river sand should be added to the universal soil. The mixture should be thoroughly mixed.
Relevant: Why geraniums don’t bloom and which of the 8 reasons is to blame?
Special soil for geraniums can be purchased at any flower shop. It is allowed to use land intended for begonias. You can also take garden soil or make your own soil mixture. In the latter case, it is necessary to remember that the soil should not only be rich in various nutrients, but also loose. It is also necessary that the soil has a light consistency.
The soil mixture for growing pelargonium at home should include the following components:
- turf land (2 parts);
- humus (2 parts);
- river sand (1 part).
You can also prepare a soil mixture of sand, humus, peat and turf soil.
Pests and diseases
Insects rarely attack geraniums and pelargoniums due to the specific odor of the plants. Aphids and whiteflies can live on them. These pests can be controlled using insecticides.
Indoor geranium is susceptible to various diseases. Most often they are provoked by violation of the rules of care. The main diseases and treatment methods for home flowers are listed below.
Blackleg
The manifestation of the disease is darkening of the lower part of the trunk, it softens and begins to rot.
The cause of the pathology is the Pythium fungus. Its development is provoked by overwatering or hypothermia of the plant.
It is impossible to cure such a flower. It will not be possible to propagate it from cuttings. Although it is not yet visible, the entire plant has already been affected by the disease.
Gray rot
When infected with gray mold, dark spots on the trunk are accompanied by the appearance of plaque on the leaves, as well as spots that appear along the edges of the plates.
Factors provoking the disease:
- excessive watering;
- heavy soil;
- insufficient drainage layer.
Treatment involves removing the infected parts and treating with products such as Agricolle fungal spray or Teldor 500 SC fungicide.
Leaf rust
Depending on the degree of damage, the disease manifests itself with the following symptoms:
- yellow-red spots on the leaves;
- solid stripes of a yellow-red hue;
- drying and falling of leaves.
The cause of leaf rust is a fungus. But its development can be triggered by factors such as irregular watering and too high air humidity.
The control method is treatment with fungicides (Oxyx, Topaz, etc.). It will have to be repeated 2-3 times within a month.
Pot size and material
If the transfer will be carried out due to the fact that the geranium has simply become crowded in the old pot, you need to responsibly approach the choice of container. The intensity of growth and quality of flowering of pelargonium directly depends on the correctness of this choice. First of all, the container should be slightly larger than the previous pot. You should not choose a container that is too large, as the flower will not grow well in it. It will form many shoots that will stop blooming and begin to stretch. As a result, instead of a beautiful flowering plant, you will get an overgrown bush. The new container in diameter should be only a couple of centimeters larger than the old one.
The pot can be either plastic or clay. Plastic is more practical in terms of care, but it impairs root aeration. Clay containers are prettier and better for plants. But it is more difficult to remove flowers from such pots, since the roots are often strongly attached to the inner surface of such a container.
It is important that there are drainage holes at the bottom of the pot through which excess moisture in the soil will be removed.
Where should the pot be?
The ideal temperature for keeping a flower during its active growth period is +20-25 degrees . This means that the plant can be placed on any windowsill. However, if the owner wants to observe abundant and lush flowering, he should choose a south, east or west window sill.
Geranium is not afraid of direct sunlight, so it can be safely placed in the sun. But you will definitely need to periodically turn the pot so that the plant is formed on all sides.
During the dormant period, which occurs in the winter months, it is better to provide geraniums with a cooler room . She is not afraid of temperatures dropping to +10-14 degrees.
But what geranium does not tolerate is drafts.
Pruning and pinching geraniums
Pruning is an important stage in geranium care, which begins from infancy. And although there are dormant buds on the stems that can produce lateral branches, the plant almost never forms them on its own. This requires intervention in the form of pruning the stems, which helps to plant flowers and form new shoots. As a result, the bush grows on the sides and becomes smooth and lush.
Pruning is also necessary for hanging geraniums, the long shoots of which become very elongated over the course of a year. Technically, the procedure is performed with a sharp knife. The cut should pass over a leaf node, which is turned outward rather than toward the center of the bush. This way the plant will grow on the sides. A young shoot can be pinched, that is, removed with your fingers. The remaining sections are sprinkled with activated carbon powder, and the plant itself is fed with fertilizer with a high nitrogen content. This substance will help the flower grow green mass.
Rare tulip-shaped geraniums may produce shoots with ordinary flowers. There is only one way out: cut such a stem to the base.
Pruning can be done at different times of the year:
- In the spring . There is no point in delaying pruning; it is usually scheduled for the end of February and the beginning of March. We correct the shape of the bush, but try not to go to extremes. The plant still has to recover from winter dormancy and grow flower buds. Therefore, we cut only long and weak stems to 3-4 buds from the bottom.
- In autumn . This is the main procedure designed to give the plant a beautiful shape and rejuvenate it. We remove all ballast in the form of dry inflorescences and yellowed leaves. We shorten all shoots by 1/3, the plant is preparing for a state of dormancy, so it does not need excess green mass. We prune from September to December.
If desired, you can make a miniature tree from geranium. To do this, grow one selected stem, removing the side shoots. It should be tied to a support. In the chosen place, this shoot is pinched, which will lead to the growth of lateral branches. 6–7 shoots are selected, the rest are removed. After 4 leaves, these shoots are pinched and branching begins again. Thus, we get a nice geranium tree, which, due to frequent pinching, will bloom only in a year.
How to bring a flower home from the street?
It is worth replanting the geranium back into the pot in early September before the first cold weather sets in (read more about growing geraniums at home in this article).
The procedure in this case will be as follows:
- Water generously so that the entire root system is saturated with moisture.
- Pour a drainage layer and a small amount of substrate into the prepared pot.
- Carefully dig up the plant along with the lump of earth surrounding the roots.
- Remove excess soil and carefully examine the root system. If the roots have grown too wide, they can be cut off, as well as all dry and damaged areas.
- Place the geranium along with the remaining soil in a pot and sprinkle with soil in a circle. There should be at least 1 cm left to the top edge of the pot.
- Water moderately so that the soil is saturated with moisture.
In the photo below you can see what geranium looks like after transplantation, outdoors and at home in a pot:
Types and varieties of indoor geraniums
A lot of time has passed since the days of “grandmother’s” geranium. Over the past decades, breeders have developed many species and varieties of flowers. Let's look at the most popular of them:
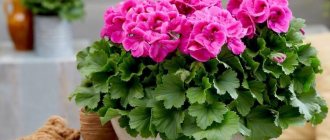
Royal geranium . An incredibly showy plant with large flowers and jagged leaves. Flowers can be simple or double, with wavy or corrugated petals. The diameter of individual flowers reaches 4–6 cm. Many colors have been developed, including variegated ones. Caring for this type of geranium is considered quite difficult.
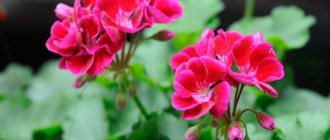
Fragrant geranium . An original flower that carries different scents. They are felt especially clearly when touching the leaves. Depending on the variety, the flower can smell like rose, lemon, or berries. The inflorescences themselves are not as large as those of the previous species and have a standard color.
Lemon geranium . The plant can reach a height of 1 meter. This species blooms quite rarely and produces small light flowers, but has very beautiful decorative leaves, carved and openwork. Prized for its incredible scent, similar to the aroma of a bitter citrus fruit.
Ivy geranium . Most often, this species is grown as a hanging plant due to its lodging stems. From a distance the leaves look very similar to the greenery of ivy. The colors of the flowers are very diverse, they can be monochromatic or variegated. Looks very nice in hanging flowerpots.
Tulip geranium . The flowers of this amazing plant look like tiny tulips. The species appeared in 1966 in the USA and today is considered quite rare, therefore it is the dream of many gardeners. Caring for the flower is simple.
Geranium is a beautiful and healthy flower, but due to its strong smell it is considered a strong allergen. And people who have a reaction to this plant should not have it at home.
Planting and care
In order for your pelargonium to smell fragrant all season, it needs to be provided with comfortable conditions.
The soil for planting is prepared in the fall: after digging, mineral fertilizers and humus are added.
Immediately before planting, the plant is watered abundantly and no more than 12-14 seedlings are placed per 1 sq.m.
The next 2 weeks pay special attention to soil moisture. At home, with the right approach, it blooms for 10 to 12 years, maintaining its picturesqueness
On average, it is recommended to update the pot every 10-12 months as needed.
Large rhizomatous
It is a perennial plant that has an elegant and decorative appearance, producing delightful flowers and greenery. It is often used instead of lawns. In order to avoid problems in the process of breeding this crop, you must follow the following planting rules:
- the soil for planting must be fertile;
- maintain a distance: between bushes 25-30 cm, and between rows from 70 cm to one meter;
- planting algorithm: drainage is laid out at the bottom of the prepared hole, followed by fertilizing, a bush is placed on top and sprinkled with earth.
Rules of care:
- abundant, but not frequent watering (this plant is heat-loving, and therefore tolerates drought more easily than excessive moisture);
- regular feeding;
- timely removal of inflorescences;
- good drainage is a must.
It is better to plant it in sunny and abundantly warmed areas. Partial shade is also perfect. To prevent the plant from freezing, it is recommended to create a shelter for the winter. However, frost-resistant species will winter well without it.
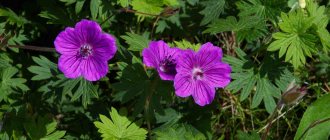
Lugovoy
It is a dense bush up to 120 cm in height. Blooms in mid-summer with blue-purple flowers. Its requirements for planting and subsequent care are no different from other types of pelargonium.
Peculiarities
In Soviet times, almost every house had a window sill decorated with geraniums. Many people remember that this plant is unremarkable, but today’s varieties simply fascinate with their beauty and interesting color schemes, patterns on the leaves, and lush greenery. Every year the number of fans only increases, so it is worth considering in more detail how to replant indoor geraniums, as well as note the subtleties of caring for them.
Geranium is an unpretentious plant that does not require special care. The only danger for the flower is replanting, because if it is done incorrectly, the plant may even die. Indoor flowers need to be replanted for the following reasons:
- the plant grows, its root system cannot fit in a cramped pot;
- the soil loses nutrients, the plant needs new soil for normal growth and development.
Key points
Thus, we have discussed the main aspects of replanting indoor geraniums (read about caring for indoor geraniums here). We will focus on the main points so that your beauty continues to delight you with her healthy and bright appearance :
- The optimal time for transplantation is spring. However, if necessary, replanting can be done in summer or autumn.
- Examine the plant to see if it really needs replanting.
- Choose a small pot with drainage holes.
- We use loose soil with the addition of sand and peat. We use brick chips or polystyrene foam as drainage.
- After transplantation, geranium does not require watering for 2 weeks.
- Flowering geraniums can be replanted, but it is recommended.
- Geranium grows well in open ground until the first frost.
We wish you success in growing indoor geraniums!
How to plant geraniums without roots
Geraniums can be planted without roots. To do this, you need to cut off the branch-handle and prepare a light substrate or other material in which rooting will take place without problems. Regardless of the rooting method you choose, follow the general rules: cuttings need warmth, light and moderate moisture in the substrate. No bags or cans on top.
Being rooted in the ground
Rooting cuttings in the soil is the most common method of propagating pelargonium:
- Cut apical cuttings 7-10 cm long, with 4-6 leaves. Make the cut at an angle. Remove the lower leaves and dry cuttings for 2-3 hours, leaving air. The cut must be set aside film.
Root apical cuttings about 10 cm long
- Prepare small containers (200 ml plastic cups) and make drainage holes for them.
- At the bottom, the drainage area on the top is light soil consisting of sand, peat and perlite. Lightly moisten the mixture.
- Use a wooden stick or pencil to make a hole in the ground. Place the cuttings 3-5 cm deep and gently compact the soil around them.
Cups with cuttings and keep in a warm, bright place
- The container with the plant is placed in a bright and warm (at least +22) place. Covering the geranium plantings, pretending to be a greenhouse, is not worth it.
- Watering of crops is carried out from below through a tray.
- Rooting occurs in 2-4 weeks.
- When the plant has put out true leaves and strengthen the presidnete upper bud in order to develop side buds. Then the bush will be lush.
Young roots of pelargonium grow quite quickly
- If the pelargonium was planted in late summer or autumn, transfer it to a new pot and soil in early spring.
Pelargonium lovers claim that ordinary geranium cuttings root well without treatment with stimulants. But if you have a capricious plant, treat it before planting, cut it, put it in a solution of Epin, Kornevina or other corporatively for half a minute.
Video: rooted cuttings are transplanted into a permanent pot
Another option is to germinate in water first
Root geranium cuttings in water. Most often, roots appear and grow quickly, this process is interesting to observe. However, the method has a significant drawback: “water” roots do not always successfully adapt to the soil. Some cuttings die after moving into the soil.
How to root cuttings in water:
- Fill a container with a 4-5 cm layer of settled water.
The method of rooting cuttings in water is very simple, but not always reliable.
- Pour powdered activated carbon into the water to prevent rotting.
- Place the pre-dried cuttings in water.
- Every other day, change fluids.
- Roots usually sprout within a week.
Pelargoniums take root very quickly in water, but the delicate roots may die when planted in the ground.
- After this, transplant the cuttings into light soil.
Cherencha capricious varieties of pelargonium, Royal, spend a day earlier, 3 weeks, stimulation of mother plants. Make small cuts under the buds along the entire branch that will be cut. Nodules appear in places nasechek. The cuttings are cut underneath. Then young roots will appear in 2-3 days.
Nuances in the case of a flowering bush
During flowering, any plants spend a lot of energy on forming buds and ripening seeds. During such a period, it is better to take pity on the geranium, increase feeding, and not subject it to additional stress (read about how to feed geranium with iodine and hydrogen peroxide here, and from this article you will learn about how to fertilize the plant for lush flowering). Otherwise, first the flowers will fall off, then the leaves will turn yellow. The plant may even die. It is recommended to wait for the end of flowering and replant the indoor geranium after 5–10 days.
If there is an urgent need to transplant the geranium into a new pot at the time of flowering (the plant was dropped or damaged, the bush became sick), then this can still be done. You need to try to transfer the pelargonium into a new container without damaging the roots , without destroying the earthen lump. The flowers will, of course, fall off, but the geranium will survive.