Author: Tamara Altova. August 10, 2018
Category: Garden plants.
Sometimes opinions are expressed that digging up tulip bulbs after flowering is not necessary, but experience has shown: if this is not done annually, the reproduction rate of tulips decreases, the bulbs become overgrown with small children, the plant feeding area decreases, the soil in the area is depleted, and the risk of flower contamination diseases and pests increases. This is why experts recommend replanting tulip bulbs every year. From our article you will learn when to dig up and how to store tulip bulbs before planting in the ground, as well as when to plant tulip bulbs.
Why do you need to dig up bulbs?
Varietal tulips require annual removal of the bulbs from the soil. Having released a peduncle and produced many daughter bulbs, the old root dies. The following year, this process is repeated, as a result, the conditions for development of young plants become worse: the living space is reduced, the volume of useful substances decreases. This leads to shredding and degeneration of flowers.
Before the flower bud forms, the bulb must warm up well. If you leave it in the ground, the heat will not be enough and the flowers will grow less attractive.
Digging up tulips for the winter makes it possible to properly prepare the soil: add sand or peat, apply fertilizer, remove weeds without damaging the bulbs. Cleaning the planting material from soil and loose scales, sorting and treating with a solution of potassium permanganate significantly reduces the likelihood of damage by larvae of harmful insects and fungal diseases.
Article: May beetle larva.
After some time, the bulbs that have not been dug up since the summer sink deeper into the ground. This prolongs germination time and worsens the conditions for the formation of flower buds. Therefore, to preserve all the qualities of varietal tulips, the bulbs must be dug up in time and kept in a suitable microclimate.
To remove tulip tubers from the ground or not
All varieties and hybrids of tulips are divided into three groups according to the frequency of replanting:
- Annually. Parrots, lily-like, fringed, all late and Rembrandt hybrids. If these tulips are not dug up at the end of each season, they quickly lose the characteristics of the variety and degenerate.
- Once every two years. Varieties Triumph, Darwin hybrids, not varietal. During one growing season, full-fledged tubers are poorly formed, so it is not recommended to disturb them more often.
- Once every five years. Varietal tulips of Foster, Greig, Kaufman. These are low-growing plants, they are used in the design of paths. Over a five-year period, they do not degenerate and give birth to a small number of children.
Excavation and preparation of material
The bulbs are dug out from the soil after flowering has completed. The right time for this is selected based on the appearance of the plant. The faded color of the leaves and areas of yellowing on them indicate the maturation of the bulb and its readiness for extraction. Maturity can also be determined by the darkening of the outer scales.
Mature bulbs
Immediately after digging, the bulbs, not cleared of soil and scales, are placed in baskets woven from branches or wooden boxes and kept for seven days in a dry and warm room. A ventilated barn, veranda or gazebo is suitable for this task. During drying, the tulips should not be exposed to sunlight.
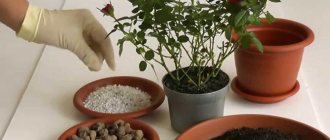
After a week, the remaining roots and covering scales are removed from the dried material. Specimens with rotting and numerous damage are thrown away, and the remainder is distributed according to variety and size. If there are minor defects, they are cut out with a sharp knife, and the cut is treated with brilliant green. Bulbs with damaged bottoms are thrown away as they are unsuitable for growing.
After this, the prepared planting material is immersed in a pinkish solution of potassium permanganate for half an hour. Then dry for a week in a well-ventilated area, spreading in one layer. The dried bulbs are sorted out again and placed according to variety and size.
Time to dig tulip bulbs
When the tulips have already bloomed, the trunks with the seed pods are cut off, and only the leaves remain on the site. After a while they will wither and completely wither, approximately a month after the end of flowering. That's when they dig up the roots. But you cannot wait until the leaves completely disappear, otherwise the bulbs will be overripe and begin to crumble.
No one can tell you a more precise time, because there are early, mid-early, middle and late varieties. Each flowering period is different, so whether it is possible to dig will become clear by observing each species separately. If you start the procedure before the leaves wither, the characteristic brown husk will not form on the bulb, which protects it from excessive drying out and wilting. Unripe tubers cannot be stored for a long time or produce a full-fledged flower.
To extract the roots, use a pitchfork; use a shovel to injure more and often cut large tubers. If the tulips are planted in special baskets for lilies, then removing the bulbs is easier and it is almost impossible to damage them.
Suitable conditions
In the first month after digging out of the soil, flower buds form. Therefore, during this period, planting material is kept at a temperature of +24 degrees. Then this indicator is lowered to +20, and by the time of autumn planting to +17.
The optimal humidity should be no higher than 70%. To comply with physiological processes, the bulbs must be kept without light. Only low and diffuse lighting is allowed.
You cannot keep tulip planting material at home at temperatures exceeding +30 degrees. Otherwise, the flower buds are damaged, the flowers become dehydrated and die.
Premises requirements
Before planting, you need to keep the tulip seed in a cool room. It is quite difficult to create such a microclimate in a city apartment. The basement or attic of a house, as well as a barn, are suitable for this purpose. This should be a dry place with good ventilation, but without access to light.
It is important to protect the seed from rodents if the storage location is chosen in the basement or attic of a private home. To do this, you need to first poison the mice and rats or put the tulips in old nylon stockings or mesh and hang them from the ceiling. This way, all conditions will be met, and rodents will not get to the desired bulbs.
Many people believe that tulips can be kept in the vegetable drawer in the refrigerator. This opinion is wrong. It is correct to store the material for sowing at elevated temperatures for the first two months, and then gradually reduce it. It is impossible to create such conditions in a regular refrigerator, so the seed material will inevitably be spoiled.
Requirements for containers
In order to preserve tulips well, containers must meet the requirements for size and material. Before planting in the ground, it is important to provide free air access to the bulbs.
Tips for proper storage:
- It is recommended to keep planting material in boxes made of boards;
- it should lie in one layer;
- to protect it from moisture, the seed must be sprinkled with sawdust;
- To protect against damage, it is necessary to wrap the bulbs individually in newspapers.
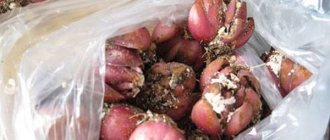
Do not place bulbs in polyethylene bags, plastic buckets and basins, or cardboard boxes. In closed containers, they quickly become overgrown with mold and begin to rot, and pathogenic bacteria and fungal infections accumulate on the cardboard.
When is the best time to plant
Unlike other types of ornamental plants, it is better to plant tulips in the fall. The optimal time for this event is the second and third ten days of September or the first week of November. During this period, the soil at a depth of 15 cm has a temperature of 10 to 13⁰ C.
Cooling during this period stimulates the plant to form sprouts and lay buds. Plants of the bulbous family cannot bloom without pre-cooling. Timely planted material has time to take root and tolerates frost well. If tulips are planted in the ground after the top layer of soil has frozen, then the planting should be well covered with brushwood, peat or other insulation.
Storage problems and their solutions
In addition to creating the conditions necessary for high-quality storage of bulbs, the compliance of the microclimate in the room is periodically checked. The material is inspected monthly for damage, mold and signs of rotting. Instances with signs of disease or suspicious spots are immediately removed from the general container and thrown away. This is important to prevent the possible transfer of infection to other bulbs.
With insufficient moisture, the bulbs soften and become less elastic. To correct the situation, several wide containers with water are placed in the building where the seed is stored.
Mold on planting material
Another way to solve the problem is to buy a household humidifier equipped with a humidity sensor. When the device shows that the optimal indicator has been achieved, it is turned off.
If there is excess humidity in the storage, rot and sores appear on the tulip. A signal for the need for urgent drying of the room will be drops of water appearing on the surface of the bulbs. Then the humidity is reduced by turning on a household heater for several hours.
Storage until spring
When it is not possible to plant tulip bulbs in autumn or in case of late acquisition of seed, conditions are provided for long-term storage of flowers until spring using early forcing:
- Having prepared the soil mixture for bulbs in advance, the seed is planted in boxes in the fall. The thickness of the soil layer in such a container should be 40 cm or more. The distance between individual copies is 5 cm.
- Containers with planted tulip bulbs are sent to the basement, where the air temperature is kept in the range from +3 to +5 degrees. Violation of these boundaries leads to freezing of the material or too rapid germination.
- Future flowers are briefly inspected weekly. If necessary, moisten the soil, but do not allow the soil to flood. Excess moisture causes flowers to rot.
- The first shoots appear in late February or early March.
- With the final establishment of warm weather, containers with plants are taken outside, where after a while flowers bloom on them.
In spring, tulips cannot be transplanted from boxes into open ground. During the winter, the plants will already have time to form a strong root system. An attempt to replant them will inevitably damage the underground part. Then, even if the plant develops well, flowers will not appear this year.
How to store it correctly
Every experienced gardener has plenty of ways to properly store bulbs. Usually, over time, a person chooses the one that suits him best. Methods for storing bulbs. Bulbs are stored in:
- sand;
- sawdust;
- peat;
- agrovermiculite.
Important! You cannot use a cardboard box as a storage box. The cardboard may become wet, moisture will be absorbed into the filler and the bulbs will become moldy.
Sand
The bulbs are laid out in one row and covered with dry sand. The disadvantages are the heavy sand, which makes it impossible to store the bulbs in several rows. Premature germination of bulbs is possible.
Sawdust
A very good option for storing tulip bulbs. Sawdust will prevent the tubers from losing too much moisture or absorbing it from the air. Sawdust itself is not very hygroscopic, but has good heat-insulating properties.
When choosing sawdust, it should be taken into account that the larger the sawdust, the less hygroscopic they are. You will have to choose the dispersion of sawdust yourself, based on the existing storage conditions.
For example, if boxes are stored outdoors and snow gets on the sawdust, during a thaw large sawdust will let water through to the very bottom, while small sawdust will absorb moisture on the top layer.
Of the minuses: too small sawdust generates a lot of dust, which has a harmful effect on the human respiratory tract.
Peat
Also a good drawer filler. Here you need to make sure that the peat is dry. The bulbs will perceive wet peat as a substrate for germination. However, it is not a fact that the bulbs will even be able to germinate.
Peat is often acidic, while tulips prefer neutral or alkaline soil. This is especially true for high-moor peat. Lowland peat often has an acidity between 6.4 and 7.0, but lowland peat is already a substrate for germination.
Important! Do not use sphagnum moss to store bulbs. This is a very hygroscopic material that will draw all the moisture from the tubers.
Agrovermiculite
A mineral used to loosen soil mixtures and as a filler when storing plant roots. It is good because it can absorb excess moisture, gradually releasing it if necessary. Thus, tulip bulbs stored in the mineral will not become moldy due to excessive humidity, but will not dry out due to too dry air. The disadvantage is the same as that of sawdust. Vermiculite dust is harmful to the respiratory tract.
The general principle of storing tubers in boxes with fillers: pour a cushion of filler, lay out the bulbs, cover with a thick layer (from eight to thirteen centimeters) of filler, repeat the cycle. You should be more careful with sand.